is_easy_island.png
is_easy_mainland.png
is_easy_flattened.png
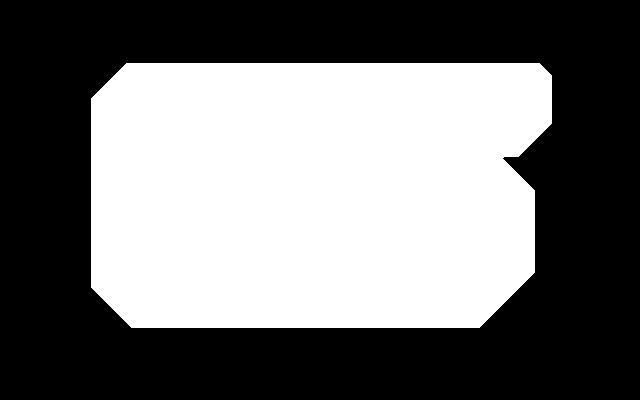
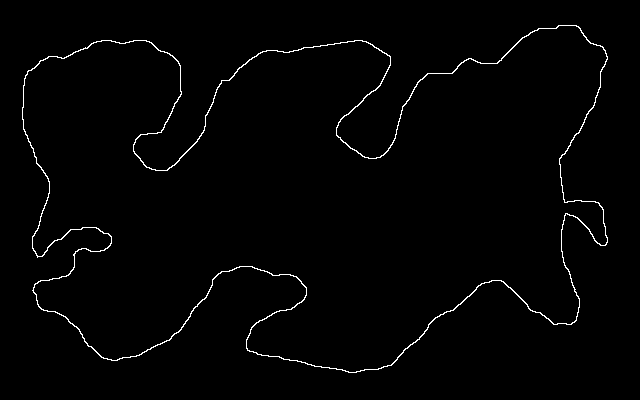
Suppose we have an arbitrary black shape and an arbitrary black border. The shape is an "island"; it is surrounded by white. The black border extends to the image edges; it is a "mainland".
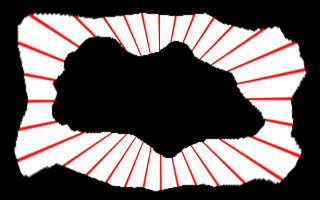
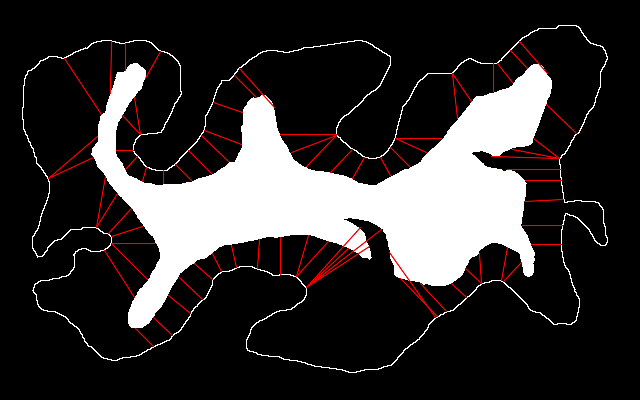
Some shapes have a central point, from which straight lines can be drawn to every edge point without crossing the edge. In other words, from the central point we can "see" every edge point.
How do we know if an image qualifies as an "easy shape? We could depolar from an assumed central point, scale this to a single line, then use a simplified version of graph1d.bat to scale it back up again. If the round-trip hasn't changed the image (much), then we have found a central point.
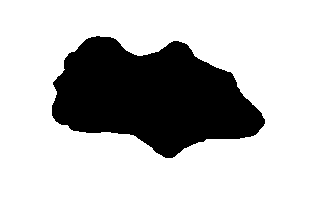
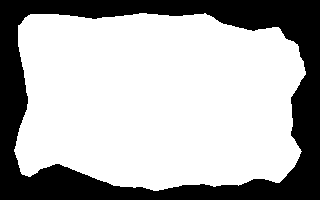
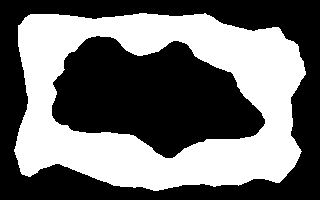
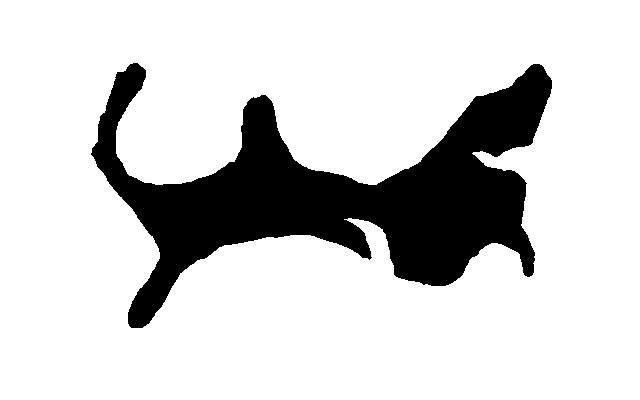
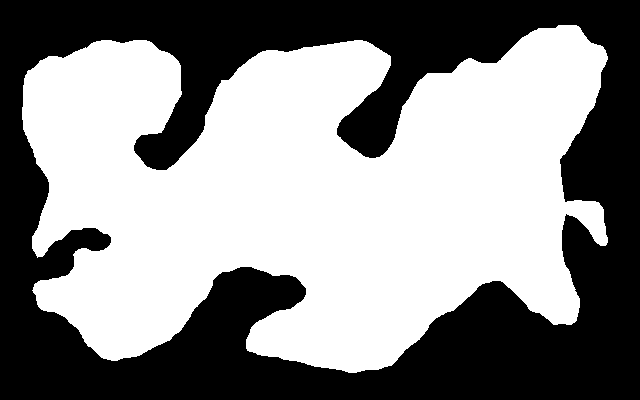
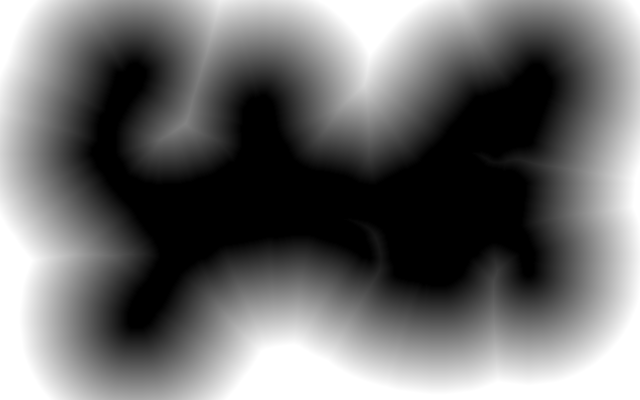
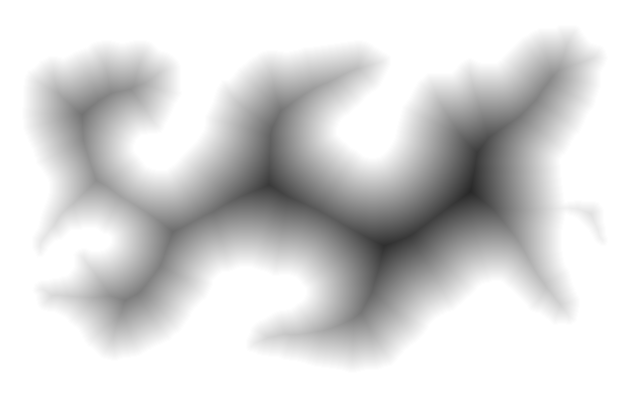
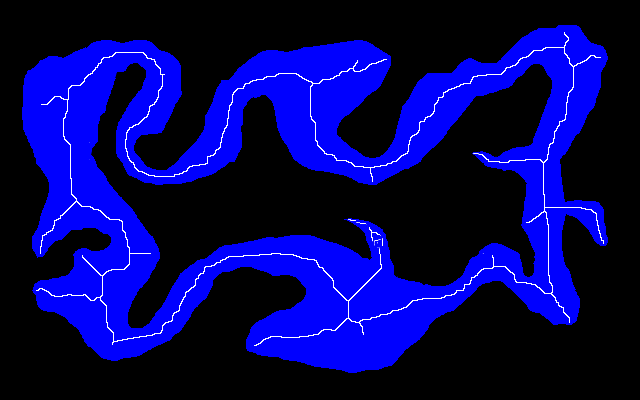
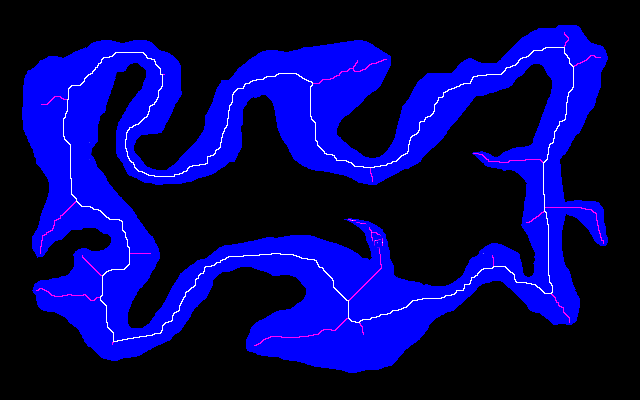
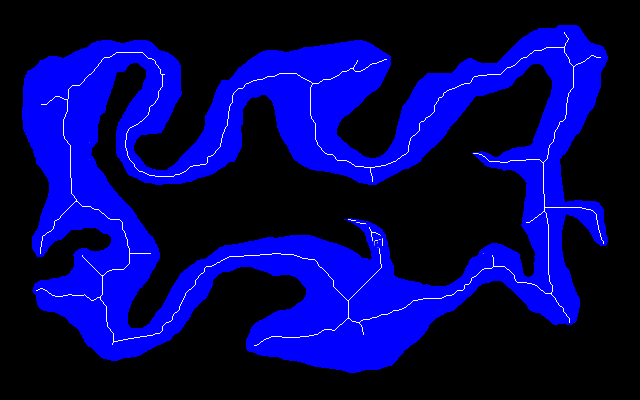
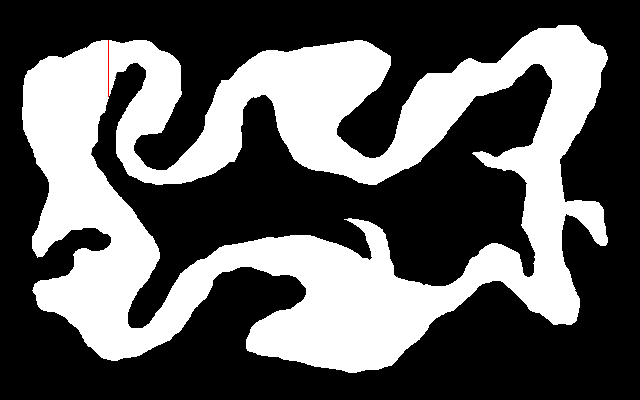
Here is an easy island surrounded by an easy mainland. You can download is_easy.xcf, which has the island in one layer and the mainland in another. See Gimp and IM on how to extract the layers with extrXcfLayers.bat.
if not exist is_easy.xcf copy %PICTBAT%shapeEasy.xcf is_easy.xcf

call %PICTBAT%extrXcfLayers is_easy.xcf

%IMG7%magick ^
  is_easy_island.png ^
  -background White -layers flatten ^
  -channel RGB -threshold 50%% +channel ^
  is_easy_island.png
|
is_easy_island.png |
|
|
is_easy_mainland.png |
|
|
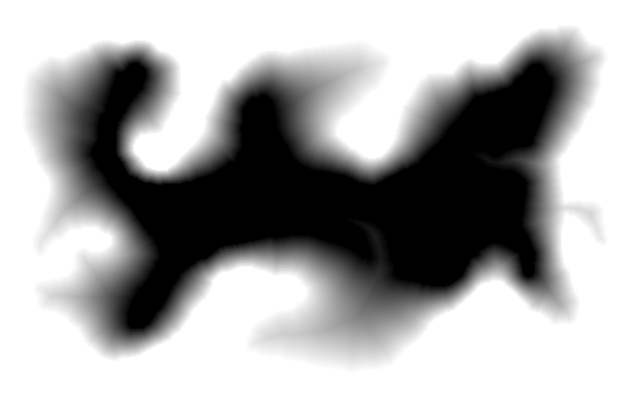
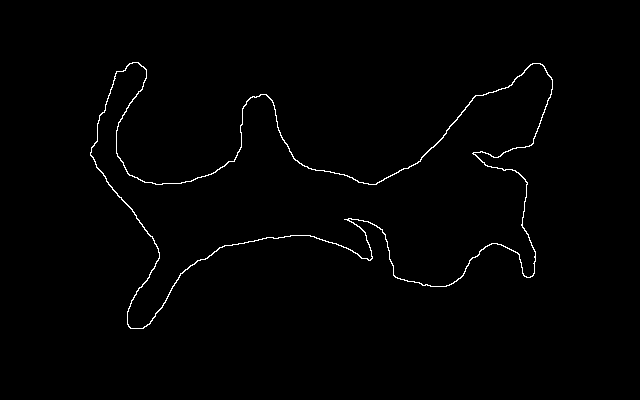
is_easy_flattened.png |
|
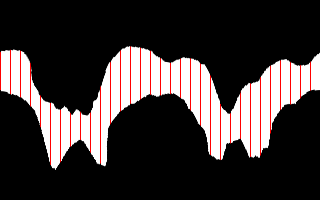
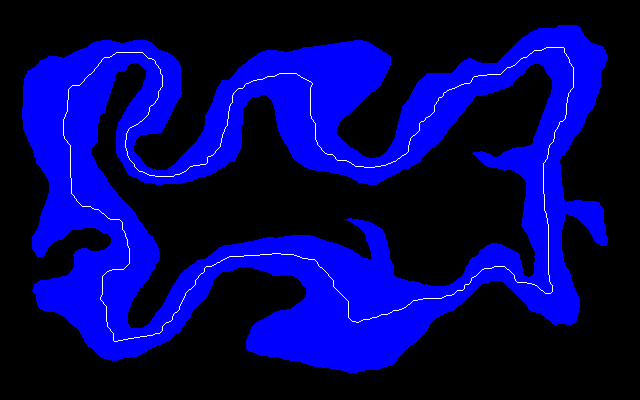
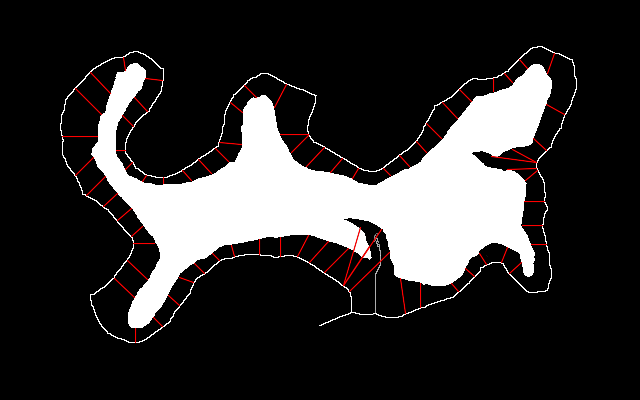
We can unroll using depolar, do any processing, and invert the distortion.
%IMG7%magick ^
  -verbose ^
  is_easy_flattened.png ^
  -transparent White ^
  -distort depolar -1 ^
  ( +clone ^
    ( xc:Red -size 9x1 xc:White ^
      +append +repage ^
      -write mpr:REDLINES +delete ^
    ) ^
    -fill mpr:REDLINES -draw "color 0,0 reset" ^
  ) ^
  +swap -composite ^
  -write is_easy_depol.png ^
  -distort polar -1 ^
  is_easy_ex.png
|
|
Instead of drawing red lines, we might pick off boundary points and convert the coordinates back with data from "-verbose". Thus, we can find the correspondence between island points and mainland points.
The verbose data is:
is_easy_flattened.png PNG 320x200 320x200+0+0 8-bit TrueColorAlpha sRGB 1713B 0.002u 0:00.001
DePolar Distort, Internal Coefficients
  c0 = +188.679623
  c1 = +0.000000
  c2 = +160.000000
  c3 = +100.000000
  c4 = -3.141593
  c5 = +3.141593
  c6 = +0.019635
  c7 = +0.943398
DePolar Distort, FX Equivalent:
  -fx 'aa=(i+.5)*0.019635 -3.141593;
       rr=(j+.5)*0.943398 +0.000000;
       xx=rr*sin(aa) +160.000000;
       yy=rr*cos(aa) +100.000000;
       v.p{xx-.5,yy-.5}' \
xc:Red=>Red XC 1x1 1x1+0+0 16-bit sRGB 0.000u 0:00.000
xc:White=>White XC 9x1 9x1+0+0 16-bit sRGB 0.000u 0:00.000
mpr:REDLINES=>REDLINES XC 1x1=>10x1 10x1+0+0 16-bit sRGB 0.000u 0:00.000
Polar Distort, Internal Coefficients
  c0 = +188.679623
  c1 = +0.000000
  c2 = +160.000000
  c3 = +100.000000
  c4 = -3.141593
  c5 = +3.141593
  c6 = +50.929582
  c7 = +1.059998
Polar Distort, FX Equivalent:
  -fx 'ii=i+page.x-160.000000; jj=j+page.y-100.000000;
       xx=(atan2(ii,jj)-0.000000)/(2*pi);
       xx=xx-round(xx);
       xx=xx*2*pi*50.929582 + v.w/2;
       yy=(hypot(ii,jj)-0.000000)*1.059998;
       v.p{xx-.5,yy-.5}' \
More usefully, we can displace vertically, eg to stretch the island out to the mainland. See Clut cookbook: Cluts from graphics for techniques.
Some shapes have no central point.
I made this image with Gimp, putting the island in one layer and the border in another. You can download is_src.xcf.
if not exist is_src.xcf copy %PICTBAT%shapeSamp.xcf is_src.xcf

call %PICTBAT%extrXcfLayers is_src.xcf

%IMG7%magick ^
  is_src_island.png ^
  -background White -layers flatten ^
  -channel RGB -threshold 50%% +channel ^
  is_src_island.png
|
is_src_island.png |
|
|
is_src_border.png |
|
|
is_src_flattened.png |
|
A "morphology distance" on the flattened image would give us the distance from any land.
For morphing from one shape to another, we need something different: a smooth gradient from the island to the mainland. It should be exactly black where adjacent to the island, and exactly white adjacent to the mainland.
This is not a simple problem. Here is a solution.
|
Make a gradient that starts black at the island,
%IMG7%magick ^ is_src_island.png ^ -morphology Distance Euclidean:4,600^! ^ is_isl_dist.png |
|
|
Make a gradient that starts white at the mainland,
%IMG7%magick ^ is_src_border.png ^ -morphology Distance Euclidean:4,600^! ^ -negate ^ is_bord_dist.png |
|
|
Merge the two gradients into one that is black at the island and white at the mainland. call %PICTBAT%fanComp ^ is_bord_dist.png ^ is_isl_dist.png ^ is_grad1.png For fanComp.bat, see Composite compositions: Fan compose. The gradient is quite good,
|
|
|
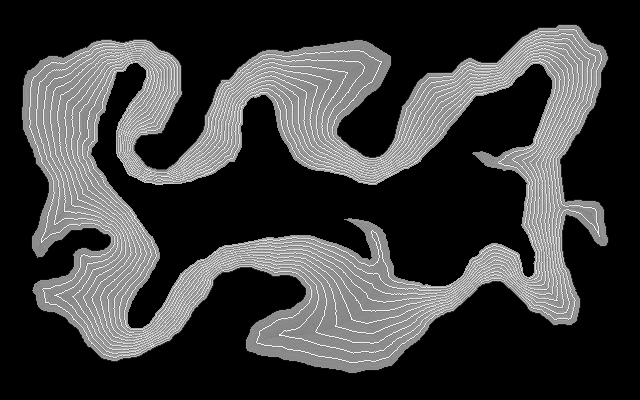
For clarity, show contours. %IMG7%magick ^
is_grad1.png ^
( -size 1x500 gradient: -rotate 90 ^
-duplicate 10 +append +repage ^
) ^
-clut ^
-morphology edgein diamond:1 ^
is_grad2.png
The contour is linear.
|

|
|
Show contours over the flattened image. %IMG7%magick ^ is_src_flattened.png ^ ( is_grad2.png -alpha set -channel A -evaluate set 50%% ) ^ -composite ^ is_grad3.png The contours are entirely between the island and mainland, as required. |
|
We find a centre-line between the island and mainland by reducing to a skeleton, and removing line ends. The centre-line will generally be different to the 50% gradient.
See Anthony's Morphology of shapes: Thinning down to a Skeleton.
|
4-connected skeleton %IMG7%magick ^ is_src_flattened.png ^ -channel RG ^ -morphology Erode Diamond ^ -morphology Thinning:-1 Skeleton:3 ^ -clamp ^ +channel ^ -write is_skel_4con.png ^ -channel G ^ -morphology Thinning:-1 LineEnds ^ -clamp ^ is_skel_4con_loops.png |
|
|
From the 4-connected skeleton,
%IMG7%magick ^
  is_skel_4con.png ^
  -channel RG ^
  -morphology Thinning:-1 Diagonals ^
  -clamp ^
  -morphology Thinning Corners ^
  -clamp ^
  -write is_skel_8con.png ^
  -channel G ^
  -morphology Thinning:-1 LineEnds ^
  -clamp ^
  is_skel_8con_loops.png
Removing these line ends doesn't work. |

|
|
From the 4-connected skeleton,
%IMG7%magick ^ is_skel_4con.png ^ -channel RG ^ -morphology Thinning:-1 LineEnds ^ -clamp ^ -morphology Thinning:-1 Diagonals ^ -clamp ^ -morphology Thinning Corners ^ -clamp ^ -morphology Thinning LineEnds:4 ^ -clamp ^ is_skel_8con_loops2.png |
|
See Anthony's Morphology of shapes: ConvexHull.
|
Very slow. %IMG7%magick ^ -verbose ^ is_src_island.png ^ -negate ^ -channel RG ^ -morphology Close Diamond ^ -morphology Thicken:-1 ConvexHull ^ -morphology Close Diamond ^ is_convhull.png |
|
|
Very slow. %IMG7%magick ^ -verbose ^ is_src_island.png ^ -negate ^ -channel RG ^ -morphology Close Square ^ -morphology Thicken:-1 ConvexHull ^ -morphology Close Square ^ is_convhullSq.png |

|
|
Very slow. %IMG7%magick ^ -verbose ^ is_src_island.png ^ -negate ^ -channel RG ^ -morphology Close Disk:1 ^ -morphology Thicken:-1 ConvexHull ^ -morphology Close Disk:1 ^ is_convhullDisk.png |

|
Make a line at the edge of the mainland.
%IMG7%magick ^ -verbose ^ is_src_border.png ^ -morphology EdgeIn Square ^ is_src_border_edge.png |
|
Pick points that are adjacent to the island. For highest precision we would use all the points. Instead, we pick a sample, using nLightest.bat.
%IMG7%magick ^
  is_src_island.png ^
  -morphology EdgeIn Square ^
  -write is_src_island_edge.png ^
    ( +clone -blur 0x10 -auto-level ) ^
    +swap -compose Multiply -composite ^
  is_src_island_edge_bl.png
The indented lines are optional. They place greater emphasis on high-entropy locations. |
|
|
We use an exclusion radius of 5% of min(width,height). set nlDEBUG=1 call %PICTBAT%nLightest is_src_island_edge_bl.png 9999 5 >is_isl_pnts.lis |
|
How many points did nLightest find?
echo nl_nFound=%nl_nFound%

if "%nl_nFound%"=="" goto :error
if "%nl_nFound%"=="0" goto :error
nl_nFound=73
nLightest.bat doesn't pick the points in a nice neat clockwise or anticlockwise order. We blurred is_src_island_edge.png before calling nLightest so the more "interesting" locations were found first. (If we wanted the points in order, we could modulate the line by a circular gradient that was centred on a point that was on the island.)
The command above redirected the coordinates to is_isl_pnts.lis:
360,227
491,156
369,246
521,262
507,169
381,229
531,244
125,70
122,115
348,248
105,176
256,97
125,169
117,193
527,68
134,97
93,157
153,317
101,114
507,247
512,149
179,277
147,279
547,73
145,78
457,118
441,138
426,152
131,208
389,252
479,253
168,295
110,93
142,226
512,82
471,101
291,152
228,161
465,268
134,297
194,263
97,136
154,243
212,253
409,166
390,175
533,138
525,180
522,225
211,173
135,328
274,107
116,150
306,166
280,134
142,181
451,283
400,278
546,104
352,178
493,91
328,241
420,283
242,112
191,180
231,245
241,144
259,239
330,172
280,237
524,201
308,235
163,183
For each of these points, we can find the nearest point on the border (mainland). How?
It is tempting to find a load of points on the mainland, and find which of these is closest to each island point. But distances will then cross the island.
Instead, we put single black pixel on a white background, and use morphology IterativeDistance, masked by the island, to find distances from that point. Along the edge of the border, the lowest value found is the closest border to the point.
The integer after "IterativeDistance" is, ideally, the maximum expected distance.
To show the process, let us find the closest border point to the coordinate (108,96), which is towards the top-left of the island.
|
We write intermediate results purely for illustration. set InX=108 set InY=96 set MAX_DIST=600 for /F "usebackq tokens=1-3 delims=," %%W ^ in (`%IMG7%magick ^ is_src_island.png ^ ^( +clone -negate -write mpr:MASK +delete ^) ^ -fill #fff -colorize 100 ^ -fill #000 -draw "point %InX%,%InY%" ^ -write-mask mpr:MASK ^ -morphology IterativeDistance:%MAX_DIST% Euclidean ^ +write-mask ^ -write is_grad_samp.png ^ is_src_border_edge.png ^ -compose CopyOpacity -composite ^ -write is_grad_samp2.png ^ -background #fff -alpha Remove ^ -auto-level ^ -format "%%[fx:minima]," -write info: ^ +transparent #000 ^ -write is_grad_samp3.png ^ sparse-color:`) ^ do ( set MIN=%%W set blackX=%%X set blackY=%%Y ) echo MIN=%MIN% blackX=%blackX% blackY=%blackY% MIN=0 blackX=108 blackY=40 |
|
|
We can show the result: %IMG7%magick ^ is_src_flattened.png ^ -fill Red -draw "line %InX%,%InY% %blackX%,%blackY%" ^ is_grad_samp4.png |
|
We should check that MIN is zero. If it is, we have a valid border point.
The command above finds the match for one point. To find all matches, the script joinIslandMainland.bat loops through the points. The script needs a white island on a black background, so we negate it first.
%IMG7%magick ^ is_src_island.png ^ -negate ^ is_island_neg.png set jimDEBUG=1 call %PICTBAT%joinIslandMainland ^ is_island_neg.png ^ is_isl_pnts.lis ^ is_src_border_edge.png ^ out.csv %IMG7%magick %jimDEBUG_FILE% is_join1.png |
|
Lines don't cross each other, which is good.
Less desirable features:
The first two undesirable features are unavoidable unless the island and mainland are exactly parallel.
We can treat the centre line as a mainland edge, or (with a little initial processing) as an island.
%IMG7%magick ^ is_src_flattened.png ^ -morphology Erode Diamond ^ -morphology Thinning:-1 Skeleton ^ -clamp ^ -morphology Thinning:-1 "LineEnds:1^>" ^ -clamp ^ is_cent_line.png |

|
set jimDEBUG=1 call %PICTBAT%joinIslandMainland ^ is_island_neg.png ^ is_isl_pnts.lis ^ is_cent_line.png ^ out.csv %IMG7%magick %jimDEBUG_FILE% is_join2.png |
|
The "less desirable features" have been reduced but not entirely eliminated.
We could iterate the process, dividing each distance into two, generating a (probably) very smooth transition from the island to the mainland. It is probably easier (and quicker?) to use the Gradient method above.
This section was written before ImageMagick acquired the "-connected-components" feature. See the official Connected Components Labeling page.
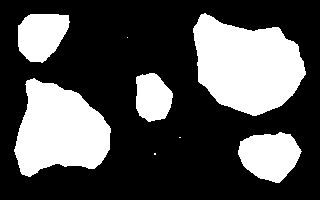
We sometimes have multiple "lakes", ie a number of white shapes on a black background. This example includes five large and three small shapes.
We might ask:
We start by reducing each shape to a single white pixel. If a shape was a ring, it would be reduced to multiple pixels.
%IMG7%magick ^ is_multi_lakes.png ^ -morphology Thinning:-1 Skeleton:3 ^ -clamp ^ -morphology Thinning:-1 LineEnds ^ -clamp ^ is_multi_lakes_one.png |
|
If the command had included "-morphology Erode Diamond", it would have missed the small shapes.
We count the white pixels, to find how many shapes there are:
%IMG7%magick ^
  is_multi_lakes_one.png ^
  ( +clone -fill Black -colorize 100 ) ^
  -metric AE ^
  -compare -format "%%[distortion]" ^
  info:
8
We list the white pixels:
%IMG7%magick ^
  is_multi_lakes_one.png ^
  +transparent White ^
  sparse-color: >is_mlo_list.lis

type is_mlo_list.lis
39,34,graya(255,1) 127,37,graya(255,1) 242,61,graya(255,1) 151,98,graya(255,1) 54,129,graya(255,1) 180,137,graya(255,1) 155,154,graya(255,1) 270,157,graya(255,1)
Or we list the coordinates of the white pixels to a space-separated file:
call %PICTBAT%listWhiteSps is_multi_lakes_one.png is_mlo_coords.lis
39 34
127 37
242 61
151 98
54 129
180 137
155 154
270 157
We can walk through this list of coordinates. For each one, first find the number of pixels in the shape. Then we find the bounding rectangle.
del is_mlo_walk.lis 2>nul

for /F "usebackq tokens=1,2" %%X in (is_mlo_coords.lis) do (

  %IMG7%magick ^
    is_multi_lakes.png ^
    ^( +clone ^
       -fill Red -floodfill +%%X+%%Y White ^) ^
    -metric AE ^
    -compare -format "X=%%X,  Y=%%Y,  size=%%[distortion], " ^
    info:  >>is_mlo_walk.lis

  %IMG7%magick ^
    is_multi_lakes.png ^
    -fill Red -floodfill +%%X+%%Y White ^
    -fill Black +opaque Red ^
    -format " BoundRect=%%@\n" ^
    info:  >>is_mlo_walk.lis
)
type is_mlo_walk.lis
X=39,  Y=34,  size=1919, BoundRect=52x49+18+14
X=127,  Y=37,  size=1, BoundRect=1x1+127+37
X=242,  Y=61,  size=8001, BoundRect=113x103+193+13
X=151,  Y=98,  size=1406, BoundRect=37x49+136+73
X=54,  Y=129,  size=6559, BoundRect=97x99+14+78
X=180,  Y=137,  size=2, BoundRect=2x1+179+137
X=155,  Y=154,  size=4, BoundRect=2x2+154+153
X=270,  Y=157,  size=2310, BoundRect=64x51+238+132
"Line Ends" is slow. If the shapes approach the size of the image and there aren't many of them, an alternative may be faster. For example, the following finds a white pixel, flood-fills, and repeats until no more are found. As this needs a loop, we might as well do the other tasks (finding the size and bounding rectangle) at the same time.
del is_mlo_walk2.lis 2>nul

set TMPIMG=%TEMP%\is_temp.png

%IMG7%magick ^
  is_multi_lakes.png ^
  %TMPIMG%

:loop

set fwX=
for /F "usebackq tokens=1,2 delims=, " %%L in (`%IMG7%magick ^
  %TMPIMG% ^
  +transparent White ^
  sparse-color:`) do (
  set fwX=%%L
  set fwY=%%M
)

if not "!fwX!"=="" (
  rem echo fwS=!fwS! fwX=!fwX! fwY=!fwY! >>is_mlo_walk2.lis

  %IMG7%magick ^
    %TMPIMG% ^
    ^( +clone ^
       -fill Red -floodfill +!fwX!+!fwY! White ^
       -write %TMPIMG% ^) ^
    -metric AE ^
    -compare -format "X=!fwX!,  Y=!fwY!,  size=%%[distortion], " ^
    info:  >>is_mlo_walk2.lis

  %IMG7%magick ^
    -regard-warnings ^
    is_multi_lakes.png ^
    -fill Red -floodfill +!fwX!+!fwY! White ^
    -fill Black +opaque Red ^
    -format " BoundRect=%%@\n" ^
    info:  >>is_mlo_walk2.lis

  if ERRORLEVEL 1 exit /B 1
)
if not "!fwX!"=="" goto loop

type is_mlo_walk2.lis
X=204,  Y=13,  size=0, BoundRect=113x103+193+13
X=30,  Y=14,  size=1919, BoundRect=52x49+18+14
X=127,  Y=37,  size=1, BoundRect=1x1+127+37
X=149,  Y=73,  size=1406, BoundRect=37x49+136+73
X=33,  Y=78,  size=6559, BoundRect=97x99+14+78
X=279,  Y=132,  size=2310, BoundRect=64x51+238+132
X=179,  Y=137,  size=2, BoundRect=2x1+179+137
X=154,  Y=153,  size=4, BoundRect=2x2+154+153
This has found the same sizes and bounding rectangles. It has found different coordinates but they are, of course, within the shapes.
ASIDE: The commands just given use "sparse-color:" to list just the white pixels, and then pulls out the coordinates of the first one. When there are no white pixels there will be no coordinates, hence the test for !fxW! being blank.
An alternative is to create a single white pixel, and search for it:
for /F "usebackq tokens=1,3,4 delims=()@, " %%L in (`%IMG7%magick compare ^
  -metric RMSE ^
  -similarity-threshold 0 ^
  -dissimilarity-threshold 1 ^
  -subimage-search ^
  %TMPIMG% xc:White NULL: 2^>^&1`) do (
  set fwS=%%L
  set fwX=%%M
  set fwY=%%N
)
The test is then whether fwS is zero. If it is, then a white pixel was found. This method is much slower than using "sparse-color:".
NOTE: After the above was written, a new feature was added to ImageMagick: "-connected-components". This is a very fast method for finding patches of connected colours. See the official documentation Connected Components Labeling.
%IMG7%magick ^
  is_multi_lakes.png ^
  -define connected-components:verbose=true -connected-components 4 ^
  NULL:
Objects (id: bounding-box centroid area mean-color):
  0: 320x200+0+0 158.2,101.1 43798 srgb(0,0,0)
  1: 113x103+193+13 246.6,65.1 8001 srgb(255,255,255)
  5: 97x99+14+78 59.3,130.2 6559 srgb(255,255,255)
  6: 64x51+238+132 269.3,155.2 2310 srgb(255,255,255)
  2: 52x49+18+14 41.1,35.0 1919 srgb(255,255,255)
  4: 37x49+136+73 152.4,97.1 1406 srgb(255,255,255)
  8: 2x2+154+153 154.5,153.5 4 srgb(255,255,255)
  7: 2x1+179+137 179.5,137.0 2 srgb(255,255,255)
  3: 1x1+127+37 127.0,37.0 1 srgb(255,255,255)
This has found nine components: the eight white shapes, and the black background.
The centroid coordinates may not be within the shape. (For example, the centroid of a crescent-moon shape is not within the crescent moon.) From the results, a crop could be made of the bounding-box, and the crop searched for a pixel of the found colour.
The techniques above are suitable when one shape is entirely within another.
When shapes overlap, the techniques can be adapted by making another shape that contains all the others. This could be a circle, rectangle or union of the smaller shapes. Treat that enclosing shape as the mainland, and each overlapping shape as an island, and continue as above.
See also Nearest coastal point and Correlating shapes (not yet published).
For convenience, .bat scripts are also available in a single zip file. See Zipped BAT files.
rem Given:
rem   %1 island image (white island on black background)
rem   %2 list of coords adjacent to island
rem   %3 mainland edge image (white line on black background)
@rem Writes:
@rem   %4 output CSV file, list of coords on mainland that correspond to island coords
@rem
@rem Also uses:
@rem   jimDEBUG if 1, creates debug image
@rem   jimMAX_DIST
@rem
@rem Updated:
@rem   24-May-2016
@rem   24-August-2022 for IM v7.
@rem


@if "%4"=="" findstr /B "rem @rem" %~f0 & exit /B 1

@setlocal enabledelayedexpansion

@call echoOffSave

call %PICTBAT%setInOut %1 jim


set ISLAND=%1
set INCOORDS=%2
set MNLAND_EDGE=%3
set OUTCSV=%4

set DEBUG_FILE=%BASENAME%_%sioCODE%_dbg%EXT%
set DBG_LINES=%TEMP%\%~n1_%sioCODE%_dbglns.txt

del %OUTCSV% 2>nul
if "%jimDEBUG%"=="1" del %DBG_LINES% 2>nul

set TMPEXT=.miff
set TMP_ISLAND=%TEMP%\%~n1%TMPEXT%
set TMP_MNLAND_EDGE=%TEMP%\%~n3%TMPEXT%

if "%jimMAX_DIST%"=="" set jimMAX_DIST=100

%IMG7%magick %ISLAND% %TMP_ISLAND%

%IMG7%magick %MNLAND_EDGE% %TMP_MNLAND_EDGE%

for /F "tokens=1-2 delims=, " %%X in (%INCOORDS%) do (
  for /F "usebackq tokens=1-3 delims=," %%W in (`%IMG7%magick ^
    %TMP_ISLAND% ^
    ^( +clone -write mpr:MASK +delete ^) ^
    -fill #fff -colorize 100 ^
    -fill #000 -draw "point %%X,%%Y" ^
    -write-mask mpr:MASK ^
    -morphology IterativeDistance:%jimMAX_DIST% Euclidean ^
    +write-mask ^
    %TMP_MNLAND_EDGE% ^
    -compose CopyOpacity -composite ^
    -background #fff -alpha Remove ^
    -channel RGB -auto-level +channel ^
    -format "%%[fx:minima]," -write info: ^
    +transparent #000 ^
  sparse-color:`) do (
    set MIN=%%W
    set blackX=%%X
    set blackY=%%Y
  )

  echo %0: %%X,%%Y  MIN=!MIN! !blackX!,!blackY!

  if !MIN!==0 (
    echo !blackX!,!blackY! >>%OUTCSV%

    if "%jimDEBUG%"=="1" echo line %%X,%%Y !blackX!,!blackY! >>%DBG_LINES%
  )
)

if "%jimDEBUG%"=="1" if exist %DBG_LINES% %IMG7%magick ^
  %ISLAND% ^
  %MNLAND_EDGE% ^
  -compose Lighten -composite ^
  -stroke Red -draw @%DBG_LINES% ^
  %DEBUG_FILE%

@call echoRestore

@endlocal & set jimDEBUG_FILE=%DEBUG_FILE%
@rem From image %1, finds (%2) lightest points.
@rem
@rem After each point is found,
@rem    blacks out pixels within radius (r) of that point
@rem where r = min(width,height) * %3/100
@rem %3 defaults to 10 (percent).
@rem
@rem Returns number of points found. Could be < n, or even zero (?).
@rem
@rem Also uses:
@rem   nlDEBUG if 1, creates debugging image.
@rem   nlPOINTSIZE optional, pointsize for debug images.
@rem   nlSTROKEWIDTH for debug.
@rem   nlONLY_WHITE if 1, doesn't auto-level,
@rem      so finds only points that are exactly white.
@rem
@rem Returns:
@rem   nl_nFound number of points found, integer >= 0
@rem   echos list of coordinates.
@rem
@rem Updated:
@rem   24-May-2016 v7 needs -channel RGB for -auto-level.
@rem   7-May-2017 "+antialias" the circles.
@rem   2-August-2022 for IM v7 magick.
@rem


@if "%1"=="" findstr /B "rem @rem" %~f0 & exit /B 1

@setlocal enabledelayedexpansion

@call echoOffSave

call %PICTBAT%setInOut %1 nl

for /F "usebackq" %%L in (`cygpath %TEMP%`) do set CYGTEMP=%%L

set TMPFILE=%TEMP%\%~n1_%sioCODE%.miff
set CYGTMPFILE=%CYGTEMP%\%~n1_%sioCODE%.miff
set LISTFILE=%BASENAME%_%sioCODE%.lis
set TMPDEBUGFILE=%BASENAME%_%sioCODE%_dbg.miff
set DEBUGFILE=%BASENAME%_%sioCODE%_dbg%EXT%
set DEBUGDRAW=%TEMP%\%~n1_%sioCODE%_dbgdrw.txt

del %DEBUGDRAW% 2>nul

if "%nlPOINTSIZE%"=="" set nlPOINTSIZE=20

if "%nlSTROKEWIDTH%"=="" set nlSTROKEWIDTH=1

set MAX_FIND=%2
if "%MAX_FIND%"=="" set MAX_FIND=10

set PC_RAD=%3
if "%PC_RAD%"=="" set PC_RAD=10

set AUTOLEV=-channel RGB -auto-level +channel
if "%nlONLY_WHITE%"=="1" set AUTOLEV=

for /F "usebackq" %%L in (`%IMG7%magick ^
  %INFILE% ^
  -format "PIX_RAD=%%[fx:int(min(w,h)*%PC_RAD%/100+0.5)]" ^
  info:`) do set %%L

%IMG7%magick %INFILE% -colorspace Gray %AUTOLEV% %TMPFILE%

if "%nlDEBUG%"=="1" %IMG7%magick %INFILE% %TMPDEBUGFILE%

set /A nFound=0

:loop

set MAX=
set whiteX=

for /F "usebackq tokens=1-3 delims=:, " %%W ^
in (`%IM7DEV%magick ^
    %TMPFILE% ^
    -process onewhite ^
    NULL: 2^>^&1`) ^
do (
  if "%%W"=="onewhite" (
    set MAX=%%W
    set whiteX=%%X
    set whiteY=%%Y
    set /A whiteX2=%%X+%PIX_RAD%
  )
)

if "!MAX!"=="onewhite" if "!whiteX!" neq "none" (
  %IMG7%magick ^
    %TMPFILE% ^
    +antialias -fill #000 ^
    -draw "circle %whiteX% %whiteY% %whiteX2% %whiteY%" ^
    %AUTOLEV% ^
    %TMPFILE%

  if "%nlDEBUG%"=="1" (
    (
      echo fill None stroke #f00 circle %whiteX%,%whiteY%,%whiteX2%,%whiteY%
      echo fill #f00 stroke None text %whiteX%,%whiteY% '!nFound!'
    ) >>%DEBUGDRAW%
  )

  set /A nFound+=1
  echo %whiteX%,%whiteY%
  if !nFound! LSS %MAX_FIND% goto loop
)

if "%nlDEBUG%"=="1" if exist %DEBUGDRAW% %IMG7%magick ^
  %INFILE% ^
  -strokewidth %nlSTROKEWIDTH% ^
  -pointsize %nlPOINTSIZE% ^
  -draw @%DEBUGDRAW% ^
  %DEBUGFILE%

rem echo %0: nFound=%nFound%

call echoRestore

@endlocal & set nl_nFound=%nFound%& set nlDEBUG_FILE=%DEBUGFILE%
See Composite compositions: Fan compose.
rem A compose like a fan.
@rem
@rem result = src / (src-dest+1)
@rem
@rem Updated:
@rem   13-August-2022 for IM v7.
@rem

@if "%3"=="" findstr /B "rem @rem" %~f0 & exit /B 1

@%IMG7%magick ^
  %1 ^
  %2 ^
  ( -clone 1 -evaluate Divide 2 ) ^
  ( -clone 0-1 ^
    -compose Mathematics ^
      -define compose:args=0,0.5,-0.5,0.5 ^
      -composite ^
  ) ^
  -delete 0-1 ^
  -compose DivideSrc -composite ^
  %3

if ERRORLEVEL 1 exit /B 1

exit /B 0
rem From image %1,
rem creates text file %2 with coords of white pixels. (Space between x and y.)
rem Uses sparse-color and DOS tools; fast but messy.
@rem
@rem Updated:
@rem   24-August-2022 for IM v7.
@rem

@if "%2"=="" findstr /B "rem @rem" %~f0 & exit /B 1

@setlocal

call echoOffSave

set BAT_FILE=%TEMP%\%~n1_lws.bat

echo BAT_FILE=%BAT_FILE%

echo call %PICTBAT%sparseCoord.bat ^^>%BAT_FILE%
%IMG7%magick %1 -alpha set +transparent #fff sparse-color:>>%BAT_FILE%

call %BAT_FILE%>%2

call echoRestore
:loop
@if "%1"=="" @exit /B 0
@echo %1 %2
@shift
@shift
@shift
@shift
@goto loop
All images on this page were created by the commands shown, using:
%IMG7%magick -version
Version: ImageMagick 7.1.1-20 Q16-HDRI x86 98bb1d4:20231008 https://imagemagick.org
Copyright: (C) 1999 ImageMagick Studio LLC
License: https://imagemagick.org/script/license.php
Features: Cipher DPC HDRI OpenCL OpenMP(2.0)
Delegates (built-in): bzlib cairo freetype gslib heic jng jp2 jpeg jxl lcms lqr lzma openexr pangocairo png ps raqm raw rsvg tiff webp xml zip zlib
Compiler: Visual Studio 2022 (193532217)
Source file for this web page is islands.h1. To re-create this web page, execute "procH1 islands".
This page, including the images, is my copyright. Anyone is permitted to use or adapt any of the code, scripts or images for any purpose, including commercial use.
Anyone is permitted to re-publish this page, but only for non-commercial use.
Anyone is permitted to link to this page, including for commercial use.
Page version v1.2 15-July-2014.
Page created 02-Mar-2024 17:32:01.
Copyright © 2024 Alan Gibson.