%IMG7%magick ^
pbpx_srgb.tiff ^
( +clone ^
%WEBSIZE% ^
+write pbpx_srgb_sm.miff ^
+delete ^
) ^
%WEBCROP% ^
pbpx_srgb_cr.miff
Using dcraw to extract mosaic data, and exiftool to re-build a raw file.
Scripts on this page use dcraw and exiftool. dcraw has been slightly hacked by me; see dcraw and WB. The IM version should be Q16 or larger. It does not need to be HDRI.
When processing raw camera images, we may want to operate on the raw camera values before they are de-Bayered (aka de-mosaiced). For example, when a pixel in a camera sensor records noise, the de-Bayer process will spread that noise to other pixels. Hence de-noising is easier and more effective if we apply it to raw pixels, before de-Bayering.
Inserting our own ImageMagick processing into a program such as dcraw is a non-trivial task. Instead, a simple process enables us to extract the raw pixel data for each channel, then process that data however we want, then put that data into a DNG file that can be de-Bayered in the usual way.
On this page, a Bayer image contains one channel. Each pixel represents the intensity of light received by that photo sensor, either red or green or blue, in a repeating 2x2 pattern known as a Color Filter Array (CFA). We assume the pattern is:
R  G0
G1 B
With this arrangement, the camera will sample green at twice the spatial frequency of red and blue, which mimics the human visual system's greater sensitivity to green.
An image viewer will show a grayscale image with pixels varying in a chequer-board pattern.
Some camera-raw images have a different repeating pattern, perhaps larger than 2x2. We ignore those.
A TIFF file contains one or more images, and metadata (known as "tags") for each image. The TIFF format was originally defined by Aldus, and now by Adobe. The extension is often ".TIFF" or ".TIF", but other extensions are used.
A NEF file is a TIFF file made by a Nikon camera. It contains a Bayer image (the "raw" camera image) and some JPEG versions of that image that we ignore. Some metadata is specific or proprietary to Nikon. The extension is usually ".NEF".
Other camera manufacturers have similar formats, eg Canon has ".CR2" files.
A DNG ("Digital Negative") file is a TIFF file with images and metadata that conform to an open standard, defined by Adobe. However, it may also contain metadata that is proprietary to a manufacturer, and it may not contain all proprietary metadata converted to the open format. It may also contain an exact copy of the raw file it was derived from. In theory, it provides a manufacturer-neutral format for raw images. Most raw processing software can read DNG files. The extension is usually ".DNG".
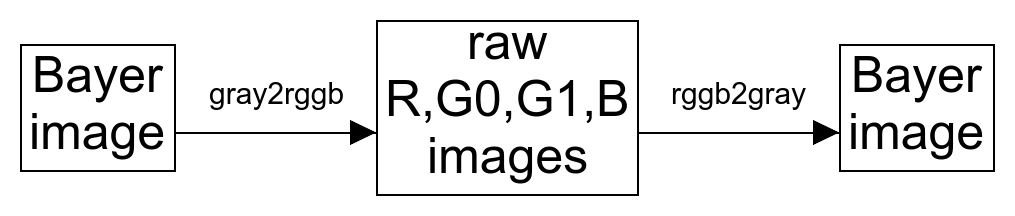
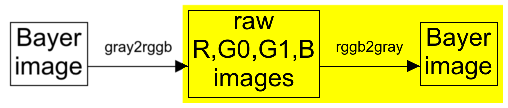
The essential transformations are:
In addition, we do a final transformation from a DNG to an sRGB image using dcraw so we can see what we have done.
These transformations are:

We also use ImageMagick scripts to transform between a Bayer image and individual images that represent the raw red, green and blue channels:
We can do any processing we want on the raw R, G0, G1 and B images. They can be stored in any image format we want such as MIFF or TIFF or PNG.
Most processing is with linear values, proportional to the intensity of light received by the sensor pixels.
Each of the transformations is described below.
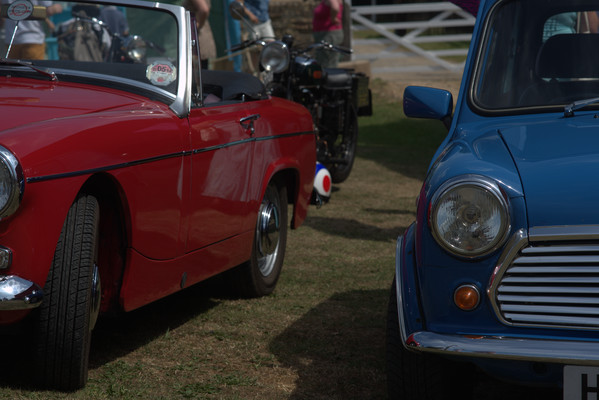
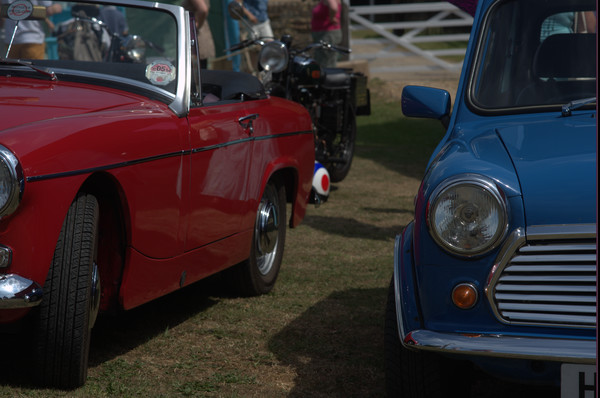
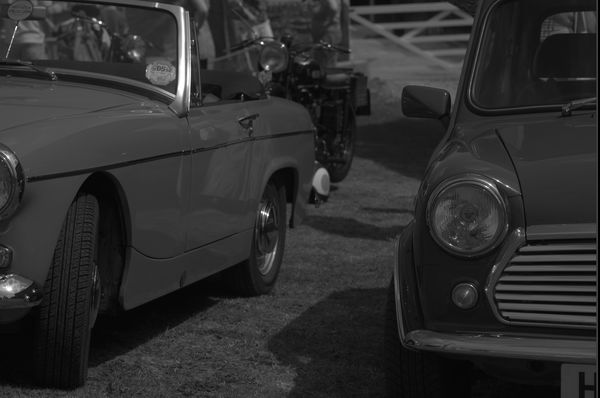
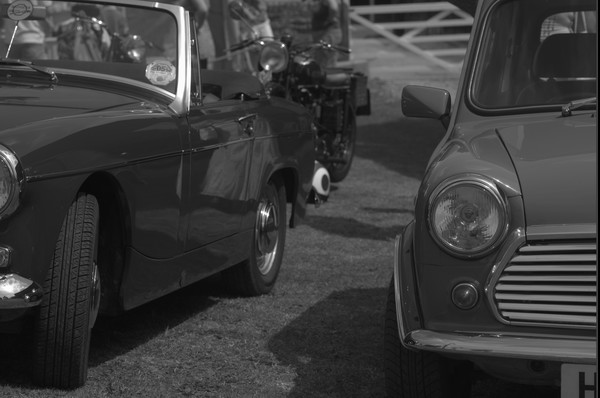
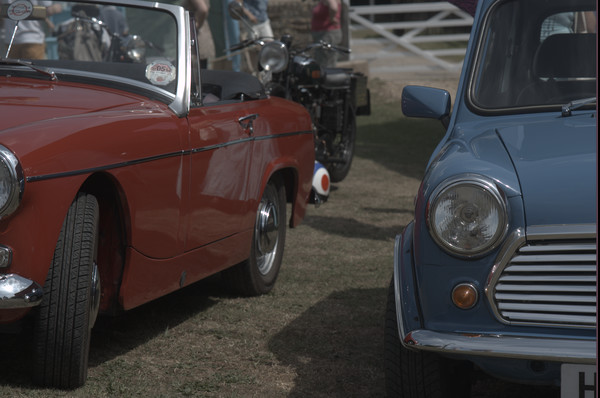
For comparison purposes, we make an sRGB image using dcraw in the conventional way.
set CAMERA_SRC=%PICTLIB%20130713\AGA_1369.NEF

%DCRAW% -v -w -W -6 -T -O pbpx_srgb.tiff %CAMERA_SRC% 2>pbpx_srgb.lis
Loading Nikon D800 image from F:\pictures\20130713\AGA_1369.NEF ...
Multipliers pre-norm:  1.933594 1.000000 1.394531
Scaling with darkness 0, saturation 16383, and
multipliers 1.933594 1.000000 1.394531
AHD interpolation...
rgb_cam:  1.78157 -0.61339 -0.168179 -0.17356 1.64529 -0.471726 0.0227679 -0.446194 1.42343
out_cam:  1.78157 -0.61339 -0.168179 -0.17356 1.64529 -0.471726 0.0227679 -0.446194 1.42343
Converting to sRGB colorspace...
Writing data to pbpx_srgb.tiff ...
bright=1.000000, gamma_curve imax=65536
For the web, we make a small version and a crop that is scaled up:
set WEBSIZE=-resize 600x400
set WEBCROP=-crop 150x100+3891+2086 +repage -scale "600x400^!"
set WEBCROP2=-crop 75x50+1945+1043 +repage -scale "600x400^!"
%IMG7%magick ^
  pbpx_srgb.tiff ^
  ( +clone ^
    %WEBSIZE% ^
    +write pbpx_srgb_sm.miff ^
    +delete ^
  ) ^
  %WEBCROP% ^
  pbpx_srgb_cr.miff
|
|
dcraw has applied the following processes:
We also extract the 3x3 camera matrix from the text outout:
for /F "tokens=1,* delims= " %%A in (pbpx_srgb.lis) do (
  if /I %%A==out_cam: set CAM_MAT="%%B"
)

echo CAM_MAT=%CAM_MAT%
CAM_MAT="1.78157 -0.61339 -0.168179 -0.17356 1.64529 -0.471726 0.0227679 -0.446194 1.42343"

A simple dcraw command does the work:
%DCRAW% -v -W -o 0 -6 -r 1 1 1 1 -g 1 0 -D -d -T -O pbpx_bay.tiff %CAMERA_SRC%
Loading Nikon D800 image from F:\pictures\20130713\AGA_1369.NEF ...
rgb_cam:  1.78157 -0.61339 -0.168179 -0.17356 1.64529 -0.471726 0.0227679 -0.446194 1.42343
out_cam:  1.78157 -0.61339 -0.168179 -0.17356 1.64529 -0.471726 0.0227679 -0.446194 1.42343
Building histograms...
Writing data to pbpx_bay.tiff ...
bright=1.000000, gamma_curve imax=65536
-W tells dcraw not to auto-brighten the result. The camera records 14 bits/channel/pixel, so the maximum possible value that can be recorded is 214-1 = 16383.
%IMG7%magick pbpx_bay.tiff -format %%[maxima] info:
16383
The maximum possible has actually been recorded, suggesting the sensor saturated when the photograph was taken.
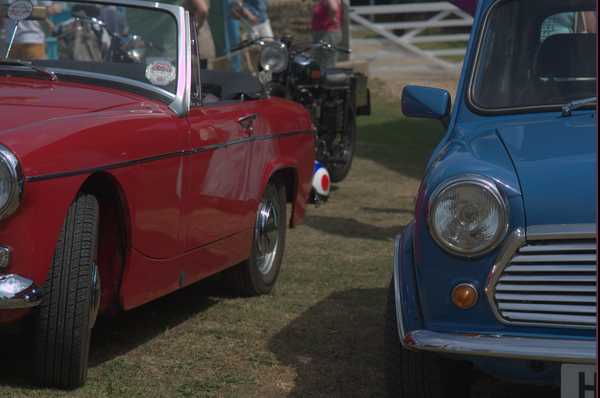
For viewing, we need to divide by 16383 and multiply by QuantumRange of this version of IM, then apply the sRGB transfer curve to the linear values.
set QMULT=QuantumRange/16383
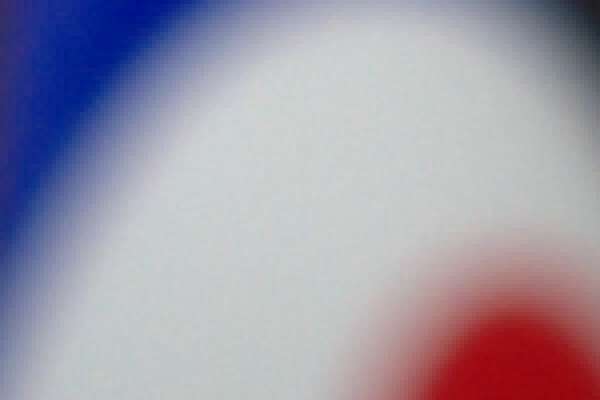
We can multiply the image by QMULT and then view the Bayer image with any image viewer. For the web, we make a small version and a crop that is scaled up.
%IMG7%magick ^
  pbpx_bay.tiff ^
  -evaluate Multiply %%[fx:%QMULT%] ^
  +write pbpx_bay.tiff ^
  -set colorspace RGB ^
  -colorspace sRGB ^
  ( +clone ^
    %WEBSIZE% ^
    +write pbpx_bay_sm.miff ^
    +delete ^
  ) ^
  %WEBCROP% ^
  pbpx_bay_cr.miff
|

|
In the scaled-up crop we clearly see the chequer-board pattern that is characteristic of a Bayer image.
We also extract the red and blue balance factors from the NEF file:
set RedBalance=0
set BlueBalance=0

for /F "usebackq tokens=1,2*" %%i ^
in (`exiftool -p "$RedBalance $BlueBalance" %CAMERA_SRC%`) ^
do (
  set RedBalance=%%i
  set BlueBalance=%%j
)
echo RedBalance=%RedBalance%  BlueBalance=%BlueBalance%
RedBalance=1.933594 BlueBalance=1.394531
We also prepare a file of arguments for exiftool to build DNG files:
(
  exiftool -args -make -model %CAMERA_SRC%

  echo -DNGVersion=1.4.0.0
  echo -DNGBackwardVersion=1.3.0.0
  echo -EXIF:SubfileType=Full-resolution Image
  echo -PhotometricInterpretation=Color Filter Array
  echo -IFD0:CFARepeatPatternDim=2 2
  echo -IFD0:CFAPattern2=0 1 1 2
  echo -Orientation=Horizontal
  echo -BitsPerSample=16
  echo -SamplesPerPixel=1
)>pbpx_exft_args.txt
The argument list, pbpx_exft_args.txt, is:
-Make=NIKON CORPORATION
-Model=NIKON D800
-DNGVersion=1.4.0.0
-DNGBackwardVersion=1.3.0.0
-EXIF:SubfileType=Full-resolution Image
-PhotometricInterpretation=Color Filter Array
-IFD0:CFARepeatPatternDim=2 2
-IFD0:CFAPattern2=0 1 1 2
-Orientation=Horizontal
-BitsPerSample=16
-SamplesPerPixel=1

We use exiftool to write a DNG file containing the Bayer image. This changes metadata, while simply copying the image without changing pixel values. The Bayer file must contain one grayscale image, with no alpha channel, and no compression. We do not write any JPEG versions of the image to the DNG.
del pbpx_bay.dng

exiftool ^
  -@ pbpx_exft_args.txt ^
  -o pbpx_bay.dng ^
  pbpx_bay.tiff

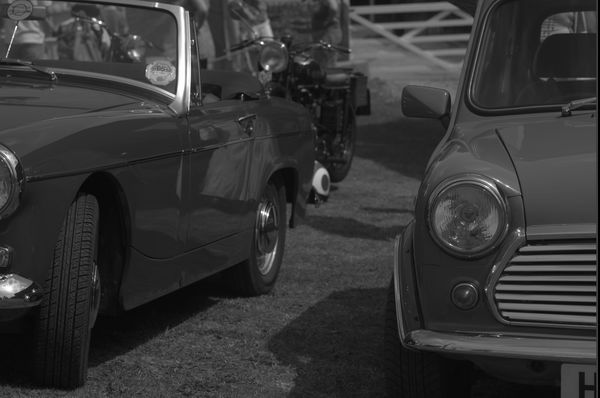
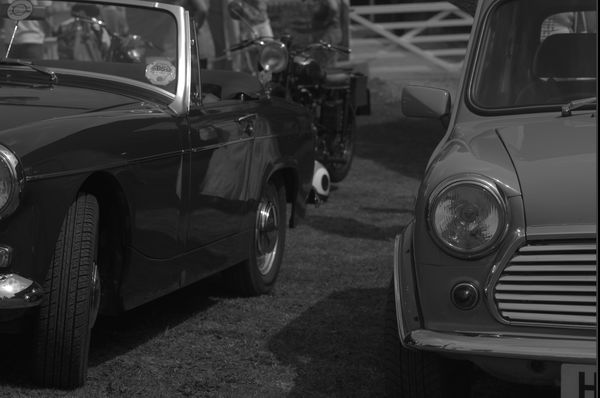
We have made a DNG file. As a check, we use dcraw to convert it to a TIFF in sRGB colorspace, then IM to make versions for the web.
%DCRAW% -v -r %RedBalance% 1 %BlueBalance% 1 -6 -T -O pbpx_bay2.tiff pbpx_bay.dng
Loading Nikon D800 image from pbpx_bay.dng ...
Multipliers pre-norm:  1.933594 1.000000 1.394531
Scaling with darkness 0, saturation 65535, and
multipliers 1.933594 1.000000 1.394531
AHD interpolation...
rgb_cam:  1.78157 -0.61339 -0.168179 -0.17356 1.64529 -0.471726 0.0227679 -0.446194 1.42343
out_cam:  1.78157 -0.61339 -0.168179 -0.17356 1.64529 -0.471726 0.0227679 -0.446194 1.42343
Converting to sRGB colorspace...
Writing data to pbpx_bay2.tiff ...
bright=1.000000, gamma_curve imax=65528
%IMG7%magick ^
  pbpx_bay2.tiff ^
  ( +clone ^
    %WEBSIZE% ^
    +write pbpx_bay2_sm.miff ^
    +delete ^
  ) ^
  %WEBCROP% ^
  pbpx_bay2_cr.miff
|
|
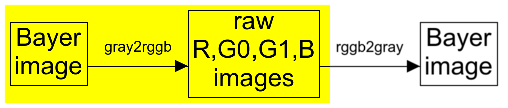
A Bayer file is not a convenient format for image processing. The script gray2rggb.bat reads a Bayer image and makes four images, representing the R, G0, G1 and B components.
Each component is half the linear size of the Bayer image
call %PICTBAT%gray2rggb pbpx_bay.tiff pbpx_one_XX.miff
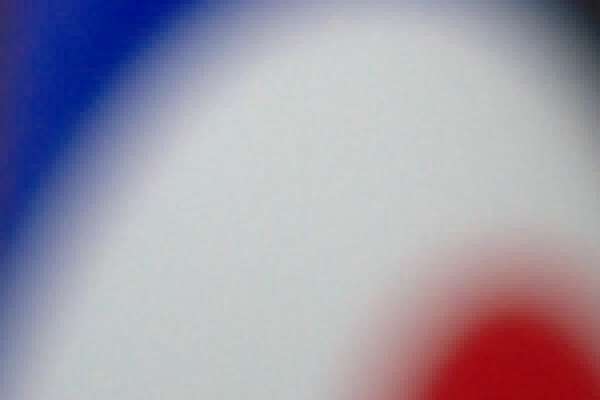
We show each component. As before, we show a resized version and an enlarged crop.
%IMG7%magick ^
  pbpx_one_R.miff ^
  -set colorspace RGB ^
  -colorspace sRGB ^
  ( +clone ^
    %WEBSIZE% ^
    +write pbpx_one_R_sm.miff ^
    +delete ^
  ) ^
  %WEBCROP2% ^
  pbpx_one_R_cr.miff
|
|
%IMG7%magick ^
  pbpx_one_G0.miff ^
  -set colorspace RGB ^
  -colorspace sRGB ^
  ( +clone ^
    %WEBSIZE% ^
    +write pbpx_one_G0_sm.miff ^
    +delete ^
  ) ^
  %WEBCROP2% ^
  pbpx_one_G0_cr.miff
|


|
%IMG7%magick ^
  pbpx_one_G1.miff ^
  -set colorspace RGB ^
  -colorspace sRGB ^
  ( +clone ^
    %WEBSIZE% ^
    +write pbpx_one_G1_sm.miff ^
    +delete ^
  ) ^
  %WEBCROP2% ^
  pbpx_one_G1_cr.miff
|
|
%IMG7%magick ^
  pbpx_one_B.miff ^
  -set colorspace RGB ^
  -colorspace sRGB ^
  ( +clone ^
    %WEBSIZE% ^
    +write pbpx_one_B_sm.miff ^
    +delete ^
  ) ^
  %WEBCROP2% ^
  pbpx_one_B_cr.miff
|

|
Just for fun, we can combine these channel images in ImageMagick.
%IMG7%magick ^
  ( pbpx_one_R.miff ^
    -evaluate Multiply %RedBalance% ) ^
  ( pbpx_one_G0.miff pbpx_one_G1.miff ^
    -evaluate-sequence Mean ) ^
  ( pbpx_one_B.miff ^
    -evaluate Multiply %BlueBalance% ) ^
  -combine ^
  -set colorspace sRGB ^
  pbpx_combim.miff
%IMG7%magick ^
  pbpx_combim.miff ^
  -set colorspace RGB ^
  -colorspace sRGB ^
  ( +clone ^
    %WEBSIZE% ^
    +write pbpx_combim_sm.miff ^
    +delete ^
  ) ^
  %WEBCROP2% ^
  pbpx_combim_cr.miff
|
|
This is sufficient to check that we haven't swapped channels. The colours are inaccurate mostly because we have not applied the camera matrix. We can do that:
%IMG7%magick ^
  pbpx_combim.miff ^
  -color-matrix %CAM_MAT% ^
  pbpx_combim2.miff
%IMG7%magick ^
  pbpx_combim2.miff ^
  -set colorspace RGB ^
  -colorspace sRGB ^
  ( +clone ^
    %WEBSIZE% ^
    +write pbpx_combim2_sm.miff ^
    +delete ^
  ) ^
  %WEBCROP2% ^
  pbpx_combim2_cr.miff
|
|
This is the inverse of the previous process. The script rggb2gray.bat reads four images, representing the R, G0, G1 and B components, and combines them to make a Bayer image.
call %PICTBAT%rggb2gray pbpx_one_XX.miff pbpx_bay3.tiff
To verify the round-trip, we compare with the Bayer image that was split:
%IMG7%magick compare ^
  -metric AE ^
  pbpx_bay.tiff ^
  pbpx_bay3.tiff ^
  NULL: 2>pbpx_cmp.lis
0
As expected, all corresponding pixels are identical. As shown above, we can then convert the Bayer image into a DNG file.
The script works by replicating each input pixel into four pixels (using "-scale"), and using a mask to make three of those pixels transparent. The command does a lot of processing. A custom program or process module could simply read the four input files, then walk though each output pixel, picking the value from the appropriate input pixel. This would be much faster.
So, we can start with a camera raw file, make a Bayer image, split that into four channels, then convert those back to a Bayer image which we can convert to a DNG file which we can read with any raw processor to convert to sRGB or whatever we want. But why would we want to? What can we do with this?
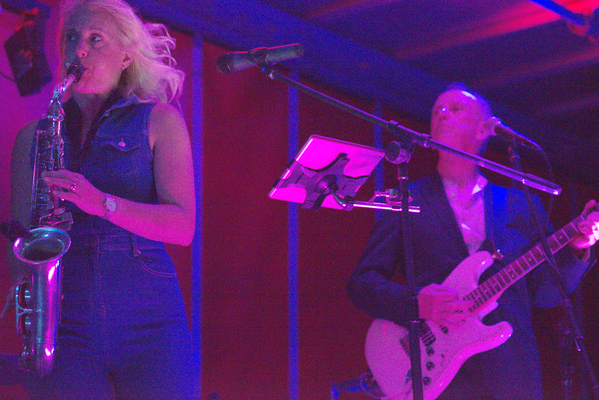
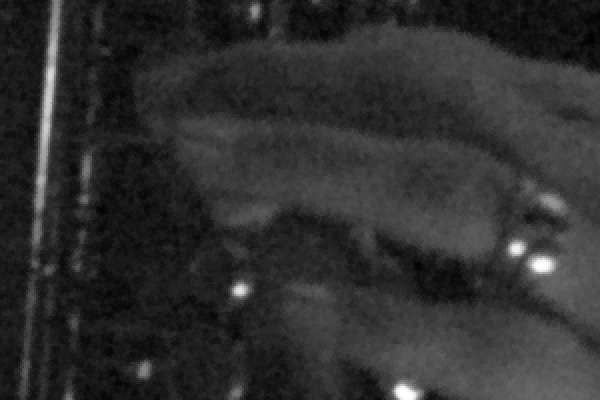
This noisy image is from a Nikon D800 with 85/1.8 lens, ISO "H2" (256000), auto-exposure with -2 stops bias to reduce burnt highlights, 1/320s f/2.8.
An ordinary dcraw conversion to sRGB, with auto-brighten:
set CAMERA_SRC2=%PICTLIB2%20190806\AGA_4360.NEF

%DCRAW% -v -w -6 -T -O pbpx_nse.tiff %CAMERA_SRC2%

set WEBSIZE=-resize 600x400
set WEBCROP=-crop 600x400+371+2065 +repage
set WEBCROP2=-crop 300x200+185+1032 +repage -scale "600x400^!"
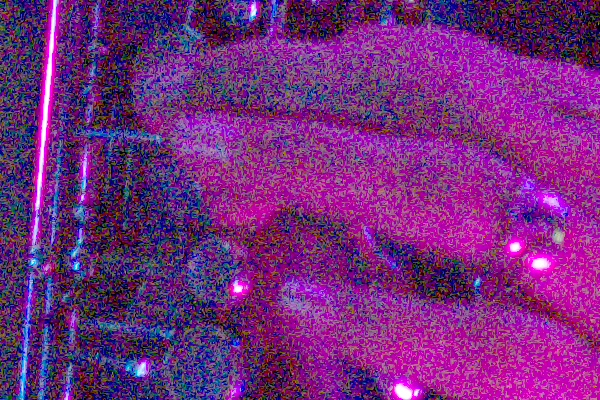
As usual, we show a small version of the complete image, and a 1:1 crop.
%IMG7%magick ^
  pbpx_nse.tiff ^
  -set colorspace RGB ^
  -colorspace sRGB ^
  ( +clone ^
    %WEBSIZE% ^
    +write pbpx_nse_sm.miff ^
    +delete ^
  ) ^
  %WEBCROP% ^
  pbpx_nse_cr.miff
|
|
Notice the heavy noise in the 1:1 crop. The noise is clumped, in areas a handful of pixels wide or high or both.
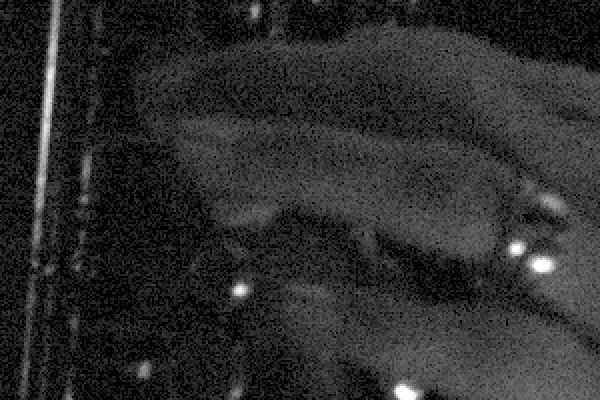
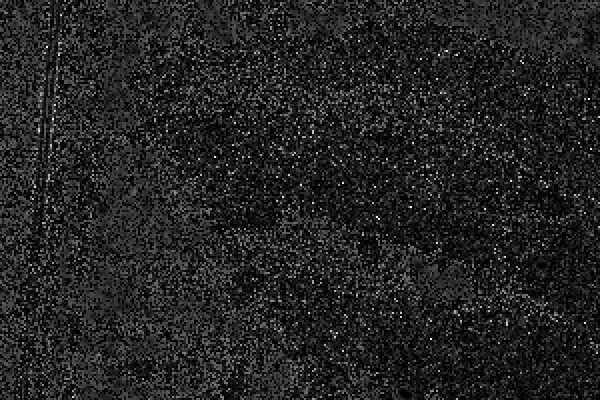
Create a Bayer image with no auto-brighten, but multiplying to stretch from 14 bits to 16 bits. We will show just the 1:1 crop of the red channel.
for /F "usebackq" %%L in (`%IMG7%magick identify ^
  -format "RAWMULT=%%[fx:65535/16383]" ^
  xc:`) do set %%L

%DCRAW% -v -W -o 0 -b %RAWMULT% -6 -r 1 1 1 1 -g 1 0 -D -d -T -O pbpx_nse2.tiff %CAMERA_SRC2%

call %PICTBAT%gray2rggb pbpx_nse2.tiff pbpx_nse2_XX.miff
%IMG7%magick ^ pbpx_nse2_R.miff ^ %WEBCROP2% ^ -set colorspace RGB ^ -colorspace sRGB ^ pbpx_nse2_R_cr.miff |
|
This noise is different: it seems to affect each pixel independently of other pixels, and any clumping seems coincidental.
A simple denoising filter smooths outliers by ensuring every pixel is within the local minimum and maximum of a small blur. See Limit min-max. The full effect on this image makes the flesh look unpleasantly blotchy, so we apply only 50% of the effect.
set lmmPOST_PROC=-set colorspace Gray

%IMG7%magick pbpx_nse2_R.miff -blur 0x1 \temp\pbpx_bl.miff
call %PICTBAT%limitMinMax \temp\pbpx_bl.miff pbpx_nse2_R.miff pbpx_bl_R.miff 3x3 50
%IMG7%magick ^ pbpx_bl_R.miff ^ %WEBCROP2% ^ -set colorspace RGB ^ -colorspace sRGB ^ pbpx_bl_R_cr.miff |
|
The difference between these images shows where noise is removed. The difference is black where nothing is removed, and lighter where more noise is removed. Ideally, the difference will be essentially random, and will not show any "signal", any detail that we want to retain.
%IMG7%magick ^ pbpx_nse2_R_cr.miff ^ pbpx_bl_R_cr.miff ^ -compose Difference -composite ^ -auto-level ^ pbpx_dense_diff.miff |
|
This is generally lighter where the inputs are darker, which means that more noise is removed from shadow areas, which is reasonable. The denoising process also removes a small amount of detail in the near-vertical specular highlight on the left. I can live with that. If we wanted, we could mask the effect with an edge-detector.
We repeat that denoising for G0, G1 and B:
%IMG7%magick pbpx_nse2_G0.miff -blur 0x1 \temp\pbpx_bl.miff
call %PICTBAT%limitMinMax \temp\pbpx_bl.miff pbpx_nse2_G0.miff pbpx_bl_G0.miff 3x3 50

%IMG7%magick pbpx_nse2_G1.miff -blur 0x1 \temp\pbpx_bl.miff
call %PICTBAT%limitMinMax \temp\pbpx_bl.miff pbpx_nse2_G1.miff pbpx_bl_G1.miff 3x3 50

%IMG7%magick pbpx_nse2_B.miff -blur 0x1 \temp\pbpx_bl.miff
call %PICTBAT%limitMinMax \temp\pbpx_bl.miff pbpx_nse2_B.miff pbpx_bl_B.miff 3x3 50

set lmmPOST_PROC=
Build a Bayer from these denoised images:
call %PICTBAT%rggb2gray pbpx_bl_XX.miff pbpx_bay_bl.tiff
Convert the Bayer to a DNG:
del pbpx_bay_bl.dng

exiftool ^
  -@ pbpx_exft_args.txt ^
  -o pbpx_bay_bl.dng ^
  pbpx_bay_bl.tiff
Process the DNG, de-Bayering and converting to sRGB, and show the 1:1 crop of the colour result:
%DCRAW% -v -6 -T -O pbpx_bay_den.tiff pbpx_bay_bl.dng
%IMG7%magick ^ pbpx_bay_den.tiff ^ %WEBCROP% ^ pbpx_bay_den_cr.miff |

|
The result is far less noisy than it was.
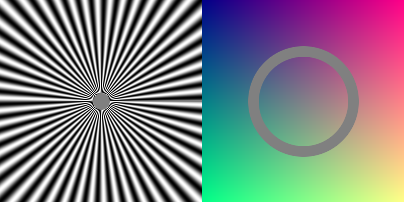
Create a sample image:
%IMG7%magick ^
  -size 200x600 gradient: -rotate 90 ^
  -distort Arc "360 -90 100" +repage ^
  -evaluate sin 50 ^
  -fill gray(50%%) ^
  -draw "translate %%[fx:w/2],%%[fx:h/2] circle 0,0,8,0" ^
  ( +clone ^
    -sparse-color bilinear ^
0,0,#008,^
%%[fx:w-1],0,#f08,^
0,%%[fx:h-1],#0f8,^
%%[fx:w-1],%%[fx:h-1],#ff8 ^
    ( +clone ^
      -fill gray(50%%) -colorize 100 ^
    ) ^
    ( +clone ^
      -fill Black -colorize 100 ^
      -fill None -stroke White -strokewidth 10  ^
      -draw "translate %%[fx:w/2],%%[fx:h/2] circle 0,0,50,0" ^
      -alpha off ^
    ) ^
    -compose Over -composite ^
  ) ^
  +append ^
  pbpx_cfatgt.png
|
|
Make a Bayer image. See Mosaicing.
call %PICTBAT%mosaic ^ pbpx_cfatgt.png . . . . ^ pbpx_cfatgt_mos.tiff |

|
Make a DNG. We declare the camera "Make" to be one that dcraw doesn't know about, so it will apply the identity camera matrix. We use a linear version of the TIFF so raw converters can convert it back to sRGB.
%IMG7%magick ^
  pbpx_cfatgt_mos.tiff ^
  -set colorspace sRGB ^
  -colorspace RGB ^
  pbpx_cfatgt_mos_lin.tiff

del pbpx_ctm.dng

exiftool ^
  -@ pbpx_exft_args.txt ^
  -Make="snibgo" ^
  -Model="nocam" ^
  -UniqueCameraModel="snibgo nocam" ^
  -ColorMatrix1="1 0 0 0 1 0 0 0 1" ^
  -ColorMatrix2="1 0 0 0 1 0 0 0 1" ^
  -MakerNotes:WB_RBLevels="1 1 1 1" ^
  -WB_RBLevels="1 1 1 1" ^
  -AnalogBalance="1 1 1" ^
  -AsShotNeutral="1 1 1" ^
  -IFD0:CalibrationIlluminant1="Standard Light A" ^
  -IFD0:CalibrationIlluminant2=D65 ^
  -o pbpx_ctm.dng ^
  pbpx_cfatgt_mos_lin.tiff
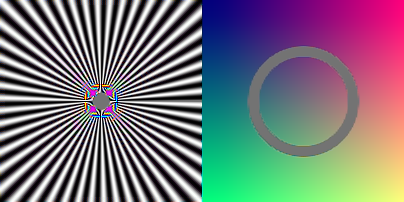
We use dcraw to convert to a conventional image. "-r 1 1 1 1" overides any multipliers set in the file metadata.
%DCRAW% ^ -v -M -r 1 1 1 1 -6 -T ^ -O pbpx_ctm.tiff ^ pbpx_ctm.dng |
|
As the detail approaches the size of the Bayer pattern, the interpolation introduces false colours. This also happens at the edge of the gray ring, though not so obviously. The edge of the gray ring has become less smooth, more broken.
In some conditions (low light, high ISO, longish exposures, hot sensor), cameras sometimes create "hot" pixels. These can be regarded as noise and treated as above.
For example, here is a scaled-up crop from an in-camera JPEG:
set HOT_JPG=%PICTLIB2%20180921\AGA_4034.JPG set HOT_NEF=%PICTLIB2%20180921\AGA_4034.NEF %IMG7%magick ^ %HOT_JPG% ^ -crop 150x100+4114+2030 +repage ^ -scale 400%% ^ pbpx_hot.png |
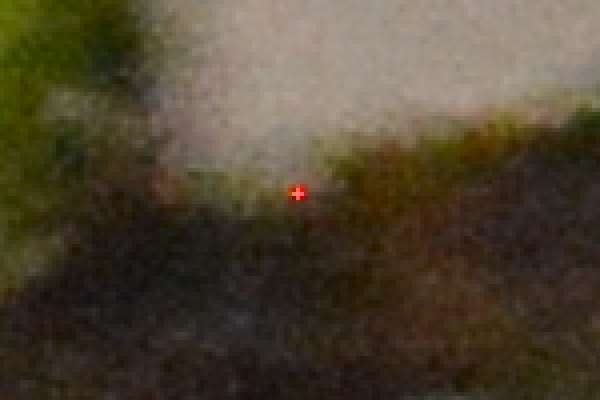
|
A red pixel on the sensor is "hot": far brighter than adjacent pixels of any colour. The de-Bayering has spread this brightness to other pixels. If the hot pixel represented green instead of red, the effect would not be so obvious on this image.
There are many possible techniques for detecting and fixing hot pixels.
%DCRAW% -W -o 0 -6 -r 1 1 1 1 -g 1 0 -D -d -T -O pbpx_hot.tiff %HOT_NEF%
%IMG7%magick ^
  pbpx_hot.tiff ^
  -crop 3x3+4195+2083 +repage ^
  txt:
# ImageMagick pixel enumeration: 3,3,65535,gray
0,0: (65)  #004100410041  gray(0.0991836%)
1,0: (556)  #022C022C022C  gray(0.848402%)
2,0: (127)  #007F007F007F  gray(0.19379%)
0,1: (372)  #017401740174  gray(0.567636%)
1,1: (12981)  #32B532B532B5  gray(19.8077%)
2,1: (376)  #017801780178  gray(0.573739%)
0,2: (155)  #009B009B009B  gray(0.236515%)
1,2: (163)  #00A300A300A3  gray(0.248722%)
2,2: (82)  #005200520052  gray(0.125124%)
In this 3x3 crop, we see that the central pixel is more than twenty times the value of any other pixel. We could use an outlier detection and fix. In practice, I so rarely experience hot pixels that I don't treat them differently to other noise.
If we want to remove hot pixels without denoising the rest of the image, see Hot pixels.
A Bayer image contains only one channel in each pixel. The de-Bayering process interpolates the other two channels at each pixel. We might say it "invents" two-thirds of the data in the final image. There is usually no ground-truth version of the image, so evaluating different de-Bayer algorithms is often subjective. By constructing an image that is then mosaiced, removing two-thirds of the data, we can then objectively compare the results with the ground-truth.
For useful testing, the input DNG image must be well-designed. It should not be derived from a raw image that has been de-Bayered as artefacts from the de-Bayering could bias results. It could be a crop from a raw image that has not been de-Bayered.
For convenience, .bat scripts are also available in a single zip file. See Zipped BAT files.
rem From grayscale image %1, a Bayer-pattern mosaic,
rem write four output files named after %2 which must contain XX,
rem   where XX will be substituted by %3, %4, %5 and %6 (R, G0, G1 or B).
rem Each output will have half the dimensions of the input.
@rem
@rem Default Bayer filter pattern is:
@rem   R  G0
@rem   G1 B
@rem

setlocal enabledelayedexpansion

set INFILE=%1

set OUTNAME=%2

if "%OUTNAME%"=="." set OUTNAME=
if "%OUTNAME%"=="" exit /B 1

if "%OUTNAME:XX=zz%"=="%OUTNAME%" exit /B 1

set C0=%3
if "%C0%"=="." set C0=
if "%C0%"=="" set C0=R

set C1=%4
if "%C1%"=="." set C1=
if "%C1%"=="" set C1=G0

set C2=%5
if "%C2%"=="." set C2=
if "%C2%"=="" set C2=G1

set C3=%6
if "%C3%"=="." set C3=
if "%C3%"=="" set C3=B

%IMG7%magick ^
  %INFILE% ^
  ( -clone 0 -define sample:offset=25 -sample 50%% ^
    -set colorspace Gray ^
    -write !OUTNAME:XX=%C0%! ^
    +delete ) ^
  ( -clone 0 -define sample:offset=75x25 -sample 50%% ^
    -set colorspace Gray ^
    -write !OUTNAME:XX=%C1%! ^
    +delete ) ^
  ( -clone 0 -define sample:offset=25x75 -sample 50%% ^
    -set colorspace Gray ^
    -write !OUTNAME:XX=%C2%! ^
    +delete ) ^
  ( -clone 0 -define sample:offset=75 -sample 50%% ^
    -set colorspace Gray ^
    -write !OUTNAME:XX=%C3%! ^
  ) ^
  -delete 0 ^
  NULL:

if ERRORLEVEL 1 exit /B 1
rem Given %1 is input name including XX representing %3, %4, %5 and %6 (R, G0, G1 and B),
rem makes output %2 grayscale of twice the dimensions, a Bayer image.
@rem
@rem Updated:
@rem   22-August-2019 Added "-alpha off -compress None" so raw readers don't get confused.
@rem   26-June-2021 Changed method to improve performance.
@rem   19-March-2022 Removed "+write msk.png" prior to "-write mpr:MSK2 +delete".
@rem

setlocal enabledelayedexpansion

set INNAME=%1
set OUTFILE=%2

set C0=%3
if "%C0%"=="." set C0=
if "%C0%"=="" set C0=R

set C1=%4
if "%C1%"=="." set C1=
if "%C1%"=="" set C1=G0

set C2=%5
if "%C2%"=="." set C2=
if "%C2%"=="" set C2=G1

set C3=%6
if "%C3%"=="." set C3=
if "%C3%"=="" set C3=B

%IMG7%magick ^
  -background None ^
  ( !INNAME:XX=%C0%! ^
    -scale 200%% ^
  ) ^
  ( -size 1x1 ^
    ( xc:Black xc:White +append +repage ) ^
    ( xc:Black xc:Black +append +repage ) ^
    -append ^
    -write mpr:MSK +delete ^
    -clone 0 ^
    -tile mpr:MSK ^
    -draw "color 0,0 reset" ^
    -write mpr:MSK2 +delete ^
  ) ^
  ( !INNAME:XX=%C1%! ^
    -scale 200%% ^
    mpr:MSK2 ^
    -alpha off ^
    -compose CopyAlpha -composite ^
  ) ^
  ( !INNAME:XX=%C2%! ^
    -scale 200%% ^
    ( mpr:MSK2 -roll +1+1 ) ^
    -alpha off ^
    -compose CopyAlpha -composite ^
  ) ^
  ( !INNAME:XX=%C3%! ^
    -scale 200%% ^
    ( mpr:MSK2 -roll +0+1 ) ^
    -alpha off ^
    -compose CopyAlpha -composite ^
  ) ^
  -compose Over -layers Flatten ^
  -alpha off -compress None ^
  -define quantum:format=integer -depth 16 ^
  %OUTFILE%
rem Similar to rggb2gray.bat, but using "-fx".

rem Given %1 is input name including XX representing %3, %4, %5 and %6 (R, G0, G1 and B),
rem makes output %2 grayscale of twice the dimensions, a Bayer image.
@rem
@rem Updated:
@rem   22-August-2019 Added "-alpha off -compress None" so raw readers don't get confused.
@rem   26-June-2021 Changed method to improve performance.
@rem   19-March-2022 Removed "+write msk.png" prior to "-write mpr:MSK2 +delete".
@rem

setlocal enabledelayedexpansion

set INNAME=%1
set OUTFILE=%2

set C0=%3
if "%C0%"=="." set C0=
if "%C0%"=="" set C0=R

set C1=%4
if "%C1%"=="." set C1=
if "%C1%"=="" set C1=G0

set C2=%5
if "%C2%"=="." set C2=
if "%C2%"=="" set C2=G1

set C3=%6
if "%C3%"=="." set C3=
if "%C3%"=="" set C3=B

%FXNEW%magick ^
  !INNAME:XX=%C0%! !INNAME:XX=%C1%! !INNAME:XX=%C2%! !INNAME:XX=%C3%! ^
  -size %%[fx:w*2]x%%[fx:h*2] xc: ^
  -colorspace Gray ^
  -insert 0 ^
  -fx "u[1 + i%%2 + 2*(j%%2)].p{floor(i/2),floor(j/2)}" ^
  -alpha off -compress None ^
  -define quantum:format=integer -depth 16 ^
  %OUTFILE%
All images on this page were created by the commands shown, using:
%IMG7%magick identify -version
Version: ImageMagick 7.1.0-4 Q16 x64 2021-07-18 https://imagemagick.org
Copyright: (C) 1999-2021 ImageMagick Studio LLC
License: https://imagemagick.org/script/license.php
Visual C++: 192930038
Features: Cipher DPC HDRI Modules OpenCL OpenMP(2.0)
Delegates (built-in): bzlib cairo flif freetype gslib heic jng jp2 jpeg jxl lcms lqr lzma openexr pangocairo png ps raqm raw rsvg tiff webp xml zip zlib
%DCRAW% |head -n 4
 Raw photo decoder "dcraw" v9.27
by Dave Coffin, dcoffin a cybercom o net
slightly hacked by Alan Gibson v2.0
exiftool -ver
12.13
%DTPATH%darktable-cli --version
this is darktable-cli 3.0.2
copyright (c) 2012-2020 johannes hanika, tobias ellinghaus
To improve internet download speeds, some images may have been automatically converted (by ImageMagick, of course) from PNG or TIFF or MIFF to JPG.
Source file for this web page is procbay.h1. To re-create this web page, execute "procH1 procbay".
This page, including the images, is my copyright. Anyone is permitted to use or adapt any of the code, scripts or images for any purpose, including commercial use.
Anyone is permitted to re-publish this page, but only for non-commercial use.
Anyone is permitted to link to this page, including for commercial use.
Page version v1.0 10-November-2019.
Page created 21-Mar-2022 09:26:17.
Copyright © 2022 Alan Gibson.