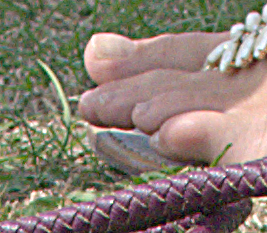
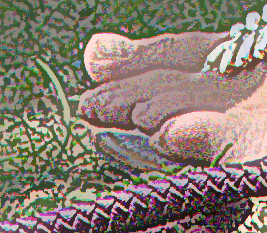
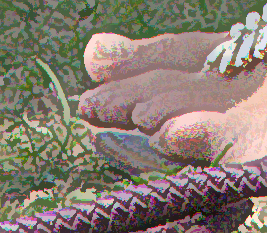
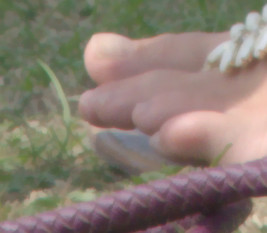
toes.png

Limiting pixel values to the min and max of a sliding window, or setting them to extremes.
We can limit the pixel values of one image to the range found in a local area (a sliding window) from a different reference image.
This is useful when the image is a sharpened version of the reference. Then, the output has limited sharpening, which prevents overshoot.
In a similar way, we can set every pixel value to either minimum or maximum of the sliding window.
For sample inputs, we use the usual toes.png...
|
toes.png |
|
... and an artificial image:
%IMG7%magick ^ -size 200x200 ^ xc:#34E ^ -fill xc:#ED3 ^ -draw "circle 140,100 140,140" ^ -colorspace RGB ^ -blur 0x1 ^ -colorspace sRGB ^ lmm_samp1.png |

|
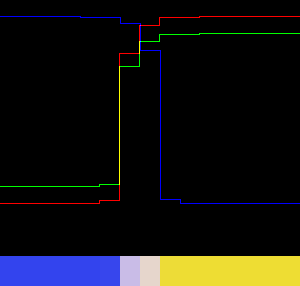
We will examine a small part of the artificial image:
set TRIM_RES=-gravity Center -crop 15x1+0+0 +repage -scale 2000%%%
%IMG7%magick ^ lmm_samp1.png ^ %TRIM_RES% ^ lmm_samp1_ts.png |
|
|
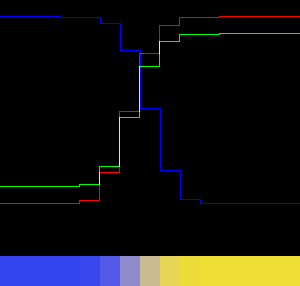
Graph this small part: call %PICTBAT%graphLineCol ^ lmm_samp1_ts.png |
|
The graph shows a typical Gaussian blur with S-shaped intensity: the intensity varies most rapidly in the centre of the effect, and varies more slightly as the distance from the centre increases. From the graph, we see clearly the effect spans six pixels. (It acually spans eight pixels, but two of these are changed too little to show on the graph.)
Let's apply an unsharp mask to the entire image, and again show just that small part:
(We use %IM7DEV%magick to avoid an OpenCL bug in unsharp.)
%IM7DEV%magick ^ lmm_samp1.png ^ -unsharp 0x1+1+0 ^ +write lmm_samp1_uns.png ^ %TRIM_RES% ^ lmm_samp1_uns_ts.png |

|
|
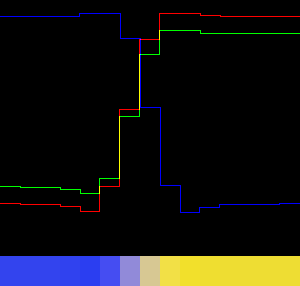
Graph the small part: call %PICTBAT%graphLineCol ^ lmm_samp1_uns_ts.png |
|
The centre portion has increased contrast. There is overshoot (aka halos): low values near the edge have become lower, and high values near the edge have become higher. Greater sharpening causes greater overshoot. Overshoot can create clipping.
Overshoot isn't, of itself, a bad thing. It helps the impression of sharpness. But it is an artifact that was not present in the original scene, so the image is one step further from being "scene-referred". And it can be obrusive. This method eliminates overshoot.
call %PICTBAT%limitMinMax ^ lmm_samp1.png ^ lmm_samp1_uns.png ^ lmm_samp1_lmm.png ^ 3x3 |

|
%IMG7%magick ^ lmm_samp1_lmm.png ^ %TRIM_RES% ^ lmm_samp1_lmm_ts.png |
|
|
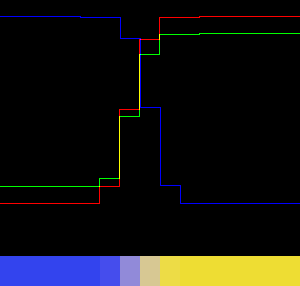
Graph the small part: call %PICTBAT%graphLineCol ^ lmm_samp1_lmm_ts.png |
|
From the graph, the width of the blur has been reduced from six to four pixels. There is no overshoot. In each channel, all values are between (or equal to) the values on each side. Limiting has adjusted only values that were strictly between the values on each side.
We show another example, with increased USM gain:
%IM7DEV%magick ^
  lmm_samp1.png ^
  -unsharp 0x1+5+0 ^
  +write lmm_samp1_uns2.png ^
  %TRIM_RES% ^
  lmm_samp1_uns2_ts.png
Overshoot is clear. |

|
|
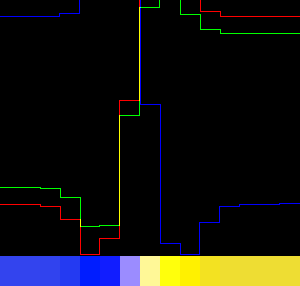
Graph the small part: call %PICTBAT%graphLineCol ^ lmm_samp1_uns2_ts.png Clipping has occurred. |
|
|
Limit, with a larger window: call %PICTBAT%limitMinMax ^ lmm_samp1.png ^ lmm_samp1_uns2.png ^ lmm_samp1_lmm2.png ^ 5x5 |

|
%IMG7%magick ^ lmm_samp1_lmm2.png ^ %TRIM_RES% ^ lmm_samp1_lmm2_ts.png |
|
|
Graph the small part: call %PICTBAT%graphLineCol ^ lmm_samp1_lmm2_ts.png |
|
The width of the blur has been reduced to two pixels. However, this has reduced the anti-aliasing, so the circle roundness is less smooth.
We create a blink comparison of the input and two outputs:
%IMG7%magick ^ -gravity NorthEast ^ -fill Yellow ^ -pointsize 30 ^ -loop 0 -delay 100 ^ ( lmm_samp1.png -annotate 0 "In" ) ^ ( lmm_samp1_lmm.png -annotate 0 "Out1" ) ^ ( lmm_samp1_lmm2.png -annotate 0 "Out2" ) ^ lmm_comp.gif |

|
The script limitMinMax.bat creates a copy of the main input (%2) but limiting values in pixel channels to be within the range of a corresponding window in a reference image (%1).
| Option | Description |
|---|---|
| %1 | Input reference image. |
| %2 | Input image to be changed. Can be an expression that manipulates the reference image. |
| %3 | Output filename. |
| %4 | Window width and height. Two integers separated by x, eg 3x3. Default 3x3. |
| %5 | Percentage effect. Default 100. |
The %2 parameter can be an image filename, or an ImageMagick expression that results in a single image. Typically this expression would be of the form:
( -clone 0 {some processing} )
The two inputs can be the same, but then all pixels will be within the min-max range, so no pixels will change.
The window is typically square, with an odd number of pixels on each side.
The script makes an image with the limited values. Then it blends between the reference image and the result of the limiting. If the blend percentage is 100 (the default) this is fast, but generally creates some duplicate values. A lower percentage (eg 95) gives almost the same result but with less duplication.
| Unsharp | Limited unsharp | ||
|---|---|---|---|
%IM7DEV%magick ^ toes.png ^ -unsharp 0x3+1+0 ^ lmm_usm1.png |

|
call %PICTBAT%limitMinMax ^ toes.png ^ "( -clone 0 -unsharp 0x3+1+0 )" ^ lmm_usm1_lmm.png ^ 10x10 |

|
%IM7DEV%magick ^ toes.png ^ -unsharp 0x3+2+0 ^ lmm_usm2.png |
|
call %PICTBAT%limitMinMax ^ toes.png ^ "( -clone 0 -unsharp 0x3+2+0 )" ^ lmm_usm2_lmm.png ^ 5x5 |

|
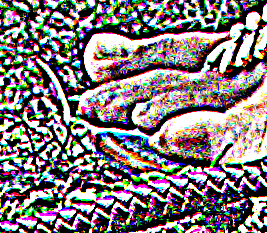
%IM7DEV%magick ^ toes.png ^ -unsharp 0x3+50+0 ^ lmm_usm3.png |
|
call %PICTBAT%limitMinMax ^ toes.png ^ "( -clone 0 -unsharp 0x3+50+0 )" ^ lmm_usm3_lmm.png ^ 3x3 |

|
For the three examples, I have chosen window sizes that make the limited outputs visually match, more or less.
A large unsharp gain pushes most pixel values to 0 or 100%, so they are set to the limits of their rectangles. So pixel colours that are most extreme are copied to other nearby pixels, and this cartoonises the grass but also creates a blotchiness in the skin. Choosing a small window reduces this effect.
With small rectangles, eg 3x3, the sharpening effect is small, and changing the gain parameter has little effect.
We can iterate the process in one of two ways:
| Limit to input | Limit to previous | ||
|---|---|---|---|
%IMG7%magick ^ toes.png ^ lmm_tmp.miff for /L %%I in (0,1,4) ^ do call %PICTBAT%limitMinMax ^ toes.png ^ "( lmm_tmp.miff -unsharp 0x3+1+0 )" ^ lmm_tmp.miff ^ 10x10 90 %IMG7%magick ^ lmm_tmp.miff ^ lmm_usm1_lmmr1.png |
|
%IMG7%magick ^ toes.png ^ lmm_tmp.miff for /L %%I in (0,1,4) ^ do call %PICTBAT%limitMinMax ^ lmm_tmp.miff ^ "( -clone 0 -unsharp 0x3+1+0 )" ^ lmm_tmp.miff ^ 10x10 90 %IMG7%magick ^ lmm_tmp.miff ^ lmm_usm1_lmmr2.png |
|
%IMG7%magick ^ toes.png ^ lmm_tmp.miff for /L %%I in (0,1,4) ^ do call %PICTBAT%limitMinMax ^ toes.png ^ "( lmm_tmp.miff -unsharp 0x3+2+0 )" ^ lmm_tmp.miff ^ 5x5 90 %IMG7%magick ^ lmm_tmp.miff ^ lmm_usm2_lmmr1.png |

|
%IMG7%magick ^ toes.png ^ lmm_tmp.miff for /L %%I in (0,1,4) ^ do call %PICTBAT%limitMinMax ^ lmm_tmp.miff ^ "( -clone 0 -unsharp 0x3+2+0 )" ^ lmm_tmp.miff ^ 5x5 90 %IMG7%magick ^ lmm_tmp.miff ^ lmm_usm2_lmmr2.png |
|
%IMG7%magick ^ toes.png ^ lmm_tmp.miff for /L %%I in (0,1,4) ^ do call %PICTBAT%limitMinMax ^ toes.png ^ "( lmm_tmp.miff -unsharp 0x3+50+0 )" ^ lmm_tmp.miff ^ 3x3 90 %IMG7%magick ^ lmm_tmp.miff ^ lmm_usm3_lmmr1.png |

|
%IMG7%magick ^ toes.png ^ lmm_tmp.miff for /L %%I in (0,1,4) ^ do call %PICTBAT%limitMinMax ^ lmm_tmp.miff ^ "( -clone 0 -unsharp 0x3+50+0 )" ^ lmm_tmp.miff ^ 3x3 90 %IMG7%magick ^ lmm_tmp.miff ^ lmm_usm3_lmmr2.png |

|
We blur the input image, then limit the input pixels to be within the windowed blur.
%IMG7%magick ^ toes.png ^ -blur 0x0.5 ^ lmm_blr1.png call %PICTBAT%limitMinMax ^ lmm_blr1.png ^ toes.png ^ lmm_limblr1.png ^ 3x3 |

|
This changes pixels that are local outliers, that are outside the range of a local blur. Pixels that are already inside this range are unchanged.
Increasing the blur sigma will narrow the min-max range, causing more pixels to be "flattened" to fit within the range.
Increasing the window size has the opposite effect, increasing the min-max range, so causing fewer pixels to be flattened.
|
Increase the blur %IMG7%magick ^ toes.png ^ -blur 0x2 ^ lmm_blr2.png call %PICTBAT%limitMinMax ^ lmm_blr2.png ^ toes.png ^ lmm_limblr2.png ^ 3x3 |
|
|
Increase the blur and the window size call %PICTBAT%limitMinMax ^ lmm_blr2.png ^ toes.png ^ lmm_limblr3.png ^ 7x7 |

|
Currently, limitMinMax has no ability to limit to only the minimum or maximum. It always limits to both. This might be added in the future.
A feature that permits a specified amount of overshoot might be useful. For example, instead of limiting to the maximum, we might limit to the maximum plus 10% of (max-min).
The percentage effect gives a blend between the reference image and the limited image. Instead, we might want a blend between the sharpened image and the limited image.
In a similar way, we can set each channel of each pixel to the minimum or maximum value for the channel within a window. But the process is slightly more complex.
As with limit, we find the minimum and maximum. Then we find the average of these two, and the maximum minus the minimum. At each pixel, we find the value (input minus average). For each channel RGB, threshold this at zero, so each channel result is zero where the input is less than or equal to the average, otherwise the result is 100%. Then the output is minimum + (maximum-minimum) * threshold, which is (for each channel, independently) either the minimum or the maximum.
output = min + (max-min) * threshold
... where ...
if input <= (min+max)/2, threshold = 0;
if input > (min+max)/2, threshold = 1.
The script setMinMax.bat implements this. It takes the same options as limitMinMax.bat above.
call %PICTBAT%setMinMax ^
  lmm_samp1.png ^
  "( -clone 0 -unsharp 0x1+5+0 )" ^
  lmm_samp1_smm.png
This has some colour changes,
|

|
%IMG7%magick ^ lmm_samp1_smm.png ^ %TRIM_RES% ^ lmm_samp1_smm_ts.png |
|
|
Graph the small part: call %PICTBAT%graphLineCol ^ lmm_samp1_smm_ts.png |
|
Repeat, but with a larger window (7x7 instead of the default 3x3)
call %PICTBAT%setMinMax ^ lmm_samp1.png ^ "( -clone 0 -unsharp 0x1+5+0 )" ^ lmm_samp1_smm2.png 7x7 |

|
%IMG7%magick ^ lmm_samp1_smm2.png ^ %TRIM_RES% ^ lmm_samp1_smm2_ts.png |
|
|
Graph the small part: call %PICTBAT%graphLineCol ^ lmm_samp1_smm2_ts.png |
|
This larger window has caused a binary swing so every pixel value becomes either the minimum or the maximum. But the swing from min to max occurs at different places for the different channels, so there is a colour-change.
The %2 parameter can be "( -clone 0 )". Every pixel is changed to the windowed minimum or maximum, but when the inputs are the same no pixels will be outside the minimum or maximum:
call %PICTBAT%setMinMax ^ toes.png ^ "( -clone 0 )" ^ lmm_t_smm.png |

|
The result is a sharpened version of the input. This method increases local contrast by locally replicating pixel values. No new values are introduced, although new colors may be introduced as a pixel may obtain its three channel values from three different source pixels.
However, the smooth skin texure has also been "sharpened", so for practical use as a sharpener we need to mask the effect with an edge-detector. The script already calculates (max-min), which is a crude edge-detector, so a small variation gives the script shpMinMax.bat:
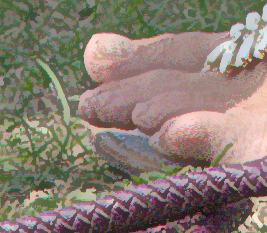
call %PICTBAT%shpMinMax ^ toes.png ^ "( -clone 0 )" ^ lmm_t_shmm.png |

|
The result is a reasonable sharpening, with no overshoot or clipping. But we do get colour-shift, eg at the top edge of the big toe.
This takes the same options as the other scripts, so we can increase the sharpening effect:
call %PICTBAT%shpMinMax ^ toes.png ^ "( -clone 0 -unsharp 0x1+5+0 )" ^ lmm_t_shmm2.png ^ 5x5 |

|
Like the other scripts, this operates on the colour channels independently, so it introduces false colours at the edges. Instead, we can operate on just the L channel of Lab:
%IMG7%magick ^ toes.png ^ -colorspace Lab ^ -separate ^ lmm_lab_%%d.miff call %PICTBAT%shpMinMax ^ lmm_lab_0.miff ^ "( -clone 0 -unsharp 0x1+5+0 )" ^ lmm_lab_0.miff ^ 5x5 %IMG7%magick ^ lmm_lab_0.miff ^ lmm_lab_1.miff ^ lmm_lab_2.miff ^ -combine ^ -set colorspace Lab ^ -colorspace sRGB ^ lmm_shpl.png |

|
The full effect gives aliased edges, so we reduce it to, say, 50%:
%IMG7%magick ^ toes.png ^ -colorspace Lab ^ -separate ^ lmm_lab_%%d.miff call %PICTBAT%shpMinMax ^ lmm_lab_0.miff ^ "( -clone 0 -unsharp 0x1+5+0 )" ^ lmm_lab_0.miff ^ 5x5 50 %IMG7%magick ^ lmm_lab_0.miff ^ lmm_lab_1.miff ^ lmm_lab_2.miff ^ -combine ^ -set colorspace Lab ^ -colorspace sRGB ^ lmm_shpl2.png |

|
The result is a reasonable sharpening, with no overshoot or clipping or colour-shift.
We can use this to enlarge an image while retaining reasonably sharp edges:
%IMG7%magick ^ toes.png ^ -resize 400%% ^ -colorspace Lab ^ -separate ^ lmm_lab2_%%d.miff call %PICTBAT%shpMinMax ^ lmm_lab2_0.miff ^ "( -clone 0 -unsharp 0x4+5+0 )" ^ lmm_lab2_0.miff ^ 7x7 50 %IMG7%magick ^ lmm_lab2_0.miff ^ lmm_lab2_1.miff ^ lmm_lab2_2.miff ^ -combine ^ -set colorspace Lab ^ -colorspace sRGB ^ lmm_shpl3.png |

|
For convenience, .bat scripts are also available in a single zip file. See Zipped BAT files.
rem Given images %1 and %2,
rem writes output %3
rem %4 is window widthxheight eg 3x3
rem Output pixels are from %2,
rem but limited to minimum and maximum within the window from %1.
rem %5 is percentage effect. [100]
@rem
@rem %2 can be a quoted expression, eg "( -clone 0 -unsharp 0x2 )"
@rem
@rem Also uses:
@rem   QUANT_FP
@rem   lmmPOST_PROC

@if [%2]==[] findstr /B "rem @rem" %~f0 & exit /B 1

@setlocal

@call echoOffSave

call %PICTBAT%setInOut %1 lmm

set IN2=%~2

if not "%3"=="" if not "%3"=="." set OUTFILE=%3

set RECT=%4
if "%RECT%"=="." set RECT=
if "%RECT%"=="" set RECT=3x3

set PC_EFFECT=%5
if "%PC_EFFECT%"=="." set PC_EFFECT=
if "%PC_EFFECT%"=="" set PC_EFFECT=100

if %PC_EFFECT%==100 (
  set BLND=-delete 0
) else (
  set BLND=-compose Blend -define compose:args=%PC_EFFECT% -composite
)

rem (We use %IM7DEV%magick to avoid an OpenCL bug in unsharp.)
%IM7DEV%magick ^
  %INFILE% ^
  +write mpr:TMPIN ^
  ( +clone ^
    ( -clone 0 -statistic Minimum %RECT% ) ^
    ( -clone 0 -statistic Maximum %RECT% ) ^
    %IN2% ^
    -delete 0 ^
    ( -clone 0,2 -evaluate-sequence Max ) ^
    -delete 0,2 ^
    -evaluate-sequence Min ^
  ) ^
  %BLND% ^
  %QUANT_FP% ^
  ( +clone ^
    mpr:TMPIN ^
    -metric RMSE ^
    -compare ^
    -format "%%[distortion]\n" ^
    -write info: ^
    -delete 0--1 ^
  ) ^
  %lmmPOST_PROC% ^
  %OUTFILE%

if ERRORLEVEL 1 exit /B 1

call echoRestore

endlocal & set lmmOUTFILE=%OUTFILE%&
rem Given images %1 and %2,
rem writes output %3
rem %4 is window widthxheight eg 3x3
rem Output pixels are from %2,
rem but sets each to minimum or maximum within the window from %1.
rem %5 is percentage effect. [100]
@rem
@rem %2 can be a quoted expression, eg "( -clone 0 -unsharp 0x2 )"
@rem
@rem Also uses:
@rem   QUANT_FP

@if [%2]==[] findstr /B "rem @rem" %~f0 & exit /B 1

@setlocal

rem @call echoOffSave

call %PICTBAT%setInOut %1 smm

set IN2=%~2

if not "%3"=="" if not "%3"=="." set OUTFILE=%3

set RECT=%4
if "%RECT%"=="." set RECT=
if "%RECT%"=="" set RECT=3x3

set PC_EFFECT=%5
if "%PC_EFFECT%"=="." set PC_EFFECT=
if "%PC_EFFECT%"=="" set PC_EFFECT=100

if %PC_EFFECT%==100 (
  set BLND=-delete 0
) else (
  set BLND=-compose Blend -define compose:args=%PC_EFFECT% -composite
)

rem (We use %IM7DEV%magick to avoid an OpenCL bug in unsharp.)
%IM7DEV%magick ^
  %INFILE% ^
  ( +clone ^
    ( -clone 0 -statistic Minimum %RECT% +write mpr:MIN +delete ) ^
    ( -clone 0 -statistic Maximum %RECT% +write mpr:MAX +delete ) ^
    ( mpr:MIN mpr:MAX -evaluate-sequence Mean +write mpr:MN +delete ) ^
    ( mpr:MIN mpr:MAX -compose MinusDst -composite +write mpr:SUB +write mm.png +delete ) ^
    %IN2% ^
    -delete 0 ^
    mpr:MN ^
    -compose MinusSrc -composite ^
    -channel RGB -threshold 0 +channel ^
    mpr:SUB ^
    -compose Multiply -composite ^
    mpr:MIN ^
    -compose Plus -composite ^
  ) ^
  %BLND% ^
  %QUANT_FP% ^
  %OUTFILE%

if ERRORLEVEL 1 exit /B 1

call echoRestore

endlocal & set smmOUTFILE=%OUTFILE%&
rem Given images %1 and %2,
rem writes output %3
rem %4 is window widthxheight eg 3x3
rem Output pixels are from %2,
rem but sets each to minimum or maximum within the window from %1,
rem masked by (max-min) auto-levelled.
rem %5 is percentage effect. [100]
@rem
@rem %2 can be a quoted expression, eg "( -clone 0 -unsharp 0x2 )"
@rem
@rem Also uses:
@rem   QUANT_FP

@if [%2]==[] findstr /B "rem @rem" %~f0 & exit /B 1

@setlocal

rem @call echoOffSave

call %PICTBAT%setInOut %1 shmm

set IN2=%~2

if not "%3"=="" if not "%3"=="." set OUTFILE=%3

set RECT=%4
if "%RECT%"=="." set RECT=
if "%RECT%"=="" set RECT=3x3

set PC_EFFECT=%5
if "%PC_EFFECT%"=="." set PC_EFFECT=
if "%PC_EFFECT%"=="" set PC_EFFECT=100

if %PC_EFFECT%==100 (
  set BLND=-delete 0
) else (
  set BLND=-compose Blend -define compose:args=%PC_EFFECT% -composite
)

rem (We use %IM7DEV%magick to avoid an OpenCL bug in unsharp.)
%IM7DEV%magick ^
  %INFILE% +write mpr:IN ^
  ( +clone ^
    ( -clone 0 -statistic Minimum %RECT% +write mpr:MIN +delete ) ^
    ( -clone 0 -statistic Maximum %RECT% +write mpr:MAX +delete ) ^
    ( mpr:MIN mpr:MAX -evaluate-sequence Mean +write mpr:MN +delete ) ^
    ( mpr:MIN mpr:MAX -compose MinusDst -composite +write mpr:SUB +write mm.png +delete ) ^
    %IN2% ^
    -delete 0 ^
    mpr:MN ^
    -compose MinusSrc -composite ^
    -channel RGB -threshold 0 +channel ^
    mpr:SUB ^
    -compose Multiply -composite ^
    mpr:MIN ^
    -compose Plus -composite ^
    mpr:IN ^
    +swap ^
    ( mpr:SUB -auto-level ) ^
    -compose Over -composite ^
  ) ^
  %BLND% ^
  %QUANT_FP% ^
  %OUTFILE%

if ERRORLEVEL 1 exit /B 1

call echoRestore

endlocal & set shmmOUTFILE=%OUTFILE%&
All images on this page were created by the commands shown, using:
%IMG7%magick -version
Version: ImageMagick 7.1.0-42 Q16-HDRI x64 396d87c:20220709 https://imagemagick.org
Copyright: (C) 1999 ImageMagick Studio LLC
License: https://imagemagick.org/script/license.php
Features: Cipher DPC HDRI OpenCL
Delegates (built-in): bzlib cairo freetype gslib heic jng jp2 jpeg jxl lcms lqr lzma openexr pangocairo png ps raqm raw rsvg tiff webp xml zip zlib
Compiler: Visual Studio 2022 (193231332)
To improve internet download speeds, some images may have been automatically converted (by ImageMagick, of course) from PNG or TIFF or MIFF to JPG.
Source file for this web page is limminmax.h1. To re-create this web page, execute "procH1 limminmax".
This page, including the images, is my copyright. Anyone is permitted to use or adapt any of the code, scripts or images for any purpose, including commercial use.
Anyone is permitted to re-publish this page, but only for non-commercial use.
Anyone is permitted to link to this page, including for commercial use.
Page version v1.0 2-August-2018.
Page created 26-Aug-2022 00:02:55.
Copyright © 2022 Alan Gibson.