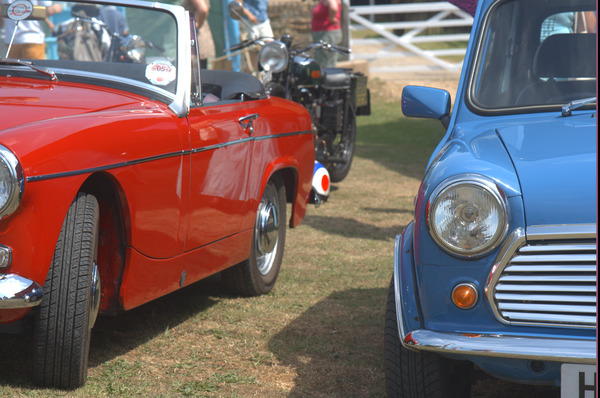
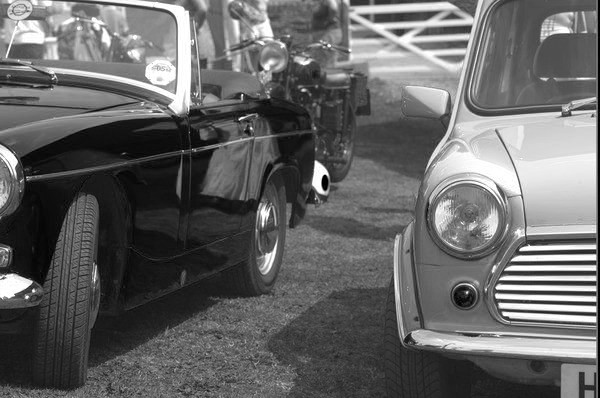
set SRC=dm_cars_demos.jpg
We can make Bayer (mosaic) images from ordinary colour images.
A mosaiced (Bayer) image contains one channel per pixel, where the value represents either red or green or blue, according to the location of the pixel within the array.
Demosaicing is the process of creating a 3-channel colour image from a mosaiced (Bayer) image. This is often done inside the camera, but can be done in a computer. Demosaicing trebles the amount of data in an image by some interpolation process that guesses the correct colours for the two values that are missing from each pixel. Many methods are available for demosaicing; there are many possible results, each arguably "correct". See my Demosaicing page.
We can do the inverse process, and mosaic a colour image. That is, we take a three-channel colour image and remove two-thirds of the data so each pixel then contains only one of the three channels. This may be useful in a round-trip evaluation of different demosaicing methods: we know a Bayer image and a desired result, so can evaluate how accurate the demosaiced results are.
I'm not sure how useful these tests are. If the colour image used is an ordinary photograph, then it has probably been demosaiced from a Bayer image. So the evaluation will determine which demosaicing method most closely emulates the original demosaicing process, rather than which method is the best for this image.
See also the related page Processing Bayer pixels, which shows how to extract mosaic images from raw camera files, and how to create DNG format raw camera files.
set SRC=dm_cars_demos.jpg |
|
From the input three-channel colour image, we make a grayscale one-channel image where each pixel represents the value that was in the red, green or blue channel.
We do this with three masks.
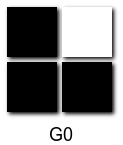
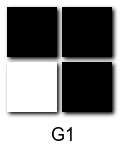
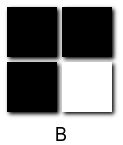
%IMG7%magick ^ -size 2x2 xc:black ^ -fill White -draw "point 1,0" ^ +write mos_msk_G0.png ^ -roll +0+1 +write mos_msk_B.png ^ -roll -1+0 +write mos_msk_G1.png ^ NULL: |
|
|
Enlarge for clarity. set bpSCALE=50 set bpTEXT=G0 call %PICTBAT%blockPix mos_msk_G0.png set bpTEXT=G1 call %PICTBAT%blockPix mos_msk_G1.png set bpTEXT=B call %PICTBAT%blockPix mos_msk_B.png set bpTEXT= set bpSCALE= |
|
We separate the channels, then compose green over red, green over the result, and blue of the result. The composites are made with the masks, tiled to the full size.
"-colorspace sRGB" is for v7. If the input is grayscale, "-separate" would do nothing.
"-channel RGB" ensures we don't separate out the alpha channel, in either v6 or v7.
%IMG7%magick ^
  %SRC% ^
  -colorspace sRGB ^
  -channel RGB ^
  -separate ^
  -compose Over ^
  ( -clone 0,1 ^
    ( +clone ^
      -tile mos_msk_G0.png ^
      -draw "color 0,0 reset" ^
    ) ^
    -composite ^
  ) ^
  ( -clone 3,1 ^
    ( +clone ^
      -tile mos_msk_G1.png ^
      -draw "color 0,0 reset" ^
    ) ^
    -composite ^
  ) ^
  ( -clone 4,2 ^
    ( +clone ^
      -tile mos_msk_B.png ^
      -draw "color 0,0 reset" ^
    ) ^
    -composite ^
  ) ^
  -delete 0--2 ^
  mos_samp_out.png
|
|
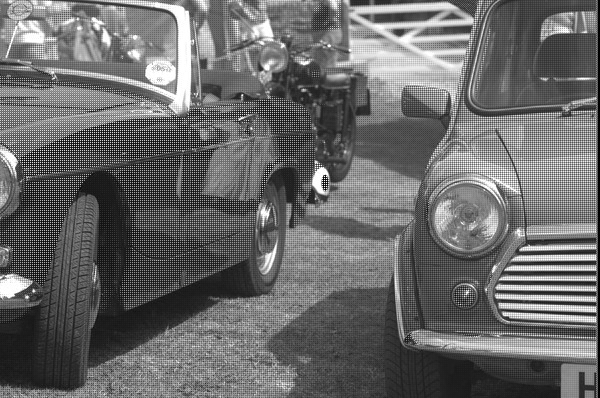
The result is grayscale, but each pixel represents one of R, G0, G1 or B.
The script mosaic.bat does the work in one command.
call %PICTBAT%mosaic ^ dm_cars_demos.jpg ^ . . . . ^ mos_cars.png |
|
This doesn't represent the values from a camera's sensor. To get those, we would first convert from sRGB to RGB, then divide by the colour balance numbers, eg 1.9, 1.0, 1.0, 1.4 for RGGB.
Now we have a mosaic image, we can demosaic as shown in the Demosaicing page.
call %PICTBAT%demos ^ mos_cars.png ^ . . . . . ^ mos_cars_demos.png |

|
The round trip has roughly re-created the initial image, though resolution has noticably decreased.
%IMG7%magick compare -metric RMSE ^
  dm_cars_demos.jpg ^
  mos_cars_demos.png ^
  NULL:
3116.99 (0.0475623)
We can test the round-trip on graphical images:
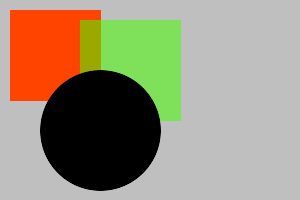
%IMG7%magick ^ -size 300x200 xc:gray(75%%) ^ -fill #f40 -draw "rectangle 10,10 100,100" ^ -fill #4f08 -draw "rectangle 80,20 180,120" ^ -fill #000 -draw "circle 100,130 160,130" ^ mos_ex1.png |
|
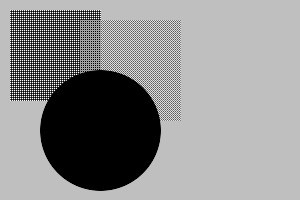
call %PICTBAT%mosaic ^ mos_ex1.png ^ . . . . ^ mos_ex1_m.png |
|
call %PICTBAT%demos ^ mos_ex1_m.png ^ . . . . . ^ mos_ex1_md.png |

|
False colours have been introduced at the sharp edges. Possible solutions include:
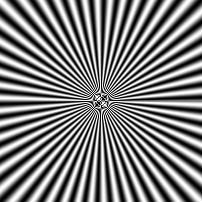
%IMG7%magick ^ -size 200x600 gradient: -rotate 90 ^ -distort Arc "360 -90 100" +repage ^ -evaluate sin 50 ^ mos_rad.png |
|
call %PICTBAT%mosaic mos_rad.png Mosaicing a grayscale file results in the same image. |

|
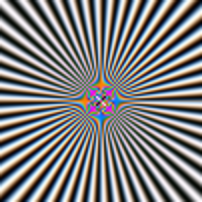
call %PICTBAT%demos %mosOUTFILE% |
|
False colours have been introduced at the sharp edges in the center.
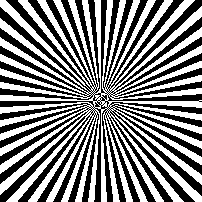
%IMG7%magick ^ -size 200x600 gradient: -rotate 90 ^ -distort Arc "360 -90 100" +repage ^ -evaluate sin 50 ^ -threshold 50%% ^ mos_rad2.png |
|
call %PICTBAT%mosaic mos_rad2.png |

|
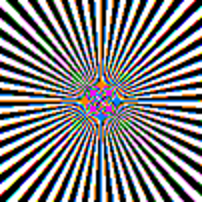
call %PICTBAT%demos %mosOUTFILE% |
|
All the edges are sharp, so false colours have been introduced at all edges.
For convenience, .bat scripts are also available in a single zip file. See Zipped BAT files.
rem From colour image %1,
rem makes mosaiced (Bayer) image, same size.
rem %2 %3 %4 and %5 are divisors for R G0 G1 and B channels.
rem %6 is optional output file.
@rem
@rem Also uses:
@rem   mosPREPROC eg "-colorspace RGB"
@rem
@rem Assumes Bayer filter pattern is:
@rem   R  G0
@rem   G1 B
@rem
@rem Updated:
@rem   6-August-2022 for IM v7
@rem

@if "%1"=="" findstr /B "rem @rem" %~f0 & exit /B 1

@setlocal enabledelayedexpansion

rem call echoOffSave

call %PICTBAT%setInOut %1 mos


if not "%6"=="" if not "%6"=="." set OUTFILE=%6

set WW=
for /F "usebackq" %%L ^
in (`%IMG7%magick identify -format "WW=%%w\nHH=%%h" %INFILE%`) ^
do set /A %%L
if "%WW%"=="" exit /B 1

set DIV_R=
set DIV_G0=
set DIV_G1=
set DIV_B=

if not "%2"=="" if not "%2"=="." set DIV_R=-evaluate divide %2
if not "%3"=="" if not "%3"=="." set DIV_G0=-evaluate divide %3
if not "%4"=="" if not "%4"=="." set DIV_G1=-evaluate divide %4
if not "%5"=="" if not "%5"=="." set DIV_B=-evaluate divide %5

%IMG7%magick ^
  -size 2x2 xc:black ^
  -fill White -draw "point 1,0" ^
  -fill None ^
  +write mpr:SQR_G0 ^
  -roll +0+1 +write mpr:SQR_B ^
  -roll -1+0 +write mpr:SQR_G1 ^
  +delete ^
  %INFILE% ^
  -set colorspace sRGB ^
  %mosPREPROC% ^
  -channel RGB ^
  -separate ^
  -compose Over ^
  ( -clone 0,1 ^
    ( +clone ^
      -tile mpr:SQR_G0 ^
      -draw "color 0,0 reset" ^
    ) ^
    -alpha off -composite ^
  ) ^
  ( -clone 3,1 ^
    ( +clone ^
      -tile mpr:SQR_G1 ^
      -draw "color 0,0 reset" ^
    ) ^
    -alpha off -composite ^
  ) ^
  ( -clone 4,2 ^
    ( +clone ^
      -tile mpr:SQR_B ^
      -draw "color 0,0 reset" ^
    ) ^
    -alpha off -composite ^
  ) ^
  -delete 0--2 ^
  +depth ^
  -compress None ^
  %OUTFILE%

if ERRORLEVEL 1 exit /B 1

call echoRestore

endlocal & set mosOUTFILE=%OUTFILE%
All images on this page were created by the commands shown, using:
%IMG7%magick -version
Version: ImageMagick 7.1.0-42 Q16-HDRI x64 396d87c:20220709 https://imagemagick.org
Copyright: (C) 1999 ImageMagick Studio LLC
License: https://imagemagick.org/script/license.php
Features: Cipher DPC HDRI OpenCL
Delegates (built-in): bzlib cairo freetype gslib heic jng jp2 jpeg jxl lcms lqr lzma openexr pangocairo png ps raqm raw rsvg tiff webp xml zip zlib
Compiler: Visual Studio 2022 (193231332)
Source file for this web page is mosaic.h1. To re-create this web page, execute mosaic.bat.
This page, including the images, is my copyright. Anyone is permitted to use or adapt any of the code, scripts or images for any purpose, including commercial use.
Anyone is permitted to re-publish this page, but only for non-commercial use.
Anyone is permitted to link to this page, including for commercial use.
Page version v1.0 15-April-2016.
Page created 08-Aug-2022 21:40:29.
Copyright © 2022 Alan Gibson.