set RESIZE=-resize 500x500

%IMG7%magick ^
  zp_sus_sat.tiff ^
  -crop 4924x4155+0+3223 +repage ^
  -write st_src.tiff ^
  %RESIZE% ^
  st_src_sm.jpg
ImageMagick is a wonderful non-interactive tool for processing raster images. With Inkscape, it can do fancy things with text in SVG files.
We can use SVG (Scalar Vector Graphics) files to write text on a path or to flow within areas. This uses features of SVG that ImageMagick can't currently process, so we need to use Inkscape as the SVG delegate.
We will use Inkscape to create curves and areas by hand, then IM convert will drive Inkscape to render the text, and IM will compose this over the raster image.
The processes described here use some unpublished programs of my own. Their functionality could be replicated fairly easily, using sed or similar.
For details of SVG syntax and semantics, see SGV1.1 8:Paths, SVG1.1 10.13:Text on a path and SVG1.2 4:Flowing text and graphics.
Caution: Flowing text is defined in SVG 1.2, which is a draft standard. If and when the standard is aproved, the syntax may change, and Inkscape would also change, and this page may also need to change.
Install Inkscape from Inkscape.org. Edit delegates.xml, or create a personal delegates.xml. On Windows I have %USERPROFILE%\.magick\delegates.xml:
<?xml version="1.0" encoding="UTF-8"?> <delegatemap> <delegate decode="flip" command="convert "%i" -flip "miff:%o""/> <delegate encode="flip" command="convert "%i" -flip "miff:%o""/> <delegate decode="svg:decode" stealth="True" command=""inkscape.exe" -z "%s" --export-png="%s" --export-dpi="%s" --export-background="%s" --export-background-opacity="%s" > "%s" 2>&1"/> <delegate decode="crxz:decode" encode="tiff" command="dcraw -6 -T -O "%o" "%i""/> <delegate decode="dng2:decode" command="dcraw.exe -q 2 -6 -w -O "%u.ppm" "%i""/> <delegate decode="png" encode="msphx" command="C:/WINDOWS/System32/rundll32.exe "C:/Program Files/Windows Photo Viewer/PhotoViewer.dll", ImageView_Fullscreen %i"/> <delegate decode="png" encode="msph" command="msph.bat %i"/> <delegate decode="png" encode="swim" spawn="True" mode="encode" command=""C:/cygwin64/home/Alan/imdevins/bin/swim.exe" %i"/> <delegate decode="png" encode="gimp" command=""C:/Program Files/gimp 2/bin/gimp-2.8.exe" %i"/> <delegate decode="png" encode="testimdel" command="testimdel.bat %f %i %o %u %Z %[fx:1/7] %[artifact:mystuff] %[name]"/> </delegatemap>
We don't need flip and flop; I just put those in for fun.
Put the Inkscape directory in the system path.
call %PICTBAT%setInkPath
Inkscape can be run directly from the command line, eg:
inkscape -f in.svg -e out.png -y 1
On this page, I run Inkscape indirectly, as a delegate of ImageMagick.
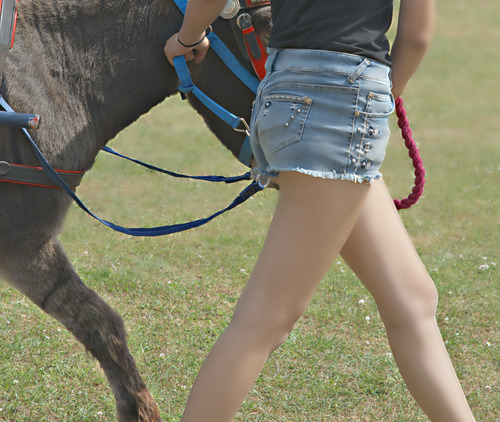
For the source image, I will use a crop from an image made in the Adding zing to photographs page. All operations will be performed on this large image, but the results will be shrunk for this web page.
set RESIZE=-resize 500x500 %IMG7%magick ^ zp_sus_sat.tiff ^ -crop 4924x4155+0+3223 +repage ^ -write st_src.tiff ^ %RESIZE% ^ st_src_sm.jpg |

|
ImageMagick could convert this to an SVG file, but it would create one vector circle for every pixel. This takes masses of space and processing time. Instead, we will embed the raster image within the SVG file.
Inkscape can render vector graphics over raster images, though it only writes 8 bits/channel. Instead, I use Inkscape to render text and ImageMagick to composite that over raster images.
Create an SVG file that links to the full-size raster image st_src.tiff. This can be done by starting Inkscape, importing the image (file, import, link not embed), and saving as an SVG which I will call st_limbs.svg. Close Inkscape. Open the SVG file in a text editor (eg Wordpad). Edit the SVG for the widths, heights and offsets.
The image will be towards the bottom of the file, something like this:
 <image
       y="-1545.1378"
       x="-2087"
       id="image2993"
       xlink:href="file:///F:/prose/PICTURES/st_src.tiff"
       height="4155"
       width="4924" />
Change x and y values to 0 (zero). Further up the file, change inkscape:window-width and inkscape:window-height to the raster dimensions, 4924 and 4155. Near the top, within the SVG tag, change width and height to the raster dimensions.
st_limbs.svg now contains:
<?xml version="1.0" encoding="UTF-8" standalone="no"?>
<svg
   xmlns:dc="http://purl.org/dc/elements/1.1/"
   xmlns:cc="http://creativecommons.org/ns#"
   xmlns:rdf="http://www.w3.org/1999/02/22-rdf-syntax-ns#"
   xmlns:svg="http://www.w3.org/2000/svg"
   xmlns="http://www.w3.org/2000/svg"
   xmlns:xlink="http://www.w3.org/1999/xlink"
   xmlns:sodipodi="http://sodipodi.sourceforge.net/DTD/sodipodi-0.dtd"
   xmlns:inkscape="http://www.inkscape.org/namespaces/inkscape"
   sodipodi:docname="sl.svg"
   inkscape:version="1.0 (4035a4fb49, 2020-05-01)"
   id="svg8"
   version="1.1"
   viewBox="0 0 4924 4155"
   height="4155"
   width="4924">
  <defs
     id="defs2" />
  <sodipodi:namedview
     inkscape:window-maximized="1"
     inkscape:window-y="0"
     inkscape:window-x="0"
     inkscape:window-height="4155"
     inkscape:window-width="4924"
     showgrid="false"
     inkscape:document-rotation="0"
     inkscape:current-layer="layer1"
     inkscape:document-units="pixels"
     inkscape:cy="4155"
     inkscape:cx="4924"
     inkscape:zoom="1"
     inkscape:pageshadow="2"
     inkscape:pageopacity="0.0"
     borderopacity="1.0"
     bordercolor="#666666"
     pagecolor="#ffffff"
     id="base" />
  <metadata
     id="metadata5">
    <rdf:RDF>
      <cc:Work
         rdf:about="">
        <dc:format>image/svg+xml</dc:format>
        <dc:type
           rdf:resource="http://purl.org/dc/dcmitype/StillImage" />
        <dc:title></dc:title>
      </cc:Work>
    </rdf:RDF>
  </metadata>
  <g
     id="layer1"
     inkscape:groupmode="layer"
     inkscape:label="Layer 1">
    <image
       sodipodi:absref="F:\prose\PICTURES\st_src.tiff"
       xlink:href="st_src.tiff"
       y="0"
       x="0"
       width="4924"
       height="4155"
       preserveAspectRatio="none"
       id="image843" />
  </g>
</svg>
ASIDE: IM's rasterisation of SVG, via Inkscape, is broken in v6.0.0-0, so I temporarily used v6.8.9-5. This is now fixed. However, the formatted text facilities used here don't work when Inkscape is called from IM, so for these I need to call Inkscape directly.
Use IM to compare the original raster image with the rasterised vector:
%IMG7%magick -verbose st_limbs.svg st_src.tiff -metric RMSE -compare -format %%[distortion] info:
0.000980239
This tests whether IM can run Inkscape, Inkscape can process the edited SVG file, and we get back what we put in.
The difference should be small, less than 0.01. Inkscape creates PNG files with 8 bits/channel/pixel, so we don't expect an exact match.
(After running Inkscape from the command line, I get the error message "RegistryTool: Could not set the value 'C:\ProgramFiles\Inkscape\inkscape.exe'". This doesn't seem to cause a problem.)
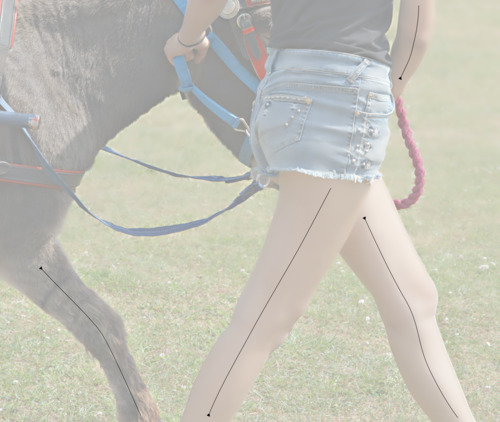
In Inkscape, read this SVG file, st_limbs.svg. View, Zoom to the page. Create a new layer (Layer, Add layer, name: "Paths", Above current). Create the desired paths ("Draw Bezier curves and straight lines"). If the lines are hard to see against the raster image, try changing the opacity of the image to about 40% (Object, Fill and stroke, Opacity). To help clarity, I set stroke width to 1mm, with a Start Marker of TriangleOutL. For each path, edit "object properties" to change the id to something meaningful and unique; use filenaming conventions, eg don't use spaces. Save the SVG file, eg as st_limbs2.svg.
Here is st_limbs2.svg:
<?xml version="1.0" encoding="UTF-8" standalone="no"?>
<svg
   xmlns:dc="http://purl.org/dc/elements/1.1/"
   xmlns:cc="http://creativecommons.org/ns#"
   xmlns:rdf="http://www.w3.org/1999/02/22-rdf-syntax-ns#"
   xmlns:svg="http://www.w3.org/2000/svg"
   xmlns="http://www.w3.org/2000/svg"
   xmlns:xlink="http://www.w3.org/1999/xlink"
   xmlns:sodipodi="http://sodipodi.sourceforge.net/DTD/sodipodi-0.dtd"
   xmlns:inkscape="http://www.inkscape.org/namespaces/inkscape"
   sodipodi:docname="st2.svg"
   inkscape:version="1.0 (4035a4fb49, 2020-05-01)"
   version="1.1"
   id="svg2"
   height="4155"
   width="4924">
  <defs
     id="defs4">
    <marker
       style="overflow:visible"
       id="TriangleOutL"
       refX="0.0"
       refY="0.0"
       orient="auto"
       inkscape:stockid="TriangleOutL">
      <path
         transform="scale(0.8)"
         style="fill-rule:evenodd;stroke:#000000;stroke-width:1.0pt"
         d="M 5.77,0.0 L -2.88,5.0 L -2.88,-5.0 L 5.77,0.0 z "
         id="path3961" />
    </marker>
    <marker
       style="overflow:visible"
       id="Arrow1Lstart"
       refX="0.0"
       refY="0.0"
       orient="auto"
       inkscape:stockid="Arrow1Lstart">
      <path
         transform="scale(0.8) translate(12.5,0)"
         style="fill-rule:evenodd;stroke:#000000;stroke-width:1.0pt"
         d="M 0.0,0.0 L 5.0,-5.0 L -12.5,0.0 L 5.0,5.0 L 0.0,0.0 z "
         id="path3819" />
    </marker>
  </defs>
  <sodipodi:namedview
     inkscape:document-rotation="0"
     inkscape:window-maximized="1"
     inkscape:window-y="-8"
     inkscape:window-x="-8"
     inkscape:window-height="1017"
     inkscape:window-width="1920"
     showgrid="false"
     inkscape:current-layer="layer2"
     inkscape:document-units="px"
     inkscape:cy="2077.5"
     inkscape:cx="1636.293"
     inkscape:zoom="0.188929"
     inkscape:pageshadow="2"
     inkscape:pageopacity="0.0"
     borderopacity="1.0"
     bordercolor="#666666"
     pagecolor="#ffffff"
     id="base" />
  <metadata
     id="metadata7">
    <rdf:RDF>
      <cc:Work
         rdf:about="">
        <dc:format>image/svg+xml</dc:format>
        <dc:type
           rdf:resource="http://purl.org/dc/dcmitype/StillImage" />
        <dc:title></dc:title>
      </cc:Work>
    </rdf:RDF>
  </metadata>
  <g
     id="layer1"
     inkscape:groupmode="layer"
     inkscape:label="Layer 1">
    <image
       sodipodi:absref="F:\prose\PICTURES\st_src.tiff"
       xlink:href="st_src.tiff"
       y="0"
       x="0"
       id="image2993"
       height="4155"
       width="4924"
       style="opacity:0.46902655" />
    <path
       inkscape:label="#path2996"
       sodipodi:nodetypes="czc"
       inkscape:connector-curvature="0"
       id="rightArm"
       d="m 3943.0288,771.27842 c 99.1868,-211.89901 94.6782,-184.84808 139.7631,-383.22162 45.0849,-198.37354 40.5764,-333.628219 40.5764,-333.628219"
       style="fill:none;stroke:#000000;stroke-width:3.54330709;stroke-linecap:butt;stroke-linejoin:miter;stroke-opacity:1;stroke-miterlimit:4;stroke-dasharray:none;marker-start:url(#TriangleOutL)" />
  </g>
  <g
     inkscape:label="Paths"
     id="layer2"
     inkscape:groupmode="layer">
    <path
       inkscape:label="#path2994"
       sodipodi:nodetypes="czsc"
       inkscape:connector-curvature="0"
       id="leftLeg"
       d="M 3590.0322,2147.955 C 3747.8293,2486.0917 3844.9994,2698.6095 3991.2878,2950.4661 C 4137.5762,3202.3227 4105.1025,3375.8495 4230.2377,3640.2651 C 4373.7354,3943.4814 4509.764,4113.6565 4509.764,4113.6565"
       style="fill:none;stroke:#000000;stroke-width:3.54331;stroke-linecap:butt;stroke-linejoin:miter;stroke-miterlimit:4;stroke-dasharray:none;stroke-opacity:1;marker-start:url(#TriangleOutL)" />
    <path
       inkscape:label="#path2992"
       sodipodi:nodetypes="cazc"
       inkscape:connector-curvature="0"
       id="rightLeg"
       d="M 2054.9628,4087.2823 C 2166.2061,3809.8752 2338.5872,3517.7177 2490.1669,3238.0846 C 2629.7571,2980.5697 2810.2358,2684.5169 2926.7029,2475.4376 C 3043.17,2266.3583 3259.2028,1851.4565 3259.2028,1851.4565"
       style="fill:none;stroke:#000000;stroke-width:3.54331;stroke-linecap:butt;stroke-linejoin:miter;stroke-miterlimit:4;stroke-dasharray:none;stroke-opacity:1;marker-start:url(#TriangleOutL)" />
    <path
       inkscape:label="#path2998"
       sodipodi:nodetypes="czc"
       inkscape:connector-curvature="0"
       id="donkeyLeg"
       d="M 404.06881,2641.4554 C 650.93643,2909.8969 903.56499,3132.4032 1006.2499,3293.2298 C 1108.9348,3454.0564 1384.9631,4091.2325 1384.9631,4091.2325"
       style="fill:none;stroke:#000000;stroke-width:3.54331;stroke-linecap:butt;stroke-linejoin:miter;stroke-miterlimit:4;stroke-dasharray:none;stroke-opacity:1;marker-start:url(#TriangleOutL)" />
  </g>
</svg>
Just for fun, what does it look like?
%IMG7%magick ^ st_limbs2.svg ^ %RESIZE% ^ st_limbs2_sm.jpg |
|
Extract the curve paths. This could be done by hand, but my program RdXml does the job. The result, curves.s, can be included within the defs section of an SVG file. Then one or more curves can be used (with xlink) as required. We don't care about anything else in st_limbs2.svg.
RdXml /ist_limbs2.svg /oNUL /n /v /ccurves.s
Here is curves.s:
<path id="path3961"
d="M 5.77,0.0 L -2.88,5.0 L -2.88,-5.0 L 5.77,0.0 z "
 />
<path id="path3819"
d="M 0.0,0.0 L 5.0,-5.0 L -12.5,0.0 L 5.0,5.0 L 0.0,0.0 z "
 />
<path id="rightArm"
d="m 3943.0288,771.27842 c 99.1868,-211.89901 94.6782,-184.84808 139.7631,-383.22162 45.0849,-198.37354 40.5764,-333.628219 40.5764,-333.628219"
 />
<path id="leftLeg"
d="M 3590.0322,2147.955 C 3747.8293,2486.0917 3844.9994,2698.6095 3991.2878,2950.4661 C 4137.5762,3202.3227 4105.1025,3375.8495 4230.2377,3640.2651 C 4373.7354,3943.4814 4509.764,4113.6565 4509.764,4113.6565"
 />
<path id="rightLeg"
d="M 2054.9628,4087.2823 C 2166.2061,3809.8752 2338.5872,3517.7177 2490.1669,3238.0846 C 2629.7571,2980.5697 2810.2358,2684.5169 2926.7029,2475.4376 C 3043.17,2266.3583 3259.2028,1851.4565 3259.2028,1851.4565"
 />
<path id="donkeyLeg"
d="M 404.06881,2641.4554 C 650.93643,2909.8969 903.56499,3132.4032 1006.2499,3293.2298 C 1108.9348,3454.0564 1384.9631,4091.2325 1384.9631,4091.2325"
 />
For the left leg, we make st_curve1.svg by filling in the blanks from a template (aka "boilerplate") SVG file, svgCurveTemplate.txt.
FOR /F "usebackq" %%L ^
IN (`%IMG7%magick identify -format "WW=%%w\nHH=%%h" st_src.tiff`) ^
DO set %%L

ExpAt /p0 /l1000000 /i%PICTBAT%svgCurveTemplate.txt /ost_curve1.svg
chBin /ist_curve1.svg /f\s /t\r\n /s70

chStrs /ist_curve1.svg /fCURVE_WW /t%WW%
chStrs /ist_curve1.svg /fCURVE_HH /t%HH%
chStrs /ist_curve1.svg /fCURVE_ID /tleftLeg
chStrs /ist_curve1.svg /fCURVE_TEXT /t"We go up, then we go down, then up again"
Here is st_curve1.svg:
<svg xmlns:svg="http://www.w3.org/2000/svg" version="1.2"
     xmlns:xlink="http://www.w3.org/1999/xlink"

  width="100%" height="100%" viewBox="0 0 4924 4155">
  <title>Template
for curved text</title>
  <defs>
<path id="path3961"
d="M 5.77,0.0 L
-2.88,5.0 L -2.88,-5.0 L 5.77,0.0 z "
 />
<path id="path3819"
d="M 0.0,0.0
L 5.0,-5.0 L -12.5,0.0 L 5.0,5.0 L 0.0,0.0 z "
 />
<path id="rightArm"
d="m
3943.0288,771.27842 c 99.1868,-211.89901 94.6782,-184.84808 139.7631,-383.22162
45.0849,-198.37354 40.5764,-333.628219 40.5764,-333.628219"
 />
<path
id="leftLeg"
d="M 3590.0322,2147.955 C 3747.8293,2486.0917 3844.9994,2698.6095
3991.2878,2950.4661 C 4137.5762,3202.3227 4105.1025,3375.8495 4230.2377,3640.2651
C 4373.7354,3943.4814 4509.764,4113.6565 4509.764,4113.6565"
 />
<path
id="rightLeg"
d="M 2054.9628,4087.2823 C 2166.2061,3809.8752 2338.5872,3517.7177
2490.1669,3238.0846 C 2629.7571,2980.5697 2810.2358,2684.5169 2926.7029,2475.4376
C 3043.17,2266.3583 3259.2028,1851.4565 3259.2028,1851.4565"
 />
<path
id="donkeyLeg"
d="M 404.06881,2641.4554 C 650.93643,2909.8969 903.56499,3132.4032
1006.2499,3293.2298 C 1108.9348,3454.0564 1384.9631,4091.2325 1384.9631,4091.2325"

/>
  </defs>
<text font-family="Verdana" font-size="100" fill="blue"
>
    <textPath xlink:href="#leftLeg"
>We go up, then we go down, then up again</textPath>
  </text>
</svg>
The SVG contains all the paths in a <defs> tag, but only one path is used in the <text> tag. What does the SVG look like?
call %PICTBAT%svg2png st_curve1.svg %IMG7%magick ^ st_curve1.png ^ %RESIZE% ^ st_curve1_sm.png |

|
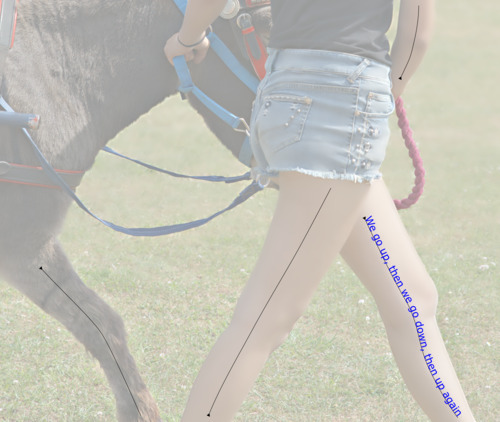
To check the result, we put this small version of the text over the small version of the image with paths:
%IMG7%magick ^ st_limbs2_sm.jpg ^ st_curve1_sm.png ^ -composite ^ st_curve1_over_sm.jpg |
|
Writing multiple text curves would be efficient by creating one SVG file with all the textPath entities. Here, we take the less efficient route: create multiple SVG files and convert each to a PNG, so we can composite the results. We already have the first SVG file, and the full-size PNG file made from it. We repeat the work for the other three curves.
ExpAt /p0 /l1000000 /i%PICTBAT%svgCurveTemplate.txt /ost_curve2.svg
ExpAt /p0 /l1000000 /i%PICTBAT%svgCurveTemplate.txt /ost_curve3.svg
ExpAt /p0 /l1000000 /i%PICTBAT%svgCurveTemplate.txt /ost_curve4.svg

chBin /ist_curve2.svg /f\s /t\r\n /s70
chBin /ist_curve3.svg /f\s /t\r\n /s70
chBin /ist_curve4.svg /f\s /t\r\n /s70

chStrs /ist_curve2.svg /fCURVE_WW /t%WW%
chStrs /ist_curve2.svg /fCURVE_HH /t%HH%
chStrs /ist_curve2.svg /fCURVE_ID /trightLeg
chStrs /ist_curve2.svg /fCURVE_TEXT /t"We go up, then we go down, then up again"

chStrs /ist_curve3.svg /fCURVE_WW /t%WW%
chStrs /ist_curve3.svg /fCURVE_HH /t%HH%
chStrs /ist_curve3.svg /fCURVE_ID /trightArm
chStrs /ist_curve3.svg /fCURVE_TEXT /t"We go up, then we go down, then up again"

chStrs /ist_curve4.svg /fCURVE_WW /t%WW%
chStrs /ist_curve4.svg /fCURVE_HH /t%HH%
chStrs /ist_curve4.svg /fCURVE_ID /tdonkeyLeg
chStrs /ist_curve4.svg /fCURVE_TEXT /t"We go up, then we go down, then up again"

call %PICTBAT%svg2png st_curve2.svg
call %PICTBAT%svg2png st_curve3.svg
call %PICTBAT%svg2png st_curve4.svg
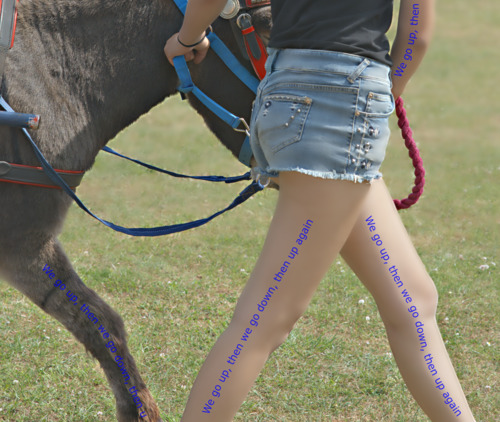
Now we can composite each PNG over the original raster image. We also reduce the opacity of the text.
%IMG7%magick ^ st_src.tiff ^ ( st_curve1.png -channel A -evaluate Multiply 0.8 ) ^ ( st_curve2.png -channel A -evaluate Multiply 0.8 ) ^ ( st_curve3.png -channel A -evaluate Multiply 0.8 ) ^ ( st_curve4.png -channel A -evaluate Multiply 0.8 ) ^ -background None ^ -layers flatten ^ -write st_curves.tiff ^ %RESIZE% ^ st_curves_sm.jpg |
|
We have succesfully written text on paths.
Aside: how do we find the best font size? We can overflow a path, use a large font size, and test whether we have written into the overflow area. To do this, we need to find an area on the image where the path cannot write, then extend the path to that area. This is easy manually: we choose an area top-left. To do this automatically, it may be easier to create a larger image and define the overflow in that extended area.
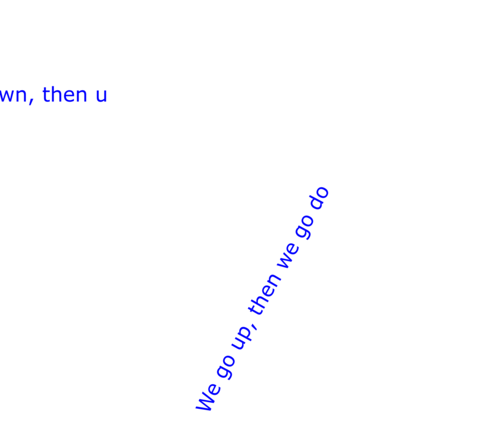
For example, we add an extra segment to the right leg path, double the font size, and we can see that text has been written to this area.
However, the SVG documentation doesn't seem to say how text should be written on a segmented path.
cGrep /icurves.s /ost_over.s /srightLeg /t"/" chStrs /ist_over.s /M3 /f\q /t_ chStrs /ist_over.s /M1 /f\q /t" M0,1000 L1000,1000\q" chStrs /ist_over.s /M3 /f_ /t\q chStrs ^ /i%PICTBAT%svgCurveTemplate.txt ^ /ost_curve_over.svg ^ /fcurves.s /tst_over.s ExpAt /p0 /l1000000 /ist_curve_over.svg /ost_curve_over.svg chBin /ist_curve_over.svg /f\s /t\r\n /s70 chStrs /ist_curve_over.svg /fCURVE_WW /t%WW% chStrs /ist_curve_over.svg /fCURVE_HH /t%HH% chStrs /ist_curve_over.svg /fCURVE_ID /trightLeg chStrs ^ /ist_curve_over.svg ^ /ffont-size=\q100\q ^ /tfont-size=\q200\q chStrs ^ /ist_curve_over.svg ^ /fCURVE_TEXT ^ /t"We go up, then we go down, then up again" call %PICTBAT%svg2png st_curve_over.svg %IMG7%magick ^ st_curve_over.png ^ %RESIZE% ^ st_curve_over_sm.png |
|
Here is st_over.s:
<path id="rightLeg"
d="M 2054.9628,4087.2823 C 2166.2061,3809.8752 2338.5872,3517.7177 2490.1669,3238.0846 C 2629.7571,2980.5697 2810.2358,2684.5169 2926.7029,2475.4376 C 3043.17,2266.3583 3259.2028,1851.4565 3259.2028,1851.4565 M0,1000 L1000,1000"
 />
Here is st_curve_over.svg:
<svg xmlns:svg="http://www.w3.org/2000/svg" version="1.2"
     xmlns:xlink="http://www.w3.org/1999/xlink"

  width="100%" height="100%" viewBox="0 0 4924 4155">
  <title>Template
for curved text</title>
  <defs>
<path id="rightLeg"
d="M 2054.9628,4087.2823
C 2166.2061,3809.8752 2338.5872,3517.7177 2490.1669,3238.0846 C 2629.7571,2980.5697
2810.2358,2684.5169 2926.7029,2475.4376 C 3043.17,2266.3583 3259.2028,1851.4565
3259.2028,1851.4565 M0,1000 L1000,1000"
 />
  </defs>
<text font-family="Verdana"
font-size="200" fill="blue" >
    <textPath xlink:href="#rightLeg"
>We go up, then we go down, then up again</textPath>

 </text>
</svg>
This could be scripted and automated, with a binary chop finding the largest font that doesn't overflow.
SVG text can be constrained to be within a defined area. We could define the area using the method above, with Inkscape. Instead, we will use Gimp and potrace.
Read the source image in Gimp. Create a new transparent layer for each object: the left leg, the right arm, and so on. Name each layer suitably (with no spaces in the names). Define the area by drawing around it with a black pencil, and fill the inside with black. (A pen would create anti-aliasing so it won't fill properly.) The black area will define the limits for the text, so we don't need to trace each object exactly; we ensure the black area is slightly inside the boundary of its object. Save the file, eg as st_limbs.xcf.
Extract each image from st_limbs.xcf. See Gimp and IM.
call %PICTBAT%extrXcfLayers st_limbs.xcf
This creates a png from each layer (with a black area on transparent background), and a CSV (Comma-Separated Values) text file st_limbs_layers.lis:
Xcf,Layer,Opacity,Mode,Visible
f:\prose\PICTURES\st_limbs,leftArm,100.0,0,1
f:\prose\PICTURES\st_limbs,rightArm,100.0,0,1
f:\prose\PICTURES\st_limbs,shorts,100.0,0,1
f:\prose\PICTURES\st_limbs,leftLeg,100.0,0,0
f:\prose\PICTURES\st_limbs,rightLeg,100.0,0,0
f:\prose\PICTURES\st_limbs,donkeyLeg,100.0,0,0
f:\prose\PICTURES\st_limbs,donkey,100.0,0,1
f:\prose\PICTURES\st_limbs,legs_jpg,100.0,0,1
We don't need the last png in this list, so delete it:
for /F "skip=1 tokens=1,2 delims=," %%A ^
in (st_limbs_layers.lis) ^
do (
  set BASE=%%A
  set LAYER=%%B
)
del %BASE%_%LAYER%.png
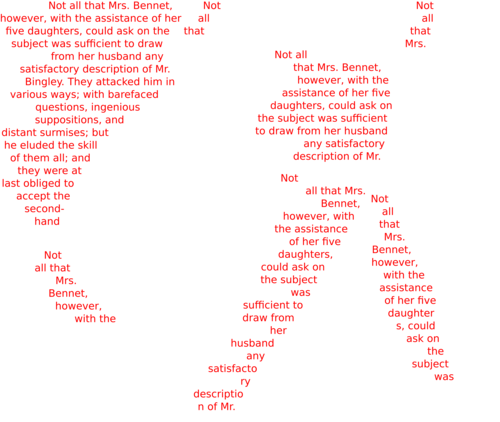
For each of the extracted images, apart from the base: trace the outline with potrace, which needs PNM input; create an SVG from a template svgAreaTemplate.txt; render text within the path into a PNG.
del areas.s
del st_areas.lis

for /F "skip=1 tokens=1,2 delims=," %%A ^
in (st_limbs_layers.lis) ^
do (
  set BASELAY=%%A_%%B
  set FILENAME=%%A_%%B.png
  if exist !FILENAME! (
    echo Found !FILENAME!
    %IMG7%magick !FILENAME! -background White -layers flatten !BASELAY!.pnm
    %POTRACEDIR%potrace -s -o !BASELAY!.svg !BASELAY!.pnm
    chBin /i!BASELAY!.svg /p0 /f\r\n /t\s /o- | chBin /i- /o!BASELAY!.svg /f\n /t\s
    rem del !BASELAY!.pnm
    RdXml /i!BASELAY!.svg /oNUL /v /cst_po_%%B.svg /D%%B
    chBin /ist_po_%%B.svg /f\s /t\r\n /s70
    chStrs /p0 /ist_po_%%B.svg /M1 /fpath /t"path transform=\qtranslate(0,%HH%) scale(0.1,-0.1)\q"
    echo @st_po_%%B.svg>areas.s

    chStrs /p0 /i%PICTBAT%svgAreaTemplate.txt /ost_area_%%B.svg /M1 /X- /fAREA_TEXT /t"@%PICTBAT%pandp.txt"
    ExpAt  /p0 /ist_area_%%B.svg /ost_area_%%B.svg
    chBin  /p0 /ist_area_%%B.svg /f^>-\r\n /t^>
    chBin  /p0 /ist_area_%%B.svg /f\r\n-^< /t^<
    chStrs /p0 /ist_area_%%B.svg /fAREA_WW /t%WW%
    chStrs /p0 /ist_area_%%B.svg /fAREA_HH /t%HH%
    rem chStrs /p0 /ist_area_%%B.svg /fAREA_ID /t%%B

    rem %IMSVG%convert -background None st_area_%%B.svg st_area_%%B.png

    call %PICTBAT%svg2png st_area_%%B.svg

    echo st_area_%%B.png >>st_areas.lis
  )
)
%PICTBAT%pandp.txt contains a short extract from Pride and Prejudice by Jane Austen.
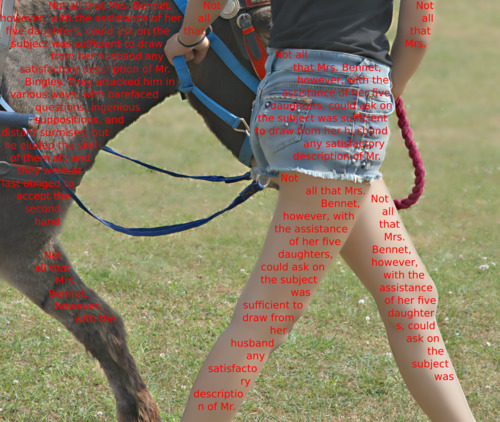
Assemble all the rendered texts into a single PNG and display it:
%IMG7%magick ^ @st_areas.lis ^ -background None ^ -layers flatten ^ -write st_areas.png ^ %RESIZE% ^ st_areas_sm.png |
|
%IMG7%magick ^ st_src.tiff ^ st_areas.png ^ -layers flatten ^ -write st_src_areas.png ^ %RESIZE% ^ st_src_areas_sm.jpg |
|
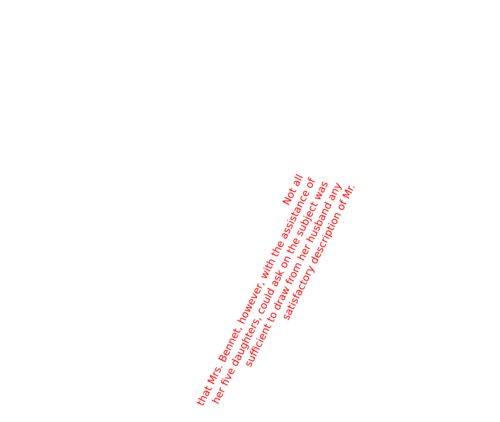
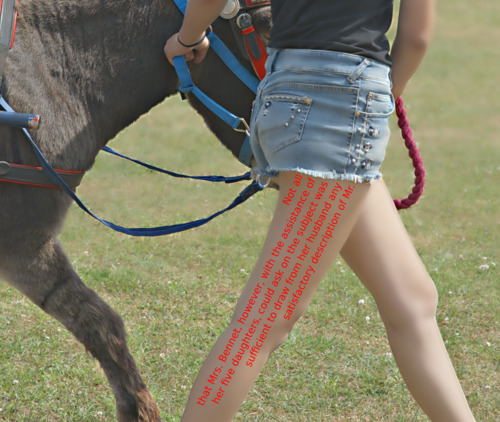
If we want to rotate the text in an area, we first rotate the area, and render the text within the rotated area as above. Then rotate the text back. Rotating the text back could be done with SVG transform (see SVG1.1 Transform), but I do it here with IM.
We use the right leg as an example. What angle (in degrees) do we need to rotate it by?
call %PICTBAT%rotMinWidth st_limbs_rightLeg.png 1

echo %rmwANG%
63.51
The two rotations add a border, so we crop it back to the original size.
FOR /F "usebackq" %%L ^
IN (`%IMG7%magick identify -format "RL_WW=%%w\nRL_HH=%%h" st_limbs_rightLeg.png`) ^
DO set %%L

%IMG7%magick ^
  st_limbs_rightLeg.png ^
  -background White -layers flatten ^
  -rotate %rmwANG% +repage ^
  st_rightLeg_rot.pnm

FOR /F "usebackq" %%L ^
IN (`%IMG7%magick identify -format "RL_WW_ROT=%%w\nRL_HH_ROT=%%h" st_rightLeg_rot.pnm`) ^
DO set %%L

%POTRACEDIR%potrace -s -o st_rightLeg_rot_crv.svg st_rightLeg_rot.pnm
chBin /ist_rightLeg_rot_crv.svg /p0 /f\r\n /t\s /o- | chBin /i- /ost_rightLeg_rot_crv.svg /f\n /t\s

RdXml /ist_rightLeg_rot_crv.svg /oNUL /v /cst_rightLeg_rot_crv2.svg /DrightLeg
chBin /ist_rightLeg_rot_crv2.svg /f\s /t\r\n /s70

chStrs /p0 /ist_rightLeg_rot_crv2.svg /M1 /fpath /t"path transform=\qtranslate(0,%RL_HH_ROT%) scale(0.1,-0.1)\q"

echo @st_rightLeg_rot_crv2.svg>areas.s

chStrs /p0 /i%PICTBAT%svgAreaTemplate.txt /ost_area_rleg_rot.svg /M1 /X- /fAREA_TEXT /t"@%PICTBAT%pandp.txt"
ExpAt  /p0 /ist_area_rleg_rot.svg /ost_area_rleg_rot.svg
chBin  /p0 /ist_area_rleg_rot.svg /f^>-\r\n /t^>
chBin  /p0 /ist_area_rleg_rot.svg /f\r\n-^< /t^<
chStrs /p0 /ist_area_rleg_rot.svg /fAREA_WW /t%RL_WW_ROT%
chStrs /p0 /ist_area_rleg_rot.svg /fAREA_HH /t%RL_HH_ROT%
chStrs /p0 /ist_area_rleg_rot.svg /fAREA_ID /trightLeg

call %PICTBAT%svg2png st_area_rleg_rot.svg

%IMG7%magick ^
  st_area_rleg_rot.png ^
  -rotate -%rmwANG% +repage ^
  -gravity Center ^
  -crop %RL_WW%x%RL_HH%+0+0 +repage ^
  -write st_area_rleg_rot.png ^
  %RESIZE% ^
  st_area_rleg_rot_sm.png
Here is the result:
Compositing over the source:
%IMG7%magick ^ st_src.tiff ^ st_area_rleg_rot.png ^ -layers flatten ^ -write st_rleg_src.png ^ %RESIZE% ^ st_rleg_src_sm.jpg |
|
The image used as input for potrace is:
%IMG7%magick ^ st_rightLeg_rot.pnm ^ %RESIZE% ^ st_rleg_pnm_sm.png rem del st_rightLeg_rot.pnm |

|
This could be given a displacement before the tracing, to make the top (or middle or bottom) a straight line. See Clut Cookbook: Cluts from graphics. The text could be rendered on this displaced area, then given the opposite displacement so the text would run parallel to the line in question, instead of in a straight line.
<svg xmlns:svg="http://www.w3.org/2000/svg" version="1.2"
     xmlns:xlink="http://www.w3.org/1999/xlink"
  width="100%" height="100%" viewBox="0 0 CURVE_WW CURVE_HH">
  <title>Template for curved text</title>
  <defs>
@curves.s
  </defs>
<text font-family="Verdana" font-size="100" fill="blue" >
    <textPath xlink:href="#CURVE_ID"
>CURVE_TEXT</textPath>
  </text>
</svg>
This has text-anchor="end" because I like this image with right-justification.
Also useful: text-align, which can be one of start, end, center or justify (see Scalable Vector Graphics (SVG) 1.2: Flowing text and graphics: Alignment).
<svg xmlns:svg="http://www.w3.org/2000/svg" version="1.2"
     xmlns:xlink="http://www.w3.org/1999/xlink"
  width="100%" height="100%" viewBox="0 0 AREA_WW AREA_HH">
  <title>Template for text flowing within area</title>

  <flowRoot font-size="100" text-anchor="end">
    <flowRegion>
@areas.s
    </flowRegion>
    <flowPara fill="red" fill-opacity="1" stroke-opacity="0"
>-
AREA_TEXT
-</flowPara>
  </flowRoot>
</svg>
For convenience, .bat scripts are also available in a single zip file. See Zipped BAT files.
@if "%1"=="" findstr /B "rem @rem" %~f0 & exit /B 1

@setlocal

@call echoOffSave


set INFILE=%1
set OUTFILE=%~dpn1.png

if not "%2"=="" set OUTFILE=%2

if [%s2pINK_OPT%]==[] (
  set s2pINK_OPT=--export-background^="rgb^(0%%,0%%,0%%^)" --export-background-opacity^="0"
)

echo %s2pINK_OPT%

%INK%inkscape ^
  %INFILE% ^
  --export-filename=%OUTFILE% ^
  %s2pINK_OPT%


call echoRestore

endlocal & set s2pOUTFILE=%OUTFILE%
rem From %1.pnm,
rem makes %1.svg containing an SVG path with id=%1.
rem The path is suitable for including in defs section, for use later.

c:\potrace\potrace.exe -s -o %1.svg %1.pnm

cGrep /p0 /i%1.svg /o%1.svg /X /s"\(g" /t"</g>"

chStrs /p0 /i%1.svg /f"fill=\q#000000\q stroke=\qnone\q\)"
chStrs /p0 /i%1.svg /f"\(path"
chStrs /p0 /i%1.svg /f"\(g" /t"\(path id=\q%1\q"
chStrs /p0 /i%1.svg /f"\(/g\)"
cNoBlank /p0 /i%1.svg
del %1.BAK
rem For image %1, find the angle a, -90 <= a <= +90, that minimises the trimmed width.
rem %2 is 0 (default, minimise width) or 1 (minimise height)
rem Assumes pixel at (0,0) is background colour.
@rem
@rem Updated:
@rem   11-August-2022 for IM v7.
@rem   19-October-2022 changed result to average of 4 angles, instead of ANG1.
@rem     Added test: if abs(W0-W3)==1, that is good enough.
@rem     Removed redundant calcs of Tn and Tx.
@rem

@if "%1"=="" findstr /B "rem @rem" %~f0 & exit /B 1

@setlocal enabledelayedexpansion

@call echoOffSave

set INFILE=%1
set TEMPFILE=%TEMP%\%~n1_rmw.miff

if "%2"=="1" (
  set TOKENS=tokens=2
) else (
  set TOKENS=
)

set RESZ=-resize 500x500
set FILT=-filter Box
set PREC=-precision 4

%IMG7%magick %INFILE% -background White -layers flatten %RESZ% %TEMPFILE%

for /F "usebackq" %%C ^
in (`%IMG7%magick %TEMPFILE% -format "%%[pixel:p{0,0}]" info:`) ^
do set ONE_PIXEL=%%C

%IMG7%magick %TEMPFILE% -bordercolor %ONE_PIXEL% -border 1 %TEMPFILE%

set ANG0=-90
set ANG3=90

for /F "usebackq" %%L ^
in (`%IMG7%magick ^
  %TEMPFILE% ^
  -background "%ONE_PIXEL%" ^
  ^( +clone %FILT% -rotate %ANG0% -format "T0=%%@\n" -write info: +delete ^) ^
  ^( +clone %FILT% -rotate %ANG3% -format "T3=%%@\n" -write info: +delete ^) ^
  NULL:`) ^
do set %%L

for /F "%TOKENS% delims=x+" %%L in ("%T0%") do set W0=%%L
for /F "%TOKENS% delims=x+" %%L in ("%T3%") do set W3=%%L

set FINISHED=0

:loop

for /F "usebackq" %%L ^
in (`%IMG7%magick identify ^
  %PREC% ^
  -format "ANG1=%%[fx:%ANG0%+(%ANG3%-(%ANG0%))/3]\nANG2=%%[fx:%ANG0%+2*(%ANG3%-(%ANG0%))/3]" ^
  xc:`) ^
do set %%L

for /F "usebackq" %%L ^
in (`%IMG7%magick ^
  %TEMPFILE% ^
  -background "%ONE_PIXEL%" ^
  ^( +clone %FILT% -rotate %ANG1% -format "T1=%%@\n" -write info: +delete ^) ^
  ^( +clone %FILT% -rotate %ANG2% -format "T2=%%@\n" -write info: +delete ^) ^
  NULL:`) ^
do set %%L

for /F "%TOKENS% delims=x+" %%L in ("%T1%") do set W1=%%L
for /F "%TOKENS% delims=x+" %%L in ("%T2%") do set W2=%%L

echo Ang:   %ANG0% %ANG1% %ANG2% %ANG3%
echo Width: %W0% %W1% %W2% %W3%

if %ANG0%==%ANG1% (
  set FINISHED=1
  goto finished
)

if %ANG2%==%ANG3% (
  set FINISHED=1
  goto finished
)

if %W0%==%W1% if %W0%==%W2% if %W0%==%W3% (
  set FINISHED=1
  goto finished
)

set FINISHED=1

if %W1% LEQ %W0% if %W1% LEQ %W2% if %W1% LEQ %W3% (
  set ANG3=%ANG2%
  set W3=%W2%
  set FINISHED=0
)

if %FINISHED%==1 if %W2% LEQ %W0% if %W2% LEQ %W1% if %W2% LEQ %W3% (
  set ANG0=%ANG1%
  set W0=%W1%
  set FINISHED=0
)

if %FINISHED%==1 if %W3% LEQ %W0% if %W3% LEQ %W1% if %W3% LEQ %W2% (
  set ANG0=%ANG2%
  set W0=%W2%
  set FINISHED=0
)

set /A dW=(%W0%-%W3%)*(%W0%-%W3%)
if %dW%==1 (
  rem set FINISHED=1
  rem goto finished
)

if %FINISHED%==0 goto loop

:finished

for /F "usebackq" %%L ^
in (`%IMG7%magick identify ^
  -format "ANG=%%[fx:(%ANG0%+%ANG1%+%ANG2%+%ANG3%)/4]" ^
  xc:`) ^
do set %%L


call echoRestore

endlocal & set rmwANG=%ANG1%
All images on this page were created by the commands shown, using:
%IMG7%magick -version
echo.
inkscape --version
echo.
%GIMPCONS% --version
echo.
%POTRACEDIR%potrace --version
Version: ImageMagick 7.1.0-49 Q16-HDRI x64 7a3f3f1:20220924 https://imagemagick.org
Copyright: (C) 1999 ImageMagick Studio LLC
License: https://imagemagick.org/script/license.php
Features: Cipher DPC HDRI OpenCL
Delegates (built-in): bzlib cairo freetype gslib heic jng jp2 jpeg jxl lcms lqr lzma openexr pangocairo png ps raqm raw rsvg tiff webp xml zip zlib
Compiler: Visual Studio 2022 (193331630)

Inkscape 1.0 (4035a4fb49, 2020-05-01)

GNU Image Manipulation Program version 2.10.24

potrace 1.11. Copyright (C) 2001-2013 Peter Selinger.
Library version: potracelib 1.11
Default unit: inches
Default page size: letter
Source file for this web page is svgtext.h1. To re-create this web page, execute "procH1 svgtext".
This page, including the images, is my copyright. Anyone is permitted to use or adapt any of the code, scripts or images for any purpose, including commercial use.
Anyone is permitted to re-publish this page, but only for non-commercial use.
Anyone is permitted to link to this page, including for commercial use.
Page version v1.1 2-May-2014.
Page created 21-Oct-2022 19:35:12.
Copyright © 2022 Alan Gibson.