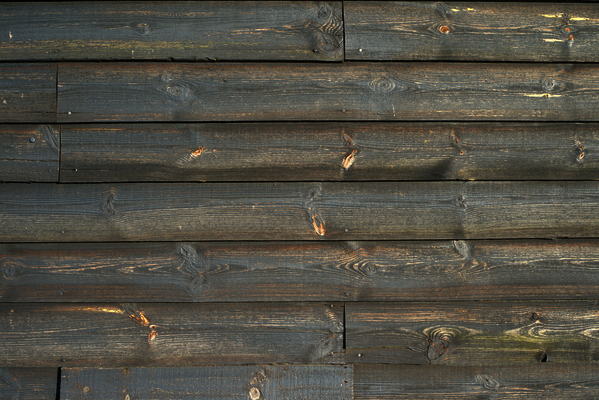
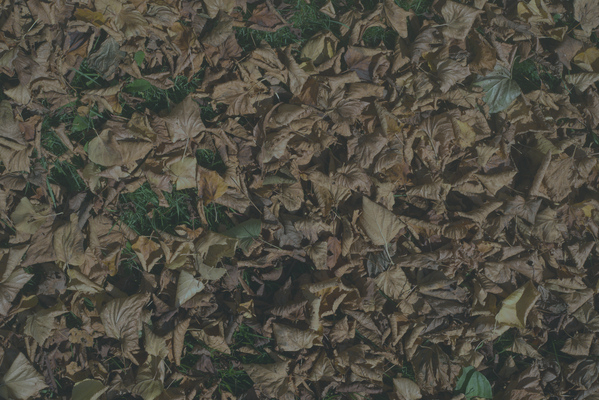
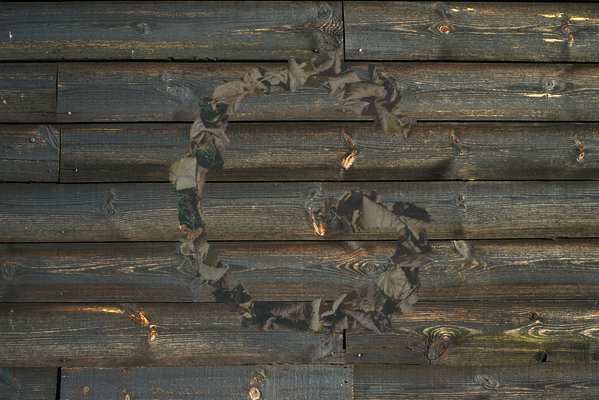
set SRC1=dpr_darker_wall.png
set SRC2=dpt_lvs_sm.jpg

An image can be cut by a single dark path to make a piece that will sit with small boundary error on another image.
The "boundary error" is the difference between the pixel at the edge of the piece, and the background pixel it replaces. As an image, this error is black where there is zero error. If we add all the differences around the boundary, we have a total boundary error. The task is to minimize this total.
This page follows directly on from material in Rectangle boundaries with dark paths.
This page was inspired by Image Quilting for Texture Synthesis and Transfer, Alexei A. Efros and William T. Freeman, 2001. Just as my darkest meandering path generalised their minimum error algorithm, this page generalises their rectangular boundaries to arbitrary shapes.
Although the problem can be solved with a meandering path, the point-to-point is more convenient.
See also Drag-and-Drop Pasting, Jiaya Jia et al, 2009.
Suppose we have two images of the same size. We want to cut a ragged path around one image so that when it is placed on the other image, the ragged edges are not obvious. The result will be like one sheet of paper placed on top of another, but with one or more margins torn from the top sheet. However, suppose we also want this path to roughly follow a pre-defined shape. Of course, it won't follow this shape exactly, because it will be ragged. We need to define the boundaries within which we want the ragged cut to fall.
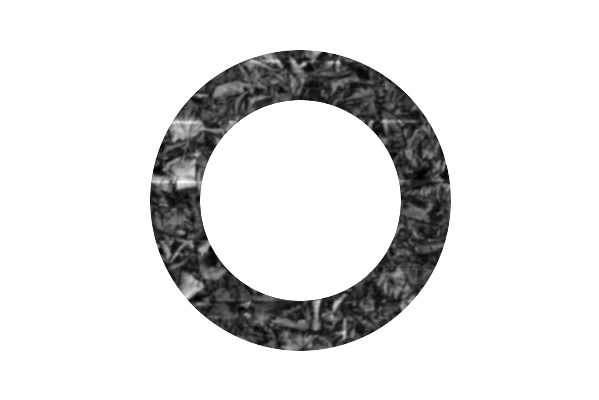
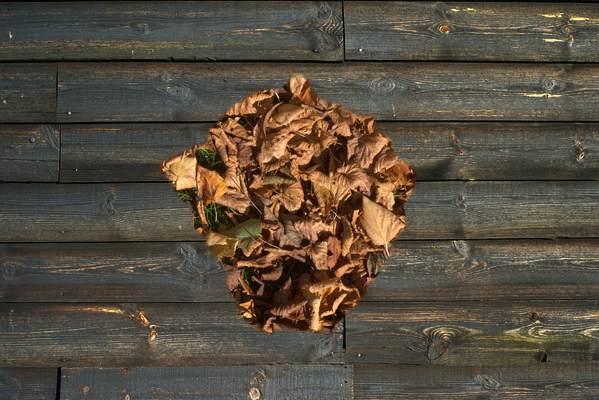
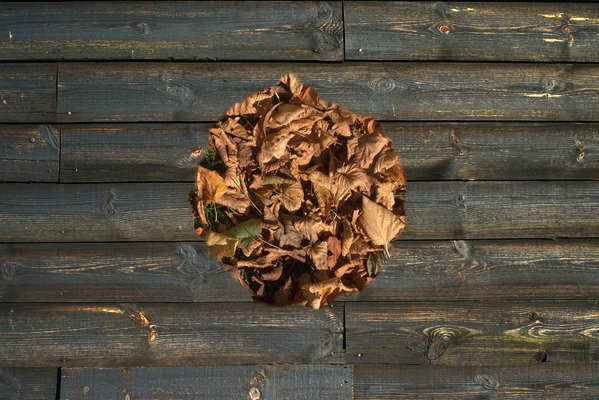
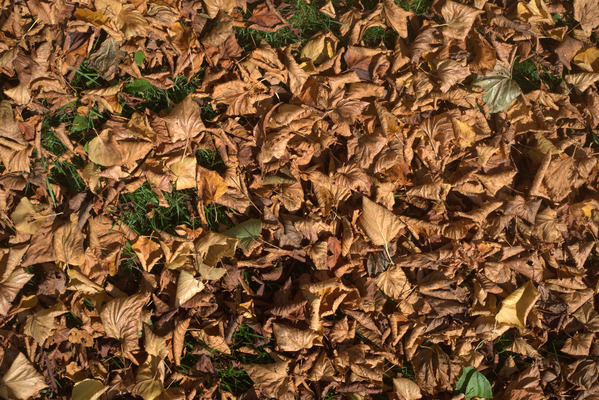
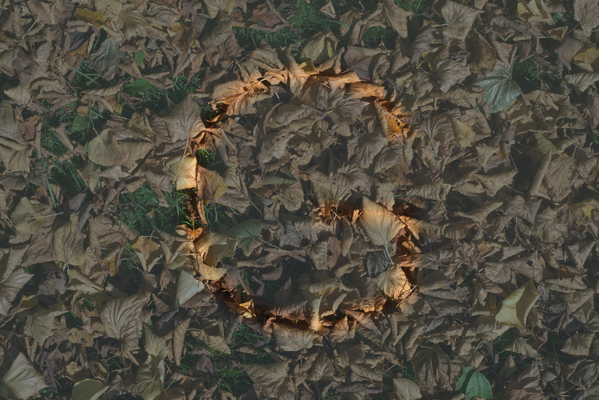
As a worked example, we want to cut out leaves to paste to a wall, with a ragged circular cut.
As examples, we use:
set SRC1=dpr_darker_wall.png |
|
set SRC2=dpt_lvs_sm.jpg |
|
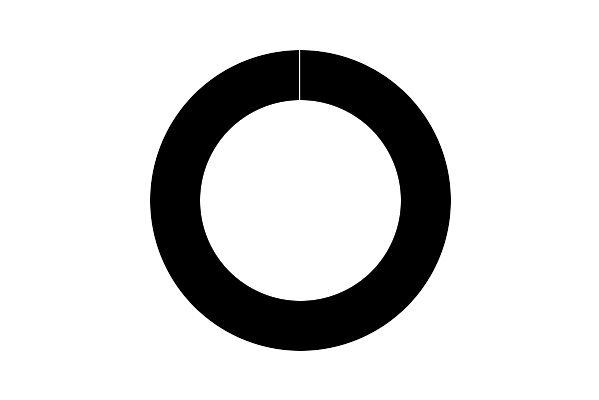
These images are 599x400 pixels. Suppose we want the ragged boundary to be a cicle radius 125 pixels, plus or minus 25 pixels. We create a mask that is white where we want the boundary to fall, and black elsewhere. The boundary will be roughly circular, somewhere within the white belt. The mask is anti-aliased, so contains gray as well as black and white.
%IMG7%magick ^ -size 599x400 ^ xc:Black ^ -fill White ^ -draw "translate 300,200 circle 0,0 0,150" ^ -fill Black ^ -draw "translate 300,200 circle 0,0 0,100" ^ -alpha off ^ dps_msk.png |

|
The process module darkestpath creates paths that are vertical, plus or minus 45°. Using this to follow an arbitrary shape would need the shape splitting into components that are each roughly straight, and rotating them. Messy.
Instead, we use process module darkestpntpnt to create a path between two pixels that are separated by a thin barrier. Hence, the "shortest" (ie darkest) path between them will go around the desired shape.
The highest white point in the mask is at 300,50 (more or less). Following the column down, the first black pixel is at 300,100. So the mid-point (which is white) is at 300,75. We will start and end our path there.
set dpsWW=599
set dpsHH=400

set dpsY1=75
set dpsY2=100
We calculate these:
set /A dpsWWm1=%dpsWW%-1

set /A dpsX=%dpsWW%/2

set /A dpsXm2=%dpsX%-2
set /A dpsXm1=%dpsX%-1
set /A dpsXp1=%dpsX%+1
set /A dpsY1p1=%dpsY1%+1
set /A dpsY1p2=%dpsY1%+2
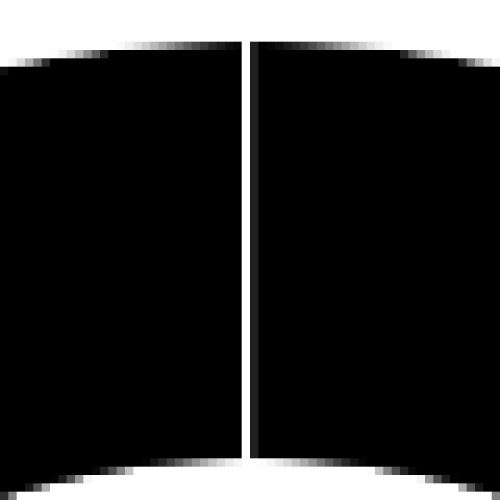
To illustrate how to construct the path, we will initially find the path around the mask. We will negate the mask, and draw a super-white line as a barrier.
%IMG7%magick ^ dps_msk.png ^ -negate ^ -stroke gray(200%%) ^ -draw "line %dpsX%,0 %dpsX%,%dpsY2%" ^ dps_msk2.png |
|
|
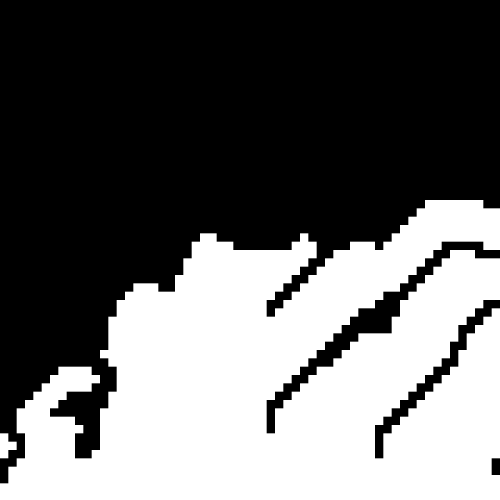
Enlarging the critical portion: %IMG7%magick ^ dps_msk2.png ^ -crop 60x60+270+45 +repage ^ -scale 500% ^ dps_msk2_enl.png |
|
The path will start immediately to the left of the barrier line, move anti-clockwise around the belt, and end immediately to the right.
(I have chosen to start and end the path mid-way down the required area. Instead, it could be at the top or bottom of that area. The script will use the coordinate with the minimum-error.)
Now we can find the path. We must use HDRI for this.
%IM7DEV%magick ^ dps_msk.png ^ -negate ^ -stroke gray(200%%) ^ -draw "line %dpsX%,0 %dpsX%,%dpsY2%" ^ -process 'darkestpntpnt start_at %dpsXm1%,%dpsY1% end_at %dpsXp1%,%dpsY1% t 1.5 v' ^ dps_mnd1.png |
|
|
Enlarging the critical portion: %IMG7%magick ^ dps_mnd1.png ^ -crop 60x60+270+45 +repage ^ -scale 500% ^ dps_mnd1_enl.png In the centre, one black pixel should be white. |
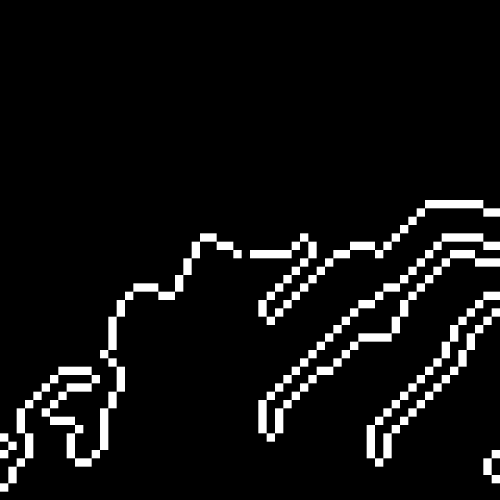
|
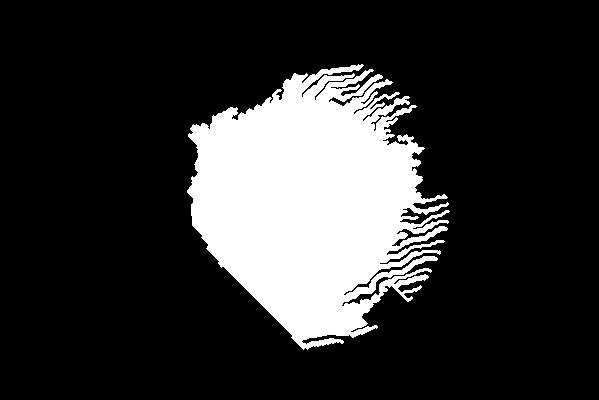
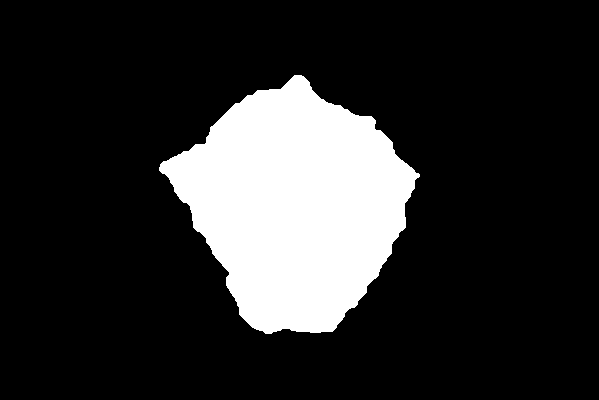
Finally, we whiten the pixel between the start and end of the path, and flood-fill to find the mask. The seed is the point immediately below the pixel we have whitened. This pixel isn't already white, because the super-white line prevented this.
%IM7DEV%magick ^ dps_msk.png ^ -negate ^ -stroke gray(200%%) ^ -draw "line %dpsX%,0 %dpsX%,%dpsY2%" ^ -process 'darkestpntpnt start_at %dpsXm1%,%dpsY1% end_at %dpsXp1%,%dpsY1% t 1.5 v' ^ -fill White ^ -draw "point %dpsX%,%dpsY1%" ^ -draw "color %dpsX%,%dpsY1p1% floodfill" ^ dps_mnd3.png |
|
|
Enlarging the critical portion: %IMG7%magick ^ dps_mnd3.png ^ -crop 60x60+270+45 +repage ^ -scale 500% ^ dps_mnd3_enl.png |
|
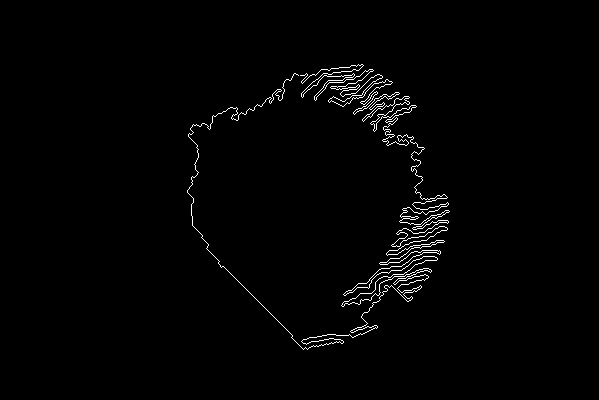
This has shown the process of creating a dark meandering path around an O-shape. But we want the path that follows the minimum difference between our source images. We will want a small blur on the mask, so we apply the same blur to the difference.
%IMG7%magick ^ %SRC1% ^ %SRC2% ^ -colorspace Lab -strip ^ -channel GB -evaluate Divide 2 +channel ^ -compose Difference -composite ^ -channel R -separate ^ -blur 0x1 ^ -auto-level ^ dps_msk.png ^ -alpha off ^ -compose CopyOpacity -composite ^ -background White ^ -compose Over -layers flatten ^ dps_diff1.png |
|
|
To prevent the path sneaking past our barrier,
%IM7DEV%magick ^ dps_diff1.png ^ -fill gray(200%%) -opaque White ^ -stroke gray(200%%) ^ -draw "line %dpsX%,0 %dpsX%,%dpsY2%" ^ -process 'darkestpntpnt start_at %dpsXm1%,%dpsY1% end_at %dpsXp1%,%dpsY1% t 1.5 v' ^ -fill White ^ -draw "point %dpsX%,%dpsY1%" ^ -draw "color %dpsX%,%dpsY1p1% floodfill" ^ dps_lvs1.png |
|
We can use this as a mask to put the leaves on the wall:
%IMG7%magick ^ %SRC1% ^ %SRC2% ^ ( dps_lvs1.png -blur 0x1 ) ^ -compose Over -composite ^ dps_lvs2.png |
|
The script shapeDp.bat implements the above. It takes arguments for two input images and one input boundary mask, and one output file.
For the calculation of the difference and hence the cut lines and the mask, it converts the inputs to grayscale with "-colorspace Gray".
The output will be the second input, with torn margins, composited over the first input. If the environment variable sdpMASK_FILE is set, the script also writes the mask to a file with the supplied name.
set sdpMASK_FILE=dps_lvs_msk.png call %PICTBAT%shapeDp ^ dpr_darker_wall.png ^ dpt_lvs_sm.jpg ^ dps_msk.png ^ dps_scr1.png |

|
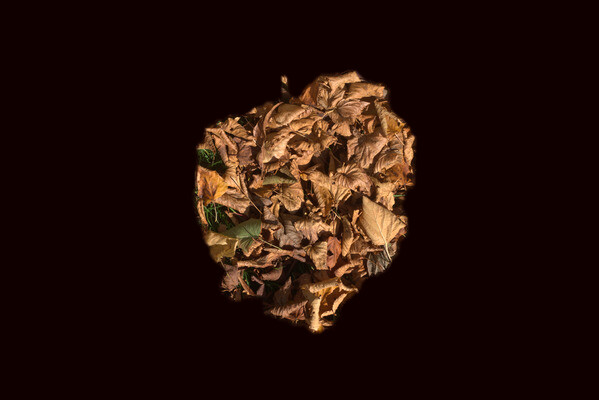
Instead, we can use a constant black background for the purpose of finding the boundary, then use the mask from this to make the composite.
%IMG7%magick ^ dpr_darker_wall.png ^ -strip ^ -fill #100 -colorize 100 ^ dpr_black.png set sdpMASK_FILE=dps_b_msk.png call %PICTBAT%shapeDp ^ dpr_black.png ^ dpt_lvs_sm.jpg ^ dps_msk.png ^ dps_scrb.png set sdpMASK_FILE= %IMG7%magick ^ dpr_darker_wall.png ^ dpt_lvs_sm.jpg ^ dps_b_msk.png ^ -composite ^ dps_blk.png |

|
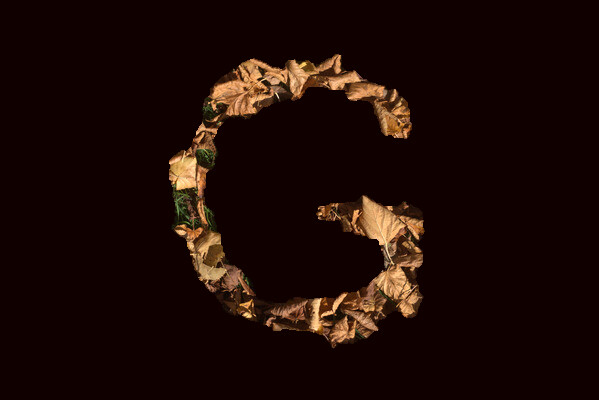
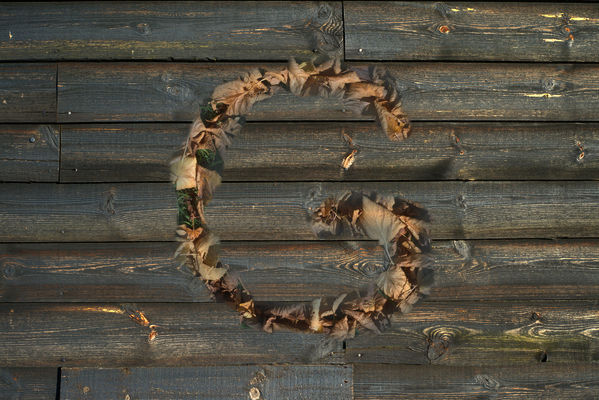
A more complex shape, the letter "G", as an image the same size as the leaves:
|
Make a mask for the boundary,
%IMG7%magick ^
  dpt_lvs_sm.jpg ^
  -fill Black -colorize 100 ^
  ( -size 500x500 ^
    -gravity Center ^
    -background Black ^
    -stroke White -fill Black ^
    -strokewidth 20 ^
    -weight Bold ^
    label:G ^
    -trim +repage ^
  ) ^
  -composite ^
  dps_mskg.png
|

|
|
Cut the leaves against a black background. set sdpBLUR_SIG=0 call %PICTBAT%shapeDp ^ dpr_black.png ^ dpt_lvs_sm.jpg ^ dps_mskg.png ^ dps_scrg.png set sdpBLUR_SIG= |
|
Other possibilities:
|
Give the leaves the appearance of the wall.
call %PICTBAT%imgGainBias ^ dpt_lvs_sm.jpg ^ dpr_darker_wall.png ^ dps_wallish_lvs.png |
|
|
Cut these leaves against the wall. set sdpBLUR_SIG=0 call %PICTBAT%shapeDp ^ dpr_darker_wall.png ^ dps_wallish_lvs.png ^ dps_mskg.png ^ dps_scrg2.png set sdpBLUR_SIG= |
|
|
Make a gradient mask. %IMG7%magick ^
dpt_lvs_sm.jpg ^
-fill Black -colorize 100 ^
( -size 500x500 ^
-gravity Center ^
-background Black ^
-fill White ^
-strokewidth 20 ^
-weight Bold ^
label:G ^
-trim +repage ^
) ^
-composite ^
+write dps_mskgw.png ^
-morphology Distance Euclidean:4,100^! ^
-auto-level ^
dps_mskgwg.png
|


|
|
Apply the gradient mask, to transition the effect. %IMG7%magick ^ dps_wallish_lvs.png ^ dpt_lvs_sm.jpg ^ dps_mskgwg.png ^ -composite ^ dps_lvsw.png |
|
|
Composite these over the wall,
call %PICTBAT%shapeDp ^ dpr_darker_wall.png ^ dps_lvsw.png ^ dps_mskg.png ^ dps_scrg3.png |
|
As suggested in the Drag-and-Drop Pasting paper, the super-white barrier line could be chosen to be the shortest possible (eg with -morphology distance), and then the shortest path between all pixels on one side of the line and all pixels on the other side could be found.
The examples above have a fixed position for the background, foreground and mask. They find the best path under these conditions, but the best path may not be a good path. A script could vary the conditions, attempting to find a better path. For example, it could slide the foreground plus mask over the background, over a window that was a central position plus or minus N pixels horizontally and vertically, and choose the position that gave the best (darkest) path.
For convenience, .bat scripts are also available in a single zip file. See Zipped BAT files.
rem From two images %1,%2 and a mask %3 (white boundary margin on black),
rem all the same size,
rem find the point-to-point path of minimum difference within the boundary margin,
rem and make a mask to put either image over the other.
rem Output to %4.
@rem
@rem (See also minDp.bat)
@rem
@rem
@rem Also uses:
@rem
@rem   sdpBLUR_SIG blur sigma. 0=no blur. [Default 1.]
@rem   sdpMASK_FILE if not blank, writes mask to this file
@rem
@rem Updated:
@rem   24-October-2016 Fixed bug for sdpBLUR_SIG.
@rem   15-July-2022 for IM v7.


@if "%3"=="" findstr /B "rem @rem" %~f0 & exit /B 1

@setlocal

@call echoOffSave

call %PICTBAT%setInOut %1 sdp

set SRC1=%1
set SRC2=%2
set BND_MSK=%3

if not "%4"=="" if not "%4"=="." set OUTFILE=%4

if "%sdpBLUR_SIG%"=="" set sdpBLUR_SIG=1

if "%sdpBLUR_SIG%"=="0" (
  set sBLUR=
) else (
  set sBLUR=-blur 0x%sdpBLUR_SIG%
)

if "%sdpMASK_FILE%"=="" (
  set sWR_MASK=
) else (
  set sWR_MASK=+write %sdpMASK_FILE%
)

:: 30-Oct-2016 was set /A sdpY1=%%C+5

%IM7DEV%magick ^
  %BND_MSK% ^
  -fuzz 0.0001%% ^
  -process onewhite ^
  -format "sdpWW=%%w\nsdpHH=%%h" ^
  info:

set A=
for /F "usebackq tokens=1-3 delims=:=, " %%A in (`%IM7DEV%magick ^
  %BND_MSK% ^
  -fuzz 0.0001%% ^
  -process onewhite ^
  -format "sdpWW=%%w\nsdpHH=%%h" ^
  info: 2^>^&1`) do (
  if "%%A"=="onewhite" (
    set A=%%A
    if "%%B"=="none" (
      echo %0: no onewhite in BND_MSK=%BND_MSK%
      exit /B 1
    )
    set /A sdpX=%%B
    set /A sdpY1=%%C
  ) else (
    set %%A=%%B
  )
)
if not "%A%"=="onewhite" exit /B 1

echo %0: sdpWW=%sdpWW% sdpHH=%sdpHH% sdpX=%sdpX% sdpY1=%sdpY1%

if "%sdpY1%"=="" exit /B 1

set /A ColHt=%sdpHH%-%sdpY1%

for /F "usebackq tokens=3 delims=:=, " %%A in (`%IM7DEV%magick ^
  %BND_MSK% ^
  -crop 1x%ColHt%+%sdpX%+%sdpY1% +repage ^
  -negate ^
  -fuzz 0.0001%% ^
  -process onewhite ^
  NULL: 2^>^&1`) do (
    set sdpY2=%%A
)

set /A sdpY2+=%sdpY1%

:: New 30-Oct-16
set /A sdpY1+=(%sdpY2%-%sdpY1%)/2

echo %0: %sdpWW% %sdpHH% %sdpX% %sdpY1% %sdpY2%

set /A sdpWWm1=%sdpWW%-1

rem set /A sdpX=%sdpWW%/2

set /A sdpXm2=%sdpX%-2
set /A sdpXm1=%sdpX%-1
set /A sdpXp1=%sdpX%+1
set /A sdpY1p1=%sdpY1%+1
set /A sdpY1p2=%sdpY1%+2

echo %0: start_at %sdpXm1%,%sdpY1% end_at %sdpXp1%,%sdpY1%

%IM7DEV%magick ^
  ( %SRC1% +write mpr:SRC1 ) ^
  ( %SRC2% +write mpr:SRC2 ) ^
  +depth ^
  -strip ^
  -compose Difference -composite ^
  %sBLUR% ^
  -auto-level ^
  %BND_MSK% ^
  -alpha off ^
  -compose CopyOpacity -composite ^
  -background White ^
  -compose Over -layers flatten ^
  -alpha off ^
  -clamp ^
  -fuzz 0.0001%% -fill gray(200%%) -opaque White -fuzz 0 ^
  -strokewidth 1 ^
  -stroke gray(200%%) ^
  -draw "line %sdpX%,0 %sdpX%,%sdpY2%" ^
  -fuzz 0.0001%% -fill gray(200%%) -opaque White -fuzz 0 ^
  -process 'darkestpntpnt start_at %sdpXm1%,%sdpY1% end_at %sdpXp1%,%sdpY1% t 1.5 v' ^
  -fill White ^
  -draw "point %sdpX%,%sdpY1%" ^
  -draw "color %sdpX%,%sdpY1p1% floodfill" ^
  %sBLUR% ^
  %sWR_MASK% ^
  mpr:SRC2 ^
  mpr:SRC1 ^
  -swap 0,2 ^
  -alpha off ^
  -compose Over -composite ^
  %OUTFILE%

if ERRORLEVEL 1 exit /B 1

call echoRestore

endlocal & set sdpOUTFILE=%OUTFILE%
rem Given image %1
rem mask %2 (white boundary margin on black),
rem find the point-to-point path of minimum %1 within the boundary margin,
rem Output %3, white shape in black background.
rem
rem (This is simplified variation of shapeDp.bat)
@rem
@rem Updated:
@rem   14-July-2022 for IM v7.
@rem


@if "%2"=="" findstr /B "rem @rem" %~f0 & exit /B 1

@setlocal

@call echoOffSave

call %PICTBAT%setInOut %1 mdp

set BND_MSK=%2

if not "%3"=="" if not "%3"=="." set OUTFILE=%3

for /F "usebackq tokens=1-3 delims=:=, " %%A in (`%IM7DEV%magick ^
  %BND_MSK% ^
  -fuzz 0.0001%% ^
  -process onewhite ^
  -format "sdpWW=%%w\nsdpHH=%%h" ^
  info: 2^>^&1`) do (
  if "%%A"=="onewhite" (
    set A=%%A
    set /A sdpX=%%B
    set /A sdpY1=%%C
  ) else (
    set %%A=%%B
  )
)
if not "%A%"=="onewhite" exit /B 1

echo %0: %sdpWW% %sdpHH% %sdpX% %sdpY1%

set /A ColHt=%sdpHH%-%sdpY1%

for /F "usebackq tokens=3 delims=:=, " %%A in (`%IM7DEV%magick ^
  %BND_MSK% ^
  -crop 1x%ColHt%+%sdpX%+%sdpY1% +repage ^
  -negate ^
  -fuzz 0.0001%% ^
  -process onewhite ^
  NULL: 2^>^&1`) do (
    set sdpY2=%%A
)

set /A sdpY2+=%sdpY1%

:: New 30-Oct-16
set /A sdpY1+=(%sdpY2%-%sdpY1%)/2

echo %0: %sdpWW% %sdpHH% %sdpX% %sdpY1% %sdpY2%

set /A sdpWWm1=%sdpWW%-1

rem set /A sdpX=%sdpWW%/2

set /A sdpXm2=%sdpX%-2
set /A sdpXm1=%sdpX%-1
set /A sdpXp1=%sdpX%+1
set /A sdpY1p1=%sdpY1%+1
set /A sdpY1p2=%sdpY1%+2

echo %0: start_at %sdpXm1%,%sdpY1% end_at %sdpXp1%,%sdpY1%

goto skip

%IM7DEV%magick ^
  %INFILE% ^
  %BND_MSK% ^
  -alpha off ^
  -compose CopyOpacity -composite ^
  -background White ^
+write x0.png ^
  -compose Over -layers flatten ^
  -alpha off ^
  -clamp ^
+write x1.png ^
  -fuzz 0.0001%% -fill gray(200%%) -opaque White -fuzz 0 ^
  -strokewidth 1 ^
  -stroke gray(200%%) ^
  -draw "line %sdpX%,0 %sdpX%,%sdpY2%" ^
  -fuzz 0.0001%% -fill gray(200%%) -opaque White -fuzz 0 ^
+write x2.png ^
  -process 'darkestpntpnt start_at %sdpXm1%,%sdpY1% end_at %sdpXp1%,%sdpY1% t 1.5 v' ^
  -fill White ^
  -draw "point %sdpX%,%sdpY1%" ^
  -draw "color %sdpX%,%sdpY1p1% floodfill" ^
  %OUTFILE%

:skip

%IM7DEV%magick ^
  %INFILE% ^
  ( %BND_MSK% -alpha off -negate ) ^
  -alpha off ^
  -compose Lighten -composite ^
  -alpha off ^
  -clamp ^
  -fuzz 0.0001%% -fill gray(200%%) -opaque White -fuzz 0 ^
  -strokewidth 1 ^
  -stroke gray(200%%) ^
  -draw "line %sdpX%,0 %sdpX%,%sdpY2%" ^
  -fuzz 0.0001%% -fill gray(200%%) -opaque White -fuzz 0 ^
  -process 'darkestpntpnt start_at %sdpXm1%,%sdpY1% end_at %sdpXp1%,%sdpY1% t 1.5 v' ^
  -fill White ^
  -draw "point %sdpX%,%sdpY1%" ^
  -draw "color %sdpX%,%sdpY1p1% floodfill" ^
  %OUTFILE%

call echoRestore

endlocal & set mdpOUTFILE=%OUTFILE%
All images on this page were created by the commands shown, using:
%IMG7%magick -version
Version: ImageMagick 7.1.1-15 Q16-HDRI x64 a0a5f3d:20230730 https://imagemagick.org
Copyright: (C) 1999 ImageMagick Studio LLC
License: https://imagemagick.org/script/license.php
Features: Cipher DPC HDRI OpenCL OpenMP(2.0)
Delegates (built-in): bzlib cairo freetype gslib heic jng jp2 jpeg jxl lcms lqr lzma openexr pangocairo png ps raqm raw rsvg tiff webp xml zip zlib
Compiler: Visual Studio 2022 (193532217)
%IM7DEV%magick -version
Version: ImageMagick 7.1.1-5 (Beta) Q32-HDRI x86_64 852a723f1:20230319 https://imagemagick.org
Copyright: (C) 1999 ImageMagick Studio LLC
License: https://imagemagick.org/script/license.php
Features: Cipher DPC HDRI Modules OpenMP(4.5)
Delegates (built-in): bzlib cairo fftw fontconfig freetype heic jbig jng jpeg lcms ltdl lzma pangocairo png raqm raw rsvg tiff webp wmf x xml zip zlib
Compiler: gcc (11.3)
Source file for this web page is dpshape.h1. To re-create this web page, execute "procH1 dpshape".
This page, including the images, is my copyright. Anyone is permitted to use or adapt any of the code, scripts or images for any purpose, including commercial use.
Anyone is permitted to re-publish this page, but only for non-commercial use.
Anyone is permitted to link to this page, including for commercial use.
Page version v1.0 17-Nov-2015.
Page created 04-Sep-2023 10:42:03.
Copyright © 2023 Alan Gibson.