snibgo's ImageMagick pages
Colour checker charts
Tiny little images help us to correct grayness and colour.
Colour checker charts help us with colour correction (aka colour grading) between shots taken under different lighting, or with different lenses or cameras.
We photograph a standard chart under the varying conditions, crop the photos to show just the chart, then tweak the images to approximate each other. The same tweaking can be done to other photos taken without the chart but under the same conditions.
How do we tweak the images? We could do it manually in Gimp or similar, but we can do it automatically with IM. A number of methods can be used:
The page
Finding and analysing colour charts describes how IM can find the colour chart within the photograph and reduce it to one pixel per colour patch.
This page shows how to use those pixels to calculate the best colour matrix or polynomial that would transform one photographed chart to another, and hence can be applied to a set of photos (or video frames) to make that set match another set.
This is useful in still photography (the bride may complain if her white dress is slightly green) but arguably more important for video, especially when cutting between two cameras on the same scene. Human vision accommodates for non-neutral grays, but problems arise when grays are inconsistently coloured.
The phrase white balance usually refers to a process that makes "white" pixels become neutral. I often want to make a range of tones from black to white become neutral, and I refer to this as gray balance.
This page describes methods we can use on any photos, wherever they have come from. Many of my photos come from dcraw, and there is some benefit to feeding back data from these methods into dcraw, so it does a basic white balancing with linear pixel data. For that, see the
dcraw and WB page.
For more details about the process module cols2mat and how it works, see
Colours to matrix and polynomials.
Scripts on this page assume that the version of ImageMagick in %IM7DEV% has been built with various process modules. See
Process modules.
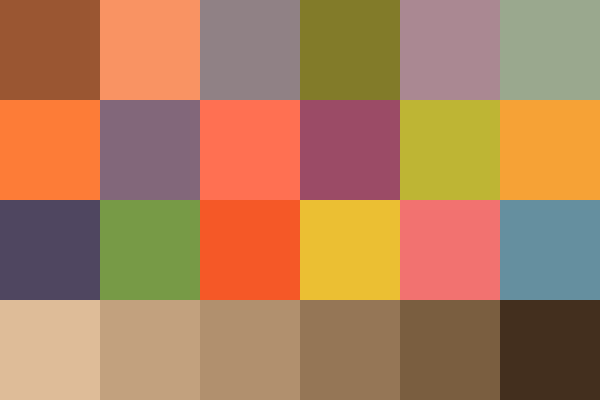
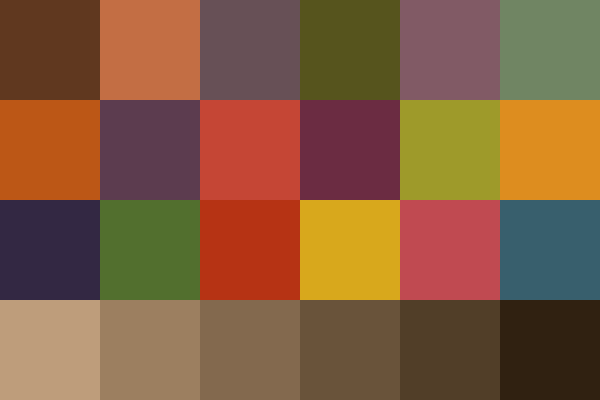
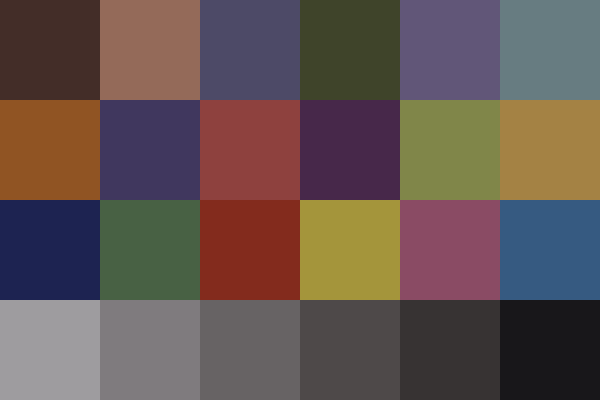
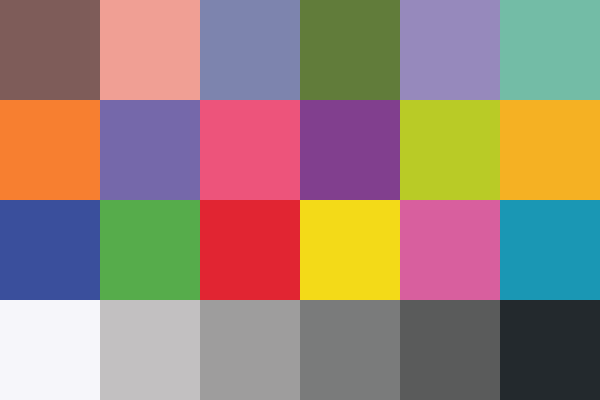
For each photograph that includes a colour chart, we run a script 24card.bat that finds the chart, squares it up and reduces each colour patch to a single pixel, so we have an image of 6x4 pixels.
Then, for any pair of 6x4 images, we run a process module cols2mat that creates a colour matrix or polynomial that most accurately transforms one 6x4 image to the other, according to some conditions. The target 6x4 image might be from a photograph, or an idealised version (where grays really are neutral), or created artificially.
We can apply the same matrix or polynomial to any image for which we want the same transformation.
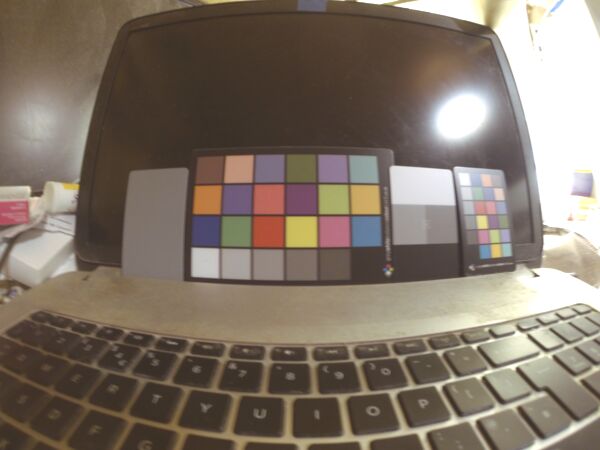
Here are two photographs taken with a Nikon D800 and a GoPro Hero 3. They were taken at night, in a room with household LED lighting (nominally 2700K). The Nikon used an 85mm lens wide open, ISO 2000, f/1.8 @ 1/250s, with white balance set to auto. The dcraw conversion used the white balance from the camera. The GoPro has a 3mm lens (equivalent to 15mm on a 35mm camera), at ISO 368, f/2.8 @ 1/12s.
I also scanned the card with a Canon CanoScan 5600F scanner.
Operations are performed on full-size images, with results resized for the web.
set SRCDIR=%PICTLIB%20171021\
set RESWEB=-resize 600
|
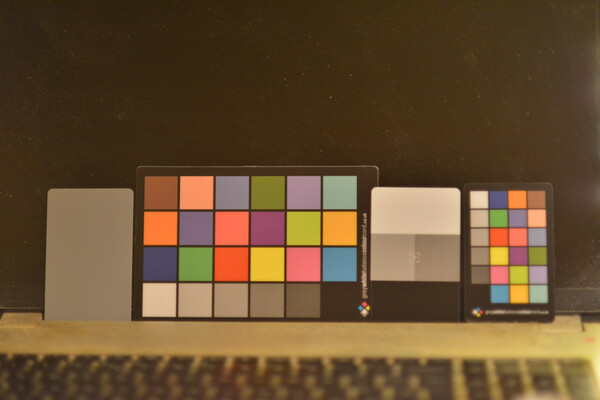
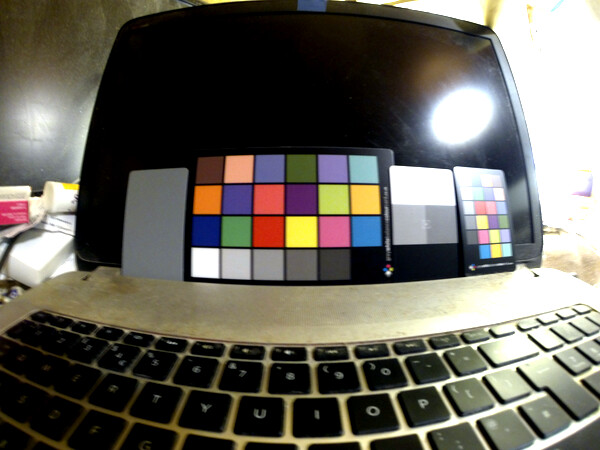
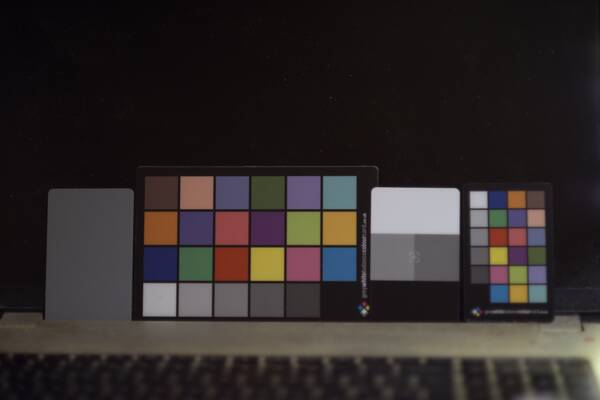
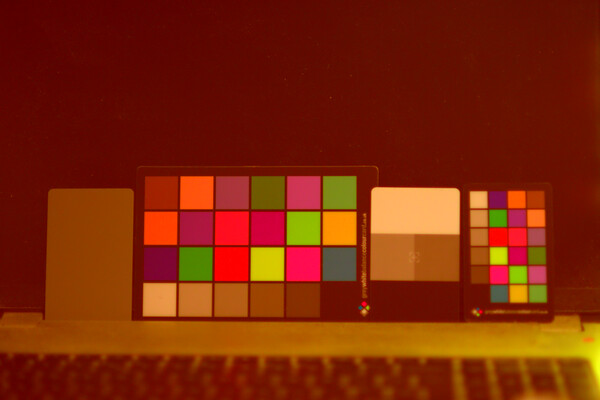
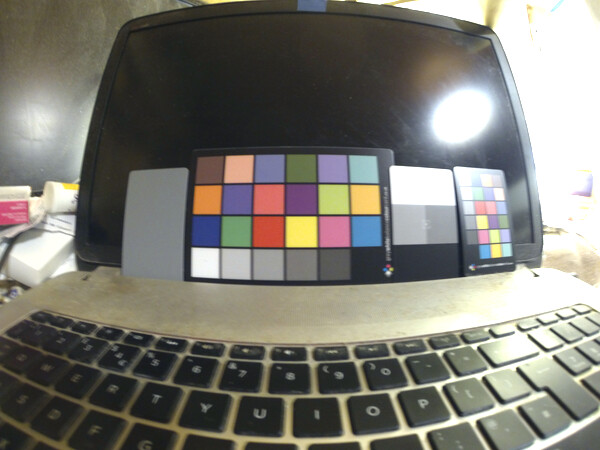
Nikon D800 in-camera JPEG.
set NIKON_JPG=%SRCDIR%AGA_3409.JPG[0]

%IMG7%magick ^
  %NIKON_JPG% ^
  %RESWEB% ^
  +depth ^
  ccc_ph1.png
|
|
|
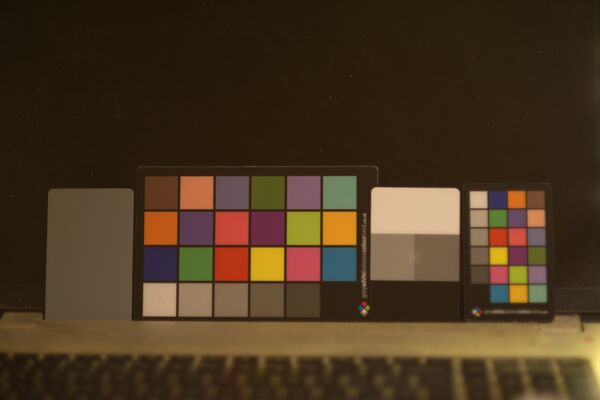
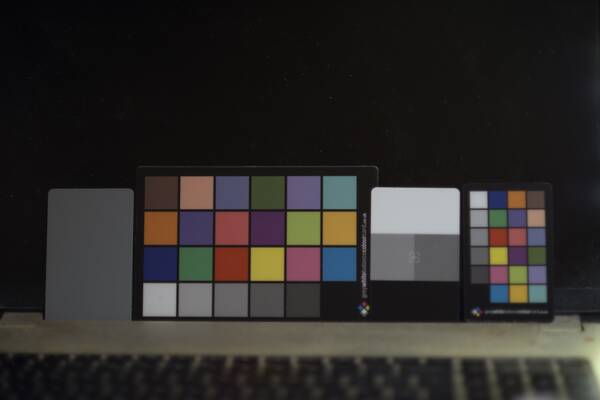
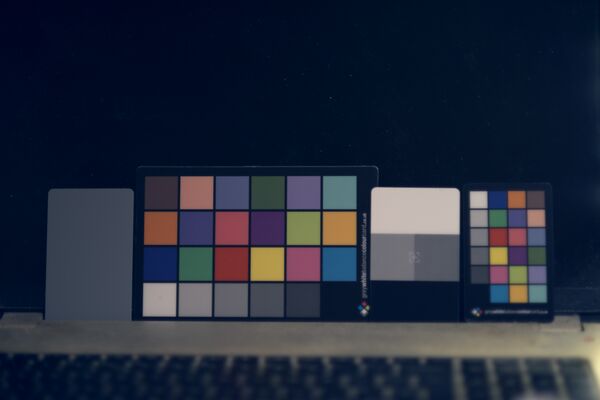
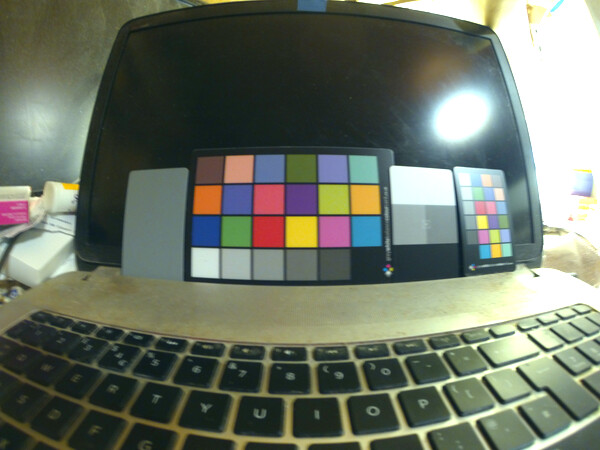
Nikon D800 raw NEF, converted by dcraw.
set NIKON_NEF=%SRCDIR%AGA_3409_sRGB.tiff

%IMG7%magick ^
  %NIKON_NEF% ^
  %RESWEB% ^
  +depth ^
  ccc_ph2.png
|
|
|
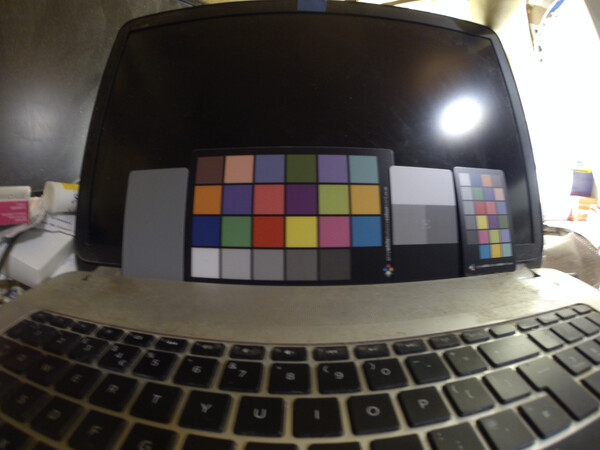
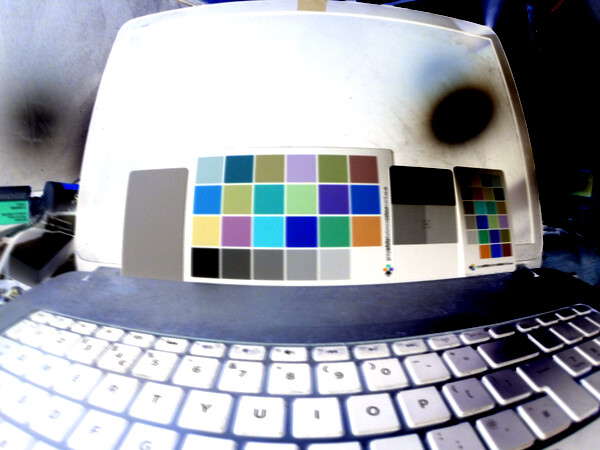
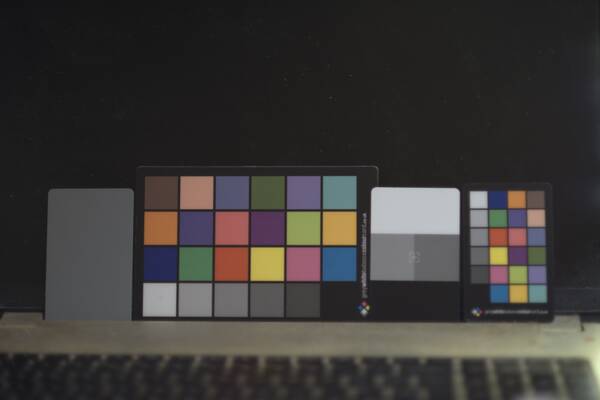
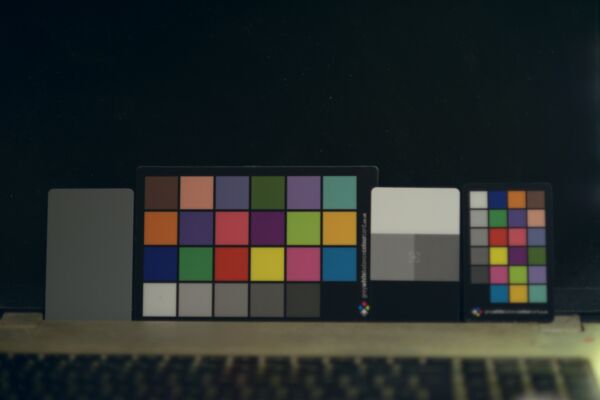
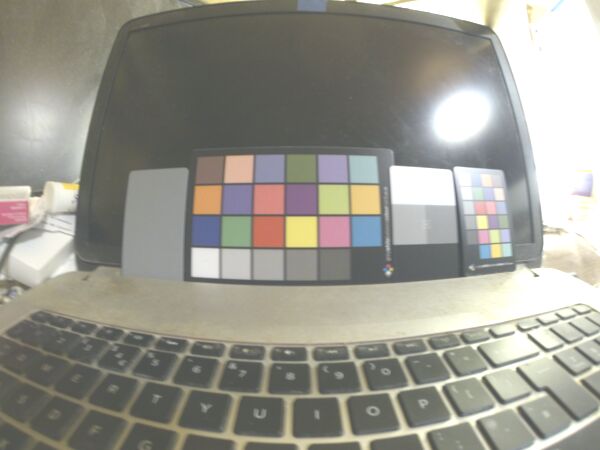
GoPro Hero 3
set GOPRO_ORIG=%SRCDIR%GOPR0395.JPG

%IMG7%magick ^
  %GOPRO_ORIG% ^
  %RESWEB% ^
  +depth ^
  ccc_ph3.png
|
|
|
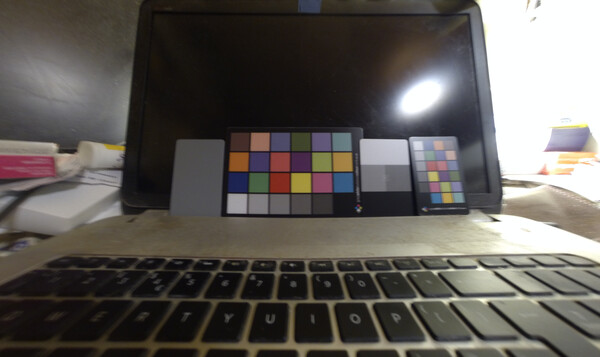
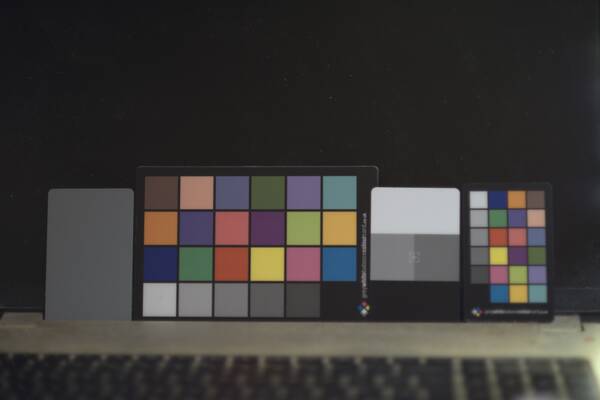
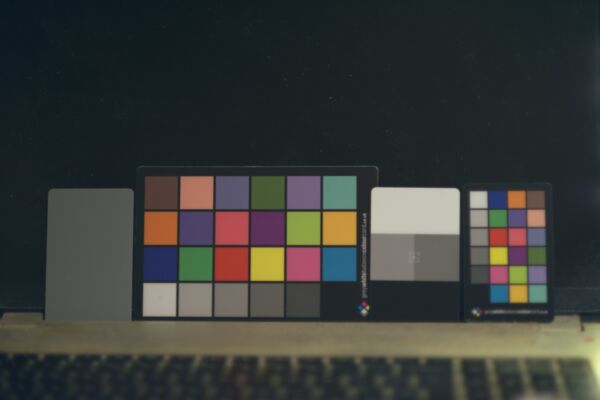
GoPro, rectified
(See
De-barrel distortion.)
set GOPRO_RECT=%SRCDIR%GOPR0395_rgp.tiff

call %PICTBAT%rectGoPro ^
  %GOPRO_ORIG% 1 . . %GOPRO_RECT%

if ERRORLEVEL 1 goto error

%IMG7%magick ^
  %GOPRO_RECT% ^
  %RESWEB% ^
  +depth ^
  ccc_ph4.png
|
|
|
Scanner
set SCAN=%SRCDIR%24cardScan.tiff

%IMG7%magick ^
  %SCAN% ^
  %RESWEB% ^
  +depth ^
  ccc_ph5.png
|

|
In the GoPro image, the small chart on the right badly reflects from the overhead room light (we also see its reflection in the laptop screen). The main chart in the centre is also somewhat affected; the top-right border is lighter than the rest of the border.
The photos don't need to have the charts in perfect focus, provided the central 75% of each patch is pure, with no overlap from a border or another patch.
From each photo that includes a colour chart, we make an image that contains one pixel per colour patch, being the mean of that patch. The scripts 24card.bat and bottomLineGray.bat are described on
Finding and analysing colour charts.
|
Nikon D800 in-camera JPEG.
Also create a debugging image.
call %PICTBAT%24card ^
  %NIKON_JPG% ^
  ccc_ph1_XX.png ^
  1

if ERRORLEVEL 1 goto error

call %PICTBAT%bottomLineGray ^
  ccc_ph1_mat.png
0.0997761
|
|
|
Nikon D800 raw NEF, converted by dcraw.
call %PICTBAT%24card ^
  %NIKON_NEF% ^
  ccc_ph2_XX.png

if ERRORLEVEL 1 goto error

call %PICTBAT%bottomLineGray ^
  ccc_ph2_mat.png
0.0836699
|
|
|
GoPro, rectified
call %PICTBAT%24card ^
  %GOPRO_RECT% ^
  ccc_ph4_XX.png

if ERRORLEVEL 1 goto error

call %PICTBAT%bottomLineGray ^
  ccc_ph4_mat.png
0.00801357
|
|
|
Scanner
call %PICTBAT%24card ^
  %SRCDIR%24cardScan.tiff ^
  ccc_ph5_XX.png

if ERRORLEVEL 1 goto error

call %PICTBAT%bottomLineGray ^
  ccc_ph5_mat.png
0.00731214
|
|
When we have two 6x4 images, "-process cols2mat" calculates the 12 numbers a..m, and hence the 6x6 colour matrix, that best transforms the first image to the second.
| Option |
Description |
Short
form |
Long form |
| m string
|
method string
|
Method for calculating the matrix, one of:
Cross include cross-channel multipliers (12 terms);
NoCross exclude cross-channel multipliers (6 terms);
NoCrossPoly polynomial without cross-channel (3*degreePoly+3 terms);
GainOnly include only this-channel multipliers (3 terms).
Default = Cross. |
| d integer
|
degreePoly integer
|
For method NoCrossPoly, degree of polynomial.
For example: degree 3 gives v' = a*v3 + b*v2 + c*v + d.
Default: 2. |
| w number
|
weightLast number
|
Weight for last line of image.
For example: more than 1.0 (eg 10, 100) to give greater weight to last line,
between 0.0 and 1.0 to give less weight.
Default: 1.0. |
| wa
|
weightAlpha
|
Multiplies weight by product of the pixel alphas. |
| x
|
noTrans
|
Don't replace images with transformation. |
| f string
|
file string
|
Write text data (the colour matrix) to stderr or stdout.
Default = stderr. |
| v
|
verbose
|
Write some text output to stderr. |
|
|
version
|
Write version information to stdout. |
The module needs two or three input images. The first two inputs must be the same size as each other. It replaces all the inputs with a single output image. It calculates the colour matrix or polynomial from the first two inputs. If there are only two inputs, the output is the first transformed by the colour matrix or polynomial. If there are three inputs then the output is the third transformed by the colour matrix or polynomial.
The inputs must have three colour chanels, representing RGB, L*a*b*, YIQ or whatever. For RGB images, I use it with sRGB colorspace, but I expect it will work with any profiled 3-channel colorspace.
Typically the first two inputs are small, with one pixel per colour patch, so examples on this page are 6x4 pixels. But they can be any size, provided they are the same size and the pixels correspond. It takes about four seconds to process a pair of 35 MP images.
For the NoCrossPoly method, the text output is three lists of polynomial coefficients. For the other methods, the text output is a single list of numbers in the 6x6 matrix. (A more general polynomial with cross-channel terms is possible, but IM has no operation for this.)
The calculation gives equal weight to all the input pixels, but a different weight may be applied to the last row on input pixels.
When we have a photo of the card, we can use the process module to correct the gray balance of the photo, and any others taken under the same conditions. The method is: crop to just the last row, create a clone and grayscale it, calculate with NoCross the matrix that most closely does that grayscale transformation, and apply that matrix to the entire image.
|
Gray-balance the Nikon JPEG.
%IM7DEV%magick ^
  ccc_ph1_mat.png ^
  -gravity South ^
  -crop x1+0+0 +repage ^
  ( +clone ^
    -colorspace Gray ^
  ) ^
  %NIKON_JPG% ^
  -process 'cols2mat method NoCross' ^
  %RESWEB% ^
  +depth ^
  ccc_ph1_corr1.miff
|
|
|
Gray-balance the Nikon NEF.
%IM7DEV%magick ^
  ccc_ph2_mat.png ^
  -gravity South ^
  -crop x1+0+0 +repage ^
  ( +clone ^
    -colorspace Gray ^
  ) ^
  %NIKON_NEF% ^
  -process 'cols2mat method NoCross' ^
  %RESWEB% ^
  +depth ^
  ccc_ph2_corr1.miff
|

|
|
Gray-balance the GoPro
%IM7DEV%magick ^
  ccc_ph4_mat.png ^
  -gravity South ^
  -crop x1+0+0 +repage ^
  ( +clone ^
    -colorspace Gray ^
  ) ^
  %GOPRO_ORIG% ^
  -process 'cols2mat method NoCross' ^
  %RESWEB% ^
  +depth ^
  ccc_ph4_corr1.miff
|
|
|
Gray-balance the scanned image
%IM7DEV%magick ^
  ccc_ph5_mat.png ^
  -gravity South ^
  -crop x1+0+0 +repage ^
  ( +clone ^
    -colorspace Gray ^
  ) ^
  %SRCDIR%24cardScan.tiff ^
  -process 'cols2mat method NoCross' ^
  %RESWEB% ^
  +depth ^
  ccc_ph5_corr1.miff
|
|
The script
24cardSelfGray.bat shows the 6x6 colour matrix that most closely makes the last line gray, and shows the RMSE difference from gray.
call %PICTBAT%24cardSelfGray ccc_ph1_mat.png
c2matrix=0.91815879,0,0,0,0,-0.051244805,0,1.0121984,0,0,0,0.010381178,0,0,1.1586241,0,0,0.0764689,0,0,0,1,0,0,0,0,0,0,1,0,0,0,0,0,0,1
Warning: may clip Red shadows
Warning: may clip Green highlights
0.0050001694
call %PICTBAT%24cardSelfGray ccc_ph2_mat.png
c2matrix=0.89018081,0,0,0,0,-0.030826899,0,1.0206407,0,0,0,0.0051988516,0,0,1.1939421,0,0,0.061844365,0,0,0,1,0,0,0,0,0,0,1,0,0,0,0,0,0,1
Warning: may clip Red shadows
Warning: may clip Green highlights
0.001116119
call %PICTBAT%24cardSelfGray ccc_ph4_mat.png
c2matrix=0.99590409,0,0,0,0,-0.0082288932,0,1.0020992,0,0,0,0.0025772433,0,0,0.98797073,0,0,8.676338e-05,0,0,0,1,0,0,0,0,0,0,1,0,0,0,0,0,0,1
Warning: may clip Red shadows
Warning: may clip Green highlights
0.004362172
call %PICTBAT%24cardSelfGray ccc_ph5_mat.png
c2matrix=0.97965167,0,0,0,0,0.014432362,0,1.0056246,0,0,0,-0.0035689738,0,0,1.0034697,0,0,-0.0069748335,0,0,0,1,0,0,0,0,0,0,1,0,0,0,0,0,0,1
Warning: may clip Green shadows
Warning: may clip Green highlights
0.0055238051
The RMSE numbers are all below 1%, so we can expect the results will look visually neutral.
When we have two photos that both include gray patches, we can (if we want) use this information to adjust the tones of one photo to roughly match the other. For example, adjust the Nikon grayscale to match the GoPro grayscale, even though the GoPro grayscale isn't balanced:
|
Gray-balance the Nikon NEF to the GoPro.
%IM7DEV%magick ^
  ccc_ph2_mat.png ^
  ccc_ph4_mat.png ^
  -gravity South ^
  -crop x1+0+0 +repage ^
  %NIKON_NEF% ^
  -process 'cols2mat method NoCross' ^
  %RESWEB% ^
  +depth ^
  ccc_ph2_corrgp.miff
|

|
We can process the grayed clone as needed. For example, we auto-level then back off, so the darkest patch is 5% and the lightest is 90%. We demonstrate this on just the GoPro photo.
|
Gray-balance and level the GoPro
%IM7DEV%magick ^
  ccc_ph4_mat.png ^
  -gravity South ^
  -crop x1+0+0 +repage ^
  ( +clone ^
    -colorspace Gray ^
    -auto-level ^
    +level 5,90%% ^
  ) ^
  %GOPRO_ORIG% ^
  -process 'cols2mat method NoCross' ^
  %RESWEB% ^
  +depth ^
  ccc_ph4_corr2.miff
|
|
We can use any pixels we want instead of the grayed clone. For example, if we assume the gray patches should be evenly spread between black and white:
|
Gray-balance and "gradient" the GoPro
%IM7DEV%magick ^
  ccc_ph4_mat.png ^
  -gravity South ^
  -crop x1+0+0 +repage ^
  ( -size 6x1 gradient: ^
  ) ^
  %GOPRO_ORIG% ^
  -process 'cols2mat method NoCross' ^
  %RESWEB% ^
  +depth ^
  ccc_ph4_corr3.miff
|
|
|
Gray-balance and negate the GoPro
%IM7DEV%magick ^
  ccc_ph4_mat.png ^
  -gravity South ^
  -crop x1+0+0 +repage ^
  ( -size 6x1 gradient: ^
    -negate ^
  ) ^
  %GOPRO_ORIG% ^
  -process 'cols2mat method NoCross' ^
  %RESWEB% ^
  +depth ^
  ccc_ph4_corr4.miff
|
|
Of course, there are limitations. We are only applying a gain and bias (a multiplier and addition) to each channel, so we can't do tricks like solarize, or even raise mid-tones while leaving shadows and highlights alone.
By the same process, we could adjust gray balance on photos to roughly match any other photo.
The bottomLineGray.bat numbers show the RMSE from neutral gray. The numbers are around 0.5% which is generally good enough but not perfect, perhaps because the card isn't neutral gray across its range, or the camera sensors aren't linear, or whatever.
If greater accuracy is desired, a non-linear solution could be found using independent polynomials of arbitrary degree, or Bezier curves, for each channel.
Dcraw gives some metadata about raw files:
%DCRAW% -v -i %SRCDIR%AGA_3409.nef
 Filename: C:\pictures\20171021\AGA_3409.nef
Timestamp: Sat Oct 21 18:26:17 2017
Camera: Nikon D800
Owner: Alan Gibson
ISO speed: 2000
Shutter: 1/250.0 sec
Aperture: f/1.8
Focal length: 85.0 mm
Embedded ICC profile: no
Number of raw images: 1
Thumb size:  7360 x 4912
Full size:   7424 x 4924
Image size:  7378 x 4924
Output size: 7378 x 4924
Raw colors: 3
Filter pattern: RG/GB
Daylight multipliers: 2.099064 0.928145 1.096731
Camera multipliers: 1.214844 1.000000 2.507812 0.000000
The "Daylight multipliers", when divided by G, are (2.261569,1,1.181638).
I took the Nikon photo with the camera white balance (WB) set to auto, so the camera decided on a WB ("Camera multipliers"), probably by assuming the brightest pixel should be neutral. I could have set the camera WB manually, or I could have taken a dummy photograph of a gray card and used that setting for the real photographs. The camera used the WB setting to make the JPEG, and recorded it in the NEF, and I told dcraw to use that.
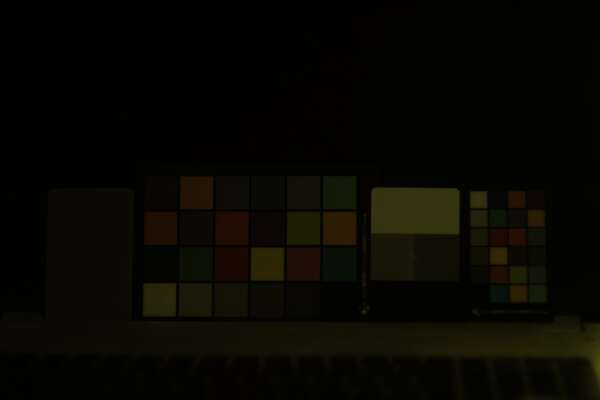
I could have told dcraw to ignore the camera's white balance, so dcraw would use the daylight multipliers, which gives this:
|
Nikon NEF, daylight multipliers
%DCRAW% ^
  -v -6 -T ^
  -O ccc_nef_day.tiff ^
  %SRCDIR%AGA_3409.nef

%IMG7%magick ^
  ccc_nef_day.tiff ^
  %RESWEB% ^
  ccc_nef_day.miff
|
|
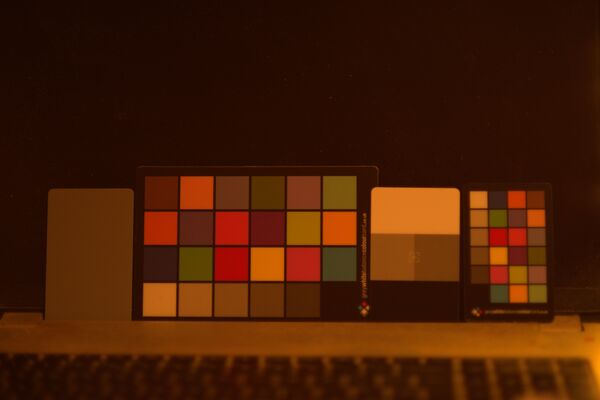
To be more extreme, I can tell dcraw not to multiply the channels at all (the factors are "1 1 1 1"), nor to automatically brighten the image ("-W"), nor to convert to sRGB "-g 1 1 -o 0".
|
Nikon NEF, unity multipliers
%DCRAW% ^
  -v -6 -T -r 1 1 1 1 -W ^
  -g 1 1 -o 0 ^
  -O ccc_nef_uni.tiff ^
  %SRCDIR%AGA_3409.nef

%IMG7%magick ^
  ccc_nef_uni.tiff ^
  %RESWEB% ^
  ccc_nef_uni.miff
|
|
We can use this image as the basis of our own gray and colour balancing, using the methods described on this page to feed back into dcraw, and this is shown on a more advanced page,
dcraw and WB. For this page, we will assume we are working on photos that "look normal".
As far as I know, in-camera white-balance always works by multiplying channels, so this is a gain-only process that has three variables. As the WB maintains lightness, there are only two independent variables. If they work on colour temperature, there is only one independent variable. The Nikon D800 seems to have two independent variables, with a resolution of one part in 256.
When balancing grays, is simple multiplication (one term per channel) good enough? Put the question another way: compare a "method GainOnly" (one term per channel) result to the perfect gray, and compare a "method NoCross" (two terms per channel) result to the perfect gray. We expect the "method NoCross" to be better because it is gain and bias. But how much better is it?
Using real-world photos, "method GainOnly" is typically 2% RMSE from perfect gray, and "method NoCross" is typically 0.2% RMSE from perfect gray. And "method Cross" is typically 0.0% RMSE from perfect gray.
A 2% RMSE difference is noticable. I conclude: simple multiplication is better than no balancing at all, but it isn't good enough for critical work.
We can correct photos so the colours will roughly match some standard reference. Methods include:
- Adjust so the six gray patches roughly match the reference grays. See
Gray balance above.
- Adjust so all 24 patches roughly match the reference as photographed.
- Adjust so all 24 patches roughly match the gray-balanced reference.
- Adjust so all 24 patches roughly match the hue and saturation of the reference, but leaving the lightness unchanged.
- Adjust so all 24 patches roughly match a set of numbers (see
Absolute correct values below).
For example, method (2) tries to match all patches, as photographed:
|
Change Nikon colours to match GoPro
%IM7DEV%magick ^
  ccc_ph2_mat.png ^
  ccc_ph4_mat.png ^
  %NIKON_NEF% ^
  -process 'cols2mat' ^
  %RESWEB% ^
  +depth ^
  ccc_ph2_colc1.miff
|
|
Method (3) balances the grays of the GoPro image (by cropping to the bottom line, grayscaling it, calculating the colour matrix that does this, and applying the matrix to the entire 6x4 image), then calculates the matrix that corrects the Nikon 6x4 to that.
|
Change Nikon colours to match gray-balanced GoPro
%IM7DEV%magick ^
  ccc_ph2_mat.png ^
  ( ccc_ph4_mat.png +write mpr:PH4MAT ^
    -gravity South ^
    -crop x1+0+0 +repage ^
    ( +clone ^
      -colorspace Gray ^
    ) ^
    mpr:PH4MAT ^
    -process 'cols2mat method NoCross' ^
  ) ^
  %NIKON_NEF% ^
  -process 'cols2mat' ^
  %RESWEB% ^
  +depth ^
  ccc_ph2_colc2.miff
|

|
In production use, we want to transform a number of images (perhaps thousands of video frames) in the same way, so we would save the -color-matrix parameters and re-use those, like this:
First, calculate the colour matrix:
set CMAT=
for /F "usebackq tokens=1,2 delims==" %%A in (`%IM7DEV%magick ^
  ccc_ph2_mat.png ^
  ^( ccc_ph4_mat.png +write mpr:PH4MAT ^
     -gravity South ^
     -crop x1+0+0 +repage ^
     ^( +clone ^
        -colorspace Gray ^
     ^) ^
     mpr:PH4MAT ^
     -process 'cols2mat method NoCross' ^
  ^) ^
  -process 'cols2mat f stdout' ^
  NULL:`) do (
  if "%%A"=="c2matrix" set CMAT=%%B
)
if "%CMAT%"=="" goto error

echo CMAT=%CMAT%
CMAT=0.70218277,0.18525511,0.073965936,0,0,-0.066312413,0.063458941,0.8803465,0.14788767,0,0,-0.053001058,-0.0039670147,0.21125834,1.029733,0,0,-0.0093883989,0,0,0,1,0,0,0,0,0,0,1,0,0,0,0,0,0,1
Then, use the same matrix to transform all the images (only one shown):
|
Change Nikon colours to match gray-balanced GoPro
%IMG7%magick ^
  %NIKON_NEF% ^
  -color-matrix %CMAT% ^
  %RESWEB% ^
  +depth ^
  ccc_ph2_colc2b.miff
|
|
Method (4) is similar, but it saves the L channel of a Lab version of the Nikon image before transforming it, and restores L afterwards.
|
Change Nikon colours to match gray-balanced GoPro,
saving and restoring lightness.
%IM7DEV%magick ^
  ccc_ph2_mat.png ^
  ( ccc_ph4_mat.png +write mpr:PH4MAT ^
    -gravity South ^
    -crop x1+0+0 +repage ^
    ( +clone ^
      -colorspace Gray ^
    ) ^
    mpr:PH4MAT ^
    -process 'cols2mat method NoCross' ^
  ) ^
  %NIKON_NEF% ^
  ( +clone ^
    -colorspace Lab ^
    -channel R -separate +write mpr:LIGHT ^
    +channel ^
    +delete ^
  ) ^
  -process 'cols2mat' ^
  -colorspace Lab -separate ^
  mpr:LIGHT ^
  -swap 0,3 +delete ^
  -combine ^
  -set colorspace Lab ^
  -colorspace sRGB ^
  +write ccc_ph2_colc3_lge.miff ^
  %RESWEB% ^
  +depth ^
  ccc_ph2_colc3.miff
|
|
This involves three colorspace conversions, which would be painful for thousands of video frames. We want a simple "-color-matrix" for each frame. So we find the matrix that most closely gives us the overall transformation of the previous example, the transformation from NIKON_NEF to ccc_ph2_colc3_lge.miff. We could modify the command above to find the colour matrix, but we will do it in a separate command:
set CMAT4=
for /F "usebackq tokens=1,2 delims==" %%A in (`%IM7DEV%magick ^
  %NIKON_NEF% ^
  ccc_ph2_colc3_lge.miff ^
  -process 'cols2mat noTrans f stdout' ^
  NULL:`) do (
  if "%%A"=="c2matrix" set CMAT4=%%B
)
if "%CMAT4%"=="" goto error

echo CMAT4=%CMAT4%
CMAT4=0.81729774,0.1371118,-0.07512135,0,0,-0.016749143,0.15663633,0.84605271,0.0049506909,0,0,-0.00065786822,0.077396,0.19292427,0.87541176,0,0,0.045005026,0,0,0,1,0,0,0,0,0,0,1,0,0,0,0,0,0,1
Then we would apply the colour matrix to all the frames. But we will do just one, the same input that we used in the long command with three colorspaces. Then we can compare results and see how accurate the -color-matrix is.
|
Change Nikon colours to match gray-balanced GoPro,
saving and restoring lightness.
%IMG7%magick ^
  %NIKON_NEF% ^
  -color-matrix %CMAT4% ^
  +write ccc_ph2_colc2d_lge.miff ^
  %RESWEB% ^
  +depth ^
  ccc_ph2_colc2d.miff

%IMG7%magick compare ^
  -metric RMSE ^
  ccc_ph2_colc3_lge.miff ^
  ccc_ph2_colc2d_lge.miff ^
  NULL:
460.39 (0.0070251)
|
|
The error is less than 1%.
As with gray balance, we can manipulate the pixels for various purposes. For example, increase chroma by dividing by the maximum chroma, so one patch will be fully saturated. ("-fx" used to be slow. Here, it is operating on an image of only 24 pixels, so speed is not a problem.)
%IM7DEV%magick ^
  ccc_ph2_mat.png ^
  ( +clone ^
    -colorspace HCL ^
    -separate ^
    ( -clone 1 ^
      -fx u/maxima ^
    ) ^
    -swap 1,3 +delete ^
    -combine ^
    -set colorspace HCL ^
    -colorspace sRGB ^
  ) ^
  %NIKON_NEF% ^
  -process 'cols2mat' ^
  %RESWEB% ^
  +depth ^
  ccc_ph2_colc4.miff
|
|
(An alternative would be to "-auto-level" the chroma.)
Another possibility: change Nikon colours to match a tweaked version of the GoPro, where we have tilted the red and blue channels to warm the highlights and cool the shadows.
|
Change Nikon colours to match tweaked GoPro
%IM7DEV%magick ^
  ccc_ph2_mat.png ^
  ( ccc_ph4_mat.png ^
    -channel R -function Polynomial 1.2,-0.1 ^
    -channel B -function Polynomial 0.8,0.1 ^
    +channel ^
  ) ^
  %NIKON_NEF% ^
  -process 'cols2mat' ^
  %RESWEB% ^
  +depth ^
  ccc_ph2_colc1t.miff
|
|
We apply the
sparse hald clut method to replicate the previous section. Populating a sparse hald clut is slow when the inputs are large. The inputs here have only 24 pixels, so that isn't a problem.
Method (2):
|
Change Nikon colours to match GoPro
call %PICTBAT%smSpHald ^
  ccc_ph2_mat.png ^
  ccc_ph4_mat.png ^
  ccc_ph24_hald.miff

%IMG7%magick ^
  %NIKON_NEF% ^
  %sshOUTFILE% ^
  -hald-clut ^
  %RESWEB% ^
  +depth ^
  ccc_ph2_h1.miff
|

|
Method (3):
|
Change Nikon colours to match gray-balanced GoPro
%IM7DEV%magick ^
  ccc_ph4_mat.png +write mpr:PH4MAT ^
  -gravity South ^
  -crop x1+0+0 +repage ^
  ^( +clone ^
     -colorspace Gray ^
  ^) ^
  mpr:PH4MAT ^
  -process 'cols2mat method NoCross' ^
  ccc_ph4gr_mat.png

call %PICTBAT%smSpHald ^
  ccc_ph2_mat.png ^
  ccc_ph4gr_mat.png ^
  ccc_ph24gr_hald.miff

%IMG7%magick ^
  %NIKON_NEF% ^
  %sshOUTFILE% ^
  -hald-clut ^
  %RESWEB% ^
  +depth ^
  ccc_ph1_h2.miff
|
|
Method (4):
|
Change Nikon colours to match gray-balanced GoPro,
saving and restoring lightness.
%IM7DEV%magick ^
  ( ccc_ph2_mat.png ^
    -colorspace Lab ^
    -channel R -separate +write mpr:LIGHT ^
    +channel ^
    +delete ^
  ) ^
  ccc_ph4_mat.png +write mpr:PH4MAT ^
  -gravity South ^
  -crop x1+0+0 +repage ^
  ^( +clone ^
     -colorspace Gray ^
  ^) ^
  mpr:PH4MAT ^
  -process 'cols2mat method NoCross' ^
  -colorspace Lab -separate ^
  mpr:LIGHT ^
  -swap 0,3 +delete ^
  -combine ^
  -set colorspace Lab ^
  -colorspace sRGB ^
  ccc_ph4gr4_mat.png

call %PICTBAT%smSpHald ^
  ccc_ph2_mat.png ^
  ccc_ph4gr4_mat.png ^
  ccc_ph24gr4_hald.miff

%IMG7%magick ^
  %NIKON_NEF% ^
  %sshOUTFILE% ^
  -hald-clut ^
  %RESWEB% ^
  +depth ^
  ccc_ph1_h4.miff
|
|
If we photograph a chart and record it as an sRGB (or other colorspace) image, can we say that the patches when photographed under some standard conditions should have certain known values? Yes, provided the chart's spectral reflectance has been scientifically measured, perhaps by the manufacturer, or the manufacturer has measured the average of a batch of cards and there is good consistency, and the card in use has not faded, and so on.
We might assume that the card I use has the same properties as the "BabelColor Average" data set (see the Pascale
reference). The assumption is probably wrong as my card is printed, not painted, so the spectral response will be different. If the assumption were true, the script
babelCol.bat creates what a photo of the card should look like:
call %PICTBAT%babelCol ^
  %PICTBAT%babelCol.txt ccc_babel.png

call %PICTBAT%bottomLineGray ^
  ccc_babel.png
0.00487778
|

|
|
Scale it up so we can see it:
%IMG7%magick ^
  ccc_babel.png ^
  -scale "600x400^!" ^
  ccc_babel_lge.png
|
|
We can adjust the gray balance or all 24 patches to this "absolute" standard:
|
Adjust gray balance:
%IM7DEV%magick ^
  ccc_ph4_mat.png ^
  ccc_babel.png ^
  -gravity South ^
  -crop x1+0+0 +repage ^
  %GOPRO_ORIG% ^
  -process 'cols2mat method NoCross' ^
  %RESWEB% ^
  +depth ^
  ccc_ph4_corr5.miff
|
|
|
Adjust all 24 patches:
%IM7DEV%magick ^
  ccc_ph4_mat.png ^
  ccc_babel.png ^
  %GOPRO_ORIG% ^
  -process 'cols2mat' ^
  %RESWEB% ^
  +depth ^
  ccc_ph4_corr6.miff
|
|
We do the same, with a sparse hald clut:
|
Adjust gray balance:
%IMG7%magick ^
  ccc_ph4_mat.png ^
  ccc_babel.png ^
  -gravity South ^
  -crop x1+0+0 +repage ^
  +adjoin ^
  ccc_tmp_2gray-%%d.miff

call %PICTBAT%smSpHald ^
  ccc_tmp_2gray-0.miff ^
  ccc_tmp_2gray-1.miff ^
  ccc_ph2b_hald1.miff

%IMG7%magick ^
  %GOPRO_ORIG% ^
  %sshOUTFILE% ^
  -hald-clut ^
  %RESWEB% ^
  +depth ^
  ccc_ph4_corrh1.miff
|
|
|
Adjust all 24 patches:
call %PICTBAT%smSpHald ^
  ccc_ph4_mat.png ^
  ccc_babel.png ^
  ccc_ph2b_hald2.miff

%IMG7%magick ^
  %GOPRO_ORIG% ^
  %sshOUTFILE% ^
  -hald-clut ^
  %RESWEB% ^
  +depth ^
  ccc_ph4_corrh2.miff
This has banding.
|
|
Sparse hald clut is not a good method for balancing grays. The initial population of the hald clut is a few values almost on the diagonal of the colour cube, between black and white. All other values are extrapolated from these, so it only take a small amount of weirdness in these initial values to skew the other values in the cube.
The adjustment for 24 patches shows banding around highlights. We can see the problem more clearly by applying the hald clut to a grayscale gradient:
|
Apply hald to gradient:
%IMG7%magick ^
  -size 50x600 gradient: ^
  -rotate -90 ^
  ( +clone ^
    %sshOUTFILE% ^
    -hald-clut ^
  ) ^
  -append +repage ^
  +depth ^
  ccc_gr_corrh2.miff
|

|
The upper half is the gradient; the lower half is after applying the hald clut to the gradient. So the problem is caused by the hald clut. With Shepards distortion, graycale inputs with intensity between the patches are over-influenced by the colour patches, which may be of the "wrong" intensity.
The Nikon in-camera JPEG is a version of the Nikon NEF, cropped ("-crop 7360x4912+8+6") and with other adjustments. We can easily compare them:
%IMG7%magick ^
  %NIKON_JPG% ^
  ( %NIKON_NEF% ^
    -crop 7360x4912+8+6 +repage ^
  ) ^
  -metric RMSE ^
  -format %%[distortion] ^
  -compare ^
  info:
0.110438
As a comparison test, we transform the in-camera Nikon JPEG to look more list the converted NEF. We do this in three different ways (Cross, NoCrossPoly, and Hald) in three different colorspaces (sRGB, RGB, and Lab).
After adjusting the JPEG to the NEF with a colour matrix, what is the error?
%IM7DEV%magick ^
  ccc_ph1_mat.png ^
  ccc_ph2_mat.png ^
  %NIKON_JPG% ^
  -process 'cols2mat' ^
  ( %NIKON_NEF% ^
    -crop 7360x4912+8+6 +repage ^
  ) ^
  -metric RMSE ^
  -format %%[distortion] ^
  -compare ^
  info:
0.046560869
As previous but in RGB space:
%IM7DEV%magick ^
  ccc_ph1_mat.png ^
  ccc_ph2_mat.png ^
  %NIKON_JPG% ^
  -colorspace RGB ^
  -set colorspace sRGB ^
  -process 'cols2mat' ^
  -set colorspace RGB ^
  -colorspace sRGB ^
  ( %NIKON_NEF% ^
    -crop 7360x4912+8+6 +repage ^
  ) ^
  -metric RMSE ^
  -format %%[distortion] ^
  -compare ^
  info:
0.31167814
What has caused this terrible score? Visually, we find the shadows have been crushed, even though Q32 HDRI has been used.
As previous but in Lab space:
%IM7DEV%magick ^
  ccc_ph1_mat.png ^
  ccc_ph2_mat.png ^
  %NIKON_JPG% ^
  -colorspace Lab ^
  -set colorspace sRGB ^
  -process 'cols2mat' ^
  -set colorspace Lab ^
  -colorspace sRGB ^
  ( %NIKON_NEF% ^
    -crop 7360x4912+8+6 +repage ^
  ) ^
  -metric RMSE ^
  -format %%[distortion] ^
  -compare ^
  info:
0.045958709
After adjusting the JPEG to the NEF with a polynomial, what is the error?
%IM7DEV%magick ^
  ccc_ph1_mat.png ^
  ccc_ph2_mat.png ^
  %NIKON_JPG% ^
  -process 'cols2mat m NoCrossPoly d 2' ^
  ( %NIKON_NEF% ^
    -crop 7360x4912+8+6 +repage ^
  ) ^
  -metric RMSE ^
  -format %%[distortion] ^
  -compare ^
  info:
0.033915143
%IM7DEV%magick ^
  ccc_ph1_mat.png ^
  ccc_ph2_mat.png ^
  %NIKON_JPG% ^
  -process 'cols2mat m NoCrossPoly d 3' ^
  ( %NIKON_NEF% ^
    -crop 7360x4912+8+6 +repage ^
  ) ^
  -metric RMSE ^
  -format %%[distortion] ^
  -compare ^
  info:
0.039172504
As previous (d 2) but in RGB space:
%IM7DEV%magick ^
  ccc_ph1_mat.png ^
  ccc_ph2_mat.png ^
  %NIKON_JPG% ^
  -colorspace RGB ^
  -set colorspace sRGB ^
  -process 'cols2mat m NoCrossPoly d 2' ^
  -set colorspace RGB ^
  -colorspace sRGB ^
  ( %NIKON_NEF% ^
    -crop 7360x4912+8+6 +repage ^
  ) ^
  -metric RMSE ^
  -format %%[distortion] ^
  -compare ^
  info:
0.22054389
As previous (d 2) but in Lab space:
%IM7DEV%magick ^
  ccc_ph1_mat.png ^
  ccc_ph2_mat.png ^
  %NIKON_JPG% ^
  -colorspace Lab ^
  -set colorspace sRGB ^
  -process 'cols2mat m NoCrossPoly d 2' ^
  -set colorspace Lab ^
  -colorspace sRGB ^
  ( %NIKON_NEF% ^
    -crop 7360x4912+8+6 +repage ^
  ) ^
  -metric RMSE ^
  -format %%[distortion] ^
  -compare ^
  info:
0.032475569
We can adjust the JPEG to the NEF using a hald-clut.
call %PICTBAT%smSpHald ^
  ccc_ph1_mat.png ^
  ccc_ph2_mat.png ^
  ccc_ph12_hald1.miff

%IMG7%magick ^
  %NIKON_JPG% ^
  ccc_ph12_hald1.miff ^
  -hald-clut ^
  ( %NIKON_NEF% ^
    -crop 7360x4912+8+6 +repage ^
  ) ^
  -metric RMSE ^
  -format %%[distortion] ^
  -compare ^
  info:
0.063041
As previous (hald-clut) but in RGB space.
%IMG7%magick ^
  ccc_ph1_mat.png ^
  ccc_ph2_mat.png ^
  -colorspace RGB ^
  -set colorspace sRGB ^
  +adjoin ^
  ccc_tmp_%%d.miff

call %PICTBAT%smSpHald ^
  ccc_tmp_0.miff ^
  ccc_tmp_1.miff ^
  ccc_ph12_hald2.miff

%IMG7%magick ^
  %NIKON_JPG% ^
  -colorspace RGB ^
  -set colorspace sRGB ^
  ccc_ph12_hald2.miff ^
  -hald-clut ^
  -set colorspace RGB ^
  -colorspace sRGB ^
  ( %NIKON_NEF% ^
    -crop 7360x4912+8+6 +repage ^
  ) ^
  -metric RMSE ^
  -format %%[distortion] ^
  -compare ^
  info:
0.908003
As previous (hald-clut) but in Lab space.
%IMG7%magick ^
  ccc_ph1_mat.png ^
  ccc_ph2_mat.png ^
  -colorspace Lab ^
  -set colorspace sRGB ^
  +adjoin ^
  ccc_tmp_%%d.miff

call %PICTBAT%smSpHald ^
  ccc_tmp_0.miff ^
  ccc_tmp_1.miff ^
  ccc_ph12_hald3.miff

%IMG7%magick ^
  %NIKON_JPG% ^
  -colorspace Lab ^
  -set colorspace sRGB ^
  ccc_ph12_hald3.miff ^
  -hald-clut ^
  -set colorspace Lab ^
  -colorspace sRGB ^
  ( %NIKON_NEF% ^
    -crop 7360x4912+8+6 +repage ^
  ) ^
  -metric RMSE ^
  -format %%[distortion] ^
  -compare ^
  info:
0.0588646
|
|
Cross |
NoCrossPoly |
Hald |
| sRGB |
0.046560869 |
0.033915143 |
0.063041 |
| RGB |
0.31167814 |
0.22054389 |
0.908003 |
| Lab |
0.045958709 |
0.032475569 |
0.0588646 |
From this limited test, we draw conclusions:
- RGB colorspace is terrible for Cross and NoCrossPoly, but okay for Hald.
- The best method is Hald, then NoCrossPoly, then Cross.
- The best colorspace is Lab, then sRGB, then RGB. There is no practical difference between Lab and sRGB.
However, for large shifts, Hald can cause banding. Use it with caution.
We have seen how to use 24card.bat to make a 6x4 image from a photo (or video frame), and how to use -process cols2mat to use those 6x4 images to balance grays or correct colours.
A wider question is how to use these mechanisms within the workflow of photography or videography, and editing. I will briefly describe how I do this, with no details of scripts etc. For video, I will assume frames have been extracted into individual image files.
First, create a list of images that contain the card. For still photography, this is entirely automatic; simply call 24card.bat for every image. For video, that takes too long, and we still have the problem of reducing a sequence of frames that include the card to a single image, so I prefer to manually flag one frame per sequence.
Second, from that list, create each 6x4 image.
Third, associate each photographed image or video clip with one 6x4 image. So we have a number of sets of stills or clips, where each set has one 6x4 image.
Fourth, decide on the required transformation for each set. For images from dcraw, this usually involves re-running dcraw with revised -r multipliers. Then we want to either (a) balance the grays or (b) correct all 26 colours to a certain standard. We might also decide to apply another effect, eg warming, cooling, increase or decrease saturation. Each transformation is either a 6x6 colour matrix, or three polynomials.
Fifth, re-run dcraw as required, and apply the transformations with IM's -color-matrix or -function Polynomial.
See also Avisynth ChannelMixer() which is a 3x3 colour matrix (colour channel multipliers only) and ffmpeg colorchannelmixer which is a 4x4 colour matrix, for R, G, B and A.
A given transformation on a given image might cause clipping, at either end, in any channel. A process module to flag this and/or correct it would be useful. See
Putting OOG back in the box.
All these 6x4 images are a slight nuisance. Perhaps they should be embedded in the image they came from, perhaps as a string attribute.
For convenience, .bat scripts are also available in a single zip file. See
Zipped BAT files.
rem From %1, text file of 16-bit sRGB colours,
rem make 6x4 image %2.
@rem
@rem Updated:
@rem   22-August-2022 Upgraded for IM v7.
@rem

set DRAW_LIST=\temp\cb_draw.scr

set x=0
set y=0

echo off
(
  echo xc:
  for /F "eol=! tokens=1-3 delims=, " %%A in (%1) do (
    %IMG7%magick identify ^
      -format "-fill srgb(%%[fx:100*%%A/65535]%%%%,%%[fx:100*%%B/65535]%%%%,%%[fx:100*%%C/65535]%%%%) " ^
      xc:

    echo -draw "point !x!,!y!"

    set /A x+=1
    if !x!==6 (
      set /A y+=1
      set x=0
    )
  )
  echo %2
) >%DRAW_LIST%
echo on

%IMG7%magick ^
  -size 6x4 ^
  -script %DRAW_LIST%
29648,20935,17313
50244,38278,33089
23958,31538,40419
23139,27772,16655
33501,33047,45194
25382,48996,43894
56443,31662,11558
18426,23530,43150
50002,21654,25096
23277,15113,26893
41244,48567,15925
58773,41257,10499
11084,15826,37768
18307,38320,18395
45152,12376,14467
61195,51274,5688
48247,21529,38553
0,35005,42717
62967,62924,61645
51453,51785,51563
41222,41477,41427
30782,31198,31196
21331,21658,21772
12759,12804,12975
@rem From image %1, where bottom line should be gray.
@rem finds 6x6 colour matrix that most closely makes it gray,
@rem and the RMSE score.
@rem %2 optional method
@rem
@rem Updated:
@rem   22-August-2022 Upgraded for IM v7.
@rem

@set m=%~2
@if "%m%"=="" set m=NoCross

@%IM7DEV%magick ^
  %1 ^
  -gravity South ^
  -crop x1+0+0 +repage ^
  ( +clone ^
    -colorspace Gray ^
  ) ^
  ( -clone 0-1 ^
    -process 'cols2mat method %m% f stdout' ^
  ) ^
  -delete 0 ^
  -metric RMSE ^
  -format "%%[distortion]\n" ^
  -compare ^
  info:
All images on this page were created by the commands shown, using:
%IMG7%magick -version
Version: ImageMagick 7.1.1-15 Q16-HDRI x64 a0a5f3d:20230730 https://imagemagick.org
Copyright: (C) 1999 ImageMagick Studio LLC
License: https://imagemagick.org/script/license.php
Features: Cipher DPC HDRI OpenCL OpenMP(2.0)
Delegates (built-in): bzlib cairo freetype gslib heic jng jp2 jpeg jxl lcms lqr lzma openexr pangocairo png ps raqm raw rsvg tiff webp xml zip zlib
Compiler: Visual Studio 2022 (193532217)
%IM7DEV%magick -version
Version: ImageMagick 7.1.1-20 (Beta) Q32-HDRI x86_64 66c30fc22:20231002 https://imagemagick.org
Copyright: (C) 1999 ImageMagick Studio LLC
License: https://imagemagick.org/script/license.php
Features: Cipher DPC HDRI Modules OpenCL OpenMP(4.5)
Delegates (built-in): bzlib cairo fftw fontconfig freetype heic jbig jng jpeg lcms ltdl lzma pangocairo png raqm raw rsvg tiff webp wmf x xml zip zlib
Compiler: gcc (11.3)
Source file for this web page is colchkcha.h1. To re-create this web page, execute "procH1 colchkcha".
This page, including the images, is my copyright. Anyone is permitted to use or adapt any of the code, scripts or images for any purpose, including commercial use.
Anyone is permitted to re-publish this page, but only for non-commercial use.
Anyone is permitted to link to this page, including for commercial use.
Page version v1.1 1-Nov-2017.
Page created 07-Oct-2023 18:05:52.
Copyright © 2023 Alan Gibson.