snibgo's ImageMagick pages
Colour temperature
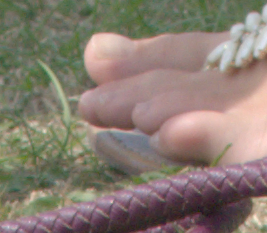
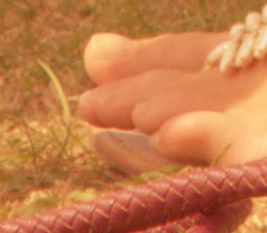
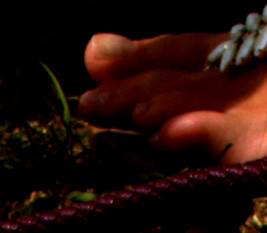
We can shift the colour temperature of an image (perhaps to compensate for light sources) by manipulating the colour channels.
See also
Clut cookbook.
Shifting the colour temperature of an image is related to white balancing.
White balancing is generally concerned with making pixels that should contain no hue (because they represent grey or white objects) actually have no hue, and adjusting other pixels accordingly. I intend to write another page about white balancing.
Colour temperature refers to the light source of a photographed object. Traditional light sources include:
- direct light from the sun;
- sunlight reflected from clouds or blue sky;
- metal heated suffciently that it glows (eg incandescent electric light bulbs).
These light sources emit a spectrum that depends on their temperature. The spectrum is measured in kelvin. (Sometime incorrectly called "degrees kelvin".)
Technically, the light source's hue should be compared to that emitted by an ideal black body radiator. When the hues match, the absolute temperature of the radiator is taken as the colour temperature of the light source. In practice, hues don't exactly match, especially with fluorescent lights and LEDs.
Aside: "cold" and "warm".
Blueish light is referred to as "cool" or "cold" where reddish light is "warm". This is a psychological description that might come from an association with cold wintry days and overcast (blueish) daylight contrasted with the warmth of summer days and bright (redder) sunshine.
Black-body temperatures work in the opposite direction: as the temperature rises, the emitted light becomes more blue.
An alternative unit is mired, micro-reciprocal kelvin. m = 1,000,000 / k. Photographic filters, placed over the camera lens, are additive in mireds. If two filters have mired shifts of A and B, then stacking the two filters will result in a mired shift of A+B. Mireds also corrrespond more closely than kelvin to human perception.
Taking some colour temperatures from
Wikipedia: Color temperature, and calculating mireds:
| Source |
Temperature |
Mireds |
| Match flame |
1,700 K |
588 M |
| Candle flame, sunset, sunrise |
1,850 K |
541 M |
| Incandescent lamps |
2,700-3,300 K |
303-370 M |
| Warm fluorescent lamps |
3,000 K |
333 M |
| Moonlight |
4,100-4,150 K |
241-244 M |
| "Daylight" fluorescent |
5,000 K |
200 M |
| Vertical daylight, electronic flash |
5,500-6,000 K |
167-182 M |
| Overcast daylight |
6,500 K |
154 M |
| LCD or CRT screen |
6,500-10,500 K |
95-154 M |
| Clear blue poleward sky |
15,000-27,000 K |
37-67 M |
Here are numbers from a Nikon D800 camera, showing the temperature of a light source and the multipliers for the four channels. I have added the mired numbers.
| Light source |
Temperature (K) |
Mireds |
R |
B |
G0 |
G1 |
| Incandescent |
3000 |
333 |
1.2890625 |
2.17578125 |
1 |
1 |
| 3130K |
3130 |
319 |
1.33203125 |
2.0859375 |
1 |
1 |
| Cool WHT FL |
3500 |
286 |
1.8125 |
1.96484375 |
1 |
1 |
| Sunny |
5200 |
192 |
1.97265625 |
1.375 |
1 |
1 |
| Flash |
5400 |
185 |
2.1875 |
1.20703125 |
1 |
1 |
| Cloudy |
6000 |
167 |
2.1015625 |
1.25390625 |
1 |
1 |
| Shade |
8000 |
125 |
2.37890625 |
1.12890625 |
1 |
1 |
| 10000K |
10000 |
100 |
2.6171875 |
1.046875 |
1 |
1 |
From these numbers we can derive the following approximations:
- To compensate for an increase in mireds (a shift towards red) of a light source, we should multiply the blue channel by a factor greater than one and divide the red channel by the same factor.
- The blue channel factor is related to the mired shift by
log(factB) / mired_shift = 0.00134
Hence
factB = 10^(mired_shift * 0.00134)
and
mired_shift = log(factB) / 0.00134
(Unpublished NikonWB.ods.)
This gives us the trivial script
miredShift.bat.
To adjust for blue light, we want a negative mired shift:
call %PICTBAT%miredShift -141
echo ms_factR=%ms_factR% ms_factB=%ms_factB% ms_chDec=%ms_chDec% ms_low_fact=%ms_low_fact%
ms_factR=1.54504 ms_factB=0.647232 ms_chDec=B ms_low_fact=0.647232
We can adjust the colour temperature of an image directly, or via a clut. We make the clut by adjusting the colour temperature of a linear gradient.
The last transformation above may be satisfactory, especially if performed on raw camera images before autolevelling and converting to sRGB.
A different soluon to the clipping problem is to process with HDRI, and "-auto-level" the result. If any processing has created pixel values outside 0..100%, they will be brought back into range. However, this will also expand the dynamic range of narrow-range images to 0..100%, and this may not be desirable.
If we want to modify midtones more than highlights and shadows, a gamma transformation can be used. To calculate the gamma required for a particular shift, suppose we want an input x to become the output y.
y = x^p

p = log(y) / log(x)
The base of the logarithms doesn't matter.
For example if we want x=0.5 to become y=0.7:
p = log(0.7) / log(0.5) = 0.51457.

gamma = 1/p = 1/0.51457 = 1.94336.
If we want to increase the value x by a constant factor k, then
p = log(k*x) / log(x)
  = (log(k) + log(x)) / log(x)
  = 1 + log(k)/log(x)
We will use the last expression to increase x=0.5 by the factors for red and blue:
for /F "usebackq" %%L in (`%IMG7%magick identify ^
  -format "powR=%%[fx:1+log(%ms_factR%)/log(0.5)]\npowB=%%[fx:1+log(%ms_factB%)/log(0.5)]" ^
  xc:`) do set %%L

echo powR=%powR% powB=%powB%
powR=0.372356 powB=1.62765
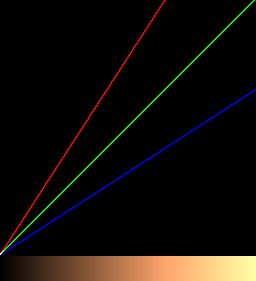
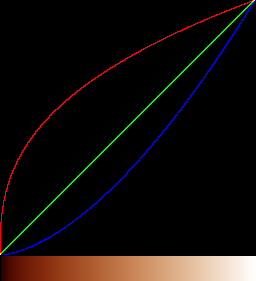
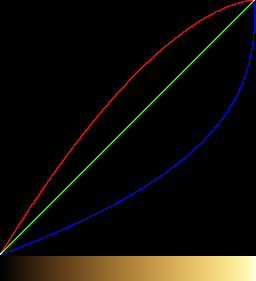
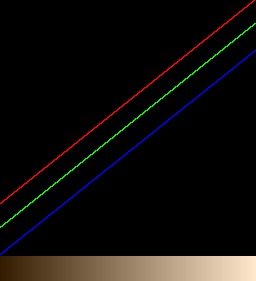
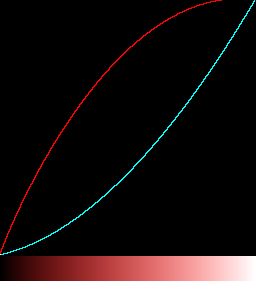
%IMG7%magick ^
-size 1x256 gradient: -rotate 90 ^
-channel R -evaluate pow %powR% ^
-channel B -evaluate pow %powB% ^
ct_pow1.png
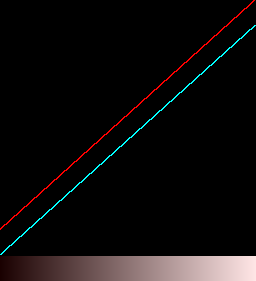
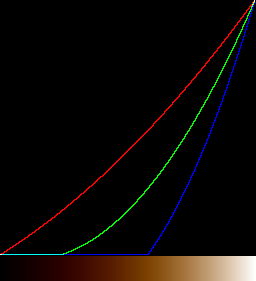
call %PICTBAT%graphLineCol ct_pow1.png
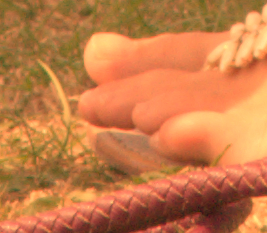
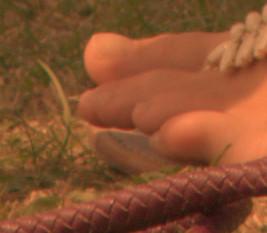
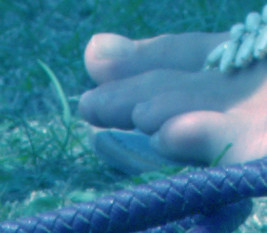
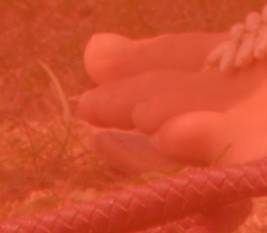
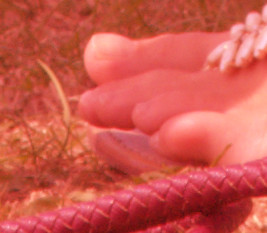
%IMG7%magick %SRC% ^
-channel R -evaluate pow %powR% ^
-channel B -evaluate pow %powB% ^
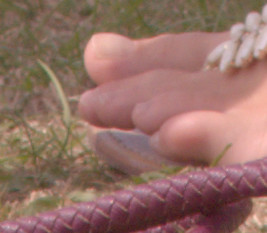
ct_src_pow1.png
The coloring is greatest at low values.
|
|
|
Invert the clut?
call %PICTBAT%invClut ct_pow1.png

call %PICTBAT%graphLineCol ct_pow1_icl.png

%IMG7%magick %SRC% ^
  ct_pow1_icl.png -clut ^
  ct_src_pow1_icl.png
The coloring is greatest at low values. ??
|
|
|
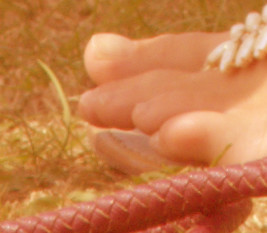
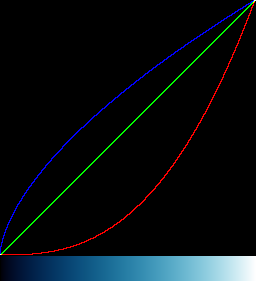
We negate the input (by rotating the other way) and output,
and also reverse the powers for the two channels.
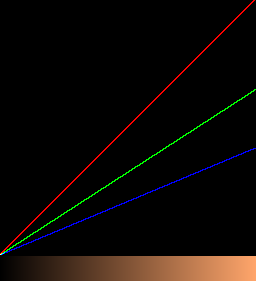
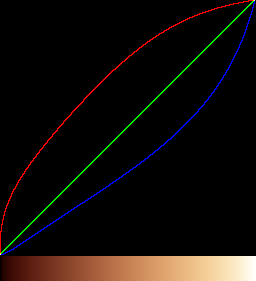
%IMG7%magick ^
-size 1x256 gradient: -rotate -90 ^
-channel R -evaluate pow %powB% ^
-channel B -evaluate pow %powR% ^
+channel ^
-negate ^
ct_pow2.png
call %PICTBAT%graphLineCol ct_pow2.png
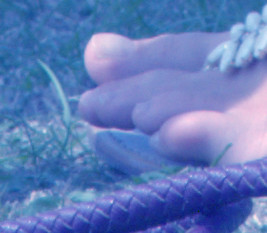
%IMG7%magick %SRC% ^
-channel R -evaluate pow %powB% ^
-channel B -evaluate pow %powR% ^
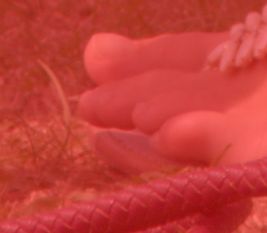
ct_src_pow2.png
The coloring is spread more evenly. However, the result is inaccurate.
|
|
|
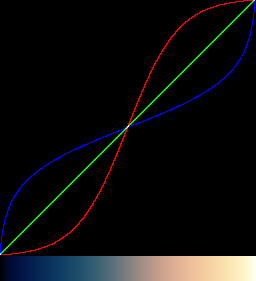
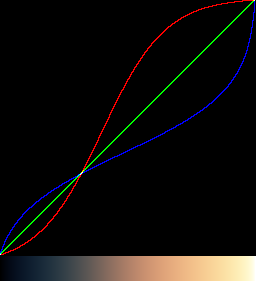
We apply sigmoidal contrast before the power,
with the steepest (neutral) point at 50% as that is where
we want a specific factor.
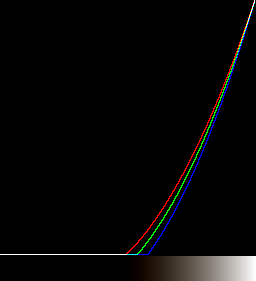
%IMG7%magick ^
-size 1x256 gradient: -rotate 90 ^
-channel R -sigmoidal-contrast 5x50%% -evaluate pow %powR% ^
-channel B +sigmoidal-contrast 5x50%% -evaluate pow %powB% ^
+channel ^
ct_pow3.png
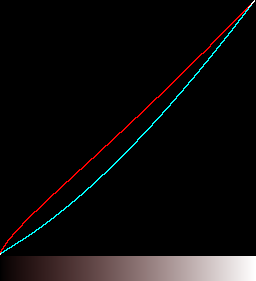
call %PICTBAT%graphLineCol ct_pow3.png
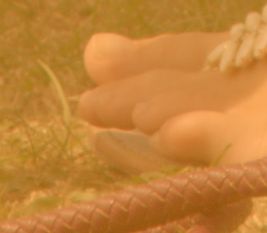
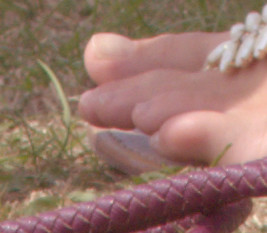
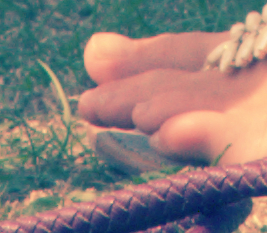
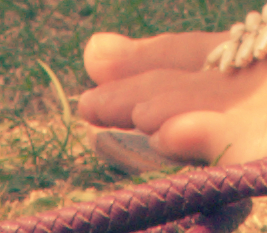
%IMG7%magick %SRC% ^
-channel R -sigmoidal-contrast 5x50%% -evaluate pow %powR% ^
-channel B +sigmoidal-contrast 5x50%% -evaluate pow %powB% ^
+channel ^
ct_src_pow3.png
The coloring is spread fairly evenly.
|
|
Other processes can be used to shift colour temperature.
%IMG7%magick ^
  -size 1x256 gradient: -rotate 90 ^
  -fill Red -colorize 10 ^
  ct_colr.png

call %PICTBAT%graphLineCol ct_colr.png

%IMG7%magick %SRC% ^
  -fill Red -colorize 10 ^
  ct_src_colr.png
|
|
%IMG7%magick ^
  -size 1x256 gradient: -rotate 90 ^
  -fill Red -colorize 50 ^
  ct_colr50.png

call %PICTBAT%graphLineCol ct_colr50.png

%IMG7%magick %SRC% ^
  -fill Red -colorize 50 ^
  ct_src_colr50.png
|

|
%IMG7%magick ^
  -size 1x256 gradient: -rotate 90 ^
  -fill #f80 -colorize 20 ^
  ct_colo.png

call %PICTBAT%graphLineCol ct_colo.png

%IMG7%magick %SRC% ^
  -fill Red -colorize 50 ^
  -fill #f80 -colorize 20 ^
  ct_src_colo.png
|
|
%IMG7%magick ^
  -size 1x256 gradient: -rotate 90 ^
  -fill #f80 -colorize 50 ^
  ct_colo50.png

call %PICTBAT%graphLineCol ct_colo50.png

%IMG7%magick %SRC% ^
  -fill #f80 -colorize 50 ^
  ct_src_colo50.png
|

|
%IMG7%magick ^
  -size 1x256 gradient: -rotate 90 ^
  -fill #f80 -tint 10 ^
  ct_tint10.png

call %PICTBAT%graphLineCol ct_tint10.png

%IMG7%magick %SRC% ^
  -fill #f80 -tint 10 ^
  ct_src_tint10.png
|
|
%IMG7%magick ^
  -size 1x256 gradient: -rotate 90 ^
  -fill #f80 -tint 50 ^
  ct_tint50.png

call %PICTBAT%graphLineCol ct_tint50.png

%IMG7%magick %SRC% ^
  -fill #f80 -tint 50 ^
  ct_src_tint50.png
|

|
%IMG7%magick ^
  -size 1x256 gradient: -rotate 90 ^
  -fill Red -tint 10 ^
  -auto-gamma ^
  ct_tint10_ag.png

call %PICTBAT%graphLineCol ct_tint10_ag.png

%IMG7%magick %SRC% ^
  -fill Red -tint 10 ^
  -auto-gamma ^
  ct_src_tint10_ag.png
|
|
%IMG7%magick ^
  -size 1x256 gradient: -rotate 90 ^
  -fill Red -tint 50 ^
  -auto-gamma ^
  ct_tint50_ag.png

call %PICTBAT%graphLineCol ct_tint50_ag.png

%IMG7%magick %SRC% ^
  -fill Red -tint 50 ^
  -auto-gamma ^
  ct_src_tint50_ag.png
|
|
|
We can warm highlights and cool shadows.
%IMG7%magick ^
  -size 1x256 gradient: -rotate 90 ^
  -channel R -sigmoidal-contrast 10,50%% ^
  -channel B +sigmoidal-contrast 10,50%% ^
  ct_sig1.png

call %PICTBAT%graphLineCol ct_sig1.png

%IMG7%magick %SRC% ^
  -channel R -sigmoidal-contrast 10,50%% ^
  -channel B +sigmoidal-contrast 10,50%% ^
  ct_src_sig1.png
Again, the coloring is greatest at low values.
|
|
%IMG7%magick ^
  -size 1x256 gradient: -rotate 90 ^
  -channel R -sigmoidal-contrast 8,40%% ^
  -channel B +sigmoidal-contrast 8,40%% ^
  ct_sig2.png

call %PICTBAT%graphLineCol ct_sig2.png

%IMG7%magick %SRC% ^
  -channel R -sigmoidal-contrast 8,40%% ^
  -channel B +sigmoidal-contrast 8,40%% ^
  ct_src_sig2.png
Again, the coloring is spread more evenly.
|
|
|
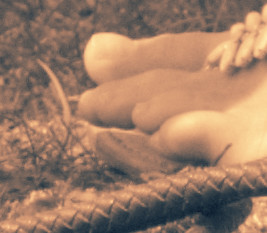
This can be used for a dual-toning of a monochrome image.
%IMG7%magick %SRC% ^
  -modulate 100,0,100 ^
  -channel R -sigmoidal-contrast 8,40%% ^
  -channel B +sigmoidal-contrast 8,40%% ^
  ct_src_sig2bw.png
|
|
For convenience, .bat scripts are also available in a single zip file. See
Zipped BAT files.
@rem From mired shift %1, returns factB and factR.
@rem
@rem Updated:
@rem   21-August-2022 Upgraded for IM v7.
@rem

@for /F "usebackq" %%L in (`%IMG7%magick identify ^
  -format "ms_factB=%%[fx:pow(10,%1*0.00134)]\nms_factR=%%[fx:1/pow(10,%1*0.00134)]" ^
  xc:`) do set %%L

set ms_shift=%1
set ms_first=%ms_shift:~0,1%

if "%ms_first%"=="-" (
  set ms_chInc=R
  set ms_chDec=B
  set ms_low_fact=%ms_factB%
) else (
  set ms_chInc=B
  set ms_chDec=R
  set ms_low_fact=%ms_factR%
)
All images on this page were created by the commands shown, using:
%IMG7%magick -version
Version: ImageMagick 7.1.0-42 Q16-HDRI x64 396d87c:20220709 https://imagemagick.org
Copyright: (C) 1999 ImageMagick Studio LLC
License: https://imagemagick.org/script/license.php
Features: Cipher DPC HDRI OpenCL
Delegates (built-in): bzlib cairo freetype gslib heic jng jp2 jpeg jxl lcms lqr lzma openexr pangocairo png ps raqm raw rsvg tiff webp xml zip zlib
Compiler: Visual Studio 2022 (193231332)
To improve internet download speeds, some images may have been automatically converted (by ImageMagick, of course) from PNG or TIFF or MIFF to JPG.
Source file for this web page is coltemp.h1. To re-create this web page, run "procH1 coltemp".
This page, including the images, is my copyright. Anyone is permitted to use or adapt any of the code, scripts or images for any purpose, including commercial use.
Anyone is permitted to re-publish this page, but only for non-commercial use.
Anyone is permitted to link to this page, including for commercial use.
Page version v1.0 20-May-2014.
Page created 22-Aug-2022 03:24:16.
Copyright © 2022 Alan Gibson.