%IMG7%magick ^ %CAMERA_JPG% ^ -resize 600 ^ cns_jpg_sm.jpg
Where it comes from, and some methods to fix it.
When a pixel has a large deviation from the local mean, we don't know whether this is due to some noise plus some detail, or more noise and no detail, or pure detail with no noise. Noise varies randomly (of course), so we cannot know how much to remove. No algorithm can remove all noise without removing any detail. For any amount of removal, some pixels will be correctly denoised, some will be over-denoised (also removing detail) and some will be insufficiently denoised. The optimum amount depends on personal taste.
Personally, I usually prefer to leave some noise in the image. This avoids an artificial plastic-like appearance, which I dislike especially in skin tones.
Some methods on this page split the raw image into four channels (RGGB), process each channel independently, re-combine the channels into a DNG file, and demosaic that file. That process is explained more carefully in Processing Bayer pixels.
See also:
Light enters a digital camera. At the other end, a bunch of numbers come out, in the form of a "raw" file. The transformation can be represented as:
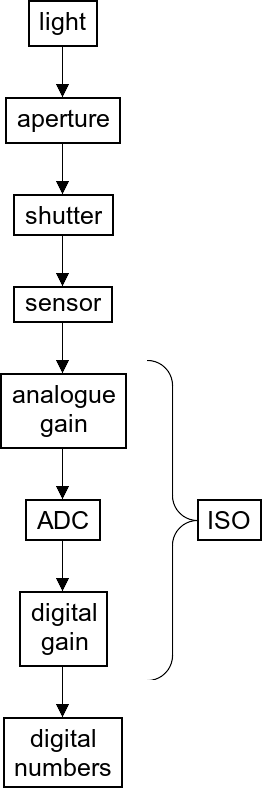
The literature describes forms of noise: photon shot noise, read noise, fixed pattern noise, thermal noise, pixel response non-uniformity (PRNU), quantization error, hot pixels, and dark current noise. Noise is inherent in light, and sensors, and the gain processes. Tests can be performed to establish the noise source. For example, does a histogram of a dark image cluster at zero or elsewhere? See the reference "Camera Test Protocol".
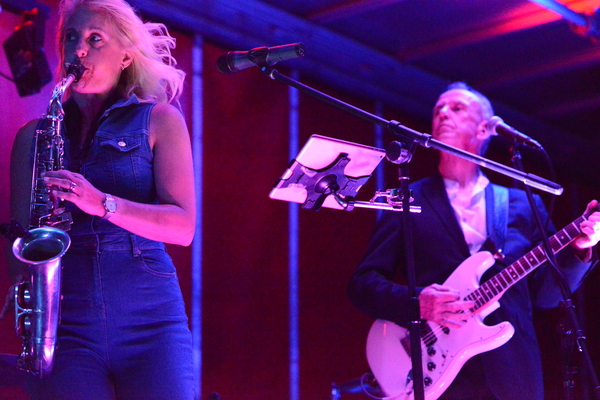
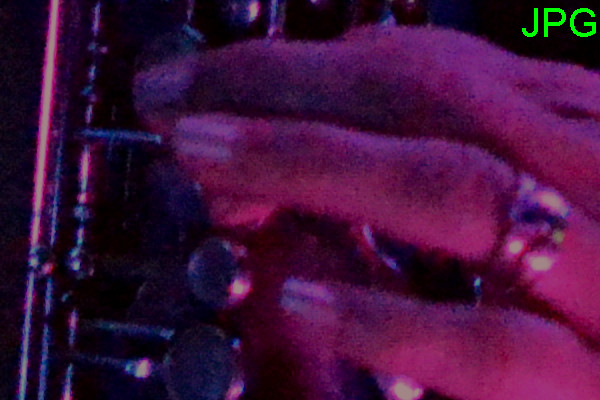
I took some photos with a Nikon D800, with reasonable hand-held exposures eg 1/200s of musicians under stage lighting, so typically ISO 6400, and measured statistics from 50x50 pixel detail-free patches of Bayer images separated into channels. For example, in the photo shown below:
tablet:          50x50+1923+918
guitar near top: 50x50+2805+1686
guitar (left):   50x50+2283+2118
dark suit:       50x50+3246+2279
dark (right):    50x50+3600+1795
I discovered that the standard deviation of noise is roughly proportional to the square root of the image intensity. This suggests that most noise is photon shot noise, rather than read noise. A better camera, even an ideal perfect noise-free camera, would not reduce this noise. I could use the camera on a tripod and ask the musicians to freeze for a couple of seconds, but this wouldn't capture live performances.
For intensity measured in a small blur, normalised to 0.0 to 1.0, defining noise as (non-detail-image minus blur), measuring standard deviation (SD) in 3x3 windows:
SDnoise = k * sqrt (intensityimage)
k is about 0.07.
set CAMERA_SRC=%PICTLIB2%20190806\AGA_4360.NEF
set CAMERA_JPG=%PICTLIB2%20190806\AGA_4360.JPG
%IMG7%magick ^ %CAMERA_JPG% ^ -resize 600 ^ cns_jpg_sm.jpg |
|
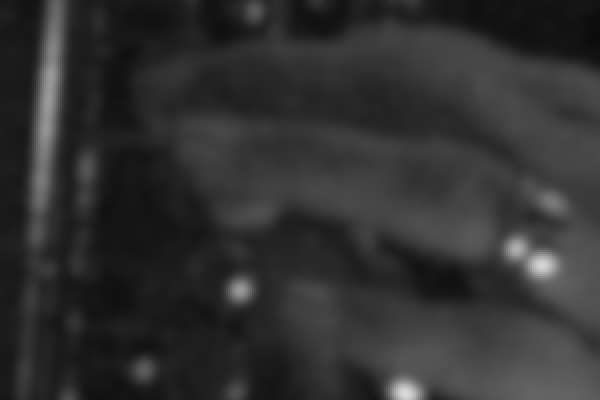
We create a linear Bayer image with no auto-brighten, but multiplying to stretch from 14 bits to 16 bits. We will show just the 1:1 crop of the red channel.
set WEBSIZE=-resize 600x400
set WEBCROP=-crop 600x400+371+2065 +repage
set WEBCROPJ=-crop 600x400+363+2059 +repage
set WEBCROP2=-crop 300x200+185+1032 +repage -scale "600x400^!"

set LOCBLR=-blur 2x1

set ANNOT=+antialias -gravity NorthEast -fill #0f0 -pointsize 40 -annotate 0

for /F "usebackq" %%L in (`%IMG7%magick identify ^
  -format "RAWMULT=%%[fx:65535/16383]" ^
  xc:`) do set %%L

set RAWOPT=-v -W -d -o 0 -6 -r 1 1 1 1 -g 1 0 -T

%DCRAW% %RAWOPT% -O cns_nse2.tiff %CAMERA_SRC%

call %PICTBAT%gray2rggb cns_nse2.tiff cns_nse2_XX.miff
We also prepare a file of arguments for exiftool to build DNG files:
(
  exiftool -args -make -model %CAMERA_SRC%

  echo -DNGVersion=1.4.0.0
  echo -DNGBackwardVersion=1.3.0.0
  echo -EXIF:SubfileType=Full-resolution Image
  echo -PhotometricInterpretation=Color Filter Array
  echo -IFD0:CFARepeatPatternDim=2 2
  echo -IFD0:CFAPattern2=0 1 1 2
  echo -Orientation=Horizontal
  echo -BitsPerSample=16
  echo -SamplesPerPixel=1
)>cns_exft_args.txt
The argument list, cns_exft_args.txt, is:
-Make=NIKON CORPORATION
-Model=NIKON D800
-DNGVersion=1.4.0.0
-DNGBackwardVersion=1.3.0.0
-EXIF:SubfileType=Full-resolution Image
-PhotometricInterpretation=Color Filter Array
-IFD0:CFARepeatPatternDim=2 2
-IFD0:CFAPattern2=0 1 1 2
-Orientation=Horizontal
-BitsPerSample=16
-SamplesPerPixel=1
For comparison, here is the red channel with no de-noising.
%IMG7%magick ^ cns_nse2_R.miff ^ %WEBCROP2% ^ -set colorspace RGB ^ -colorspace sRGB ^ cns_nse2_R_cr.miff |

|
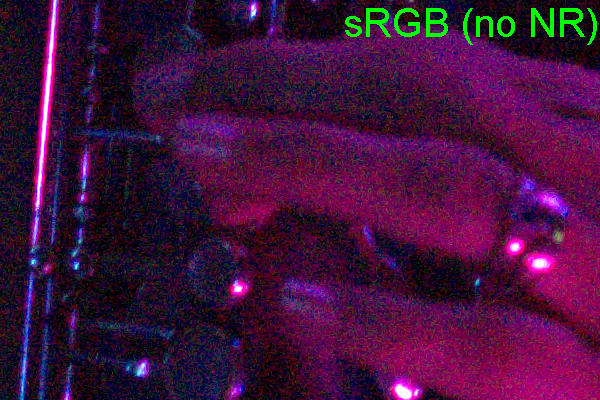
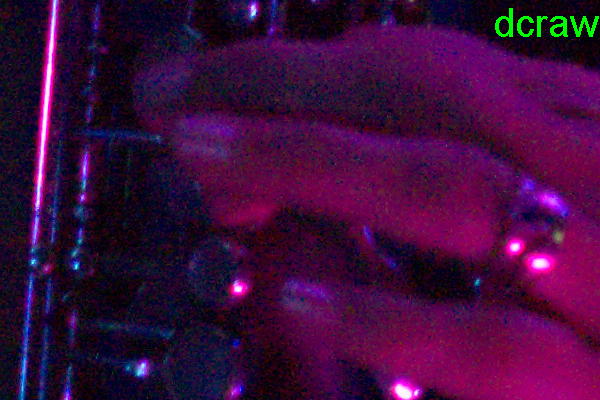
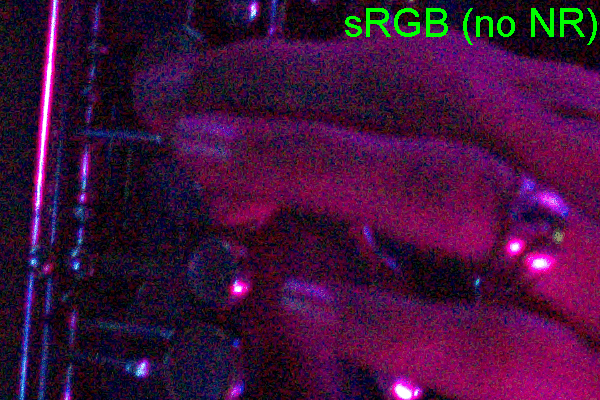
And here is a simple sRGB development of the raw, with no noise reduction:
%DCRAW% -v -W -6 -T -O cns_srgb.tiff %CAMERA_SRC%
%IMG7%magick ^ cns_srgb.tiff ^ %WEBCROP% ^ +write cns_srgb_cr.miff ^ %ANNOT% "sRGB (no NR)" ^ cns_srgb_cr_an.miff |
|
The noise is clear, and obtrusive. It causes variation in hue and lightness. This part of the overall image is not quite in focus so the tiny speckles we see are noise, not detail. Perhaps the noise adds to the atmosphere of the photograph, an impressionist effect that reflects the music performance.
Anyhow, for this page we will assume we want to reduce the obtrusiveness of the noise, without removing detail of the saxophone and without making the flesh tones look bad.
The camera processes the raw sensor data to make a JPEG image. The processing includes some de-noising, as well as sharpening, increased saturation, and so on.
%IMG7%magick ^ %CAMERA_JPG% ^ %WEBCROPJ% ^ cns_jpg_cr.miff |
|
For comparison purposes, we apply a gain and bias to the JPEG crop to match the simple sRGB version:
call %PICTBAT%imgGainBias ^ cns_jpg_cr.miff ^ cns_srgb_cr.miff ^ cns_jpgadj_cr.miff %IMG7%magick ^ cns_jpgadj_cr.miff ^ %ANNOT% "JPG" ^ cns_jpgadj_cr.miff |
|
The dcraw -n option performs wavelet denoising, with a single control. Note that -D disables denoising.
We process the raw file with a few -n settings, and create a GIF from crops for easy comparison.
set FILESET=

for %%N in (0 200 1000 2000 5000 10000) do (
  %DCRAW% %RAWOPT% -n %%N -O cns_dcr_%%N.tiff %CAMERA_SRC%

  call %PICTBAT%gray2rggb cns_dcr_%%N.tiff cns_dcr_%%N_XX.miff

  %IMG7%magick ^
    cns_dcr_%%N_R.miff ^
    %WEBCROP2% ^
    -set colorspace RGB ^
    -colorspace sRGB ^
    -gravity NorthWest -pointsize 30 +antialias -fill Yellow ^
    -annotate 0 %%N ^
    cns_dcr_%%N_cr.miff

  set FILESET=!FILESET! cns_dcr_%%N_cr.miff
)

%IMG7%magick ^
  -delay 100 ^
  %FILESET% ^
  cns_dcr.gif
The result is:

At extreme reduction (-n 10000), noise is almost entirely removed, but there is noticable blur and loss of detail. At -n 2000, the caucasian skin tone is fairly smooth, and noise is more evident in shadows. Detail is not noticably removed. There is a slight softening.
Where noise is still visible, these are the most extreme (dark or light) pixels. Each is moved slightly towards its local mean, and its value is not spread to other pixels.
In my opinion, this noise reduction is useful up to about -n 2000. Beyond that, we lose too much detail, there is too much softening, and we have too many pixels at extreme values that are too obvious against a smooth background.
So, processing with dcraw at that noise reduction:
%DCRAW% -W -6 -n 2000 -T -O cns_dcr_dn.tiff %CAMERA_SRC%
%IMG7%magick ^ cns_dcr_dn.tiff ^ %WEBCROP% ^ %ANNOT% "dcraw" ^ cns_dcr_dn_cr.miff |
|
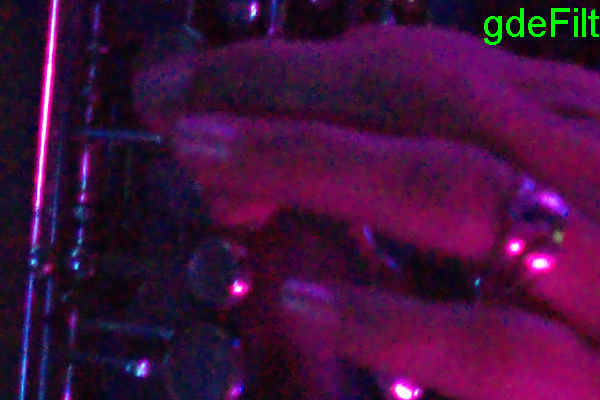
The Xin Sun reference gives a denoising method that uses wavelets and guided filters.
We can use a guided filter more directly (and crudely) for simple edge-aware smoothing:
call %PICTBAT%guideFilt ^
  cns_srgb.tiff cns_srgb.tiff  ^
  cns_gdefilt.miff . . 2x2 0.01 2
%IMG7%magick ^ cns_gdefilt.miff ^ %WEBCROP% ^ %ANNOT% "gdeFilt" ^ cns_gdefilt_cr.miff |
|
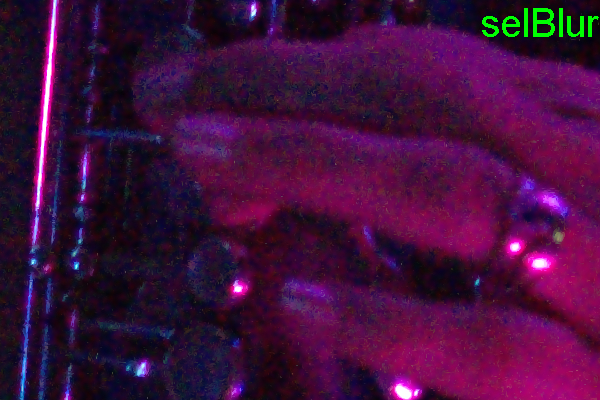
%IMG7%magick ^ cns_srgb.tiff ^ -selective-blur 0x2+10%% ^ %WEBCROP% ^ %ANNOT% "selBlur" ^ cns_selbl_cr.miff |
|
For the purpose of removing noise, "-selective-blur" is rather crude as it is binary: each pixel is either smoothed or not smoothed.
set FILESET=

for %%N in (0 1 2 3 4 5 7 10 20 50 100) do (
  %IMG7%magick ^
    cns_nse2_R.miff ^
    -wavelet-denoise %%N%% ^
    %WEBCROP2% ^
    -set colorspace RGB ^
    -colorspace sRGB ^
    -gravity NorthWest -pointsize 30 +antialias -fill Yellow ^
    -annotate 0 %%N ^
    cns_wlt_%%N_cr.miff

  set FILESET=!FILESET! cns_wlt_%%N_cr.miff
)

%IMG7%magick ^
  -delay 100 ^
  %FILESET% ^
  cns_wlt.gif

From 10% onwards, we get ringing. up to that level, noise is reduced, starting from the least-obtrusive noise. Most noise is removed at 5%, though with some loss of detail. At lower levels, eg 2%, we have general smoothness but the most intense noise remains, and I find the result unpleasant.
A more pleasing result is obtained by blending the input with a fairly heavily noise-reduced version:
%IMG7%magick ^
  cns_nse2_R.miff ^
  ( +clone ^
    -wavelet-denoise 5%% ^
  ) ^
  -compose blend -define compose:args=50 -composite ^
  %WEBCROP2% ^
  -set colorspace RGB ^
  -colorspace sRGB ^
  cns_wlt2.png

The script dnseWavelet.bat implements this.
set PARAMS=. 50

call %PICTBAT%dnseWavelet cns_nse2_R.miff cns_wvlt_R.miff %PARAMS%
call %PICTBAT%dnseWavelet cns_nse2_G0.miff cns_wvlt_G0.miff %PARAMS%
call %PICTBAT%dnseWavelet cns_nse2_G1.miff cns_wvlt_G1.miff %PARAMS%
call %PICTBAT%dnseWavelet cns_nse2_B.miff cns_wvlt_B.miff %PARAMS%
We build a Bayer from these denoised images:
call %PICTBAT%rggb2gray cns_wvlt_XX.miff cns_bay_wvlt.tiff
Convert the Bayer to a DNG:
exiftool ^
  -@ cns_exft_args.txt ^
  -o cns_bay_wvlt.dng ^
  cns_bay_wvlt.tiff
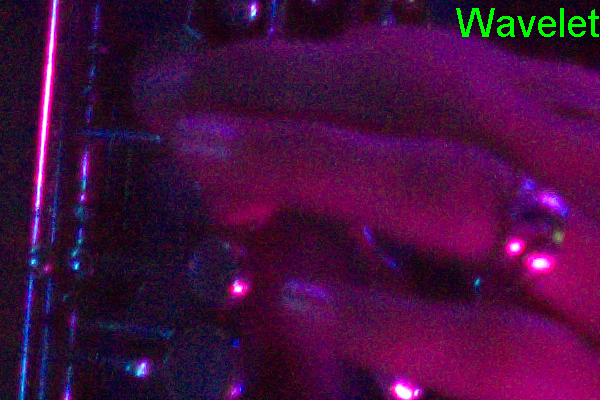
Process the DNG, de-Bayering and converting to sRGB, and show the 1:1 crop of the colour result:
%DCRAW% -v -6 -T -O cns_bay_wvlt.tiff cns_bay_wvlt.dng
%IMG7%magick ^ cns_bay_wvlt.tiff ^ %WEBCROP% ^ %ANNOT% "Wavelet" ^ cns_bay_wvlt_cr.miff |
|
Another possibility is to mask the result, reducing the de-noising at edges, or as a function of lightness.
set lmmPOST_PROC=-set colorspace Gray

%IMG7%magick cns_nse2_R.miff %LOCBLR% \temp\cns_bl.miff
call %PICTBAT%limitMinMax \temp\cns_bl.miff cns_nse2_R.miff cns_bl_R.miff 3x3 50

%IMG7%magick cns_nse2_G0.miff %LOCBLR% \temp\cns_bl.miff
call %PICTBAT%limitMinMax \temp\cns_bl.miff cns_nse2_G0.miff cns_bl_G0.miff 3x3 50

%IMG7%magick cns_nse2_G1.miff %LOCBLR% \temp\cns_bl.miff
call %PICTBAT%limitMinMax \temp\cns_bl.miff cns_nse2_G1.miff cns_bl_G1.miff 3x3 50

%IMG7%magick cns_nse2_B.miff %LOCBLR% \temp\cns_bl.miff
call %PICTBAT%limitMinMax \temp\cns_bl.miff cns_nse2_B.miff cns_bl_B.miff 3x3 50

set lmmPOST_PROC=
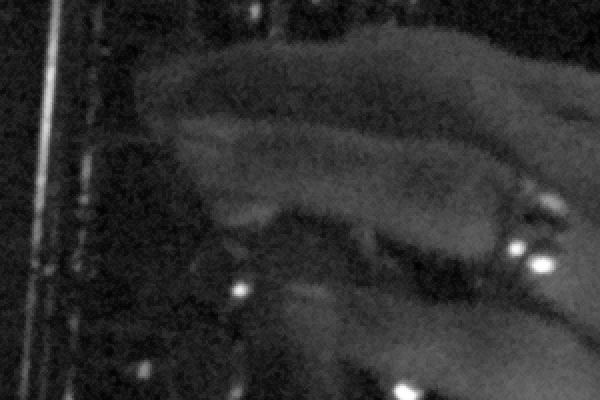
Here is the crop from the red channel:
%IMG7%magick ^ cns_bl_R.miff ^ %WEBCROP2% ^ -set colorspace RGB ^ -colorspace sRGB ^ cns_bl_R_cr.miff |

|
We build a Bayer from these denoised images:
call %PICTBAT%rggb2gray cns_bl_XX.miff cns_bay_bl.tiff
Convert the Bayer to a DNG:
exiftool ^
  -@ cns_exft_args.txt ^
  -o cns_bay_bl.dng ^
  cns_bay_bl.tiff
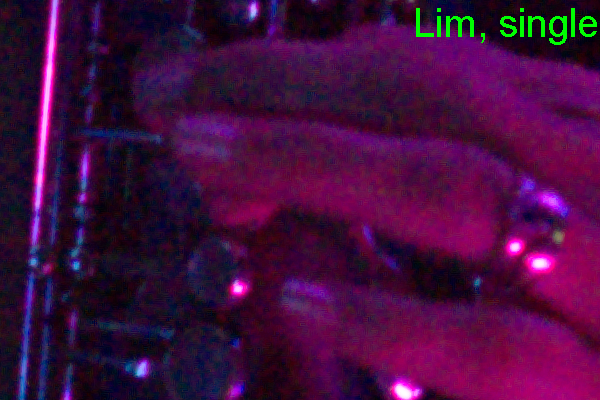
Process the DNG, de-Bayering and converting to sRGB, and show the 1:1 crop of the colour result:
%DCRAW% -v -6 -T -O cns_bay_den.tiff cns_bay_bl.dng
%IMG7%magick ^ cns_bay_den.tiff ^ %WEBCROP% ^ %ANNOT% "Lim, single" ^ cns_bay_den_cr.miff |
|
set lmmPOST_PROC=-set colorspace Gray

set PARAMS="-blur 1x1" 3x3 50 3

call %PICTBAT%dnseLmm cns_nse2_R.miff cns_blm_R.miff %PARAMS%
call %PICTBAT%dnseLmm cns_nse2_G0.miff cns_blm_G0.miff %PARAMS%
call %PICTBAT%dnseLmm cns_nse2_G1.miff cns_blm_G1.miff %PARAMS%
call %PICTBAT%dnseLmm cns_nse2_B.miff cns_blm_B.miff %PARAMS%

set lmmPOST_PROC=
Here is the crop from the red channel:
%IMG7%magick ^ cns_blm_R.miff ^ %WEBCROP2% ^ -set colorspace RGB ^ -colorspace sRGB ^ cns_blm_R_cr.miff |
|
Build a Bayer from these denoised images:
call %PICTBAT%rggb2gray cns_blm_XX.miff cns_bay_blm.tiff
Convert the Bayer to a DNG:
exiftool ^
  -@ cns_exft_args.txt ^
  -o cns_bay_blm.dng ^
  cns_bay_blm.tiff
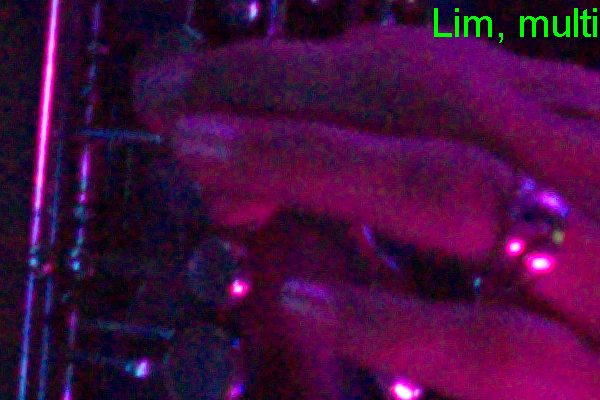
Process the DNG, de-Bayering and converting to sRGB, and show the 1:1 crop of the colour result:
%DCRAW% -v -6 -T -O cns_bay_denm.tiff cns_bay_blm.dng
%IMG7%magick ^ cns_bay_denm.tiff ^ %WEBCROP% ^ %ANNOT% "Lim, multi" ^ cns_bay_denm_cr.miff |
|
We subtract a blur. The result contains image detail that is higher in frequency than the blur. Values are positive and negative, close to zero. We multiply that by a factor less than one, and finally add the same blur back in.
We multiply by (1-k) rather than k so when k=0 there is no denoising.
v' = (v - blur) * (1-k) + blur
   = v - blur - k*v + k*blur + blur
   = v - k*v + k*blur
   = (1-k)*v + k*blur

When k==0, v' = v.
When k==1, v' = blur.
This is simply an interpolation between the input and the blur.
set k=0.50

%IMG7%magick ^
  cns_nse2_R.miff ^
  ( +clone %LOCBLR% -write mpr:BLR ) ^
  -define compose:clamp=off ^
  -compose MinusSrc -composite ^
  -evaluate Multiply %%[fx:1-%k%] ^
  mpr:BLR ^
  -compose Plus -composite ^
  cns_interpbl_R.miff
%IMG7%magick ^ cns_interpbl_R.miff ^ %WEBCROP2% ^ -set colorspace RGB ^ -colorspace sRGB ^ cns_interpbl_R_cr.miff |

|
The script dnseDiv2Mn.bat implements this.
Repeat the denoising for the other channels:
call %PICTBAT%dnseDiv2Mn cns_nse2_G0.miff cns_interpbl_G0.miff "%LOCBLR%" 50
call %PICTBAT%dnseDiv2Mn cns_nse2_G1.miff cns_interpbl_G1.miff "%LOCBLR%" 50
call %PICTBAT%dnseDiv2Mn cns_nse2_B.miff cns_interpbl_B.miff "%LOCBLR%" 50
Build a Bayer from these denoised images:
call %PICTBAT%rggb2gray cns_interpbl_XX.miff cns_interpbl.tiff
Convert the Bayer to a DNG:
exiftool ^
  -@ cns_exft_args.txt ^
  -o cns_interpbl.dng ^
  cns_interpbl.tiff
Process the DNG, de-Bayering and converting to sRGB, and show the 1:1 crop of the colour result:
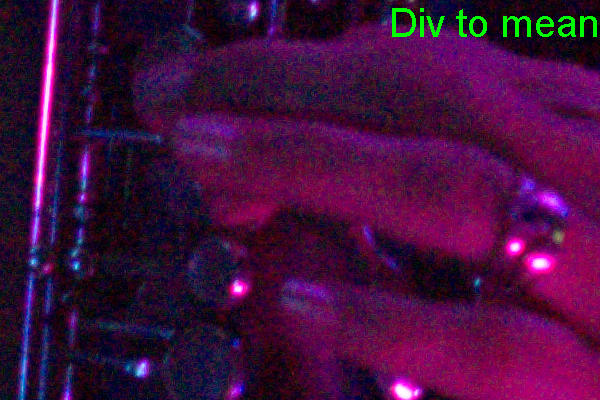
%DCRAW% -v -6 -T -O cns_interpbl_out.tiff cns_interpbl.dng
%IMG7%magick ^ cns_interpbl_out.tiff ^ %WEBCROP% ^ %ANNOT% "Div to mean" ^ cns_interpbl_out_cr.miff |
|
Instead of multiplying by (1-k), we might subtract. The variation from the local blur is due to detail and noise. We assume noise creates a constant variation, say V0. So (v-blur) has absolute values that are less than V0 due to noise only, and values that are more than V0 are due to detail plus noise. So we want to push values towards zero by a constant amount V0.
if v >= 0, v' = clamp (v - V0)
if v < 0,  v' = -clamp (-v - V0)
We create a blur image (cns_bl.miff), and the input minus the blur (cns_bldiff.miff). This difference image will contain negative values.
%IMG7%magick ^
  cns_nse2_R.miff ^
  -define quantum:format=floating-point -depth 32 ^
  ( +clone %LOCBLR% ^
    +write cns_bl.miff ^
  ) ^
  -define compose:clamp=off ^
  -compose MinusSrc -composite ^
  cns_bldiff.miff
The blur looks like this:
%IMG7%magick ^ cns_bl.miff ^ %WEBCROP2% ^ -set colorspace RGB ^ -colorspace sRGB ^ cns_bl_cr.miff |

|
The script pushZero.bat takes the difference image and pushes values towards zero. It is quite complex. A process module would be faster.
call %PICTBAT%pushZero cns_bldiff.miff 2 cns_bldiff_pz.miff

%IMG7%magick ^
  cns_bldiff_pz.miff ^
  cns_bl.miff ^
  -define compose:clamp=off ^
  -compose Plus -composite ^
  -define quantum:format=floating-point -depth 32 ^
  cns_bdp.miff
We add the result back to the blurred image.
%IMG7%magick ^ cns_bdp.miff ^ %WEBCROP2% ^ -set colorspace RGB ^ -colorspace sRGB ^ cns_bdp_cr.miff |

|
We put the above processes (blur, subtract, call pushZero, and plus) into a script, dnsePsh2Mn.bat.
As before, we call pushZero with a few settings, and create a GIF from crops for easy comparison.
set FILESET=

for %%N in (0 1 2 3 4 5 7 10 20 50 100) do (
  call %PICTBAT%pushZero cns_bldiff.miff %%N cns_bldiff_pz.miff

  %IMG7%magick ^
    cns_bldiff_pz.miff ^
    cns_bl.miff ^
    -define compose:clamp=off ^
    -compose Plus -composite ^
    -define quantum:format=floating-point -depth 32 ^
    %WEBCROP2% ^
    -set colorspace RGB ^
    -colorspace sRGB ^
    -gravity NorthWest -pointsize 30 +antialias -fill Yellow ^
    -annotate 0 %%N ^
    cns_bdp_%%N_cr.miff

  set FILESET=!FILESET! cns_bdp_%%N_cr.miff
)

%IMG7%magick ^
  -delay 100 ^
  %FILESET% ^
  cns_bdp.gif

At parameter 100, the result is the blur, but the effect is more or less complete at parameter 10 (very few pixels are more than 10% of quantum from their local mean). In my opinion, the optimum parameter is 4.
Even at 100, this doesn't remove all the noise because the blur isn't strong enough. We can re-run with an increased blur:
%IMG7%magick ^
  cns_nse2_R.miff ^
  -define quantum:format=floating-point -depth 32 ^
  ( +clone -blur 0x3 ^
    +write cns_bl2.miff ^
  ) ^
  -define compose:clamp=off ^
  -compose MinusSrc -composite ^
  cns_bl2diff.miff
The blur looks like this:
%IMG7%magick ^ cns_bl2.miff ^ %WEBCROP2% ^ -set colorspace RGB ^ -colorspace sRGB ^ cns_bl2_cr.miff |
|
set FILESET=

for %%N in (0 1 2 3 4 5 10 20 50 100) do (
  echo %%N

  call %PICTBAT%pushZero cns_bl2diff.miff %%N cns_bl2diff_pz.miff

  %IMG7%magick ^
    cns_bl2diff_pz.miff ^
    cns_bl2.miff ^
    -define compose:clamp=off ^
    -compose Plus -composite ^
    -define quantum:format=floating-point -depth 32 ^
    %WEBCROP2% ^
    -set colorspace RGB ^
    -colorspace sRGB ^
    -gravity NorthWest -pointsize 30 +antialias -fill Yellow ^
    -annotate 0 %%N ^
    cns_bdp2_%%N_cr.miff

  set FILESET=!FILESET! cns_bdp2_%%N_cr.miff
)

%IMG7%magick ^
  -delay 100 ^
  %FILESET% ^
  cns_bdp2.gif

From 5 upwards, the blur removes significant detail.
Apply denoising to all channels, using parameter 4:
call %PICTBAT%dnsePsh2Mn cns_nse2_R.miff cns_bdp_R.miff "%LOCBLR%" 4
call %PICTBAT%dnsePsh2Mn cns_nse2_G0.miff cns_bdp_G0.miff "%LOCBLR%" 4
call %PICTBAT%dnsePsh2Mn cns_nse2_G1.miff cns_bdp_G1.miff "%LOCBLR%" 4
call %PICTBAT%dnsePsh2Mn cns_nse2_B.miff cns_bdp_B.miff "%LOCBLR%" 4
Build a Bayer from these denoised images:
call %PICTBAT%rggb2gray cns_bdp_XX.miff cns_bdp.tiff
Convert the Bayer to a DNG:
exiftool ^
  -@ cns_exft_args.txt ^
  -o cns_bdp.dng ^
  cns_bdp.tiff
Process the DNG, de-Bayering and converting to sRGB, and show the 1:1 crop of the colour result:
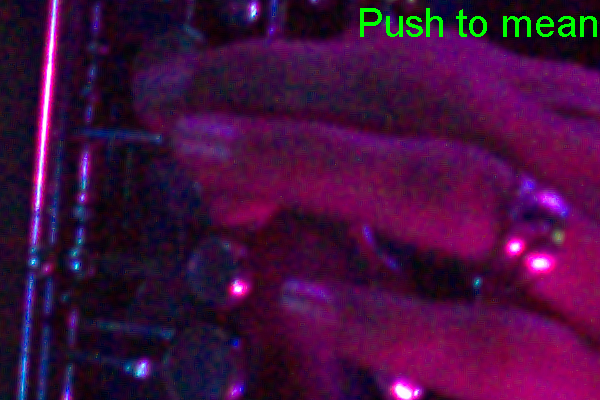
%DCRAW% -v -6 -T -O cns_bdp_out.tiff cns_bdp.dng
%IMG7%magick ^ cns_bdp_out.tiff ^ %WEBCROP% ^ %ANNOT% "Push to mean" ^ cns_bdp_out_cr.miff |
|
In the previous, we assumed noise caused a constant variation from the local mean. In fact, noise increases with lightness. For this image, the increase is not a constant factor; the noise is proportional to the square root of the lightness.
%IMG7%magick ^
  cns_bl.miff ^
  -evaluate Pow 0.5 ^
  -define quantum:format=floating-point -depth 32 ^
  cns_pzmsk.miff
In this demonstration, we use the blur and the difference-from-blur from the previous section.
The script pushZeroMsk.bat pushes the blur-difference towards zero, and we add the result to the blur:
call %PICTBAT%pushZeroMsk cns_bldiff.miff cns_pzmsk.miff 14 cns_bldiff_pzm.miff

%IMG7%magick ^
  cns_bldiff_pzm.miff ^
  cns_bl.miff ^
  -define compose:clamp=off ^
  -compose Plus -composite ^
  -define quantum:format=floating-point -depth 32 ^
  cns_bdpm.miff
%IMG7%magick ^ cns_bdpm.miff ^ %WEBCROP2% ^ -set colorspace RGB ^ -colorspace sRGB ^ cns_bdpm_cr.miff |

|
As before, we call pushZeroMsk with a few settings, and create a GIF from crops for easy comparison.
set FILESET=

for %%N in (0 5 10 15 20 30 40 50) do (
  echo %%N

  call %PICTBAT%pushZeroMsk cns_bldiff.miff cns_pzmsk.miff %%N cns_bldiff_pzm.miff

  %IMG7%magick ^
    cns_bldiff_pzm.miff ^
    cns_bl.miff ^
    -define compose:clamp=off ^
    -compose Plus -composite ^
    -define quantum:format=floating-point -depth 32 ^
    %WEBCROP2% ^
    -set colorspace RGB ^
    -colorspace sRGB ^
    -gravity NorthWest -pointsize 30 +antialias -fill Yellow ^
    -annotate 0 %%N ^
    cns_bdpm_%%N_cr.miff

  set FILESET=!FILESET! cns_bdpm_%%N_cr.miff
)

%IMG7%magick ^
  -delay 100 ^
  %FILESET% ^
  cns_bdpm.gif

From 15% upwards, the result is visually the same as the blur.
As before, if we want to entirely remove noise, accepting that we will also lose detail, we can use a larger blur.
:skip

set FILESET=

for %%N in (0 5 10 15 20 30 40 50) do (
  call %PICTBAT%pushZeroMsk cns_bl2diff.miff cns_pzmsk.miff %%N cns_bl2diff_pzm.miff

  %IMG7%magick ^
    cns_bl2diff_pzm.miff ^
    cns_bl2.miff ^
    -define compose:clamp=off ^
    -compose Plus -composite ^
    -define quantum:format=floating-point -depth 32 ^
    %WEBCROP2% ^
    -set colorspace RGB ^
    -colorspace sRGB ^
    -gravity NorthWest -pointsize 30 +antialias -fill Yellow ^
    -annotate 0 %%N ^
    cns_bdpm2_%%N_cr.miff

  set FILESET=!FILESET! cns_bdpm2_%%N_cr.miff
)

%IMG7%magick ^
  -delay 100 ^
  %FILESET% ^
  cns_bdpm2.gif

A parameter of 10% is the largest that doesn't lose detail, though it does have some noise. 15% has less noise, but has lost detail behind noticable blur.
Apply denoising to all channels:
call %PICTBAT%dnsePsh2MnMsk cns_nse2_R.miff cns_bdpm_R.miff "%LOCBLR%" cns_pzmsk.miff 10
call %PICTBAT%dnsePsh2MnMsk cns_nse2_G0.miff cns_bdpm_G0.miff "%LOCBLR%" cns_pzmsk.miff 10
call %PICTBAT%dnsePsh2MnMsk cns_nse2_G1.miff cns_bdpm_G1.miff "%LOCBLR%" cns_pzmsk.miff 10
call %PICTBAT%dnsePsh2MnMsk cns_nse2_B.miff cns_bdpm_B.miff "%LOCBLR%" cns_pzmsk.miff 10
Build a Bayer from these denoised images:
call %PICTBAT%rggb2gray cns_bdpm_XX.miff cns_bdpm.tiff
Convert the Bayer to a DNG:
exiftool ^
  -@ cns_exft_args.txt ^
  -o cns_bdpm.dng ^
  cns_bdpm.tiff
Process the DNG, de-Bayering and converting to sRGB, and show the 1:1 crop of the colour result:
%DCRAW% -v -6 -T -O cns_bdpm_out.tiff cns_bdpm.dng
%IMG7%magick ^ cns_bdpm_out.tiff ^ %WEBCROP% ^ %ANNOT% "Push to mean, masked" ^ cns_bdpm_out_cr.miff |

|
We make a GIF to compare the denoised versions:
%IMG7%magick ^ -delay 100 ^ cns_srgb_cr_an.miff ^ cns_jpgadj_cr.miff ^ cns_dcr_dn_cr.miff ^ cns_gdefilt_cr.miff ^ cns_selbl_cr.miff ^ cns_bay_wvlt_cr.miff ^ cns_bay_den_cr.miff ^ cns_bay_denm_cr.miff ^ cns_interpbl_out_cr.miff ^ cns_bdp_out_cr.miff ^ cns_bdpm_out_cr.miff ^ cns_comp.gif |
|
(Comparing a small crop of one image is insufficient evaluation. And we have reduced each method to a GIF that can show only 256 colours in each frame, which doesn't help. My own conclusions are drawn from multiple complete images.)
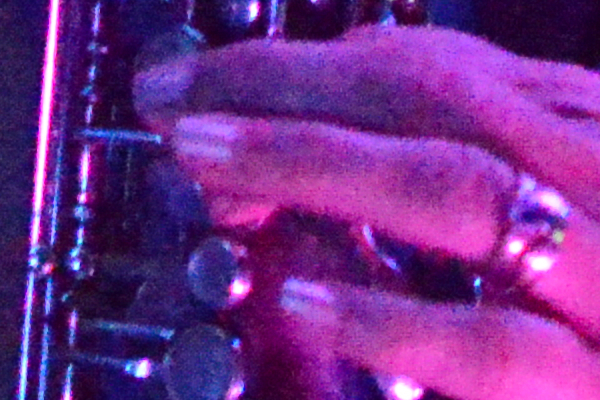
My preferred method for my photography with my camera is the last method shown above, masked push towards mean, defining "local mean" as "-blur 2x1", and pushing by 10% of the mask towards the mean, where the mask is the square root of the intensity. This gives me the best overall noise reduction across all tones, with minimal reduction of detail.
IM's wavelet at 5%, blended 50% with the original, gives a result with finer sharper grain, and I also find this acceptable.
The methods shown here apply to the individual RGGB channels of the Bayer image. Alternatively, noise reduction could be applied to chroma and lunimance after de-Bayering.
For convenience, .bat scripts are also available in a single zip file. See Zipped BAT files.
rem %1 input with positive and negative values.
rem %2 percent threshold value.
rem %3 output with values pushed towards zero.
@rem
@rem This needs an HDRI version of IM.

@if "%1"=="" findstr /B "rem @rem" %~f0 & exit /B 1

@setlocal

@call echoOffSave

call %PICTBAT%setInOut %1 pz

set THRSH=%2
if "%THRSH%"=="." set THRSH=
if "%THRSH%"=="" set THRSH=10

if not "%3"=="" if not "%3"=="." set OUTFILE=%3

%IMG7%magick ^
  %INFILE% ^
  ( -clone 0 ^
    -evaluate Multiply -1 ^
    -evaluate Subtract %THRSH%%% ^
    -clamp ^
    -evaluate Multiply -1 ^
  ) ^
  ( -clone 0 ^
    -evaluate Subtract %THRSH%%% ^
    -clamp ^
  ) ^
  ( -clone 0 ^
    -threshold 0 ^
  ) ^
  -delete 0 ^
  -define compose:clamp=off ^
  -compose Over -composite ^
  -define quantum:format=floating-point -depth 32 ^
  %OUTFILE%

call echoRestore

endlocal & set pzOUTFILE=%OUTFILE%&
rem %1 input with positive and negative values.
rem %2 mask image.
rem %3 percentage multiplier for mask [default 100]
rem %4 output with values pushed towards zero.
@rem
@rem This needs an HDRI version of IM.
@rem
@rem Also uses:
@rem   QUANT_FP

@if "%2"=="" findstr /B "rem @rem" %~f0 & exit /B 1

@setlocal

@call echoOffSave

call %PICTBAT%setInOut %1 pzm

set MSK=%2

set MSKMULT=%3
if "%MSKMULT%"=="." set MSKMULT=
if "%MSKMULT%"=="" set MSKMULT=100

if not "%4"=="" if not "%4"=="." set OUTFILE=%4

if %MSKMULT%==100 (
  set sMult=
) else (
  set sMult=-evaluate Multiply %%[fx:%MSKMULT%/100]
)

%IMG7%magick ^
  %INFILE% ^
  -define compose:clamp=on ^
  ( -clone 0 ^
    -evaluate Multiply -1 ^
    ( %MSK% ^
      %sMult% ^
      +write mpr:MSK ^
    ) ^
    -compose MinusSrc -composite ^
    -clamp ^
    -evaluate Multiply -1 ^
  ) ^
  ( -clone 0 ^
    mpr:MSK ^
    -compose MinusSrc -composite ^
    -clamp ^
  ) ^
  ( -clone 0 ^
    -threshold 0 ^
  ) ^
  -delete 0 ^
  -define compose:clamp=off ^
  -compose Over -composite ^
  %QUANT_FP% ^
  %OUTFILE%

call echoRestore

endlocal & set pzmOUTFILE=%OUTFILE%&
rem Denoise by wavelet, optionally repeated.

rem %1 input image
rem %2 output
rem %3 wavelet parameter [5%]
rem %4 percentage effect of each pass [100]
rem %5 number of passes [1]

@rem Also uses:
@rem   QUANT_FP

@if "%1"=="" findstr /B "rem @rem" %~f0 & exit /B 1

@setlocal

rem @call echoOffSave

call %PICTBAT%setInOut %1 dnwvlt

if not "%2"=="" if not "%2"=="." set OUTFILE=%2

set WVLT=%3
if "%WVLT%"=="." set WVLT=
if "%WVLT%"=="" set WVLT=5%%

set PC_EFFECT=%4
if "%PC_EFFECT%"=="." set PC_EFFECT=
if "%PC_EFFECT%"=="" set PC_EFFECT=100

set NUMPASS=%5
if "%NUMPASS%"=="." set NUMPASS=
if "%NUMPASS%"=="" set NUMPASS=1

if %PC_EFFECT%==100 (
  set BLND=-delete 0
) else (
  set BLND=-compose Blend -define compose:args=%PC_EFFECT% -composite
)

set TMPIMG=\temp\dwvlt_tmp.miff

%IMG7%magick ^
  %INFILE% ^
  %TMPIMG%

for /L %%I in (1,1,%NUMPASS%) do (
  echo %0: %%I

  %IMG7%magick ^
    %TMPIMG% ^
    ^( +clone ^
       -wavelet-denoise %WVLT% ^
    ^) ^
    %BLND% ^
    %QUANT_FP% ^
    %TMPIMG%
)

if ERRORLEVEL 1 exit /B 1

%IMG7%magick ^
  %TMPIMG% ^
  %OUTFILE%

if ERRORLEVEL 1 exit /B 1

call echoRestore

endlocal & set dnwvltOUTFILE=%OUTFILE%&
rem Denoise by dividing towards local mean.

rem %1 input image
rem %2 output
rem %3 local mean eg "-blur 0x1" [default]
rem %4 percentage effect of each pass [100]
rem %5 number of passes [1]

@rem Also uses:
@rem   QUANT_FP

@if "%1"=="" findstr /B "rem @rem" %~f0 & exit /B 1

@setlocal

rem @call echoOffSave

call %PICTBAT%setInOut %1 dnd2m

if not "%2"=="" if not "%2"=="." set OUTFILE=%2

set LOCMN=%~3
if "%LOCMN%"=="." set LOCMN=
if "%LOCMN%"=="" set LOCMN=-blur 0x1

set PC_EFFECT=%4
if "%PC_EFFECT%"=="." set PC_EFFECT=
if "%PC_EFFECT%"=="" set PC_EFFECT=100

set NUMPASS=%5
if "%NUMPASS%"=="." set NUMPASS=
if "%NUMPASS%"=="" set NUMPASS=1

if %PC_EFFECT%==100 (
  set BLND=-delete 0
) else (
  set BLND=-compose Blend -define compose:args=%PC_EFFECT% -composite
)

set TMPIMG=\temp\dnd2m_tmp.miff
set TMPBLR=\temp\dnd2m_tmp_blr.miff

%IMG7%magick ^
  %INFILE% ^
  %TMPIMG%

for /L %%I in (1,1,%NUMPASS%) do (
  echo %0: %%I

  %IMG7%magick ^
    %TMPIMG% ^
    ^( +clone -blur 0x1 -write mpr:BLR ^) ^
    -define compose:clamp=off ^
    -compose MinusSrc -composite ^
    -evaluate Multiply %%[fx:1-%PC_EFFECT%/100] ^
    mpr:BLR ^
    -compose Plus -composite ^
    %TMPIMG%
)

if ERRORLEVEL 1 exit /B 1

%IMG7%magick ^
  %TMPIMG% ^
  %OUTFILE%

if ERRORLEVEL 1 exit /B 1

call echoRestore

endlocal & set dnd2mOUTFILE=%OUTFILE%&
rem Denoise by pushing towards local mean.

rem %1 input image
rem %2 output
rem %3 local mean eg "-blur 0x1" [default]
rem %4 percent to be pushed [default 1]
@rem
@rem This needs an HDRI version of IM.

@rem Also uses:
@rem   QUANT_FP

@if "%1"=="" findstr /B "rem @rem" %~f0 & exit /B 1

@setlocal

rem @call echoOffSave

call %PICTBAT%setInOut %1 dp2m

if not "%2"=="" if not "%2"=="." set OUTFILE=%2

set LOCMN=%~3
if "%LOCMN%"=="." set LOCMN=
if "%LOCMN%"=="" set LOCMN=-blur 0x1

set PC_PUSH=%4
if "%PC_PUSH%"=="." set PC_PUSH=
if "%PC_PUSH%"=="" set PC_PUSH=1

set TMPIMG=\temp\dp2m_tmp.miff
set TMPBLR=\temp\dp2m_tmp_blr.miff
set TMPDIFF=\temp\dp2m_diff.miff
set TMPPZ=\temp\dp2m_diff.miff

%IMG7%magick ^
  %INFILE% ^
  -define quantum:format=floating-point -depth 32 ^
  ( +clone %LOCMN% ^
    +write %TMPBLR% ^
  ) ^
  -define compose:clamp=off ^
  -compose MinusSrc -composite ^
  %QUANT_FP% ^
  %TMPDIFF%

if ERRORLEVEL 1 exit /B 1

call %PICTBAT%pushZero %TMPDIFF% %PC_PUSH% %TMPPZ%

if ERRORLEVEL 1 exit /B 1

%IMG7%magick ^
  %TMPPZ% ^
  %TMPBLR% ^
  -define compose:clamp=off ^
  -compose Plus -composite ^
  %QUANT_FP% ^
  %OUTFILE%

if ERRORLEVEL 1 exit /B 1

call echoRestore

endlocal & set dP2mOUTFILE=%OUTFILE%&
rem Denoise by pushing towards local mean, masked.

rem %1 input image
rem %2 output
rem %3 local mean eg "-blur 0x1" [default]
rem %4 mask image
rem %5 percentage of mask to be pushed [default 100]
@rem
@rem This needs an HDRI version of IM.
@rem
@rem Also uses:
@rem   QUANT_FP

@if "%1"=="" findstr /B "rem @rem" %~f0 & exit /B 1

@setlocal

rem @call echoOffSave

call %PICTBAT%setInOut %1 dp2mm

if not "%2"=="" if not "%2"=="." set OUTFILE=%2

set LOCMN=%~3
if "%LOCMN%"=="." set LOCMN=
if "%LOCMN%"=="" set LOCMN=-blur 0x1

set MSK=%4
if "%MSK%"=="." set MSK=
if "%MSK%"=="" set MSK=

set PC_PUSH=%5
if "%PC_PUSH%"=="." set PC_PUSH=
if "%PC_PUSH%"=="" set PC_PUSH=100

set TMPIMG=\temp\dp2m_tmp.miff
set TMPBLR=\temp\dp2m_tmp_blr.miff
set TMPDIFF=\temp\dp2m_diff.miff
set TMPPZ=\temp\dp2m_diff.miff

%IMG7%magick ^
  %INFILE% ^
  -define quantum:format=floating-point -depth 32 ^
  ( +clone %LOCMN% ^
    +write %TMPBLR% ^
  ) ^
  -define compose:clamp=off ^
  -compose MinusSrc -composite ^
  %QUANT_FP% ^
  %TMPDIFF%

if ERRORLEVEL 1 exit /B 1

call %PICTBAT%pushZeroMsk %TMPDIFF% %MSK% %PC_PUSH% %TMPPZ%

if ERRORLEVEL 1 exit /B 1

%IMG7%magick ^
  %TMPPZ% ^
  %TMPBLR% ^
  -define compose:clamp=off ^
  -compose Plus -composite ^
  %QUANT_FP% ^
  %OUTFILE%

if ERRORLEVEL 1 exit /B 1

call echoRestore

endlocal & set dp2mmOUTFILE=%OUTFILE%&
All images on this page were created by the commands shown, using:
%IMG7%magick identify -version
Version: ImageMagick 7.0.8-64 Q16 x64 2019-09-08 http://www.imagemagick.org
Copyright: Copyright (C) 1999-2018 ImageMagick Studio LLC
License: http://www.imagemagick.org/script/license.php
Visual C++: 180040629
Features: Cipher DPC HDRI Modules OpenCL OpenMP(2.0)
Delegates (built-in): bzlib cairo flif freetype gslib heic jng jp2 jpeg lcms lqr lzma openexr pangocairo png ps raw rsvg tiff webp xml zlib
Source file for this web page is camnoise.h1. To re-create this web page, execute procH1 camnoise.
This page, including the images, is my copyright. Anyone is permitted to use or adapt any of the code, scripts or images for any purpose, including commercial use.
Anyone is permitted to re-publish this page, but only for non-commercial use.
Anyone is permitted to link to this page, including for commercial use.
Page version v1.0 23-November-2020.
Page created 04-Jul-2021 11:24:43.
Copyright © 2021 Alan Gibson.