snibgo's ImageMagick pages
Segmenting images
Images can be segmented (broken into pieces, clustered) according to the similarity of adjacent pixels. Manual intervention can prevent merging where pixels from two objects are similar by coincidence, as well as enforcing merging.
The module entirely ignores the alpha channel. It ignores the general "-channel" setting (but has its own private "channel" setting).
In its simplest use, the process takes a list containing exactly one image. It creates clusters based on the similarity of 4-connected adjacent pixels. If the similarity is less than a threshold, they are in the same cluster.
Each pixel is compared to (the mean value of the cluster of) the pixel above and the pixel to the left. If they are similar, they are in the same cluster.
"Similar" means within a fuzzy threshold. This is best done in Lab or similar perceptual colourspace, rather than sRGB.
It replaces the input images with a number of others. The first is the friendliest; each pixel is replaced by the average colour of the cluster containing the pixel. The example below delete the other images (those numbered from 1 to -1).
%IMDEV%convert ^
  toes.png ^
  -process segscanmerge ^
  -delete 1--1 ^
  seg_t0.png

%IM%convert seg_t0.png -unique-colors -format %%w info:
62206
|

|
%IMDEV%convert ^
  -fuzz 1%% ^
  toes.png ^
  -colorspace Lab ^
  -process segscanmerge ^
  -delete 1--1 ^
  -colorspace sRGB ^
  seg_t1.png

%IM%convert seg_t1.png -unique-colors -format %%w info:
25753
|

|
%IMDEV%convert ^
  -fuzz 1.5%% ^
  toes.png ^
  -colorspace Lab ^
  -process segscanmerge ^
  -delete 1--1 ^
  -colorspace sRGB ^
  seg_t15.png

%IM%convert seg_t15.png -unique-colors -format %%w info:
12873
|

|
%IMDEV%convert ^
  -fuzz 2%% ^
  toes.png ^
  -colorspace Lab ^
  -process segscanmerge ^
  -delete 1--1 ^
  -colorspace sRGB ^
  seg_t2.png

%IM%convert seg_t2.png -unique-colors -format %%w info:
6435
|

|
%IMDEV%convert ^
  -fuzz 2.5%% ^
  toes.png ^
  -colorspace Lab ^
  -process segscanmerge ^
  -delete 1--1 ^
  -colorspace sRGB ^
  seg_t25.png

%IM%convert seg_t25.png -unique-colors -format %%w info:
3327
|

|
%IMDEV%convert ^
  -fuzz 3%% ^
  toes.png ^
  -colorspace Lab ^
  -process segscanmerge ^
  -delete 1--1 ^
  -colorspace sRGB ^
  seg_t3.png

%IM%convert seg_t3.png -unique-colors -format %%w info:
1753
|

|
%IMDEV%convert ^
  -fuzz 4%% ^
  toes.png ^
  -colorspace Lab ^
  -process segscanmerge ^
  -delete 1--1 ^
  -colorspace sRGB ^
  seg_t4.png

%IM%convert seg_t4.png -unique-colors -format %%w info:
572
|

|
%IMDEV%convert ^
  -fuzz 5%% ^
  toes.png ^
  -colorspace Lab ^
  -process segscanmerge ^
  -delete 1--1 ^
  -colorspace sRGB ^
  seg_t5.png

%IM%convert seg_t5.png -unique-colors -format %%w info:
214
|

|
%IMDEV%convert ^
  -fuzz 10%% ^
  toes.png ^
  -colorspace Lab ^
  -process segscanmerge ^
  -delete 1--1 ^
  -colorspace sRGB ^
  seg_t10.png

%IM%convert seg_t10.png -unique-colors -format %%w info:
2
|

|
When every pixel has been assigned to a cluster, the clusters can be refined.
Each cluster is contiguous. It is 4-connected; every pixel is joined vertically or horizontally. Two clusters might happen to have the same average colour.
| Option |
Description |
Short
form |
Long form |
| a N |
algorithm N |
Algorithm.
0 (ScanMerge)
or 1 (GrowCut).
Default: 0. |
| m N |
comp_method N |
Comparison method.
0 (compare pixel with adjacent pixel)
or 1 (compare pixel with current average of cluster of adjacent pixel).
Default: 0. |
| t N |
max_iterations N |
Maximum number of iterations. 0 = no limit.
Only relevant for GrowCut algorithm.
Default: 0. |
| n N |
n_connected N |
Connected. 4 or 8.
Only relevant for GrowCut algorithm.
Default: 8. |
| h N |
hard_limit_clust N |
Maximum number of clusters.
Default: 255 in Q8; otherwise 65535. |
| z N |
min_clust_size N |
Minimum cluster size. Pixels, or % of image size.
Default: 0 (no merging of small clusters). |
| x N |
max_num_clust N |
Maximum number of clusters.
Zero means no limit.
Default: no limit. |
| c
|
channel string |
Channels to be used in comparisons. String can contain any of RGBLA.
Default: RGB (= LAB). |
| l
|
list_clusters
|
Write cluster data to stderr. |
| v
|
verbose
|
Write some text output to stderr. |
list_clusters writes cluster data in the format:
n: c: (r,g,b)
where n is the number of the cluster (from 1); c is the number of pixels in that cluster; and r,g,b is the mean values of the three channels.
The default fuzz is zero, so adjacent pixels will be in the same cluster only if they are exactly equal. In ordinary photographs, there will be nearly as many clusters as pixels. We want to group pixels that are similar, not necessarily identical, so we usually want a non-zero fuzz. Increasing the fuzz will reduce the number of clusters.
Ordinary photographs are coherent from on pixel to the next. Hence (for the default method, which compares each pixel with its neighbours) a low "-fuzz" is needed to ensure we don't get all the pixels in the same cluster.
We can show the approximate boundaries of the clusters:
%IMDEV%convert ^
  toes.png ^
  ( -clone 0 ^
    ( +clone ) ^
    -geometry +1+0 ^
    -compose Difference -composite ^
    -gravity West -chop 1x ^
    -grayscale RMS ^
  ) ^
  ( -clone 0 ^
    ( +clone ) ^
    -geometry +0+1 ^
    -compose Difference -composite ^
    -gravity North -chop x1 ^
    -grayscale RMS ^
  ) ^
  -delete 0 ^
  -compose Lighten -composite ^
  -write seg_toes_data.png ^
  ( +clone ^
    -process 'mkhisto capnumbuckets 1000 cumul norm' ^
    -write seg_toes_diff_ch.png ^
    +delete ^
  ) ^
  ( +clone ^
    -process 'mkhisto capnumbuckets 1000 norm' ^
    -write seg_toes_diff_h.png ^
    +delete ^
  ) ^
  -format "min=%%[fx:minima] max=%%[fx:maxima] mean=%%[fx:mean] sd=%%[fx:standard_deviation]\n" ^
  -write info:seg_toes_stats.lis ^
  -auto-level ^
  seg_toes_diff_al.png
min=0.000568898 max=0.240554 mean=0.0257506 sd=0.0199988
The range is about 0.05% to 24%. If we set a threshold above 25%, all the pixels will be in the same cluster. The mean is at 2.6%.
call %PICTBAT%graphLineCol seg_toes_diff_h.png . 1 0
call %PICTBAT%graphLineCol seg_toes_diff_ch.png . 1 0
This is the auto-leveled image. From this, we see that a low threshold will capture grass detail in separate clusters. A higher threshold will merge these clusters but keep the toes separate from the background.

This is the histogram of the non-auto-leveled image:

And the cumulative histogram:

We can zoom into these graphs:
%IMDEV%convert ^
  seg_toes_data.png ^
  ( +clone ^
    -process 'mkhisto capnumbuckets 10000 cumul norm' ^
    -gravity West ^
    -crop 1000x1+0+0 +repage ^
    -write seg_toes_diff_ch2.png ^
    +delete ^
  ) ^
  ( +clone ^
    -process 'mkhisto capnumbuckets 10000 norm' ^
    -gravity West ^
    -crop 1000x1+0+0 +repage ^
    -write seg_toes_diff_h2.png ^
    +delete ^
  ) ^
  NULL:

call %PICTBAT%graphLineCol seg_toes_diff_h2.png . 1 0
call %PICTBAT%graphLineCol seg_toes_diff_ch2.png . 1 0
Here is the first 10% of the histogram of the non-auto-leveled image. The peak (the statistical mode) is at 1%.

And here is the first 10% of the cumulative histogram. The statistical median is at 2%: half the values are below this, and half are above.

%IMDEV%convert ^
  -fuzz 1%% ^
  toes.png ^
  -colorspace Lab ^
  -process 'segscanmerge comp_method 0' ^
  -delete 1--1 ^
  -colorspace sRGB ^
  seg_c0.png
|

|
%IMDEV%convert ^
  -fuzz 2.5%% ^
  toes.png ^
  -colorspace Lab ^
  -process 'segscanmerge comp_method 1' ^
  -delete 1--1 ^
  -colorspace sRGB ^
  seg_c1.png
|

|
Stripping out the lightness is useful for segmentation, especially when the objects are rounded, the light is directional, and there are shadows. This is what the image looks like with constant lightness:
%IMDEV%convert ^
  toes.png ^
  -colorspace Lab ^
  -channel R -evaluate set 50%% +channel ^
  -colorspace sRGB ^
  seg_no_light.png
|

|
Visually, it is hard to read this image. The blades of grass have visually merged together. We can tell the module to ignore the first channel in comparisons (ignore L; use just a and b). We need to reduce the fuzz value.
%IMDEV%convert ^
  -fuzz 0.6%% ^
  toes.png ^
  -colorspace Lab ^
  -process 'segscanmerge channel ab' ^
  -delete 1--1 ^
  -colorspace sRGB ^
  seg_nl1.png
|

|
If the option min_clust_size N is given, clusters where the number of pixels is less than a given threshold have each of their pixels reassigned to the neigbouring cluster with the smallest similarity.
(Currently, "neigbouring" means directly above, or to the left or right. This may change to include below.)
The threshold is specified either as a number of pixels or a percentage of the image area.
This merging process starts with the smallest clusters first.
%IMDEV%convert ^
  -fuzz 0.6%% ^
  toes.png ^
  -colorspace Lab ^
  -process 'segscanmerge channel ab min_clust_size 0.1%%' ^
  -delete 1--1 ^
  -colorspace sRGB ^
  seg_z1.png

%IM%convert seg_z1.png -unique-colors -format %%w info:
331
|

|
The option max_num_clust N merges clusters until there are no more than N clusters. This applies the same "Small cluster" algorithm.
%IMDEV%convert ^
  -fuzz 0.6%% ^
  toes.png ^
  -colorspace Lab ^
  -process 'segscanmerge channel ab max_num_clust 331' ^
  -delete 1--1 ^
  -colorspace sRGB ^
  seg_x1.png
|

|
%IMDEV%convert ^
  -fuzz 0.6%% ^
  toes.png ^
  -colorspace Lab ^
  -process 'segscanmerge channel ab max_num_clust 60' ^
  -delete 1--1 ^
  -colorspace sRGB ^
  seg_x2.png
|

|
%IMDEV%convert ^
  -fuzz 0.6%% ^
  toes.png ^
  -colorspace Lab ^
  -process 'segscanmerge channel ab max_num_clust 4' ^
  -delete 1--1 ^
  -colorspace sRGB ^
  seg_x3.png
|

|
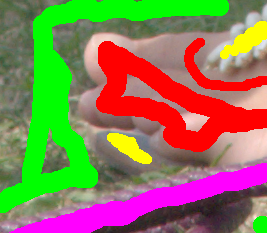
The user can create a mask of "swiped colours". All pixels with a common swipe colour will be in the same cluster.
When two pixels are compared, if they have the same swipe colour, they are considered equal.
OR
This is applied after the main algorithm. The effect is to merge clusters. When swipes of two or more different colours are used, there is no guarantee that pixels from these swipes will end up in different clusters.
In Gimp I create a file
seg_toes.xcf from toes.png as a background layer, and create a second transparent layer. I name this layer "swipe", and draw a couple of coloured swipes. I extract the layers with extrXcfLayers (see
Gimp and IM: From Gimp XCF to IM).
|
This is how it looks in Gimp:
|
|
|
Extract the layers:
call %PICTBAT%extrXcfLayers seg_toes.xcf
The swipe image is mostly transparent.
|
seg_toes_swipe.png:

|
Compare processing wthout, then with, the swipe layer:
%IMDEV%convert ^
  -fuzz 2%% ^
  toes.png ^
  -colorspace Lab ^
  -process segscanmerge ^
  -delete 1--1 ^
  -colorspace sRGB ^
  seg_sw1.png

%IM%convert seg_sw1.png -unique-colors -format %%w info:
6435
|

|
%IMDEV%convert ^
  -fuzz 2%% ^
  toes.png ^
  seg_toes_swipe.png ^
  -colorspace Lab ^
  -process segscanmerge ^
  -delete 1--1 ^
  -colorspace sRGB ^
  seg_sw2.png

%IM%convert seg_sw2.png -unique-colors -format %%w info:
5889
|

|
A separate mask is used to enforce a separation of clusters. This is used when pixels from different but adjacent objects happen to be similar.
The mask is opaque black where a pixel is not to be compared with the pixels above and left.
The IM operations +dither -colors and -posterize make good swipe masks.
%IMDEV%convert ^
  toes.png ^
  +dither -colors 15 ^
  seg_cols1.png
|

|
%IMDEV%convert ^
  toes.png ^
  -posterize 5 ^
  seg_post1.png
|

|
%IMDEV%convert ^
  toes.png ^
  ( +clone ^
    +dither -colors 15 ^
  ) ^
  -process segscanmerge ^
  -delete 1--1 ^
  seg_cols2.png

%IM%convert seg_col2.png -unique-colors -format %%w info:
2139
|

|
%IMDEV%convert ^
  toes.png ^
  ( +clone ^
    -posterize 5 ^
  ) ^
  -process segscanmerge ^
  -delete 1--1 ^
  seg_post2.png

%IM%convert seg_post2.png -unique-colors -format %%w info:
2916
|

|
%IMDEV%convert ^
  -fuzz 1%% ^
  toes.png ^
  ( +clone ^
    +dither -colors 15 ^
  ) ^
  -process segscanmerge ^
  -delete 1--1 ^
  seg_cols3.png

%IM%convert seg_cols3.png -unique-colors -format %%w info:
3014
|

|
%IMDEV%convert ^
  -fuzz 1%% ^
  toes.png ^
  ( +clone ^
    -posterize 5 ^
  ) ^
  -process segscanmerge ^
  -delete 1--1 ^
  seg_post3.png

%IM%convert seg_post3.png -unique-colors -format %%w info:
2239
|

|
For each segment, we could mark outlying edge pixels, and outliers adjacent to those.
The module expects a list of one, two or three images, the same size as each other. They must be in the following order. The first is required. If Divider_mask is supplied, then Swipe_mask must also be supplied (but may be entirely transparent).
- Input_image: a colour image that is to be segmented. Can be in any 3-channel colorspace; Lab or other perceptual colorspace is best.
- Swipe_mask: optional mask of colour swipes. Each swipe is opaque; elsewhere is transparent.
- Divider_mask: optional mask of divider black pixels. This mask is entirely black, with binary alpha. Opaque black pixels will cause the similarity test in the basic algorithm to fail. An entirely transparent Divider_mask is equivalent to no Divider_mask.
Five images are output. These will replace the entire input image list.
- Output_image: a colour image, the same size as Input_image, where each pixel is set to the mean value of the cluster containing that pixel.
- Cluster_of: a greyscale image, the same size as Input_image. where each pixel value (during calculation, just the red channel) represents the cluster number, from one to W-1.
- Cluster_mean: A clut image, size (max_clust_num+1)x1, representing up to max_clust_num clusters, where each pixel is the mean value of the pixels belonging to that cluster.
- Cluster_count: A clut image, size (max_clust_num+1)x1, representing up to max_clust_num clusters, where each pixel is the number of pixels belonging to that cluster.
- Swipe_of: A colour image, size (max_clust_num+1)x1, representing up to max_clust_num clusters, where each pixel is a swipe colour. To find the cluster of a swipe colour, do a linear search of this. To populate this, scan the swipe image: at each coloured pixel, search Swipe_of; if not found, add new entry. (Swipes are coherent, so start search at last place found.)
All except the first are used as working storage. The first is generated from the others, as a "pretty picture".
Cluster_mean and Swipe_of will be sparse: the pixel at coordinate (0,0), and perhaps others, will be black.
I can't see any point in keeping Swipe_of.
If Cluster_mean is an appropriate width, then ...
convert Cluster_of Cluster_mean -clut out.png
... would give an image resembling Input, but where the cluster mean is used to colour all the pixels in the cluster.
Some text output is created, as attributes on all the images.
- Number of colours.
-
-
References:
Regions are grown from the seed points, which are defined by swipe colours.
The basic algorithm assigns pixels to clusters according to their colour and adjacency to pixels in clusters. So there can be any number of clusters. By contrast, the GrowCut algorithm assigns pixels to one of the swipe colours. If there are (n) different swipe colours, there will be exactly (n) clusters.
The algorithm works like this:
- Each pixel has a label (from the colour of the swipe image) and a strength (scale 0 to 1, from the alpha channel of the swipe).
- For each pixel, examine the 8 (or 4) neighbours. For each neighbour, calculate the colour-difference (scale 0 to 1) from the pixel. If the difference multiplied by the neighbour's strength is greater than the pixel's strength, then the pixel is labelled from the neighbour, and its strength becomes the neighbour's strength multiplied by the difference.
if (strength(p) < diff(p,n) * strength(n) {
  label(p) = label(n);
  strength(p) = diff(p,n) * strength(n);
}
- Step two is repeated until it makes no more changes.
Option: after each iteration, save image. Or every ten iterations, etc
Some consequences from the algorithm:
- If the algorithm starts with no labels, there will be no clusters.
- If the algorithm starts with (n) different labels, it will end with (n) clusters.
- When the algorithm ends, each pixel will be in a cluster.
- Each pixel may be in a cluster before the algorithm ends. As the algorithm continues, strengths and labels of pixels may change.
- Clusters may not be connected.
- A pixel with a strength=1 is guaranteed to not change cluster.
- The algorithm isn't fast. The time is proportional to the image size multiplied by the number of iterations. More swipes will reduce the time.
-
Perhaps the speed could be improved by first working on a smaller version of the image, then taking the result as the new swipe, after making pixels near a cluster's boundary transparent.
"strength" = "weight".
Smooth boundaries: two additional rules, each with a threshold. Defines a pixel's "enemies" as the neighbours (up to 8) that are of a different label to the pixel. E(p) is the number of enemies of pixel p.
- If E(p) ≥ T1, it doesn't attack any neighbour.
- If E(p) ≥ T2, it is occupied by its weakest neighbour.
Rule 2 is a simple modification of the main algorithm. Rule 1 isn't so simple. If implemented as a modification of the main algorithm, it requires that the neighbours of a pixel's neighbours are examined; very slow. Better if implemented as a separate pass prior to the main algorithm.
Implementation: the swipe_image is cloned to cluster_image and new_cluster_image. The algorithm reads cluster_image (3 rows) and updates new_cluster_image (1 row). After each iteration, new_cluster_image is copied to cluster_image.
In the algorithm and implementation in the references above, a pixel takes its new label and strength from the neighbour that was examined last. I vary this, so the label and strength comes from the strongest neighbour. This makes the algorithm converge more quickly, and creates smoother boundaries.
|
Using this image and swipe:
%IMDEV%convert ^
  toes.png ^
  seg_toes_swipe.png ^
  -composite ^
  seg_toes_flat2.png
|

|
%IMDEV%convert ^
  toes.png ^
  seg_toes_swipe.png ^
  -virtual-pixel Mirror ^
  -process 'segscanmerge algorithm 1' ^
  -delete 0--2 ^
  -background White ^
  -layers flatten ^
  seg_gc1.png
Resulting pixels are exactly red or green, but with an alpha representing the strength.
Flattening against white ensures uncertain areas show up.
|

|
We refine the result by painting more swipes in Gimp. (For this web page, I put them in a second layer.)
%IMDEV%convert ^
  toes.png ^
  ( seg_toes_swipe.png ^
    seg_toes_swipe2.png ^
    -composite ^
  ) ^
  -virtual-pixel Mirror ^
  -process 'segscanmerge algorithm 1' ^
  -delete 0--2 ^
  seg_gc2.png
|

|
|
We can use any of the swipe colours for an opacity mask.
%IM%convert ^
  toes.png ^
  ( seg_gc2.png ^
    -alpha off ^
    -fill Black +opaque Red ^
    -fill White -opaque Red ^
  ) ^
  -compose CopyOpacity -composite ^
  seg_gc3.png
|

|
Seed points for the CrowCut algorithm could be automatically selected, perhaps based on a technique from
Details, details. This is easier if something is already known about the image, eg it is a photograph of an object against a roughly constant background.
My usual version of IM is:
%IM%identify -version
Version: ImageMagick 6.9.0-0 Q16 x64 2014-11-14 http://www.imagemagick.org
Copyright: Copyright (C) 1999-2014 ImageMagick Studio LLC
Features: DPC OpenMP
Delegates (built-in): bzlib cairo freetype jbig jng jp2 jpeg lcms lqr pangocairo png ps rsvg tiff webp xml zlib
This customised development version is:
%IMDEV%identify -version
Version: ImageMagick 6.9.0-0 Q32 x86_64 2014-11-22 http://www.imagemagick.org
Copyright: Copyright (C) 1999-2014 ImageMagick Studio LLC
Features: DPC HDRI Modules OpenMP
Delegates (built-in): bzlib fontconfig freetype fpx jbig jng jpeg lcms ltdl lzma png tiff x zlib
To improve internet download speeds, some images may have been automatically converted (by ImageMagick, of course) from PNG to JPG.
Source file for this web page is profiles.h1. To re-create this web page, run "procH1 profiles".
This page, including the images, is my copyright. Anyone is permitted to use or adapt any of the code, scripts or images for any purpose, including commercial use.
Anyone is permitted to re-publish this page, but only for non-commercial use.
Anyone is permitted to link to this page, including for commercial use.
Page version v1.0 2-September-2014.
Page created 25-Nov-2014 12:16:46.
Copyright © 2014 Alan Gibson.