snibgo's ImageMagick pages
Resampling with halo minimization
Resizing an image can create halo artifacts. These can be reduced by blending two results.
The essential idea is that two resizes are done, both in RGB colorspace. One of these is performed in a further gamma-shifted colorspace. These two resizes are blended according to lightness.
Reference:
- Luminous Landscape forum thread:
A free high quality resampling tool for ImageMagick users.
- Published there, the script Resample_by_Percentage_V122.bat. "Halo minimization by Gamma blending, as suggested by Nicolas Robidoux." Author: Bart van der Wolf. Contributions from Alan Gibson, Nicolas Robidoux, Fred Weinhaus.
This is experimental work by other people, especially Bart van der Wolf and Nicolas Robidoux. This page is merely a snapshot of their work, and I take no credit for their ideas. They know far more than I do about resizing filters.
My script differs from theirs, in that mine does all the work in a single magick command. This save time and loss of precison in converting to sRGB, writing a file, reading it, and converting to RGB.
The folks on the Luminous Landscape thread suggest HDRI (floating point) for this process, so results on this page use IM with HDRI.
If you want to evaluate the results on this page, you should ensure your browser doesn't enlarge or reduce them. For example, Firefox on my computer is set to View -> Zoom -> Zoom Text Only, so text is easily readable to my old eyes without disturbing the images.
CAUTION: I have slight cataracts in both eyes. This smears highlights into shadows; shadows appear lighter to me than they should. Doubtless, this affects my judgement of which images appear "best". It probably makes me prefer images with high contrast and reduces my sensitivity to halos.
CAUTION 2: My interest is in photography and video. My conclusions may not be valid for computer graphics, cartoons, line drawings and so on.
Quality depends on factors that can (in principle) be measured, but also on aesthetics which are more subjective. To me, the quality of an image depends on how well it fulfills its purpose, its message. Sharp detail may be important to an image, or it might detract from the message. High acutance may be useful or another distraction.
The script takes two required arguments and five optional arguments. Each optional argument that is not given, or is given with "." as a placeholder, takes a default value.
| Argument |
Description |
| %1 |
Filename of input image |
| %2 |
Resize amount.
Any valid argument to "-distort resize", eg 50% or 800x800. |
| %3 |
d = use downsample method; u = use upsample method; a = automatic.
Default: a. |
| %4 |
Sharpen amount, eg 0 or 100.
Default: 50. |
| %5 |
Deconvolve radius. 0 = no deconvolution.
Default: 0. |
| %6 |
Deconvolve sharpness, eg 0 or 100.
Default: 50. |
| %7 |
Output filename.
Default: input filename, with _rhm suffix to name. |
The downsample or upsample method may be selected, regardless of the actual dimensions. If "a" for automatic is chosen, the script will use the downsample method only if both dimensions will decrease; otherwise it will use the upsample method.
The script returns environment variable rhmOUTFILE, set to the name of the output file.
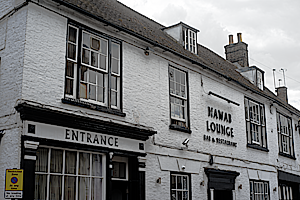
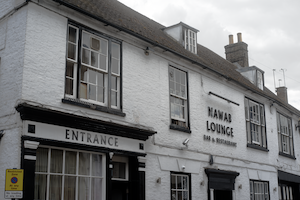
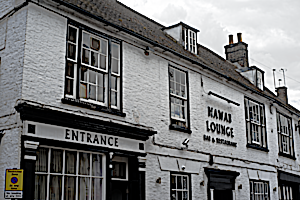
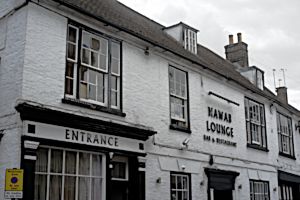
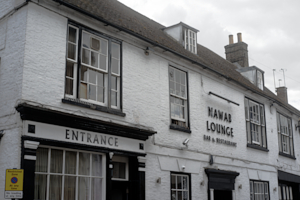
For these trials, I use this image:
set SRC=%PICTLIB%20140523\AGA_1837_g.tiff

%IMG7%magick %SRC% info:
F:\pictures\20140523\AGA_1837_g.tiff TIFF 7378x4924 7378x4924+0+0 16-bit TrueColor sRGB 171.329MiB 0.000u 0:00.000
Larger versions of this image can be seen at
Simple alignment by matching areas.
Compare three methods: a conventional "-resize", a "-resize" in RGB space, and the halo minimization script.
|
#1: Default resize:
%IMG7%magick %SRC% -resize 300x200 rhm_d1.png
|

|
|
#2: Resize in RGB colorspace:
%IMG7%magick %SRC% ^
  -colorspace RGB -resize 300x200 -colorspace sRGB ^
  rhm_d2.png
|
|
|
#3: Resize with halo minimization
call %PICTBAT%resampHM %SRC% 300x200 d . . . rhm_d3.png
|

|
To reduce the effect of vertical viewing angle on LCD screens, here they are side by side:
I can see no difference between these images. With a blink comparison, I can see differences between #1 and #3, but no differences between #1 and #2, or #2 and #3. A blink comparison of scaled-up images shows differences more clearly. For some aspects (eg edge definition) I prefer #1; for other aspects (eg contrast between small adjacent areas) I prefer #3.
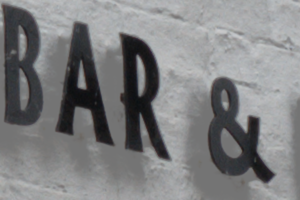
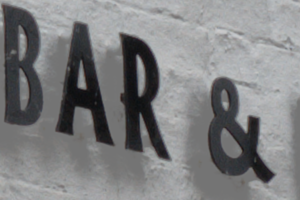
Near the centre of the image is the lettering "BAR & RESTAURANT". For upsampling trials, we crop the top of the letter "B".
set CROP=-gravity NorthWest -crop 75x50+5018+3309 +repage
We enlarge with three methods: a conventional "-resize", a "-resize" in RGB space, and the halo minimization script.
|
#1: Default resize:
%IMG7%magick %SRC% %CROP% -resize 300x200 rhm_u1.png
|

|
|
#2: Resize in RGB colorspace:
%IMG7%magick %SRC% ^
  -colorspace RGB %CROP% -resize 300x200 -colorspace sRGB ^
  rhm_u2.png
|

|
|
#3: Resize with halo minimization
%IMG7%magick %SRC% %CROP% rhm_crop.png

call %PICTBAT%resampHM rhm_crop.png 300x200 u . . . rhm_u3.png
|

|
Again, side by side:
I can see no difference, and have no preference.
The script can sharpen the image, with a strength determined by a number.
for /L %%S in (0,50,200) do (
  call %PICTBAT%resampHM %SRC% 300x200 d %%S . . rhm_d_%%S.png
)
The 100, 150 and 200 images look good to me. Detail is sharpened without being obtrusive. Maybe 200 is over-sharpened.
(Update August 2018: The cataract in my right eye has been fixed, with acuity now 6/4.8 (25/20). With that eye, I find that 50 and 100 look good, and 150 is over-sharp.)
Let's take it to extremes, to see what happens:
for /L %%S in (300,100,700) do (
  call %PICTBAT%resampHM %SRC% 300x200 d %%S . . rhm_d_%%S.png
)
To my eyes, 400 onwards are horrible. 300 might be acceptable for flat input images.
For downsampling, sharpening of 50 to 100 seems to work well.
Let's compare this script with the results from a "-resize" followed by "-unsharp":
|
|
-resize -unsharp |
resampHM.bat |
%IMG7%magick ^
  %SRC% ^
  -resize 300x200 ^
  -unsharp 0x1+1.0+0 ^
  rhm_us1.png
|
 |
100
 |
%IMG7%magick ^
  %SRC% ^
  -resize 300x200 ^
  -unsharp 0x2+1.0+0 ^
  rhm_us2.png
|
 |
200
 |
%IMG7%magick ^
  %SRC% ^
  -resize 300x200 ^
  -unsharp 0x3+1.0+0 ^
  rhm_us3.png
|
 |
300
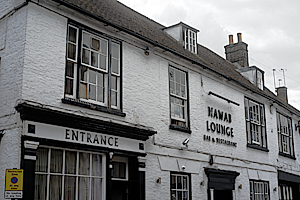 |
All the results from "resize unsharp" show heavy halos, clearly evident around the lettering "ENTRANCE" and "NAWAB LOUNGE", and in the sky at the roof line. The white window frames also show well, almost glowing. The halos degrade the image, creating spurious detail that distracts from the real detail, and creating an artificial appearence.
The results from resampHM.bat show no halos (that I can see). But the detail in the brickwork, and at the lettering, is much clearer (especially at 200 and 300). I love these results.
The same parameter can sharpen upsampled images.
for /L %%S in (0,50,200) do (
  call %PICTBAT%resampHM rhm_crop.png 300x200 u %%S . . rhm_u_%%S.png
)
Staircasing is visible at the white/black boundary at image top-left from 50 onwards. In the low-contrast areas, the image is perhaps slightly improved, and for images without long continuous lines values up to 200 might be used.
for /L %%S in (300,100,700) do (
  call %PICTBAT%resampHM rhm_crop.png 300x200 u %%S . . rhm_u_%%S.png
)
300 is horrible everywhere. 400 is just plain weird. Then the effect seems to fade down.
For upsampling, sharpening may be useful for images without "man-made" boundaries, but for most images I doubt that I would like any sharpening at all.
Downsampling can be followed by a deconvolution, to sharpen the result. This takes two parameters: a radius and amount.
for /L %%R in (1,1,4) do (
  for /L %%S in (100,100,400) do call %PICTBAT%resampHM ^
    %SRC% 300x200 d 0 %%R %%S rhm_d_%%R_%%S.png
)
1,100
 |
1,200
 |
1,300
 |
1,400
 |
2,100
 |
2,200
 |
2,300
 |
2,400 Bad
 |
3,100
 |
3,200
 |
3,300 Bad
 |
3,400 Bad
 |
4,100
 |
4,200 Bad
 |
4,300 Bad
 |
4,400 Bad
|
I have marked as "Bad" the versions I consider unacceptable due to halos. Of the lines with radius greater than one, all the acceptable results are less sharp than 1,400. Thus, I would say there is never any point in using a radius larger than one.
With radius of one, I can't see difference between a deconvolved image and non-deconvolved with the same sharpness amount.
Thus, for me, deconvolution after sharpening is pointless.
Similarly, upsampling can be followed by the same sharpening deconvolution.
for /L %%R in (1,1,4) do (
  for /L %%S in (100,100,400) do call %PICTBAT%resampHM ^
    rhm_crop.png 300x200 u 0 %%R %%S rhm_u_%%R_%%S.png
)
1,100
 |
1,200
 |
1,300
 |
1,400 Bad
 |
2,100
 |
2,200
 |
2,300 Bad
 |
2,400 Bad
 |
3,100
 |
3,200 Bad
 |
3,300 Bad
 |
3,400 Bad
 |
4,100 Bad
 |
4,200 Bad
 |
4,300 Bad
 |
4,400 Bad
|
Again, I have marked as "Bad" the versions I consider unacceptable, this time due to noticable ringing, staircasing, and an over-emphasis of detail (or noise) in the dark area. The decision is more arbitrary: badness increases evenly with both radius and sharpness.
2,300 is pretty much identical to 4,100.
As above, I would be very cautious about sharpening upsampled images.
We can enlarge ten-fold, then shrink ten-fold, and compare the result with the original. I also use a crude stopwatch to show how long each process takes.
|
Create a source for round-trip tests
%IMG7%magick ^
  %SRC% ^
  -crop 300x200+5018+3309 +repage ^
  rhm_rt_src.png
|

|
|
Conventional up-down.
call StopWatch

%IMG7%magick ^
  rhm_rt_src.png ^
  ( +clone ^
    -resize 1000%% ^
    -resize 10%% ^
    +write rhm_rt_ud1.png ^
  ) ^
  -metric RMSE -format "%%[distortion]   " ^
  -compare info:

call StopWatch
0.00434616 0 00:00:02
|
|
|
Conventional up-down, via linear RGB.
%IMG7%magick ^
  rhm_rt_src.png ^
  ( +clone ^
    -colorspace RGB ^
    -resize 1000%% ^
    -resize 10%% ^
    -colorspace sRGB ^
    +write rhm_rt_ud2.png ^
  ) ^
  -metric RMSE -format "%%[distortion]   " ^
  -compare info:

call StopWatch
0.00484559 0 00:00:03
|

|
|
Conventional up-down, via the script.
call %PICTBAT%resampHM rhm_rt_src.png 1000%%%% u . . . rhm_rt_tmp.png

call %PICTBAT%resampHM rhm_rt_tmp.png 10%%%% d . . . rhm_rt_uds1.png

call StopWatch

del rhm_rt_tmp.png

%IMG7%magick ^
  rhm_rt_src.png ^
  rhm_rt_uds1.png ^
  -metric RMSE -format %%[distortion] ^
  -compare info:
0 00:01:27
0.00391736
|
|
The numbers say the script is best, followed by a plain conventional, followed by conventional via linear RGB. However, the RMSE differences are small. I can see no difference between any round-trip result and the source, even when scaled up.
The script is far slower than the conventional methods.
I usually work in sRGB colorspace so this script, like most of my scripts, assumes the image is encoded in sRGB. If the image is encoded as something else the results may be inaccurate.
If the input image is encoded in another colorspace known to ImageMagick, such as CMY, CMYK, Lab etc, the script should work fine, but the output will be sRGB.
AdobeRGB1998 is very similar to sRGB, but is defined (see
Adobe RGB (1998) Color Image Encoding section 4.3.1.2) to have a simpler relationship between pixel values and radiometrically linear values. It is a power law, where the constant is aproximately 2.2. (It is exactly 563/256.) So converting to linear and back is very easy. For this, the script will need changing; see instructions in
resampHM.bat below.
For images encoded in other colorspaces (probably with embedded profiles), I suggest these are converted to sRGB by a "-profile" command, then converted back afterwards. Again, see instructions in
resampHM.bat.
- I don't find upsampling with the script any better (or worse) than upsampling with the usual "-resize". It takes time and adds complexity with no benefit.
- For downsampling with no sharpening, I find no benefit from the script.
- For downsampling with sharpening, the script gives vastly superior results to the conventional "resize unsharp".
- Deconvolution applied to downsampling is no better than non-deconvolved versions.
- Deconvolution applied to upsampling simply creates staircasing. I don't like it.
For me, the script gives great benefit for combined downsampling and sharpening, a common operation for web preparation. For convenience, we can simplify the script to
shrinkSharp.bat, and use it like this:
|
Downsize an image, with sharpening:
call %PICTBAT%shrinkSharp ^
  %SRC% ^
  300x200 rhm_shsh.png 50
|
|
I have experimented with this technique for demosaicing Bayer images. See
Demosaicing. So far, I wouldn't say it brings any improvement.
I repeat the cautions from the top of this page: I have slight cataracts, and this will bias my preferences; my interest is in photographs, rather than solid-colour graphics, etc.
For convenience, .bat scripts are also available in a single zip file. See
Zipped BAT files.
rem Resampling with halo minimization.
rem   %1 is input image.
rem   %2 is resize, eg 50% or 800x800, etc.
@rem
@rem Optional:
@rem   %3 is d=downsample, u = upsample, a = automatic
@rem   %4 is sharpen amount (0=none, 50=default)
@rem   %5 is deconvolve radius (0=no deconvolution, default)
@rem   %6 is deconvolve sharpness (default=50)
@rem   %7 output filename

@rem See http://www.luminous-landscape.com/forum/index.php?topic=91754.msg763245#msg763245
@rem and http://im.snibgo.com/resamphm.htm

@rem Updated:
@rem   27-October-2017 Added "+depth".
@rem   28-June-2001 For v7. Assumes "magick" is HDRI. Added save and restore alpha.


@if "%2"=="" findstr /B "rem @rem" %~f0 & exit /B 1

@setlocal enabledelayedexpansion

@call echoOffSave

call %PICTBAT%setInOut %1 rhm


set mSize=%2
if "%mSize%"=="." set mSize=
if "%mSize%"=="" set mSize=100%

set method=%3
if "%method%"=="." set method=
if "%method%"=="" set method=a

if /I "%method%" NEQ "a" if /I "%method%" NEQ "d" if /I "%method%" NEQ "u" (
  echo Method must be A, D or U.
  exit /B 1
)

set shpAmount=%4
if "%shpAmount%"=="." set shpAmount=
if "%shpAmount%"=="" set shpAmount=50

set deconRad=%5
if "%deconRad%"=="." set deconRad=
if "%deconRad%"=="" set deconRad=0

set deconShp=%6
if "%deconShp%"=="." set deconShp=
if "%deconShp%"=="" set deconShp=50

if not "%7"=="" if not "%7"=="." set OUTFILE=%7


::echo mSize=%mSize% method=%method%  shpAmount=%shpAmount%


@rem If working in AdobeRGB1998, replace the next two lines with:
@rem
@rem   set colspIn=-evaluate Pow 2.19921875
@rem   set colspOut=-evaluate Pow 0.4547069271758437
@rem
@rem For images with embedded profiles, use:
@rem
@rem   set colspIn=-write IMprofile.icc -profile sRGB.icc -set colorspace sRGB -colorspace RGB
@rem   set colspOut=-set colorspace RGB -colorspace sRGB -profile IMprofile.icc

set colspIn=-colorspace RGB
set colspOut=-set colorspace RGB -colorspace sRGB


set nGam=3

for /f "usebackq" %%L in (`%IMG7%magick identify ^
  -precision 16 ^
  -format "invGam=%%[fx:1/%nGam%]" ^
  xc:`) do set %%L

set gamIn=-gamma %nGam%
set gamOut=-gamma %invGam%

if /I "%method%"=="a" (
  for /F "usebackq" %%L in (`%IMG7%magick identify ^
    -ping ^
    -format "W_OLD=%%w\nH_OLD=%%h" ^
    %INFILE%`) do set %%L

  for /F "usebackq" %%L in (`%IMG7%magick ^
    -size %W_OLD%x%H_OLD% ^
    xc: ^
    -scale %2 ^
    -format "W_NEW=%%w\nH_NEW=%%h" ^
    info:`) do set %%L

  set method=u
  if !W_NEW! LSS !W_OLD! if !H_NEW! LSS !H_OLD! set method=d

  rem echo From auto, method=!method!
)

if /I "%method%"=="d" (

  if %shpAmount%==0 (
    set REAL_WORK=-filter Quadratic -distort Resize %mSize%
  ) else (

    set PREPROC=-define filter:c=0.1601886205085204 -filter Cubic -distort Resize %mSize%

    set FILT=-define convolve:scale=%shpAmount%%%^^,100 -morphology Convolve DoG:3,0,0.4981063336734057

    set REAL_WORK= ^
      !PREPROC! ^
      ^( -clone 0 %gamIn% !FILT! %gamOut% ^) ^
      ^( -clone 0 !FILT! ^) ^
      -delete 0 ^
      ^( -clone 1 -colorspace gray -auto-level ^) ^
      -compose over -composite
  )
) else (
  for /f "usebackq" %%L in (`%IMG7%magick identify ^
    -precision 16 ^
    -format "deblurValue=%%[fx:1-0.0011450938298236*%shpAmount%]" ^
    xc:`) do set %%L

  set FILT=-define filter:blur=!deblurValue! -filter Lanczos -distort Resize %mSize%

  set REAL_WORK= ^
    ^( -clone 0 %gamIn% !FILT! %gamOut% ^) ^
    ^( -clone 0 !FILT! ^) ^
    -delete 0 ^
    ^( -clone 1 -colorspace gray -auto-level ^) ^
    -compose over -composite

)

rem echo REAL_WORK=%REAL_WORK%

set DECONV=

if not "%deconRad%"=="0" (
  for /f "usebackq" %%L in (`%IMG7%magick identify ^
    -precision 16 ^
    -format "blurSigma=%%[fx:max(0.4,0.3902*%deconRad%)]" ^
    xc:`) do set %%L

  set DECONFILT=-define convolve:scale=%deconShp%%%^^,100 -morphology Convolve DoG:0,0,!blurSigma!

  set DECONV= ^
    ^( -clone 0 %gamIn% !DECONFILT! %gamOut% ^) ^
    ^( -clone 0 !DECONFILT! ^) ^
    -delete 0 ^
    ^( -clone 1 -colorspace gray -auto-level ^) ^
    -compose over -composite
)

set SAVEALPHA=( +clone -alpha extract -resize %mSize% -write mpr:ALP +delete ) -alpha off

set RESTOREALPHA=mpr:ALP -compose CopyOpacity -composite

%IMG7%magick ^
  %INFILE% ^
  %SAVEALPHA% ^
  %colspIn% ^
  %REAL_WORK% ^
  %DECONV% ^
  %colspOut% ^
  %RESTOREALPHA% ^
  +depth ^
  %OUTFILE%

rem  ( -clone 0 %gamIn% %FILT% %gamOut% )
rem  ( -clone 0 %FILT% )


call echoRestore

@endlocal & set rhmOUTFILE=%OUTFILE%
@setlocal DisableDelayedExpansion
@set INFILE=%~f1
@if not exist "%INFILE%" set INFILE=%1
rem Next is new 25-August-2018
if %INFILE%==%CD%\%~nx1 set INFILE=%~nx1
@endlocal & set INFILE=%INFILE%
@set INNAME=%~n1
@set INNOBR=!INFILE:[%INFILE:*[=%=!
set BASENAME=%~dpn1
if not exist %INNOBR% (
  set BASENAME=%1
  set BASENAME=!BASENAME::=_!
)
set BASENAME=!BASENAME:[%BASENAME:*[=%=!

set EXT=%~x1
@set EXT=!EXT:[%EXT:*[=%=!
@if "%EXT%"=="" set EXT=.png
@set ISJPEG=0
@set ISTIFF=0
@set sioCODE=%2
@if /I "%EXT%"==".jpg" set ISJPEG=1
@if /I "%EXT%"==".jpeg" set ISJPEG=1
@if /I "%EXT%"==".txt" set EXT=.png
@if /I "%EXT%"==".ppm" set EXT=.png
@rem if /I "%EXT%"==".miff" set EXT=.png

@set COMPR=
@if %ISJPEG%==1 (
  @set EXT=%sioJPEG_EXT%
  @if "!EXT!"=="" @set EXT=.tiff
  @if !EXT!==.tiff @set COMPR=-compress Zip
)

@set OUTBASE=%BASENAME%_%sioCODE%
@set OUTFILE=%OUTBASE%%EXT%

@setlocal DisableDelayedExpansion
@if "%sioDEBUG%"=="1" @(
  echo INFILE=%INFILE%
  echo INFILEBANG=%INFILE:!=*%
  echo OUTFILE=%OUTFILE%
  echo INNAME=%INNAME%
  echo BASENAME=%BASENAME%
  echo EXT=%EXT%
)
@endlocal
@echo>%TEMP%\echo_%1.txt
@for /f "tokens=3 delims=. " %%E in (%TEMP%\echo_%1.txt) do @set ECHO_SAVE=%%E
@echo off
@echo %ECHO_SAVE%
@set STOP_WATCH_SUB=
@if not "%STOP_WATCH_TIME%"=="" set STOP_WATCH_SUB=/S "%STOP_WATCH_TIME%"

@cDate %STOP_WATCH_SUB% /f"\q \H:\M:\s"

@for /F "usebackq tokens=*" %%L IN (`cDate /f"\d-\b-\Y \H:\M:\s"`) do @set STOP_WATCH_TIME=%%L
@rem echo %STOP_WATCH_TIME%

@if not "%1"=="" @echo %STOP_WATCH_TIME% %1 %2 %3 %4 %5 %6 %7 %8 %9>>stopwatch.lis
rem Downsampling with halo minimization.
rem   %1 is input image.
rem   %2 is resize, eg 50% or 800x800, etc.
rem   %3 output filename
rem   %4 is sharpen amount (0=none, 50=default)

@rem This is a simplification of resampHM,
@rem for downsampling with sharpening, with no deconvolution.

@if "%2"=="" findstr /B "rem @rem" %~f0 & exit /B 1

@setlocal enabledelayedexpansion

@call echoOffSave

call %PICTBAT%setInOut %1 shsh

if not "%3"=="" if not "%3"=="." set OUTFILE=%3

set mSize=%2
if "%mSize%"=="." set mSize=
if "%mSize%"=="" set mSize=100%

set shpAmount=%4
if "%shpAmount%"=="." set shpAmount=
if "%shpAmount%"=="" set shpAmount=50

@rem If working in AdobeRGB1998, replace the next two lines with:
@rem
@rem   set colspIn=-evaluate Pow 2.19921875
@rem   set colspOut=-evaluate Pow 0.4547069271758437
@rem
@rem For images with embedded profiles, use:
@rem
@rem   set colspIn=-write IMprofile.icc -profile sRGB.icc -set colorspace sRGB -colorspace RGB
@rem   set colspOut=-set colorspace RGB -colorspace sRGB -profile IMprofile.icc

set colspIn=-colorspace RGB
set colspOut=-set colorspace RGB -colorspace sRGB


%IMG7%magick ^
  %INFILE% ^
  ( +clone -alpha extract ^
    -resize %mSize% -write mpr:ALP +delete ^
  ) ^
  -alpha off ^
  -colorspace RGB ^
  -define filter:c=0.1601886205085204 -filter Cubic -distort Resize %mSize% ^
  ( -clone 0 ^
    -evaluate Pow %%[fx:1/3] ^
    -define convolve:scale=%shpAmount%%%,100 -morphology Convolve DoG:3,0,0.4981063336734057 ^
    -evaluate Pow 3 ^
  ) ^
  ( -clone 0 ^
    -define convolve:scale=%shpAmount%%%,100 -morphology Convolve DoG:3,0,0.4981063336734057 ^
  ) ^
  -delete 0 ^
  ( -clone 1 -colorspace gray -auto-level ) ^
  -compose over -composite ^
  -set colorspace RGB -colorspace sRGB ^
  mpr:ALP -compose CopyOpacity -composite ^
  +depth ^
  %OUTFILE%


call echoRestore

@endlocal & set shshOUTFILE=%OUTFILE%
My usual version of IM is:
%IMG7%magick -version
Version: ImageMagick 7.1.0-49 Q16-HDRI x64 7a3f3f1:20220924 https://imagemagick.org
Copyright: (C) 1999 ImageMagick Studio LLC
License: https://imagemagick.org/script/license.php
Features: Cipher DPC HDRI OpenCL
Delegates (built-in): bzlib cairo freetype gslib heic jng jp2 jpeg jxl lcms lqr lzma openexr pangocairo png ps raqm raw rsvg tiff webp xml zip zlib
Compiler: Visual Studio 2022 (193331630)
Unlike most of my pages, these images have not been converted to JPG. They are compressed PNG files, with no loss.
Source file for this web page is resamphm.h1. To re-create this web page, run "procH1 resamphm".
This page, including the images, is my copyright. Anyone is permitted to use or adapt any of the code, scripts or images for any purpose, including commercial use.
Anyone is permitted to re-publish this page, but only for non-commercial use.
Anyone is permitted to link to this page, including for commercial use.
Page version v1.0 21-September-2014.
Page created 05-Oct-2022 05:01:00.
Copyright © 2022 Alan Gibson.