snibgo's ImageMagick pages
Painting people
... or clothing or any modelled 3D object with arbitrary images.
Suppose we have modelled a 3D object, and want a method for a 2D image to be wrapped on the object as if it were painted on. Some part of the object, or perhaps the entire object, will show the wrapped image. The result should look as if a real-world object wrapped in that image had been photographed. This is sometimes called wrapping an image around a 3D object, or painting the object with the image, or texturing an object with the image.
The
Coffee mug page shows how to do this with POV-ray and ImageMagick. This page uses Blender and ImageMagick. (The job can be done, just about, with MakeHuman and ImageMagick. But MH doesn't have the general 3D modelling, rendering and animation facilities of Blender, and isn't designed for that. Blender has a steep learning curve with a complex and non-intuitive GUI, but I show how to use it with no interaction.)
This page describes image processing only. It does not describe how to make 3D models, nor web aspects of receiving and delivering images, nor workflows required for loads (tens, hundreds or thousands) of products.
This page writes images once with the intention that they are read many times, and that the reads should be fast. On my laptop, uncompressed MIFF is the fastest format for repeated reads by ImageMagick, but it is only slightly faster than MPC. On some computers, MPC may be faster.
I expect the methods shown on this page can be used in modellers other than Blender. Terminology will often be different, and scripts will certainly be different. Details may be different for older or newer versions of Blender.
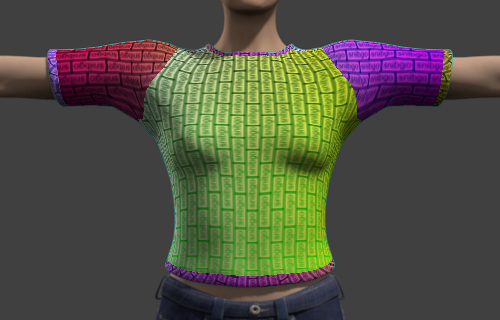
We make an image to wrap around the object:
set WW=760
set HH=640

call %PICTBAT%identAbsDispMap ^
  %WW% %HH% %TEMP%\sb.miff

%IMG7%magick ^
  -size 45x16 ^
  label:snibgo ^
  -trim ^
  -bordercolor White -border 2 ^
  -bordercolor Black -border 1 ^
  ( +clone -roll +20+0 ) ^
  -append +repage ^
  +write mpr:TILE ^
  +delete ^
  -size %WW%x%HH% ^
  xc: ^
  -tile mpr:TILE ^
    -draw "color 0,0 reset" ^
  ( %TEMP%\sb.miff ^
    -negate ^
    -separate ^
    -insert 0 ^
    -combine ^
  ) ^
  -compose Hardlight -composite ^
  pntp_myimg.png
|
|
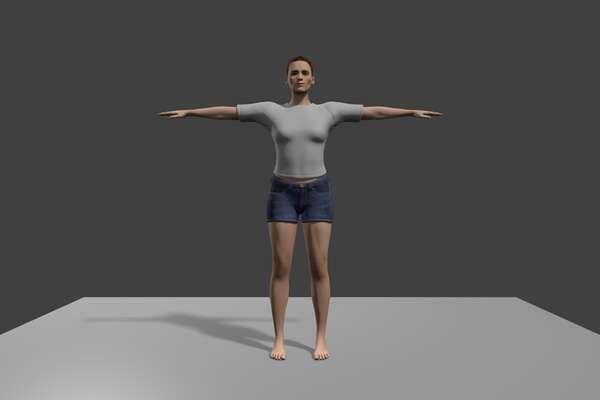
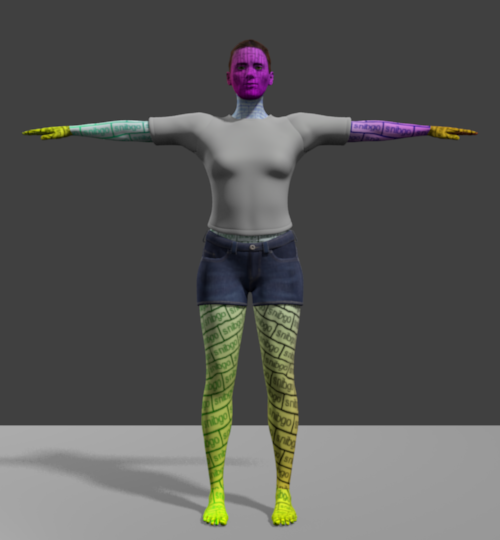
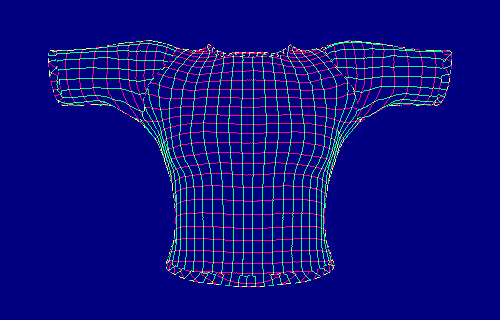
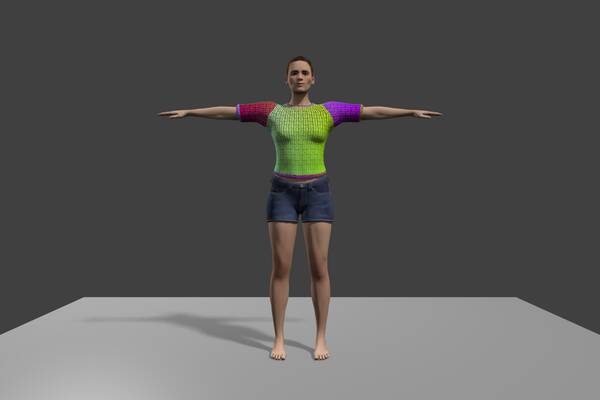
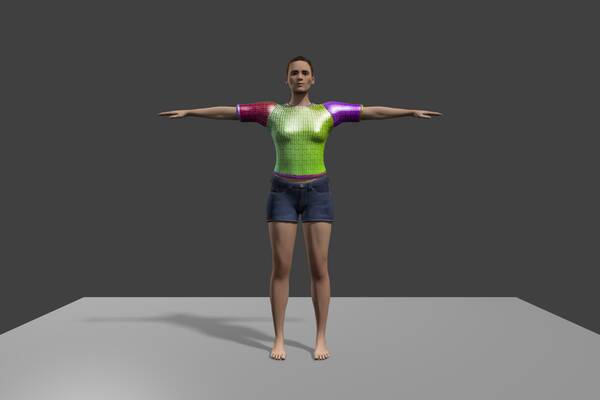
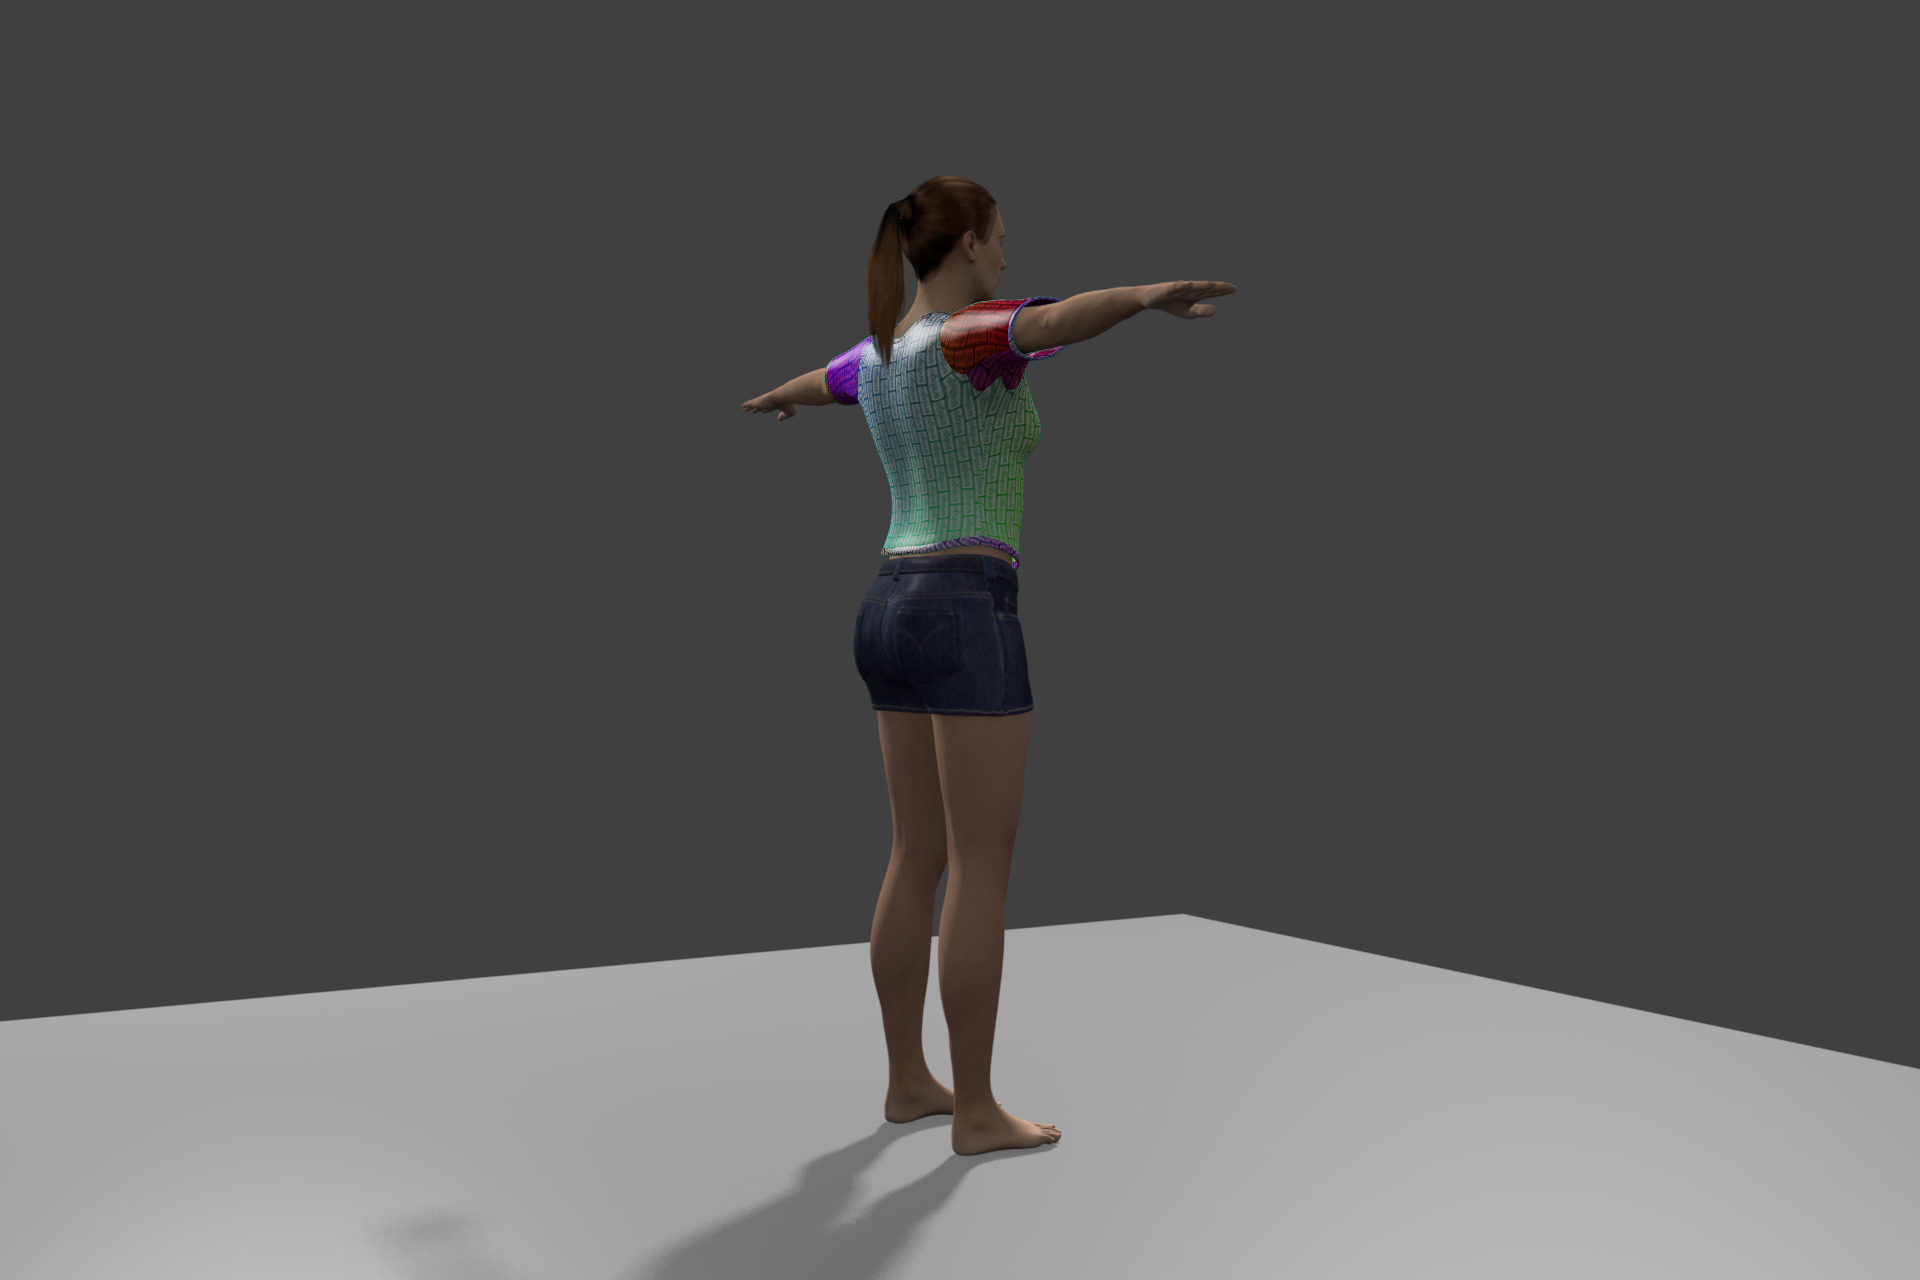
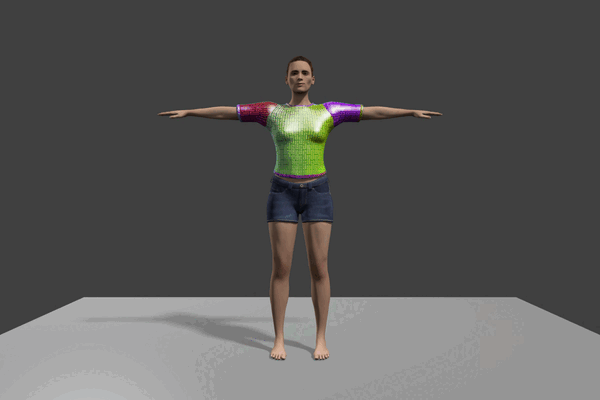
We make a 3D model of the person or clothing or whatever object we want. For example, we use MakeHuman to make a female humanoid wearing a tee-shirt and shorts, and export the .dae file into Blender. The model must have UV maps to give the mapping between coordinates of texture images and the 3D objects. In Blender, we add a stage and lighting.
zip pntpp_blnd.zip %BLUSR%pntp1.blend
You can download a zip of the blend file (which is 20 MB of text):
pntpp_blnd.zip.
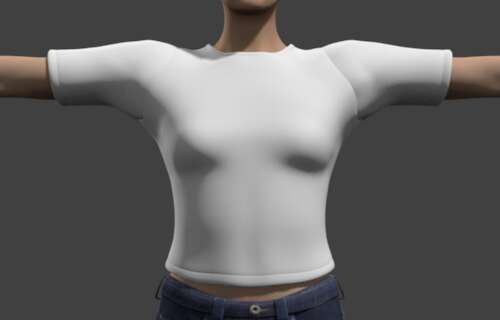
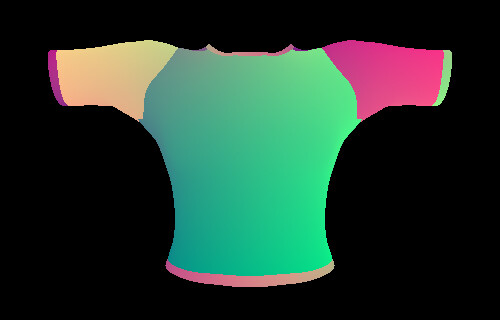
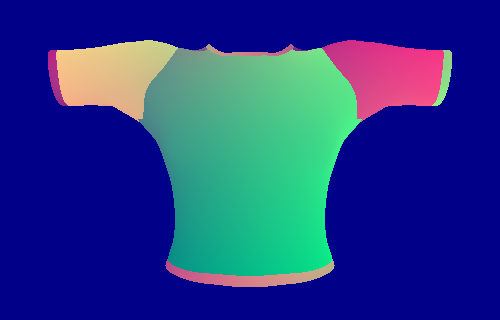
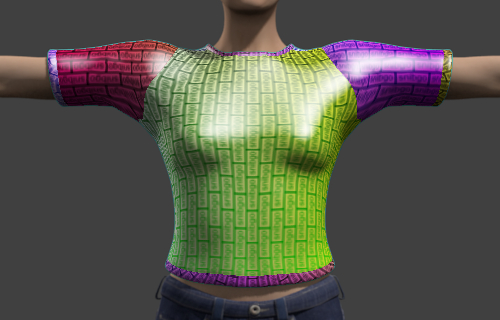
The Blender render makes this, which we resize down to show on the web:
%BLENDER% -b ^
  %BLUSR%pntp1.blend ^
  -P setsize.py ^
  -o %CD%/pntp_tmp_######.png ^
  -f 1

set WEBSIZE=-resize 600x600

%IMG7%magick ^
  pntp_tmp_000001.png ^
  -gravity Center ^
  +write pntp_null.miff ^
  %WEBSIZE% ^
  pntp_null_sm.miff
|
|
We have saved the full-size image as pntp_null.miff, for use later.
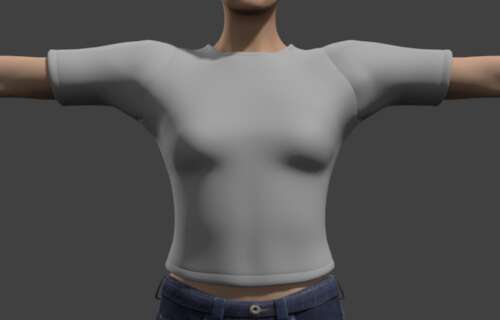
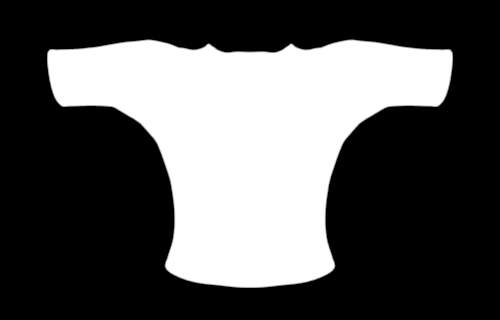
We will concentrate on the shirt:
set SHIRT_OFFS=+710+285

set IMCROP=-crop 500x320%SHIRT_OFFS% +repage

%IMG7%magick ^
  pntp_tmp_000001.png ^
  %IMCROP% ^
  pntp_null2.miff
|
|
The object mesh could be subdivided. This would extend the time required for 3D preparation without slowing the 2D operation. It might add realism to the final results.
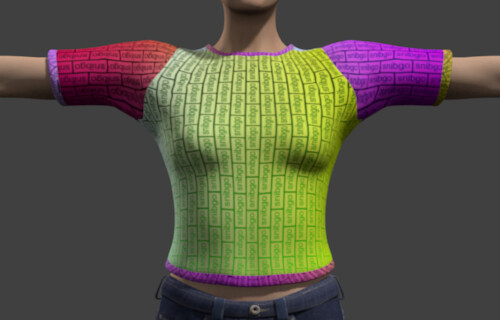
We will show two methods for wrapping pntp_myimg.png around the shirt.
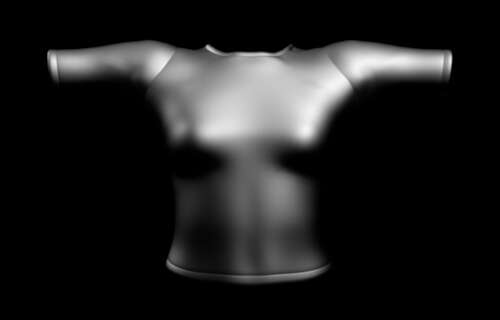
This method is simple. In Blender, we interactively select the shirt and change its texture file to pntp_myimg.png. Or, as shown here, we use Blender in non-interactive mode: we change the texture file in a Python script, and render the image.
%BLENDER% -b ^
  %BLUSR%pntp1.blend ^
  -P setsize.py ^
  -P setshirt.py ^
  -o %CD%/pntp_tmp_######.png ^
  -f 1

%IMG7%magick ^
  pntp_tmp_000001.png ^
  %IMCROP% ^
  pntp_newshirt.miff
|
|
If we wanted our image to occupy just part of the front panel of the shirt, we could use just part of pntp_myimg.png, and make the rest white.
This method is quite resource intensive: each rendering takes 2.6 seconds on my laptop, requiring 180 MB of memory.
If we want to wrap the skin instead of the shirt:
%BLENDER% -b ^
  %BLUSR%pntp1.blend ^
  -P setskin.py ^
  -o %CD%/pntp_tmp_######.png ^
  -f 1

%IMG7%magick ^
  pntp_tmp_000001.png ^
  -gravity Center ^
  -crop 500x+0+0 +repage ^
  pntp_newskin.miff
|
|
The second method is far more complex and needs far more resources overall. However, almost all the effort is in the preparation, before we have an image that is to be wrapped around the object. The actual wrapping is simple and quick.
So this method is useful when we have a standard object with standard lighting and so on, but a large number of results are to be made from a large number of images, and the effort for making each result must be small. For example, when users can upload their own images to see how they would look when wrapped around a manufactured product.
The preparation step is done in 3D. This makes a number of images that are used in the operation step (which needs no 3D software).
To prepare, we make a number of renders of the object. I call this group of renders a wrap set. If we want to offer different views of the object, then we need to make one wrap set per view. (See
Multiple views below.) If we need to wrap multiple objects each with its own image, we need one wrap set per object per view. For our example, a wrap set contains five images:
- wrap-null: An ordinary rendering of the object, with whatever background, lighting, shading and reflections we want. See pntp_null.miff above.
- wrap-ord: An ordinary rendering of the object, like wrap-null, but the parts that are to be wrapped should be white on the object. If the lighting is white, these parts will be rendered in shades of gray. We need to ensure wrap-ord is not clipped.
- wrap-mask: A mask of the wrap. This is white where the image is to be wrapped, and otherwise black. There may be anti-aliasing between the two.
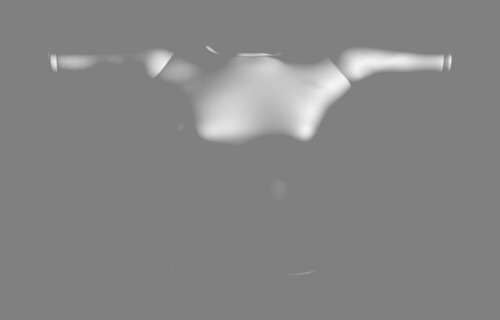
- wrap-dispmap: An absolute displacement map, explained below.
- wrap-high: A highlight and shadows mask, although we generally use this just for specular highlights. This is white where there are specular reflections, and otherwise 50% gray, with anti-aliasing. The 3D modelling software can probably make an image that is white where there are specular reflections and otherwise black, and we can easily make our white/gray mask from that.
If we are doing further work, such as compositing the entire object (not just the wrapped part) on to another image we may need further images, such as a mask of the entire image, and a mask showing any shadows cast by the image.
The absolute displacement map, wrap-dispmap, is a rendering of the object wrapped with a special image, an identity displacement map (pntp_idmap.png), which is a 2D gradation of colours. The rendering will place each colour from the identity map on the appropriate part of the object, but must not change the colours in any way. (Strictly speaking, we don't care about the colours but the numbers in the pixels. Aside from interpolation required for fractional coordinates, the render must not change these numbers.) The displacement map will go slightly beyond the white portions of wrap-mask. Everywhere else should be black. This rendering must be precise (at least 16 bits/channel/pixel) and accurate. If the output is to be web-sized (say, up to 600x600 pixels), 16-bit integer is usually precise enough. (In Blender, Properties, Render, Output, set PNG Color Depth to 16.) For larger images, we need 32-bit floating point.
Be aware that renderers may change colorspaces, and/or be fussy about what colorspaces they accept or emit. Blender is happy to accept sRGB, and emit sRGB, so that's what I use.
Doing this correctly is not simple, because renderers contain many features to make objects look realistic, and we want to turn all these features off.
Why do we need high accuracy and high precision? Because the colours in the map will be used to index locations in the image that is to be painted. An error of (say) one part in 256 in a colour is not noticable, but a displacement of one part in 256 is obvious.
A Python script could be written to generate all the wrap images for a single viewpoint, but we often want a large number of views from around an axis. It is simpler to tell Blender to make all the wrap-ord images, then all the wrap-mask images, and so on.
Make pntp_idmap.png with the
identAbsDispMap.bat script, and pntp_white.png:
call %PICTBAT%identAbsDispMap.bat 2028 2028 pntp_idmap.png

%IMG7%magick -size 2048x2048 xc:White pntp_white.png
For wrap-ord: For the object that is to be wrapped: Properties, Texture, Image, Source, change to white.png.
For wrap-mask: ensure anti-aliasing is on. For the object that is to be wrapped: Properties, Texture, Image, Source, change to white.png. Properties, Material, Shading, tick Shadeless. For the other objects, make them black (property, Material, set Diffuse and Specular Intensities to zero).
For wrap-dispmap: turn off all lighting except for Environment Lighting, and set its Energy to 1.00. For the object that is to be wrapped: properties, Texture, Image, Source, change to pntp_idmap.png. Properties, Material, Shading, tick Shadeless ("Make this material insensitive to light or shadow"). For the other objects, make them black (property, Material, set Diffuse and Specular Intensities to zero) or restrict their rendering. (Semi-transparent objects such as hair that are in front of objects to be wrapped should not be rendered in wrap-dispmap.) Turn off anti-aliasing (properties, Render, untick panel Anti-Aliasing). Every pixel should either have its colour from pntp_idmap.png, or it should be black.
For wrap-high, ensure anti-aliasing is on. Turn off the object's diffuse reflectivity. The result is almost black, so just to make it interesting for this example, increase Specular Intensity to 1.0 and set the specular colour to white. This creates a shiny plastic look.
For speed of processing in step 2, we crop all the renders except for wrap-null.
Instead of making these changes interactively, we can do them in Python scripts (listed
below). The images made by Blender, after cropping off the boring background, look like this:
%BLENDER% -b ^
  %BLUSR%pntp1.blend ^
  -P setsize.py ^
  -P setshirtwt.py ^
  -x 1 ^
  -o %CD%/pntp_tmp_######.png ^
  -f 1

%IMG7%magick ^
  pntp_tmp_000001.png ^
  %IMCROP% ^
  pntp_wrap-ord.miff
|
|
%BLENDER% -b ^
  %BLUSR%pntp1.blend ^
  -P setsize.py ^
  -P setbackblack.py ^
  -P setobjblack.py ^
  -P setshirtwt.py ^
  -P setshadeless.py ^
  -x 1 ^
  -o %CD%/pntp_tmp_######.png ^
  -f 1

%IMG7%magick ^
  pntp_tmp_000001.png ^
  %IMCROP% ^
  pntp_wrap-mask.miff
|
|
%BLENDER% -b ^
  %BLUSR%pntp1.blend ^
  -P setsize.py ^
  -P setbackblack.py ^
  -P setobjblack.py ^
  -P setshirtwt.py ^
  -P setshadeless.py ^
  -P setshirtmap.py ^
  -P setnoantialias.py ^
  -x 1 ^
  -o %CD%/pntp_tmp_######.png ^
  -f 1

%IMG7%magick ^
  pntp_tmp_000001.png ^
  %IMCROP% ^
  pntp_wrap-dispmap.miff
|

|
%BLENDER% -b ^
  %BLUSR%pntp1.blend ^
  -P setsize.py ^
  -P setbackblack.py ^
  -P setobjblack.py ^
  -P setshirtwt.py ^
  -P setshirthigh.py ^
  -x 1 ^
  -o %CD%/pntp_tmp_######.png ^
  -f 1

%IMG7%magick ^
  pntp_tmp_000001.png ^
  %IMCROP% ^
  pntp_wrap-high.miff
|
|
It is easy to over-cook 3D lighting models, so we check that wrap-ord hasn't clipped:
%IMG7%magick ^
  pntp_wrap-ord.miff ^
  -format %%[fx:maxima] ^
  info: >pntp_wo.lis
0.953689
The maximum is below 1.0, so it hasn't clipped.
Check the bit-depth of wrap-dispmap is at least 16:
%IMG7%magick identify pntp_wrap-dispmap.miff >pntp_wd.lis
pntp_wrap-dispmap.miff MIFF 500x320 500x320+0+0 16-bit TrueColor sRGB 960947B 0.016u 0:00.007
Check the blue channel of wrap-dispmap. Every pixel should be either zero, or the value set by identAbsDispMap.bat, which by default is #8:
 %IMG7%magick ^
  pntp_wrap-dispmap.miff ^
  -channel B -separate +channel ^
  -fill Black -opaque #888 -fill White +opaque Black ^
  +write pntp_dm_error.png ^
  -format %%[fx:maxima] info: >pntp_wd2.lis
0
The result should be zero. If it isn't, the image pntp_dm_error.png will have white pixels where there are problems.
We check that the contours of the red and green channels in wrap-dispmap look reasonable:
set FREQm1=49

%IMG7%magick ^
  -size 1x500 gradient: -rotate 90 ^
  -duplicate %FREQm1% +append +repage ^
  pntp_wrap-dispmap.miff ^
  +swap ^
  -clut ^
  -channel RG -separate +channel ^
  -morphology edgein diamond:1 ^
  -threshold 40%% ^
  ( -clone 0 -fill gray(50%%) -colorize 100 ) ^
  -combine ^
  pntp_chk_cont.png
|
|
These contours look okay. If they didn't, but the other tests were okay, this would suggest a UV mapping problem with the 3D model, which is beyond the scope of this page.
Okay so far. Now, we need to process these renderings.
If wrap-dispmap had anti-aliased edges, they would cause badly incorrect displacement at the edges, so we would remove them. Next, to ensure that pixels anti-aliased in the mask receive a sensible displacement, we extend the non-black pixels slightly into the black areas. Any excess will be removed by the mask.
%IMG7%magick ^
  pntp_wrap-dispmap.miff ^
  -transparent Black ^
  ( +clone ^
    -blur 0x0.5 ^
    -channel A -threshold 90%% +channel ^
  ) ^
  -compose DstOver -composite ^
  -background Black ^
  -compose Over -layers Flatten ^
  pntp_wrap-dispmap2.miff
|
|
We want wrap-high to add highlights but not shadows, so we change any pixels darker than 50% to be 50%:
%IMG7%magick ^
  pntp_wrap-high.miff ^
  -evaluate max 50%% ^
  pntp_wrap-high2.miff
|
|
One more test. wrap-dispmap2 contains a displaced identity displacement map. The red and green values give the locations of where to copy pixels from. So, if we use wrap-dispmap2 to displace an identity displacement map, the result should be like wrap-dispmap2 (aside from the black pixels, which will be masked out).
for /F "usebackq" %%L in (`%IMG7%magick identify ^
  -format "WW=%%w\nHH=%%h\n" ^
  pntp_wrap-dispmap2.miff`) do set %%L

%IMG7%magick ^
  pntp_idmap.png -resize "%WW%x%HH% ^!" ^
  pntp_wrap-dispmap2.miff ^
  -gravity Center ^
  -virtual-pixel Edge ^
  -compose Distort ^
    -define compose:args=100x100%% ^
    -composite ^
  pntp_chk_disp.png
|
|
The shirt part of the result looks like pntp_wrap-dispmap2.miff. If we mask both images by wrap-mask, we can compare them:
%IMG7%magick ^
  pntp_wrap-dispmap2.miff ^
  pntp_chk_disp.png ^
  NULL: ^
  pntp_wrap-mask.miff ^
  -alpha off ^
  -compose CopyOpacity -layers Composite ^
  -compose Over -background Black ^
  ( -clone 0 -layers Flatten ) ^
  -delete 0 ^
  ( -clone 0 -layers Flatten ) ^
  -delete 0 ^
  -metric RMSE ^
  -format "%%[distortion]\n" ^
  -compare ^
  info:
0.0112856
They are very similar.
That completes the preparation for the distortion of the required image(s).
Now comes the quick and easy step. From the wrap set we have prepared with Blender and any desired image, we distort that image, and apply diffuse and specular lighting.
The image to be wrapped needs to be made the same size as mh_wrap-dispmap2.miff.
for /F "usebackq" %%L in (`%IMG7%magick identify ^
  -format "WW=%%w\nHH=%%h\n" ^
  pntp_wrap-dispmap2.miff`) do set %%L
We show two versions of the wrapping: the first applies no specular reflections; the second is slightly slower, and does apply specular reflections.
|
Without (specular) highlights:
%IMG7%magick ^
  pntp_myimg.png ^
  -resize "%WW%x%HH%^!" ^
  pntp_wrap-dispmap2.miff ^
  -virtual-pixel Edge ^
  -compose Distort ^
    -define compose:args=100x100%% ^
    -composite ^
  pntp_wrap-mask.miff ^
  -alpha off ^
  -compose CopyOpacity -composite ^
  pntp_wrap-ord.miff ^
  -compose Multiply -composite ^
  pntp_usr.png
|
|
|
With (specular) highlights:
%IMG7%magick ^
  pntp_myimg.png ^
  -resize "%WW%x%HH%^!" ^
  pntp_wrap-dispmap2.miff ^
  -virtual-pixel Edge ^
  -compose Distort ^
    -define compose:args=100x100%% ^
    -composite ^
  pntp_wrap-mask.miff ^
  -alpha off ^
  -compose CopyOpacity -composite ^
  pntp_wrap-ord.miff ^
  -compose Multiply -composite ^
  pntp_wrap-high2.miff ^
  -compose Hardlight -composite ^
  pntp_usr2.png
|
|
That's it. That's all we need to do. We can paste either version over the null render (and reduce this in size for the web):
|
Without (specular) highlights:
%IMG7%magick ^
  pntp_null.miff ^
  pntp_usr.png ^
  -gravity None ^
  -geometry %SHIRT_OFFS% ^
  -compose Over -composite ^
  %WEBSIZE% ^
  pntp_usr_ov.png
|
|
|
With (specular) highlights:
%IMG7%magick ^
  pntp_null.miff ^
  pntp_usr2.png ^
  -gravity None ^
  -geometry %SHIRT_OFFS% ^
  -compose Over -composite ^
  %WEBSIZE% ^
  pntp_usr2_ov.png
|
|
Suppose users want to upload their own images and see how they look wrapped around a standard object, viewed from many angles.
We will rotate the camera around the object, making a render view every 5°.
As explained above, we need one wrap set per view. We prepare the wrap sets in 3D, then apply a 2D operation on each set.
In our 3D model, the camera is on a crane that can be rotated around the world origin, and the angle of rotation about the z-axis is animated (linear interpolation) from 0° at frame 1 to 360° at frame 73, so we get 5° of rotation between each frame, and it is cyclic. We render the first 72 frames. (Blender frames are numbered from one.) For convenience, we render the first 72 frames in a script,
pntp_anim.bat. This runs one animation per image in the wrap set, so it creates 72 versions of the wrap set, one version per view. It also does the ImageMagick processing to crop, extend wrap-dispmap, and remove shadows from wrap-high.
call pntp_anim.bat
On my laptop, the script takes about 25 minutes in total (4 seconds per frame, and we are making 72 wrap sets with 5 images per wrap set, so we get 360 images in about 1440 seconds). The 360 MIFF files take 1.4GB.
That completes the preparation.
Now we do the easier work of displacing the supplied image by each wrap-dispmap frame, and compositing the result, including specular reflections and pasting over each null image. For convenience, we put this in a script,
pntp_comp.bat.
call pntp_comp.bat
This has created 72 JPG files. On my laptop, the script takes about 25 seconds in total (0.35 seconds per frame).
We show frame number 49 as an example full-size JPEG output:
Notice that the hair is sometimes in front of the shirt, and that this causes no problems. We can make an animated GIF of all the frames, reduced in size for the web. (If it has stopped turning, refreshing the page will re-start it.)
%IMG7%magick ^
  -loop 10 ^
  C:\tmp\pntp_usr_*.jpg[600x400] ^
  -layers optimize ^
  pntp_usr.gif
|
|
(If the goal is animation, rather than a series of stills, we could use temporal sub-sampling.)
Blender is impressively fast at doing what it does. With many simplifications it can update 3D renderings interactively in near-real time, or can create high-quality results by taking more time. We have seen how to use Blender offline to make high quality renderings that can then be quickly combined with user-supplied images by ImageMagick to make photo-quality mockups of customized products.
Blender can change the pose of the humanoid, and adapt the clothing in a physically realistic manner to each new position. As above, this complex and resource-consuming work can be done offline, and combined with user-supplied images in a simple and quick way.
Any complex animated 3D processing can be applied to 2D images:

For convenience, .bat scripts are also available in a single zip file. See
Zipped BAT files.
set MHDIR=C:\ProgramFiles\mh111\
set MAKEHUMAN=%MHDIR%makehuman.exe
set MHUSR=%USERPROFILE%\Documents\makehuman\v1\
set BLDIR=C:\ProgramFiles\BlenderFoundation\Blender\
set BLENDER=%BLDIR%blender.exe
set BLUSR=%USERPROFILE%\Documents\blender\
@rem
@rem Updated:
@rem   17-September-2022
@rem

setlocal

set WW=%1
set HH=%2

set OUT_FILE=%3

if "%OUT_FILE%"=="" (
  echo %0 needs 3 parameters: width height outfile
  exit /B 1
)

set cBlue=%4
if "%cBlue%"=="." set cBlue=
if "%cBlue%"=="" set cBlue=8

%IMG7%magick -size %WW%x%HH% xc: ^
  -sparse-color Bilinear ^
0,0,#00%cBlue%,^
%%[fx:w-1],0,#f0%cBlue%,^
0,%%[fx:h-1],#0f%cBlue%,^
%%[fx:w-1],%%[fx:h-1],#ff%cBlue% ^
  %OUT_FILE%
if "%IMCROP%"=="" (
  echo IMCROP not set
  exit /B 1
)

setlocal enabledelayedexpansion

set START=1
set END=72

set FRAMES=%START%..%END%
set FILEPREF=c:\tmp\pntp

del %FILEPREF%_*.png
del %FILEPREF%_*.miff

%BLENDER% -b ^
  %BLUSR%pntp1.blend ^
  -P setsize.py ^
  -x 1 ^
  -o %FILEPREF%_null_######.png ^
  -f %FRAMES%

if ERRORLEVEL 1 exit /B 1

%BLENDER% -b ^
  %BLUSR%pntp1.blend ^
  -P setsize.py ^
  -P setshirtwt.py ^
  -x 1 ^
  -o %FILEPREF%_ord_######.png ^
  -f %FRAMES%

if ERRORLEVEL 1 exit /B 1

%BLENDER% -b ^
  %BLUSR%pntp1.blend ^
  -P setsize.py ^
  -P setbackblack.py ^
  -P setobjblack.py ^
  -P setshirtwt.py ^
  -P setshadeless.py ^
  -x 1 ^
  -o %FILEPREF%_mask_######.png ^
  -f %FRAMES%

if ERRORLEVEL 1 exit /B 1

%BLENDER% -b ^
  %BLUSR%pntp1.blend ^
  -P setsize.py ^
  -P setbackblack.py ^
  -P setobjblack.py ^
  -P setshirtwt.py ^
  -P setshadeless.py ^
  -P setshirtmap.py ^
  -P setnoantialias.py ^
  -x 1 ^
  -o %FILEPREF%_dispmap_######.png ^
  -f %FRAMES%

if ERRORLEVEL 1 exit /B 1

%BLENDER% -b ^
  %BLUSR%pntp1.blend ^
  -P setsize.py ^
  -P setbackblack.py ^
  -P setobjblack.py ^
  -P setshirtwt.py ^
  -P setshirthigh.py ^
  -x 1 ^
  -o %FILEPREF%_high_######.png ^
  -f %FRAMES%

if ERRORLEVEL 1 exit /B 1


pushd c:\tmp

:: We crop all except the _null images.

%IM%mogrify -format miff pntp_null_*.png
%IM%mogrify %IMCROP% -format miff pntp_ord_*.png
%IM%mogrify %IMCROP% -format miff pntp_mask_*.png
%IM%mogrify %IMCROP% -evaluate max 50%% -format miff pntp_high_*.png
%IM%mogrify %IMCROP% -format miff pntp_dispmap_*.png

:: Extend the dispmap slightly into the black.

for /L %%I in (%START%,1,%END%) do (
  set LZ=000000%%I
  set LZ=!LZ:~-6!
  echo LZ=!LZ!

  %IM%convert ^
    pntp_dispmap_!LZ!.miff ^
    -transparent Black ^
    ^( +clone ^
       -blur 0x0.5 ^
       -channel A -threshold 90%% +channel ^
    ^) ^
    -compose DstOver -composite ^
    -background Black ^
    -compose Over -layers Flatten ^
    pntp_dispmap_!LZ!.miff
)


popd
setlocal enabledelayedexpansion

set FILEPREF=c:\tmp\pntp

del %FILEPREF%_*.jpg

set WW=
for /F "usebackq" %%L in (`%IM%identify ^
  -format "WW=%%w\nHH=%%h\n" ^
  %FILEPREF%_dispmap_000001.miff`) do set %%L

if "%WW%"=="" (
  echo Can't find input miffs in %FILEPREF%
  exit /B 1
)

for /L %%I in (1,1,72) do (
  set LZ=000000%%I
  set LZ=!LZ:~-6!
  echo LZ=!LZ!

  %IM%convert ^
    pntp_myimg.png ^
    -resize "%WW%x%HH%^!" ^
    %FILEPREF%_dispmap_!LZ!.miff ^
    -virtual-pixel Edge ^
    -compose Distort ^
      -define compose:args=100x100%% ^
      -composite ^
    %FILEPREF%_mask_!LZ!.miff ^
    -alpha off ^
    -compose CopyOpacity -composite ^
    %FILEPREF%_ord_!LZ!.miff ^
    -compose Multiply -composite ^
    %FILEPREF%_high_!LZ!.miff ^
    -compose Hardlight -composite ^
    %FILEPREF%_null_!LZ!.miff ^
    +swap ^
    -gravity None ^
    -geometry %SHIRT_OFFS% ^
    -compose Over -composite ^
    %FILEPREF%_usr_!LZ!.jpg

)
The following Python scripts are not general purpose. They are specific to my 3D model on my computer.
import bpy

bpy.data.scenes["Scene"].render.resolution_x = 1920
bpy.data.scenes["Scene"].render.resolution_y = 1280
bpy.data.scenes["Scene"].render.resolution_percentage = 100
import bpy

ShirtImg = bpy.data.images["short_tail_camo_tee_diff.jpg"]
ShirtImg.filepath = "F:\prose\pictures\pntp_myimg.png"
import bpy

SkinImg = bpy.data.images["middleage_lightskinned_female_diffuse.png"]
SkinImg.filepath = "F:\prose\pictures\pntp_myimg.png"
import mathutils
import bpy

ShirtImg = bpy.data.images["short_tail_camo_tee_diff.jpg"]
ShirtImg.filepath = "F:\prose\pictures\pntp_white.png"

# bpy.data.materials["short_tail_camo_tee01"].diffuse_intensity = 1
bpy.data.materials["short_tail_camo_tee01"].specular_intensity = 0

bpy.data.materials["short_tail_camo_tee01"].diffuse_color = mathutils.Color((1,1,1))
import mathutils
import bpy

bpy.ops.object.select_all(action = "DESELECT")
Obj = bpy.data.objects["Ground"]
Obj.select = True

bpy.data.materials["Material"].diffuse_intensity = 0
bpy.data.materials["Material"].specular_intensity = 0

bpy.data.worlds["World"].use_sky_paper
bpy.data.worlds["World"].horizon_color = mathutils.Color((0,0,0))
# Set some humanoid objects black.

import bpy

bpy.data.materials["eyebrow001"].diffuse_intensity = 0
bpy.data.materials["eyebrow001"].specular_intensity = 0

bpy.data.materials["bodyMaterial"].diffuse_intensity = 0
bpy.data.materials["bodyMaterial"].specular_intensity = 0

bpy.data.materials["middleage_caucasian_female"].diffuse_intensity = 0
bpy.data.materials["middleage_caucasian_female"].specular_intensity = 0

bpy.data.materials["Eye_brownlight"].diffuse_intensity = 0
bpy.data.materials["Eye_brownlight"].specular_intensity = 0

bpy.data.materials["ponytail01"].diffuse_intensity = 0
bpy.data.materials["ponytail01"].specular_intensity = 0

bpy.data.materials["shortjeans"].diffuse_intensity = 0
bpy.data.materials["shortjeans"].specular_intensity = 0
import bpy

bpy.data.materials["short_tail_camo_tee01"].use_shadeless = True

bpy.data.worlds["World"].light_settings.environment_energy = 1
import bpy

ShirtImg = bpy.data.images["short_tail_camo_tee_diff.jpg"]
ShirtImg.filepath = "F:\prose\pictures\pntp_idmap.png"
import mathutils
import bpy

bpy.data.materials["short_tail_camo_tee01"].diffuse_intensity = 0
bpy.data.materials["short_tail_camo_tee01"].specular_intensity = 1

bpy.data.materials["short_tail_camo_tee01"].specular_color = mathutils.Color((1,1,1))
import bpy

bpy.data.scenes["Scene"].render.use_antialiasing = False
All images on this page were created by the commands shown, using:
%IMG7%magick -version
Version: ImageMagick 7.1.0-49 Q16-HDRI x64 7a3f3f1:20220924 https://imagemagick.org
Copyright: (C) 1999 ImageMagick Studio LLC
License: https://imagemagick.org/script/license.php
Features: Cipher DPC HDRI OpenCL
Delegates (built-in): bzlib cairo freetype gslib heic jng jp2 jpeg jxl lcms lqr lzma openexr pangocairo png ps raqm raw rsvg tiff webp xml zip zlib
Compiler: Visual Studio 2022 (193331630)
%BLENDER% --version
Blender 2.79 (sub 0)
	build date: Mon 09/11/2017
	build time: 07:44 AM
	build commit date: 2017-09-11
	build commit time: 10:43
	build hash: 5bd8ac9
	build platform: Windows
	build type:
	build c flags: /W3 /w34062 /wd4018 /wd4146 /wd4065 /wd4127 /wd4181 /wd4200 /wd4244 /wd4267 /wd4305 /wd4800 /we4013 /we4431 /DWIN32 /D_WINDOWS /W3 /nologo /J /Gd /MP /openmp
	build c++ flags: /W3 /w34062 /wd4018 /wd4146 /wd4065 /wd4127 /wd4181 /wd4200 /wd4244 /wd4267 /wd4305 /wd4800 /we4013 /we4431 /DWIN32 /D_WINDOWS /W3 /GR /EHsc /nologo /J /Gd /MP /EHsc /openmp
	build link flags: /MACHINE:X64 /SUBSYSTEM:CONSOLE /STACK:2097152 /INCREMENTAL:NO  /NODEFAULTLIB:msvcrt.lib /NODEFAULTLIB:msvcmrt.lib /NODEFAULTLIB:msvcurt.lib /NODEFAULTLIB:msvcrtd.lib  /ignore:4049 /ignore:4217 /ignore:4221
	build system: CMake
MakeHuman v1.1.1.
To improve internet download speeds, some images may have been automatically converted (by ImageMagick, of course) from PNG or TIFF or MIFF to JPG.
Source file for this web page is pntppl.h1. To re-create this web page, execute "procH1 pntppl".
This page, including the images, is my copyright. Anyone is permitted to use or adapt any of the code, scripts or images for any purpose, including commercial use.
Anyone is permitted to re-publish this page, but only for non-commercial use.
Anyone is permitted to link to this page, including for commercial use.
Page version v1.0 19-January-2018.
Page created 04-Oct-2022 17:41:08.
Copyright © 2022 Alan Gibson.