snibgo's ImageMagick pages
Lithographic effects
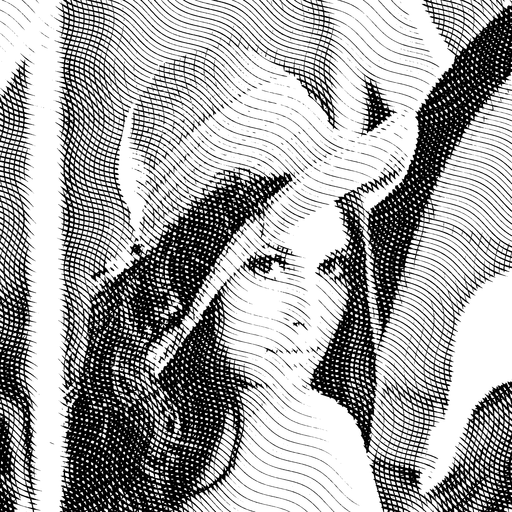
IM can make images in the style of simple lithographs, halftone, silk-screen, etching, lino-printing, engraving and similar processes.
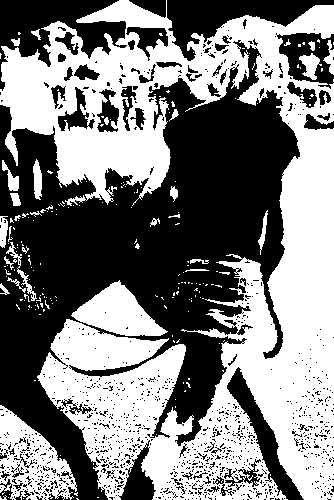
From a photograph, we can make graphic images. This is a process of simplification, reducing both high-frequency detail and bit depth. The results are most satisfying when the inputs are visually simple.
Lithography (literally "writing with stones") is a printing process that is capable of very subtle effects. Lithographic emulsions, or simply "lith", are used (or were used, back in my day) in the printing industry. Lith film and paper, when exposed and processed in a certain way, gives almost infinite contrast so the result is black and white, with no grays. Gray tones are simulated by different proportions of black (the ink) and white (the uninked paper).
(I think lith was always monochrome. For colour work, CMYK separations were made for processing, then combined at the printing stage.)
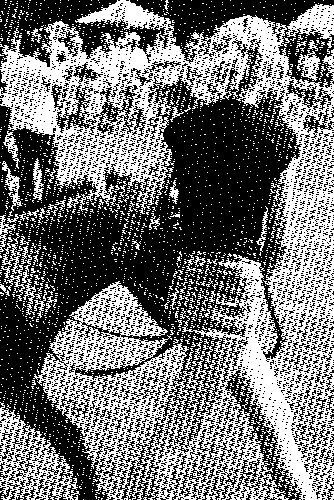
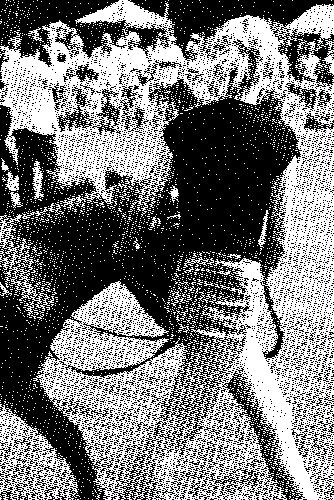
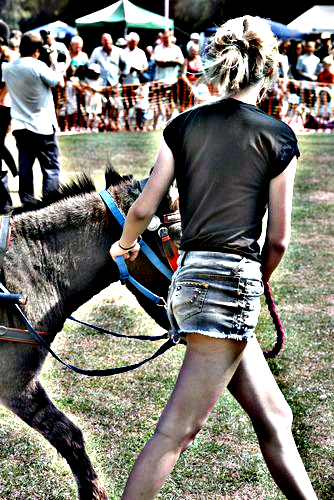
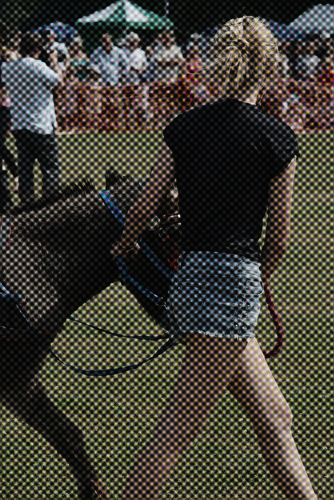
We demonstrate with a photograph and a grayscale wedge.
set SRC=li_src.jpg
set SRC_BW=li_src_bw.png

if not exist %SRC% copy zp_ssd.jpg %SRC%

%IMG7%magick ^
  %SRC% ^
  -colorspace Gray ^
  +depth ^
  %SRC_BW%

set sioJPEG_EXT=.png
|
|
set SRC_W=li_wedge_src.png

%IMG7%magick ^
  -size 80x40 ^
  xc:Black xc:gray(25%%) xc:gray(50%%) xc:gray(75%%) xc:White ^
  +append +repage ^
  -size 40x400 ^
  ( gradient: -rotate 90 ) ^
  -append +repage ^
  -rotate -90 ^
  %SRC_W%
|

|
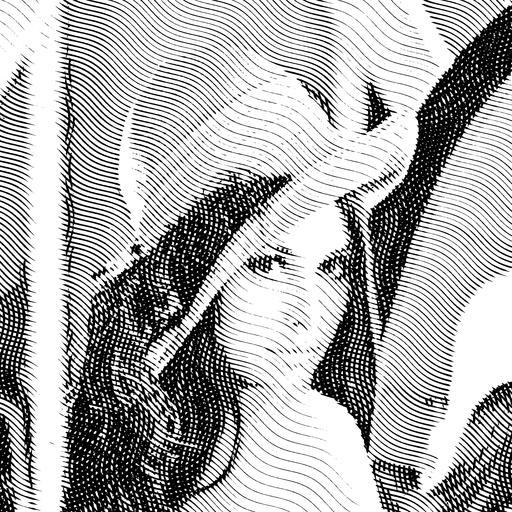
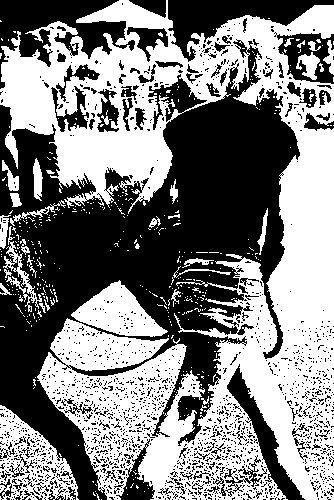
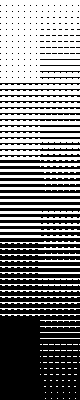
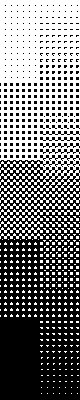
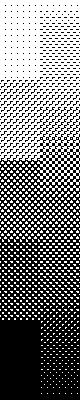
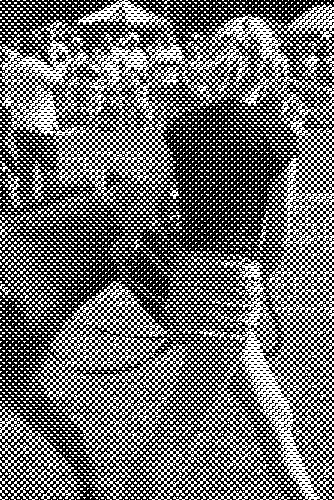
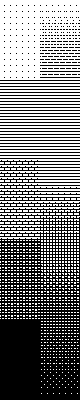
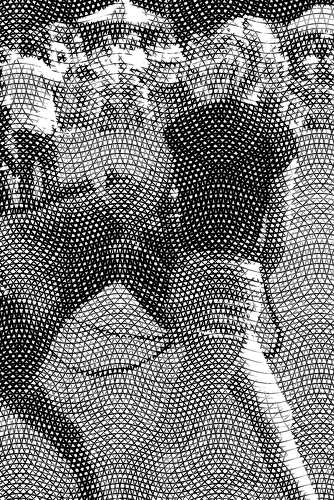
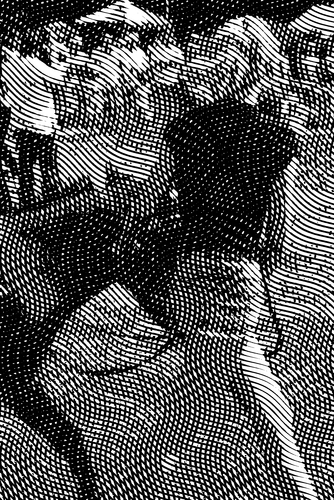
Lith (aka "litho" or "line") film is very high contrast. The simple equivalent in IM is "-threshold". Here is a sampler, varying the threshold between 10% and 90%.
(Lith films are often orthochromatic, which meant they are relatively insensitive to red light. I am ignoring this aspect.)
call %PICTBAT%thresh9 %SRC_BW%
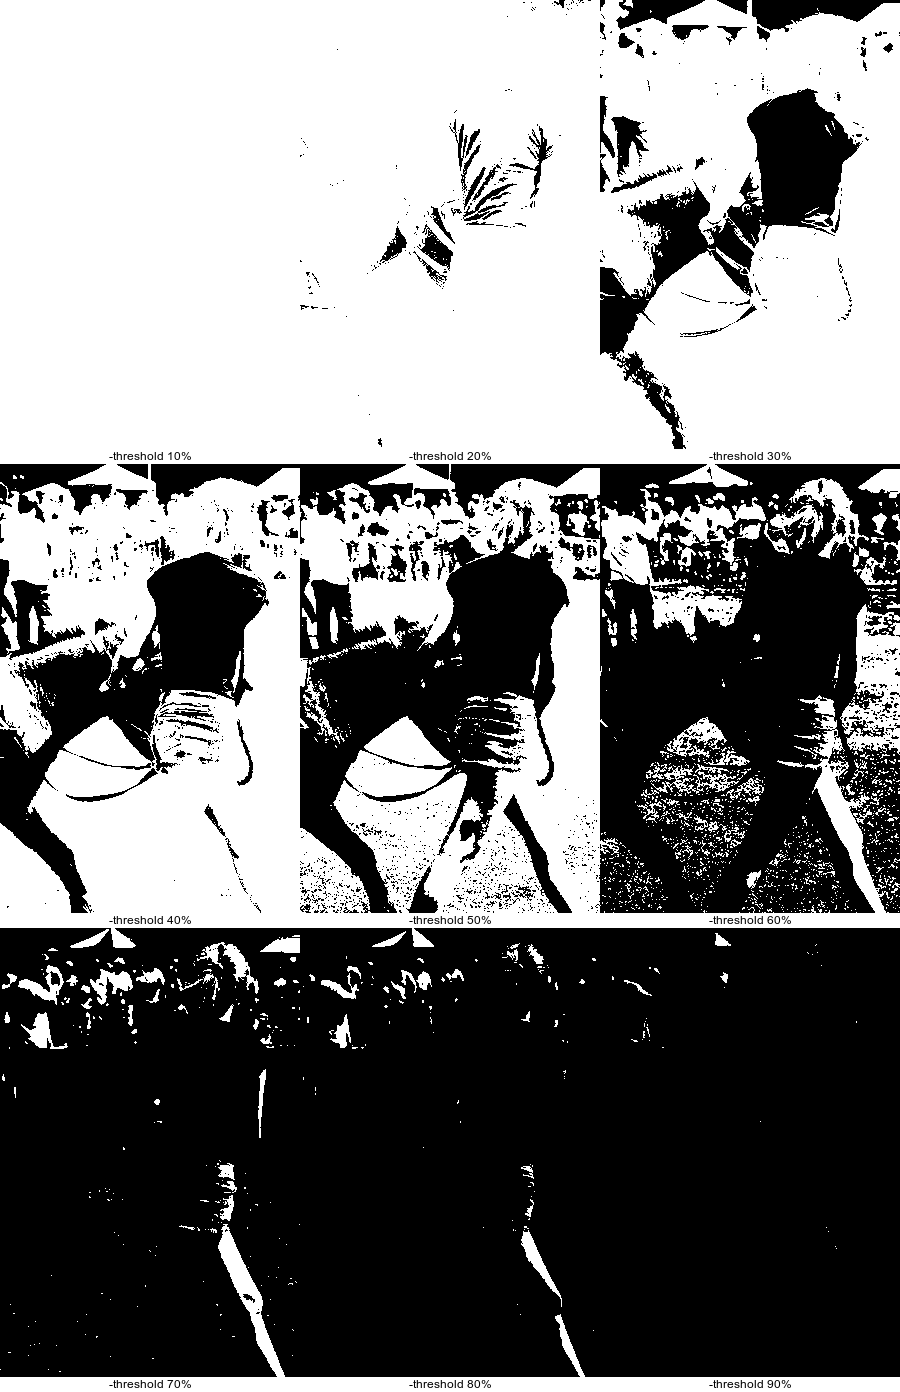
The most pleasing image is perhaps "-threshold 50%". We have lost most detail. Many areas of the image are either black or white. For example, the woman's legs are clear in only two frames.
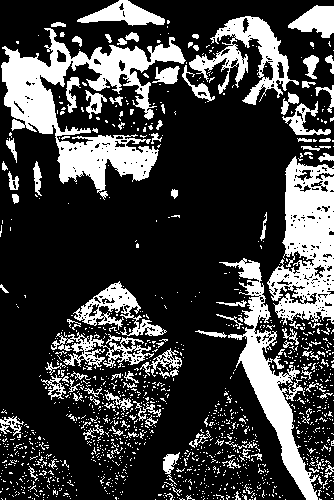
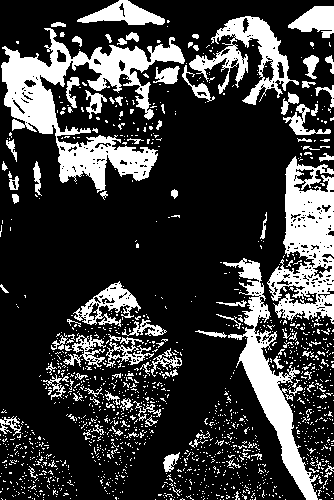
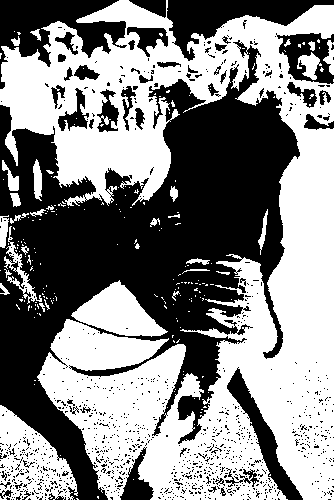
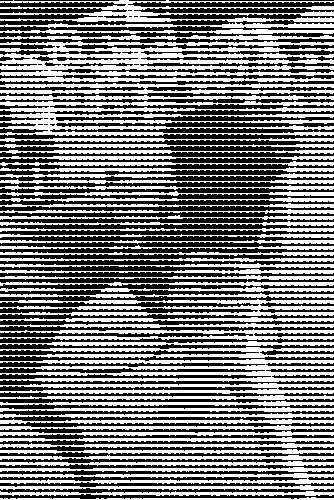
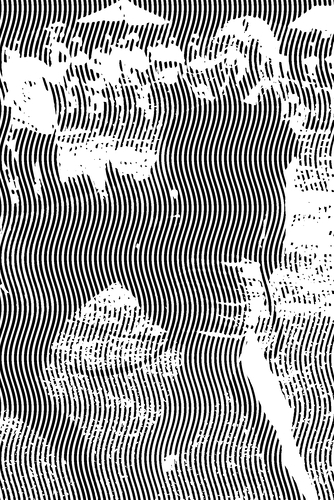
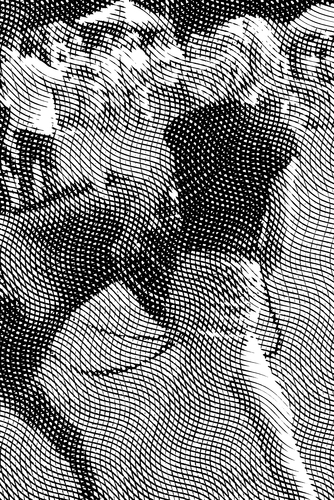
To increase local contrast, we can extrapolate from heavy blur:
call %PICTBAT%exHvyBlr %SRC_BW% 4 500
Make a threshold sampler:
call %PICTBAT%thresh9 %ehbOUTFILE%
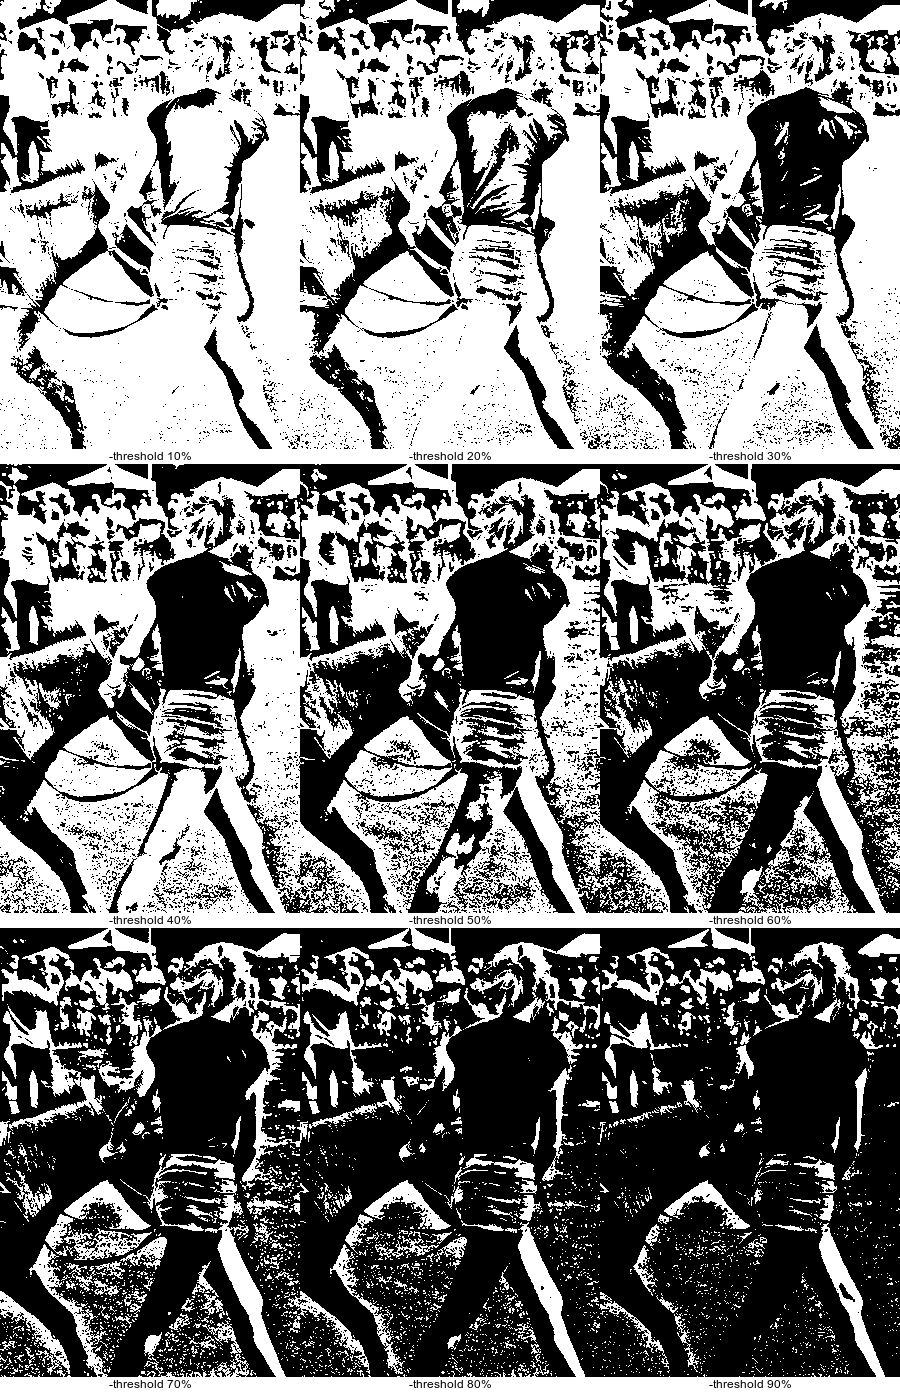
This has improved clarity. The woman's legs are now clear in 7 of the 9 images, a big improvement on the previous version.
Another useful process is "-lat", local area threshold. This thresholds at a mean of a window with specified dimensions, possibly first adding an offset to the mean.
%IMG7%magick ^
  %SRC_BW% ^
  -lat 5x5+0 ^
  li_lat1.png
|
|
Instead of the mean of a rectangular window, we might prefer to use a Gaussian mean.
%IMG7%magick ^
  %SRC_BW% ^
  ( +clone ^
    -blur 0x1.6 ^
  ) ^
  -compose Mathematics ^
    -define compose:args=0,-1,1,0.5 -composite ^
  -threshold 50%% ^
  li_latg.png
|

|
%IMG7%magick ^
  %SRC_BW% ^
  -unsharp 0x1.6+1+0 ^
  -threshold 50%% ^
  li_latu.png
|
|
An alternative lith effect is by remapping to black and white, with or without dithering. With dithering, the step wedge shows we can get accidental patterns forming; this is rarely a problem in ordinary photographs. With no dithering, the result is very similar to "-threshold 50%".
%IMG7%magick ^
  xc:black xc:white ^
  +append +repage ^
  li_bw.png

%IMG7%magick ^
  %SRC_BW% ^
  -dither FloydSteinberg ^
  -remap li_bw.png ^
  li_remap_dith.png

%IMG7%magick ^
  %SRC_W% ^
  -dither FloydSteinberg ^
  -remap li_bw.png ^
  li_remap_dith_w.png

%IMG7%magick ^
  %SRC_BW% ^
  +dither ^
  -remap li_bw.png ^
  li_remap_nodith.png

%IMG7%magick ^
  %SRC_W% ^
  +dither -remap li_bw.png ^
  li_remap_nodith_w.png
|


|
Aside: by default, dithering is turned on. To turn it off, use "+dither". Yeah, this syntax is counter-intuitive.
Remapping finds the closest colour from the map. To achieve a threshold-like variation, we can either change the image's intensity so the required level becomes 50%, or change the map and then auto-level. For example, to achieve a result similar to "-threshold 60%":
%IMG7%magick ^
  %SRC_BW% ^
  -modulate 84,100,100 ^
  +dither -remap li_bw.png ^
  li_remap_nodith2.png

%IMG7%magick ^
  xc:gray59 xc:gray61 +append +repage -write mpr:MAP +delete ^
  %SRC_BW% ^
  +dither -remap mpr:MAP ^
  -auto-level ^
  li_remap_nodith3.png
|
|
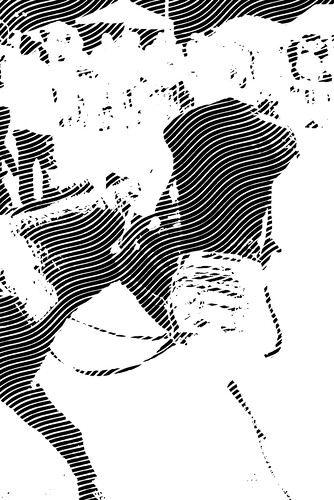
A different effect is to turn x% of the pixels black, and the rest white. (Beware: this doesn't work with 256c grayscale images.)
%IMG7%magick ^
  %SRC_BW% ^
  -contrast-stretch 50x49.99%% ^
  li_turnc1.png
|
|
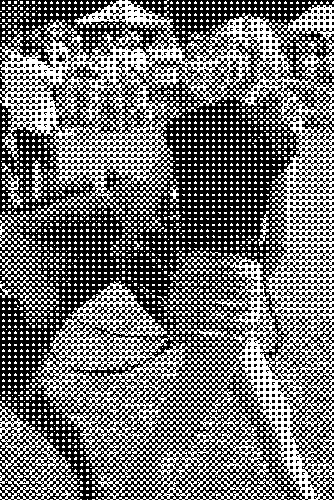
Halftoning is a method of simulating grayscale tone by using black and white only. When viewed from a distance, the human eye can't resolve the separate black and white areas, so we perceive shades of gray. Even when viewed closely enough to see the separate black and white, the brain mixes the two and interprets the image correctly, as if it contained gray.
The same principle applies to colours.
See also
Wikipedia: Halftone.
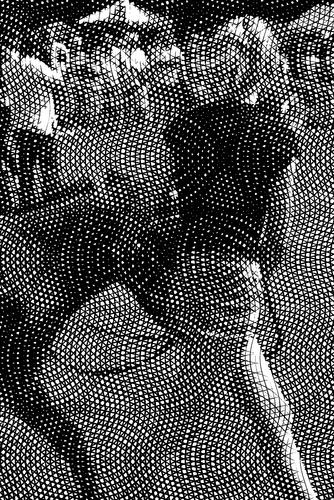
On this page, a screen template is a small arrangement of grayscale pixels that is repeated (tiled) across the width and height of the image, to make a screen image. Each input image pixel is compared with the corresponding screen image pixel to determine whether the output is black or white.
The script
lithScreen.bat applies a lith screen template to a source image, making an output with black and white only. The template should usually be a simple small grayscale image, which will be tiled the same size as the image. For each pixel, for each of the three color channels, it sets the pixel value to 100% if the source is greater than the screen pixel, otherwise it sets the pixel value to zero.
A screen template may have no dimensions (a single pixel), one dimension (eg 1xN pixels) or two dimensions (MxN pixels).
We can make the template by appending pixels, or with the script knl2img.bat (see
Convolve: knl2img), or the script
mScreenAlt.bat, or any other method.
In the examples, we show the template (often too small to be visible), the template enlarged, the result for the wedge image, and the result for the photograph.
| Code |
Template |
Wedge |
Photo |
call %PICTBAT%knl2img ^
  "1x1:0.5" li_p1.png

call %PICTBAT%blockPix li_p1.png

call %PICTBAT%lithScreen ^
  %SRC_W% li_p1.png li_hp1_w.png

call %PICTBAT%lithScreen ^
  %SRC_BW% li_p1.png li_hp1.png
|


|

|
|
call %PICTBAT%knl2img ^
  "1x6:0,1,2,3,4,5" li_s1.png . -auto-level

call %PICTBAT%knl2img ^
  "1x6:0,1,3,5,4,2" li_s1.png . -auto-level

call %PICTBAT%blockPix li_s1.png

call %PICTBAT%lithScreen ^
  %SRC_W% li_s1.png li_h1_w.png

call %PICTBAT%lithScreen ^
  %SRC_BW% li_s1.png li_h1.png
|


|
|
|
An alternative method for building the template is with the script
mScreenAlt.bat.
%IM7DEV%magick ^
  li_s1.png ^
  ( +clone -rotate 90 -evaluate divide 6 ) ^
  -scale "6x6^!" ^
  -define compose:clamp=off ^
  -compose Plus -composite ^
  -auto-level ^
  li_s2.png

call %PICTBAT%blockPix li_s2.png

call %PICTBAT%lithScreen ^
  %SRC_W% li_s2.png li_h2_w.png

call %PICTBAT%lithScreen ^
  %SRC_BW% li_s2.png li_h2.png
|

|
|
|
1  9  15 20 7  3
5  18 27 32 24 12
22 29 35 34 26 17
14 25 33 36 31 21
11 19 30 28 16 6
4  8  13 23 10 2
6  7  8  24 25 26
5  0  1  23 18 19
4  3  2  22 21 20
33 34 35 15 16 17
32 27 28 14 9  10
31 30 29 13 12 11
The next examples use a 6x6 square that is tiled for the lith screen. This responds to 36 levels of gray. A larger number would be more responsive, but also more obtrusive.
| Code |
Template |
Wedge |
Photo |
|
Spiral out from centre.
set sNUM=^
20, 21, 22, 23, 24,25,^
19,  6,  7,  8,  9,26,^
18,  5,  0,  1, 10,27,^
17,  4,  3,  2, 11,28,^
16, 15, 14, 13, 12,29,^
35, 34, 33, 32, 31,30

call %PICTBAT%knl2img ^
  "6x6:%sNUM%" li_sp.png . -auto-level

call %PICTBAT%blockPix li_sp.png

call %PICTBAT%lithScreen ^
  %SRC_W% li_sp.png li_spi_w.png

call %PICTBAT%lithScreen ^
  %SRC_BW% li_sp.png li_spi.png
|


|
|
|
|
A bricks pattern.
set sNUM=^
27, 31, 35, 15, 19, 23,^
26, 30, 34, 13, 17, 22,^
6,  7,  8,  9,  10, 11,^
14, 18, 21, 25, 29, 33,^
12, 16, 20, 24, 28, 32,^
0,  1,  2,  3,  4,  5

call %PICTBAT%knl2img ^
  "6x6:%sNUM%" li_br.png . -auto-level

call %PICTBAT%blockPix li_br.png

call %PICTBAT%lithScreen ^
  %SRC_W% li_br.png li_bri_w.png

call %PICTBAT%lithScreen ^
  %SRC_BW% li_br.png li_bri.png
|

|
|

|
We can capture more detail by breaking the 36x36 lith template into smaller squares.
| Code |
Template |
Wedge |
Photo |
|
Four squares of 3x3.
At increasing lightness, we fill each 3x3 before starting the next.
set sNUM=^
6,  7,  8,  24, 25, 26,^
5,  0,  1,  23, 18, 19,^
4,  3,  2,  22, 21, 20,^
33, 34, 35, 15, 16, 17,^
32, 27, 28, 14, 9,  10,^
31, 30, 29, 13, 12, 11

call %PICTBAT%knl2img ^
  "6x6:%sNUM%" li_n1.png . -auto-level

call %PICTBAT%blockPix li_n1.png

call %PICTBAT%lithScreen ^
  %SRC_W% li_n1.png li_n1i_w.png

call %PICTBAT%lithScreen ^
  %SRC_BW% li_n1.png li_n1i.png
|

|
|
|
|
Four squares of 3x3.
Alternate increases to opposite squares. When they are filled, do the other two.
set sNUM=^
12, 14, 16, 30, 32, 34,^
10, 0,  2,  28, 18, 20,^
8,  6,  4,  26, 24, 22,^
31, 33, 35, 13, 15, 17,^
29, 19, 21, 11, 1,  3,^
27, 25, 23, 9,  7,  5

call %PICTBAT%knl2img ^
  "6x6:%sNUM%" li_n2.png . -auto-level

call %PICTBAT%blockPix li_n2.png

call %PICTBAT%lithScreen ^
  %SRC_W% li_n2.png li_n2i_w.png

call %PICTBAT%lithScreen ^
  %SRC_BW% li_n2.png li_n2i.png
|

|
|
|
|
Four squares of 3x3.
Alternate increases to all four squares.
set sNUM=^
24, 28, 32, 26, 30, 34,^
20, 0,  4,  22, 2,  6,^
16, 12, 8,  18, 14, 10,^
27, 31, 35, 25, 29, 33,^
23, 3,  7,  21, 1,  5,^
19, 15, 11, 17, 13, 9

call %PICTBAT%knl2img ^
  "6x6:%sNUM%" li_n3.png . -auto-level

call %PICTBAT%blockPix li_n3.png

call %PICTBAT%lithScreen ^
  %SRC_W% li_n3.png li_n3i_w.png

call %PICTBAT%lithScreen ^
  %SRC_BW% li_n3.png li_n3i.png
|

|
|

|
|
Nine squares of 2x2.
rem 0 7 3
rem 4 1 6
rem 2 5 8

set sNUM=^
0,  18, 7,  25, 3,  21, ^
30, 9,  27, 16, 34, 12, ^
4,  22, 1,  19, 6,  24, ^
33, 13, 31, 10, 28, 15, ^
2,  20, 5,  23, 8,  26, ^
35, 11, 29, 14, 32, 17

call %PICTBAT%knl2img ^
  "6x6:%sNUM%" li_n4.png . -auto-level

call %PICTBAT%blockPix li_n4.png

call %PICTBAT%lithScreen ^
  %SRC_W% li_n4.png li_n4i_w.png

call %PICTBAT%lithScreen ^
  %SRC_BW% li_n4.png li_n4i.png
|

|
|

|
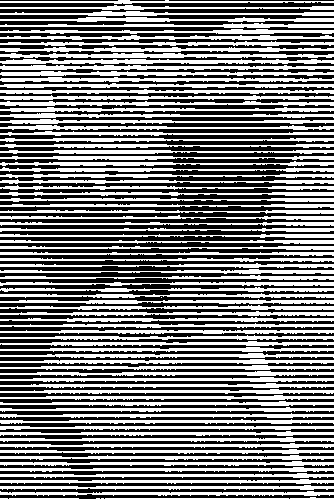
Also: 36x1 gradient, randomised (shuffled). Process module: for every pixel, swap it with one of the pixels in the image, chosen evenly amongst all the pixels (including itself).
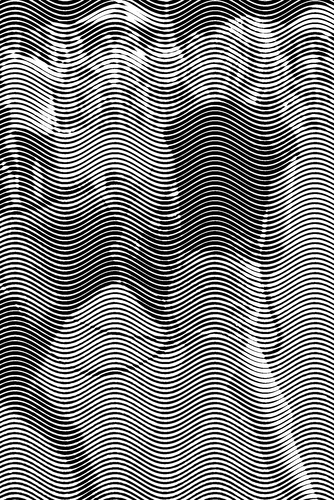
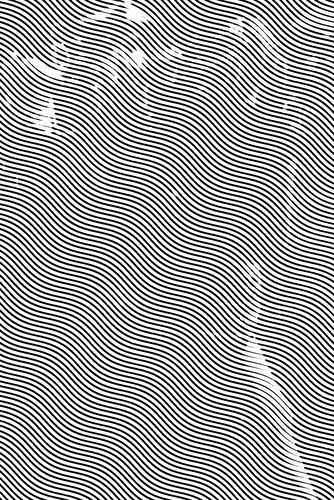
We can distort the tiled lith screen image before applying it.
This distorts the screening, not the image. However, an optical illusion may give the impression that the image has also distorted.
For screen rotation, we use code like this:
%IMG7%magick ^
  li_s1.png ^
  -set option:distort:viewport "300x200+0+0" ^
  -virtual-pixel tile ^
  -distort SRT 1,15 ^
  -auto-level ^
  li_rot.png
|
|
The viewport size will come from the source image. The rotation angle could be zero, but we still need the "-distort SRT" as this gives the tiling of the template to the viewport. Even at zero rotation, the distort may mess up the values, so we always -auto-level. For this operation, -filter gaussian is sometimes used. But that always messes values, in a way that -auto-level can't fix.
An alternative is to make a big enough image, draw with the template as a tile, and rotate the result. Making the image "big enough" is awkward. We composite a clone over a 90° rotated copy to get a square the maximum width or height, and resize up by a factor of sqrt(2). This is big enough to cope with any angle of rotation. When we use -wave, we need to tile a larger area, which we do with -border.
Linear colorspace?
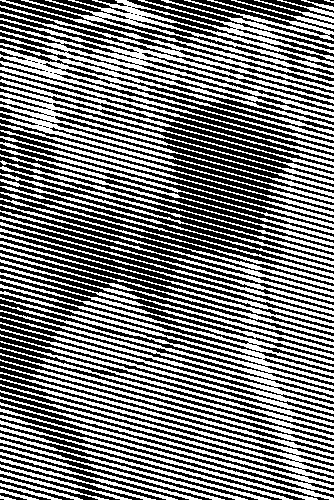
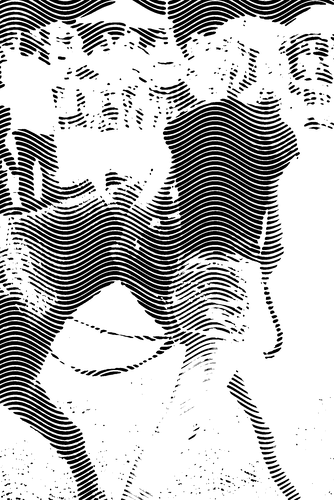
When the lith screen contains curves, aliasing causes a "jump" effect, that is seen here as a vertical artifact. For example, we have vertical light streaks on the dark shirt where the screen is horizontal.
%IMG7%magick ^
  %SRC_BW% ^
  ( +clone ^
    -gravity center -border 10x10 ^
    -tile li_s1.png -draw "color 0,0 reset" ^
    -wave 10x100 ^
  ) ^
  -compose MinusSrc -composite ^
  -fill White +opaque Black ^
  li_ds1_2.png
|

|
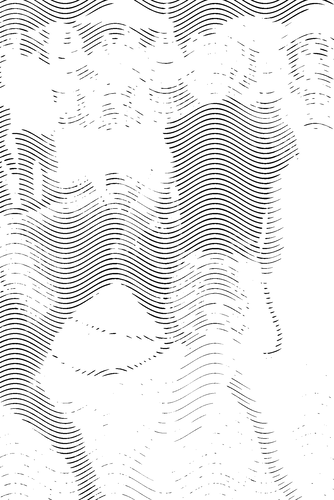
To reduce this, we can supersample the image and screen before subtraction, and subsample afterwards. However, this violates the rule that we should have black and white only.
%IMG7%magick ^
  %SRC_BW% ^
  ( +clone ^
    -gravity center -border 10x10 ^
    -tile li_s1.png -draw "color 0,0 reset" ^
    -wave 10x100 ^
  ) ^
  -resize 400%% ^
  -compose MinusSrc -composite ^
  -fill White +opaque Black ^
  -resize 25%% ^
  li_ds1_3.png
|
|
Instead of supersampling, the result would be more accurate if we started from a larger input image and screen, and just resize down at the end. However, the difference is slight.
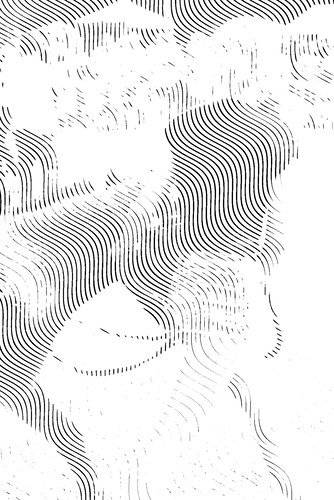
An alternative is to propagate the quantization error. We can do this very easily, by remapping the image to the colours of the lith screen, with dithering.
%IMG7%magick ^
  %SRC_BW% ^
  -dither FloydSteinberg ^
  -remap li_s1.png ^
  ( +clone ^
    -gravity center -border 10x10 ^
    -tile li_s1.png -draw "color 0,0 reset" ^
    -wave 10x100 ^
  ) ^
  -compose MinusSrc -composite ^
  -fill White +opaque Black ^
  li_ds1_3md.png
|
|
But the result still has vertical artifacts. Instead of remapping, we can add some noise. The lith screen has intervals of 0.2. We add uniformly-distributed noise in the range -0.2 to +0.2. In an image area with constant tone, about half the pixels will be unchanged by the noise; the others will either be lightened to the next level up or darkened to the next level down.
%IMG7%magick ^
  %SRC_BW% ^
  ( +clone ^
    +noise Random ^
  ) ^
  -compose Mathematics ^
    -define compose:args=0,0.4,1,-0.2 ^
  -composite ^
  ( +clone ^
    -gravity center -border 10x10 ^
    -tile li_s1.png -draw "color 0,0 reset" ^
    -wave 10x100 ^
  ) ^
  -compose MinusSrc -composite ^
  -fill White +opaque Black ^
  li_ds1_3nr.png
|

|
The script lithScreen.bat supersamples the input and template separately, then makes the (large) screen, subtracts and downsamples. An alternative is to delay supersampling until just before the subtraction. This is faster but the quality is lower.
We can restrict the effect of the screen by modifying tones in either the input image, or in the screen. As the screen is many times smaller than the image, it is quicker to change that. Three restrictions will be shown:
- Apply a tonal offset to the screen. A negative offset will darken the screen, which means it will have no effect on light parts of the image, so it creates a lighter result.
- Make the screen's minimum average lightness X%. In other words, we limit the thickness of the black lines to (100-X)%. To get this, we ensure no more than (100-X)% of pixels are black.
- Make black lines only where the image is darker than Y%. In other words, the lightest (100-Y)% image pixels will have no black lines. To get this, we ensure no screen pixels are lighter than Y%.
When we want two or more restrictions, we must apply them in that order.
Sadly, "-contrast-stretch" is not precise with small images.
In this section, we show the effect of restrictions (2) and (3). For clarity, we demonstrate with a screen of ten pixels.
|
Create a screen.
call %PICTBAT%mScreenAlt li_s10.png 10

call %PICTBAT%knl2img ^
  "1x10:0,2,4,6,8,1,3,5,7,9" li_s10.png . -auto-level
if ERRORLEVEL 1 goto error

call %PICTBAT%knl2img ^
  "1x10:8,4,0,2,6,9,5,1,3,7" li_s10.png . -auto-level
if ERRORLEVEL 1 goto error

call %PICTBAT%blockPix li_s10.png
|


|
|
Restriction (2), at 80%.
%IMG7%magick ^
  li_s10.png ^
  -black-threshold 80%% ^
  li_s10b.png

call %PICTBAT%blockPix li_s10b.png
|


|
|
Restriction (3), at 50%.
%IMG7%magick ^
  li_s10.png ^
  -evaluate Min 50%% ^
  li_s10w.png

call %PICTBAT%blockPix li_s10w.png
|


|
|
Both restrictions: (2) at 80% and (3) at 50%.
%IMG7%magick ^
  li_s10.png ^
  -black-threshold 80%% ^
  -evaluate Min 50%% ^
  li_s10bw.png

call %PICTBAT%blockPix li_s10bw.png
|


|
We apply these screens:
|
No restriction.
call %PICTBAT%lithScreen ^
  %SRC_BW% ^
  li_s10.png li_s10_out.png ^
  . 10 100 4
|
|
|
Restriction (2) at 80%.
call %PICTBAT%lithScreen ^
  %SRC_BW% ^
  li_s10b.png li_s10b_out.png ^
  . 10 100 4
|

|
|
Restriction (3) at 50%.
call %PICTBAT%lithScreen ^
  %SRC_BW% ^
  li_s10w.png li_s10w_out.png ^
  . 10 100 4
|
|
|
Restriction (2) at 80% and (3) at 50%.
call %PICTBAT%lithScreen ^
  %SRC_BW% ^
  li_s10bw.png li_s10bw_out.png ^
  . 10 100 4
|
|
|
As previous, but angled at 60°.
call %PICTBAT%lithScreen ^
  %SRC_BW% ^
  li_s10bw.png li_s10bw60_out.png ^
  60 10 100 4
|
|
We implement restrictions with a script,
restrictScreen.bat. This sets an environment variable with IM operations that modify the screen. The script lithScreen.bat will use that environment variable.
| %1 |
Initial shift percentage. Default: 0. |
| %2 |
Make black lines no denser than this percentage. [Default: no restriction.] |
| %3 |
Make black lines only where the image is darker than this percentage. [Default: no restriction.] |
| %4 |
Name of environment variable to be set. |
|
|
|
|
As previous, but with basic template.
call %PICTBAT%restrictScreen ^
  . 80 50 lsRESTRICT

call %PICTBAT%lithScreen ^
  %SRC_BW% ^
  li_s10.png li_s10bw60r_out.png ^
  60 10 100 4

set lsRESTRICT=
|

|
The previous two results are not identical because lithScreen.bat applies the restriction to the lith screen (which is large, angled and waved) instead of the template.
Using the tools shown above, we can make multiple halftoned layers and composite them. Different methods may be used for the compositing; here we use "-compose Darken" which is like using successive printing plates with black ink on white paper. This inevitably makes the output too dark, so we can first lighten it with "-evaluate Pow".
For example, we use three screens at different angles, with no restrictions.
%IMG7%magick ^
  %SRC_BW% ^
  -evaluate Pow 0.4 ^
  li_lay1_src.miff

del li_lay1_*.png 2>nul

call %PICTBAT%lithScreen ^
  li_lay1_src.miff ^
  li_s10.png li_lay1_0.png ^
  0 5 100 4

call %PICTBAT%lithScreen ^
  li_lay1_src.miff ^
  li_s10.png li_lay1_1.png ^
  60 5 100 4

call %PICTBAT%lithScreen ^
  li_lay1_src.miff ^
  li_s10.png li_lay1_2.png ^
  120 5 100 4

%IMG7%magick ^
  li_lay1_*.png ^
  -background None ^
  -compose Darken -layers Merge ^
  li_lay1.png

set lsRESTRICT=
|
|
The next example restricts each layer. Layer 0 restricts the output density to 10%.
%IMG7%magick ^
  %SRC_BW% ^
  -evaluate Pow 1.0 ^
  li_lay2_src.miff

del li_lay2_*.png 2>nul

call %PICTBAT%restrictScreen ^
  . 60 . lsRESTRICT

call %PICTBAT%lithScreen ^
  li_lay2_src.miff ^
  li_s10.png li_lay2_0.png ^
  30 5 100 4

call %PICTBAT%restrictScreen ^
  . 40 60 lsRESTRICT

call %PICTBAT%lithScreen ^
  li_lay2_src.miff ^
  li_s10.png li_lay2_1.png ^
  90 5 100 4

call %PICTBAT%restrictScreen ^
  . . 40 lsRESTRICT

call %PICTBAT%lithScreen ^
  li_lay2_src.miff ^
  li_s10.png li_lay2_2.png ^
  150 5 100 4

%IMG7%magick ^
  li_lay2_*.png ^
  -background None ^
  -compose Darken -layers Merge ^
  li_lay2.png

set lsRESTRICT=
|

|
The script
layHalf.bat reads an image, a screen template, and a text data file, and writes a layered halftone image. The text data file is a CSV (comma-separated values) file, with no header, containing one line per layer. Each line contains six values, with a single dot meaning "use the default value". The six values for each layer are:
- Initial shift percentage for the input image. [Default: 0.]
- Restrict the screen's minimum average lightness to X%.
- Restrict the black lines to only where the image is darker than Y%.
- Screen rotation angle, degrees clockwise.
- Wave amplitude, in pixels.
- Wave wavelength, in pixels.
The first three values are passed to restrictScreen.bat.
Supersampling is a parameter to the script. Supersampling is done once at the start, and subsampling once at the end.
The script reads the supersampled image once for every layer. Performance would be improved if the script wrote another script that did the work of lithScreen.bat for every layer within a single magick command.
The script also composites one layer at a time instead of doing all layers in a single magick. This is to minimise memory usage for large images, at the expense of performance.
For example, we create a text file lith_data1.csv for the three layers of the previous example:
., 60,  .,  30, 5, 100
., 40, 60,  90, 5, 100
.,  ., 40, 150, 5, 100
call %PICTBAT%layHalf ^
  %SRC_BW% li_s10.png lith_data1.csv li_lh_out1.png 4
|
|
We can use the same screen template and data file on a different input image:
Lenna.png is not my copyright.
The restrictions can cause abrupt changes in areas of gradient, creating a boundary that is not justified by the input, eg the Lenna image, half way up the left side.
As a variation, we remove the first two parameters of the lines in the CSV file. This would darken the result, so we compensate with a power parameter in the call to layHalf. The data file, lith_data2.csv, is:
.,  .,  .,  30, 5, 100
.,  .,  .,  90, 5, 100
.,  .,  ., 150, 5, 100
call %PICTBAT%layHalf ^
  %SRC_BW% ^
  li_s10.png ^
  lith_data2.csv ^
  li_lh_out1a.png ^
  4 0.6
|
|
call %PICTBAT%layHalf ^
  toes.png ^
  li_s10.png ^
  lith_data2.csv ^
  li_lh_out2a.png ^
  4 0.6
|

|
call %PICTBAT%layHalf ^
  Lenna.png ^
  li_s10.png ^
  lith_data2.csv ^
  li_lh_out3a.png ^
  4 0.8
|

|
The results have equal halftoning from the three screens: within any small area, the three screens contribute the same density.
As another variation, we apply offsets to the second and third screens so within any small area the screens contribute densities but they don't start abruptly within gradients. The data file, lith_data3.csv, is:
0,  .,  .,  30, 5, 100
-15,  .,  .,  90, 5, 100
-30,  .,  ., 150, 5, 100
call %PICTBAT%layHalf ^
  %SRC_BW% ^
  li_s10.png ^
  lith_data3.csv ^
  li_lh_out1b.png ^
  4 0.6
|
|
call %PICTBAT%layHalf ^
  toes.png ^
  li_s10.png ^
  lith_data3.csv ^
  li_lh_out2b.png ^
  4 0.6
|
|
call %PICTBAT%layHalf ^
  Lenna.png ^
  li_s10.png ^
  lith_data3.csv ^
  li_lh_out3b.png ^
  4
|
|
The script
lithScreenRGB.bat separates the RGB channels, calls lithScreen.bat for each, and combines the results.
The colour scripts do not yet implement waves, resampling or lsRESTRICT.
call %PICTBAT%lithScreenRGB ^
  %SRC% li_s1.png li_hc1.png
|
|
At each pixel, each channel is either zero or 100%, so each pixel is one of: black, red, green, blue, cyan, magenta, yellow or white. In dark areas of the source, KRGB predominate. In light areas we have mostly CMYW.
We can set the lith screen angle to any desired value for each channel.
For CMY images, we can use the same script.
%IMG7%magick ^
  %SRC% ^
  -colorspace CMY ^
  -set colorspace sRGB ^
  li_cmy.miff

call %PICTBAT%lithScreenRGB ^
  li_cmy.miff li_s1.png li_cmy_h.miff

%IMG7%magick ^
  li_cmy_h.miff ^
  -set colorspace CMY ^
  -colorspace sRGB ^
  li_cmy_h.png
|
|
This gives essentially the same result, as we would hope. However, compare says they are very different:
%IMG7%magick compare -metric RMSE li_cmy_h.png li_hc1.png NULL:
58406.4 (0.891225)
An RMSE score is about as different as they could be. This is because, in each channel, the light and dark bands have swapped positions.
A CMYK image has four channels, so we have a separate script
lithScreenCMYK.bat for that.
%IMG7%magick ^
  %SRC% ^
  -colorspace CMYK ^
  li_cmyk.miff

call %PICTBAT%lithScreenCMYK ^
  li_cmyk.miff li_s1.png li_cmyk_h.miff

%IMG7%magick ^
  li_cmyk_h.miff ^
  -set colorspace CMYK ^
  -colorspace sRGB ^
  li_cmyk_h.png
|

|
A different effect:
%IMG7%magick ^
  %SRC% ^
  -set option:distort:viewport "%%wx%%h+0+0" ^
  -colorspace CMYK -separate ^
  null: ^
  ( -size 2x2 xc: ^
    ( +clone -negate ) +append +repage ^
    ( +clone -negate ) -append +repage ^
  ) ^
  -virtual-pixel tile -filter gaussian ^
  ( +clone -distort SRT 2,60 ) +swap ^
  ( +clone -distort SRT 2,30 ) +swap ^
  ( +clone -distort SRT 2,45 ) +swap ^
  ( +clone -distort SRT 2,0  -blur 0x0.7 ) +swap +delete ^
  -compose Overlay -layers composite ^
  -set colorspace CMYK -combine ^
  -colorspace RGB ^
  li_h0.png
|
|
These multi-channel scripts have two magicks, plus one magick per chanel, with intermediate files. For production use, they would be conflated into a single magick with no intermediate files.
rem Make a 1xn grayscale screen, with increasing values alternating.
rem %1 output file.
rem %2 number of values.
@rem
@rem Updated:
@rem   6-August-2022 for IM v7
@rem

@if "%2"=="" findstr /B "rem @rem" %~f0 & exit /B 1

@setlocal enabledelayedexpansion

@call echoOffSave

call %PICTBAT%setInOut %1 msa

set OUTFILE=%1

set NUM_VAL=%2

if "%NUM_VAL%"=="." set NUM_VAL=2

if %NUM_VAL% LSS 2 set NUM_VAL=2

set LO_VAL=0
set HI_VAL=100
set SIGN=1

for /L %%I in (1,1,%NUM_VAL%) do (

  for /F "usebackq" %%L in (`%IMG7%magick identify ^
    -format "PC=%%[fx:(%%I-1)*100/(%NUM_VAL%-1)]\n" ^
    xc:`) do set %%L

  echo %%I, !PC!, !SIGN!

  if %%I==1 (
    %IMG7%magick -size 1x1 xc:Black %OUTFILE%
  ) else if !SIGN!==1 (
    %IMG7%magick -size 1x1 xc:gray^(!PC!%%^) %OUTFILE% -append +repage %OUTFILE%
  ) else (
    %IMG7%magick %OUTFILE% -size 1x1 xc:gray^(!PC!%%^) -append +repage %OUTFILE%
  )

  set /A SIGN=-^(!SIGN!^)
)

call echoRestore

endlocal & set msaOUTFILE=%OUTFILE%
rem From image %1, makes 9-panel with varying threshold.
rem %2 is first number.
rem %3 is increment.
@rem
@rem Updated:
@rem   6-August-2022 for IM v7
@rem

@if "%1"=="" findstr /B "rem @rem" %~f0 & exit /B 1

@setlocal enabledelayedexpansion

@call echoOffSave

@call %PICTBAT%setInOut %1 th9


@set BASE=%2
@if "%BASE%"=="" set BASE=10

@set DIFF=%3
@if "%DIFF%"=="" set DIFF=10

@set /A f0=%BASE%
@set /A f1=%BASE%+%DIFF%
@set /A f2=%BASE%+(%DIFF%*2)
@set /A f3=%BASE%+(%DIFF%*3)
@set /A f4=%BASE%+(%DIFF%*4)
@set /A f5=%BASE%+(%DIFF%*5)
@set /A f6=%BASE%+(%DIFF%*6)
@set /A f7=%BASE%+(%DIFF%*7)
@set /A f8=%BASE%+(%DIFF%*8)

@set OPTIONS=+dither

%IMG7%magick %INFILE% -resize "300x300^>" ^
  +dither ^
  ( -clone 0 ^
    ( -clone 0 %OPTIONS% -threshold %f0%%% -gravity center label:"-threshold %f0%%%" -append ) ^
    ( -clone 0 %OPTIONS% -threshold %f1%%% -gravity center label:"-threshold %f1%%%" -append ) ^
    ( -clone 0 %OPTIONS% -threshold %f2%%% -gravity center label:"-threshold %f2%%%" -append ) ^
    -delete 0 ^
    +append ^
  ) ^
  ( -clone 0 ^
    ( -clone 0 %OPTIONS% -threshold %f3%%% -gravity center label:"-threshold %f3%%%" -append ) ^
    ( -clone 0 %OPTIONS% -threshold %f4%%% -gravity center label:"-threshold %f4%%%" -append ) ^
    ( -clone 0 %OPTIONS% -threshold %f5%%% -gravity center label:"-threshold %f5%%%" -append ) ^
    -delete 0 ^
    +append ^
  ) ^
  ( -clone 0 ^
    ( -clone 0 %OPTIONS% -threshold %f6%%% -gravity center label:"-threshold %f6%%%" -append ) ^
    ( -clone 0 %OPTIONS% -threshold %f7%%% -gravity center label:"-threshold %f7%%%" -append ) ^
    ( -clone 0 %OPTIONS% -threshold %f8%%% -gravity center label:"-threshold %f8%%%" -append ) ^
    -delete 0 ^
    +append ^
  ) ^
  -delete 0 ^
  -append ^
  %OUTFILE%

call echoRestore

@endlocal
rem From image %1
rem and lith screen template %2,
rem make output %3.
rem %4 is screen rotation angle, degrees clockwise [default 0, no rotation].
rem %5 is wave amplitude [default 0, no wave]
rem %6 is wave wavelength
rem %7 is resampling factor [default 1, no resampling]
@rem
@rem Also uses:
@rem   lsRESTRICT if set, issues this (see restrictScreen.bat)
@rem
@rem Last updated:
@rem   8-June-2017 implemented wave, resampling and lsRESTRICT.
@rem   6-August-2022 for IM v7
@rem


@if "%2"=="" findstr /B "rem @rem" %~f0 & exit /B 1

@setlocal enabledelayedexpansion

@call echoOffSave

call %PICTBAT%setInOut %1 ls

set LITH_TMPLT=%2

if not "%3"=="" if not "%3"=="." set OUTFILE=%3

set ANGLE=%4
if "%ANGLE%"=="." set ANGLE=
if "%ANGLE%"=="" set ANGLE=0

set WAVEAMP=%5
if "%WAVEAMP%"=="." set WAVEAMP=
if "%WAVEAMP%"=="" set WAVEAMP=0

set WAVELEN=%6
if "%WAVELEN%"=="." set WAVELEN=
if "%WAVELEN%"=="" set WAVELEN=100

set RESAMP=%7
if "%RESAMP%"=="." set RESAMP=
if "%RESAMP%"=="" set RESAMP=1

if %RESAMP%==1 (
  set SAMP_UP=
  set SAMP_DN=
) else (
  for /F "usebackq tokens=*" %%L in (`%IMG7%magick identify ^
    -format "SAMP_UP=-resize %%[fx:100*%RESAMP%]%%%% \nSAMP_DN=-resize %%[fx:100/%RESAMP%]%%%% \n" ^
    xc:`) do set %%L

  for /F "usebackq tokens=*" %%L in (`%IMG7%magick identify ^
    -format "WAVEAMP=%%[fx:!WAVEAMP!*%RESAMP%]\nWAVELEN=%%[fx:!WAVELEN!*%RESAMP%]%%%% \n" ^
    xc:`) do set %%L
)

if %WAVELEN%==0 (
  set sWAVE=
) else (
  set sWAVE=+distort SRT "1,%%[fx:-(%ANGLE%)]" -wave %WAVEAMP%x%WAVELEN% +distort SRT "1,%ANGLE%"
)

%IMG7%magick ^
  %INFILE% ^
  %SAMP_UP% ^
  -set option:distort:viewport "%%[fx:w+h+2*%WAVEAMP%]x%%[fx:w+h+2*%WAVEAMP%]+0+0" ^
  ( %LITH_TMPLT% ^
    %SAMP_UP% ^
    -virtual-pixel tile -distort SRT "1,%ANGLE%" ^
    %sWAVE% ^
    -auto-level ^
    %lsRESTRICT% ^
  ) ^
  -gravity Center ^
  -compose MinusSrc -composite ^
  -fill gray(100%%) +opaque gray(0) ^
  %SAMP_DN% ^
  %OUTFILE%

if ERRORLEVEL 1 exit /B 1

call echoRestore

@endlocal & set lsOUTFILE=%OUTFILE%
rem Creates environment variable to restrict a template for a lith screen.
rem %1 Initial shift percentage.
rem %2 Make black lines no denser than this percentage.
rem %3 Make black lines only where the image is darker than this percentage.
rem %4 Name of environment variable to be set.

@if "%2"=="" findstr /B "rem @rem" %~f0 & exit /B 1

@setlocal enabledelayedexpansion

@call echoOffSave

set shiftPc=%1
if "%shiftPc%"=="." set shiftPc=
if "%shiftPc%"=="" set shiftPc=0

set rsX=%2
if "%rsX%"=="." set rsX=

set rsY=%3
if "%rsY%"=="." set rsY=

set sSH=
set SX=
set SY=

if not "%shiftPc%"=="0" set sSH=-evaluate Add %shiftPc%%%

if not "%rsX%"=="" set SX=-black-threshold %rsX%%%

if not "%rsY%"=="" set SY=-evaluate Min %rsY%%%


call echoRestore

@endlocal & set %4=%sSH% %SX% %SY%

@echo %0: %4=!%4!
rem From image %1
rem and lith screen template %2,
rem and CSV file %3
rem make layered halftone output %4.
rem %5 is resampling factor [default 1, no resampling]
rem %6 power for input [1]
@rem
@rem Updated:
@rem   6-August-2022 for IM v7
@rem

@if "%3"=="" findstr /B "rem @rem" %~f0 & exit /B 1

@setlocal enabledelayedexpansion

@call echoOffSave

call %PICTBAT%setInOut %1 lh

set LITH_SCRN=%2

set DATA_FILE=%3

if not "%4"=="" if not "%4"=="." set OUTFILE=%4

set RESAMP=%5
if "%RESAMP%"=="." set RESAMP=
if "%RESAMP%"=="" set RESAMP=1

set POW=%6
if "%POW%"=="." set POW=
if "%POW%"=="" set POW=1

set TMPDIR=%TEMP%
set TMPEXT=.miff

set TMP_IN=%TMPDIR%\lh_in%TMPEXT%
set TMP_SCRN=%TMPDIR%\lh_scrn%TMPEXT%
set TMP_LAYER_PREF=%TMPDIR%\lh_layer_
set TMP_CUMUL=%TMPDIR%\lh_cumul%TMPEXT%

:: FIXME: multiply wave specs.

if %RESAMP%==1 (
  set SAMP_UP=
  set SAMP_DN=
) else (
  for /F "usebackq tokens=*" %%L in (`%IMG7%magick identify ^
    -format "SAMP_UP=-resize %%[fx:100*%RESAMP%]%%%% \nSAMP_DN=-resize %%[fx:100/%RESAMP%]%%%% \n" ^
    xc:`) do set %%L
)

if "%POW%"=="1" (
  set sPOW=
) else (
  set sPOW=-evaluate Pow %POW%
)


%IMG7%magick %INFILE% %sPOW% %SAMP_UP% %TMP_IN%
if ERRORLEVEL 1 exit /B 1

%IMG7%magick %LITH_SCRN% %SAMP_UP% %TMP_SCRN%
if ERRORLEVEL 1 exit /B 1

set COUNT=0
for /F "tokens=1-6 delims=, " %%A in (%DATA_FILE%) do (

  set LAYER_F=%TMP_LAYER_PREF%!COUNT!%TMPEXT%

  echo !COUNT!: %%A, %%B, %%C, %%D, %%E, %%F  !LAYER_F!

  set ANGLE=%%D
  if "!ANGLE!"=="." set ANGLE=
  if "!ANGLE!"=="" set ANGLE=0

  set WAVEAMP=%%E
  if "!WAVEAMP!"=="." set WAVEAMP=
  if "!WAVEAMP!"=="" set WAVEAMP=0

  set WAVELEN=%%F
  if "!WAVELEN!"=="." set WAVELEN=
  if "!WAVELEN!"=="" set WAVELEN=100

  if not %RESAMP%==1 (
    for /F "usebackq tokens=*" %%L in (`%IMG7%magick identify ^
      -format "WAVEAMP=%%[fx:!WAVEAMP!*%RESAMP%]\nWAVELEN=%%[fx:!WAVELEN!*%RESAMP%]%%%% \n" ^
      xc:`) do set %%L
  )

  call %PICTBAT%restrictScreen %%A %%B %%C lsRESTRICT

  call %PICTBAT%lithScreen ^
    %TMP_IN% %TMP_SCRN% !LAYER_F! !ANGLE! !WAVEAMP! !WAVELEN! 1

  if !COUNT!==0 (
    %IMG7%magick !LAYER_F! %TMP_CUMUL%
  ) else (
    %IMG7%magick %TMP_CUMUL% !LAYER_F! -compose Darken -composite %TMP_CUMUL%
  )

  set /A COUNT+=1
)

%IMG7%magick %TMP_CUMUL% %SAMP_DN% %OUTFILE%
if ERRORLEVEL 1 exit /B 1


call echoRestore

@endlocal & set lhOUTFILE=%OUTFILE%
rem From RGB image %1
rem and lith screen %2,
rem make RGB halftone output %3.
rem %4 is optional quoted list of three numbers for the angles.
@rem
@rem To do: implement wave, resampling and lsRESTRICT.
@rem
@rem Updated:
@rem   6-August-2022 for IM v7
@rem

@if "%2"=="" findstr /B "rem @rem" %~f0 & exit /B 1

@setlocal enabledelayedexpansion

rem @call echoOffSave

call %PICTBAT%setInOut %1 lsrgb

set LITH_SCRN=%2

if not "%3"=="" if not "%3"=="." set OUTFILE=%3

set ANGLES=%~4
if "%ANGLES%"=="." set ANGLES=
if "%ANGLES%"=="" set ANGLES=0,120,-120

call parseCommaList "%ANGLES%" numAng Angs

%IMG7%magick ^
  %INFILE% ^
  -set colorspace sRGB ^
  -channel RGB ^
  -separate ^
  +adjoin ^
  lsrgb-%%d.miff

call %PICTBAT%lithScreen lsrgb-0.miff %LITH_SCRN% lsrgb_r.miff %Angs[0]%
if ERRORLEVEL 1 exit /B 1

call %PICTBAT%lithScreen lsrgb-1.miff %LITH_SCRN% lsrgb_g.miff %Angs[1]%
if ERRORLEVEL 1 exit /B 1

call %PICTBAT%lithScreen lsrgb-2.miff %LITH_SCRN% lsrgb_b.miff %Angs[2]%
if ERRORLEVEL 1 exit /B 1

%IMG7%magick ^
  lsrgb_r.miff lsrgb_g.miff lsrgb_b.miff ^
  -combine ^
  %OUTFILE%

call echoRestore

@endlocal & set lsrgbOUTFILE=%OUTFILE%
rem From CMYK image %1
rem and lith screen %2,
rem make CMYK halftone output %3.
rem %4 is optional quoted list of four numbers for the angles.
@rem
@rem To do: implement wave, resampling and lsRESTRICT.
@rem
@rem Updated:
@rem   6-August-2022 for IM v7
@rem

@if "%2"=="" findstr /B "rem @rem" %~f0 & exit /B 1

@setlocal enabledelayedexpansion

@call echoOffSave

call %PICTBAT%setInOut %1 lsrgb

set LITH_SCRN=%2

if not "%3"=="" if not "%3"=="." set OUTFILE=%3

set ANGLES=%~4
if "%ANGLES%"=="." set ANGLES=
if "%ANGLES%"=="" set ANGLES=45,90,-45,0

call parseCommaList "%ANGLES%" numAng Angs

%IMG7%magick ^
  %INFILE% ^
  -channel CMYK ^
  -separate ^
  +adjoin ^
  lsrgb-%%d.miff

call %PICTBAT%lithScreen lsrgb-0.miff %LITH_SCRN% lsrgb_c.miff %Angs[0]%
if ERRORLEVEL 1 exit /B 1

call %PICTBAT%lithScreen lsrgb-1.miff %LITH_SCRN% lsrgb_m.miff %Angs[1]%
if ERRORLEVEL 1 exit /B 1

call %PICTBAT%lithScreen lsrgb-2.miff %LITH_SCRN% lsrgb_y.miff %Angs[2]%
if ERRORLEVEL 1 exit /B 1

call %PICTBAT%lithScreen lsrgb-3.miff %LITH_SCRN% lsrgb_k.miff %Angs[3]%
if ERRORLEVEL 1 exit /B 1

%IMG7%magick ^
  lsrgb_c.miff lsrgb_m.miff lsrgb_y.miff lsrgb_k.miff ^
  -set colorspace CMYK ^
  -combine ^
  %OUTFILE%

call echoRestore

@endlocal & set lsrgbOUTFILE=%OUTFILE%
rem Given %1 is a (quoted) comma- or space-separated list,
rem sets environment variables %2 to the number of values
rem and %3 (as an array) to the values.

set pclLIST=%~1

set pclNUM=%2
if "%pclNUM%"=="." set pclNUM=
if "%pclNUM%"=="" set pclNUM=argc

set pclVALS=%3
if "%pclVALS%"=="." set pclVALS=
if "%pclVALS%"=="" set pclVALS=argv

call :doParse %pclLIST%
set /A %pclNUM%=%pclN%

rem echo %0: pclVALS=%pclVALS%

exit /B 0

:: --------------------------------------------
:: Subroutine

:doParse

set pclN=0
:loop
if "%1"=="" exit /B 0

rem echo %0: 1=%1 2=%2 3=%3
set %pclVALS%[%pclN%]=%1
set /A pclN+=1
shift /1

goto loop

exit /B 0
All images on this page were created by the commands shown, using:
%IMG7%magick -version
Version: ImageMagick 7.1.1-20 Q16-HDRI x86 98bb1d4:20231008 https://imagemagick.org
Copyright: (C) 1999 ImageMagick Studio LLC
License: https://imagemagick.org/script/license.php
Features: Cipher DPC HDRI OpenCL OpenMP(2.0)
Delegates (built-in): bzlib cairo freetype gslib heic jng jp2 jpeg jxl lcms lqr lzma openexr pangocairo png ps raqm raw rsvg tiff webp xml zip zlib
Compiler: Visual Studio 2022 (193532217)
To improve internet download speeds, some images may have been automatically converted (by ImageMagick, of course) from PNG or TIFF or MIFF to JPG.
Source file for this web page is lith.h1. To re-create this web page, run "procH1 lith".
This page, including the images except where shown otherwise, is my copyright. Anyone is permitted to use or adapt any of the code, scripts or images for any purpose, including commercial use.
Anyone is permitted to re-publish this page, but only for non-commercial use.
Anyone is permitted to link to this page, including for commercial use.
Page version v1.2 18-June-2017.
Page created 02-Mar-2024 17:37:02.
Copyright © 2024 Alan Gibson.