snibgo's ImageMagick pages
Knots
We can draw pretty pictures of knots.
Some ropes below are drawn with the path command. See
SVG 1.1: Paths for syntax detils.
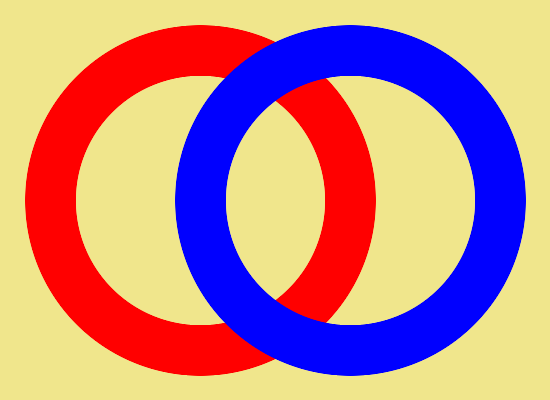
We draw a red ring and a blue ring on a khaki background. We do this in an unusual way: draw a red ring on transparent background, clone this, make it blue, and merge the layers.
%IMG7%magick ^
  -size 400x400 ^
  xc:None ^
  -fill None ^
  -strokewidth 50 -stroke Red ^
  -draw "translate 200,200 circle 0,0 0,150" ^
  ( +clone ^
    -fill Blue -colorize 100 ^
    -repage +150+0 ^
  ) ^
  -background khaki -layers merge ^
  +repage ^
  kn_c1.png
|
|
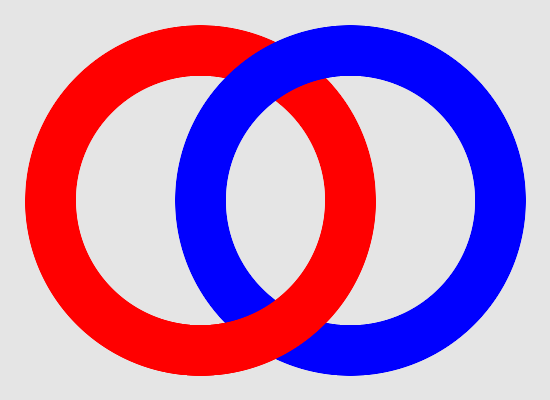
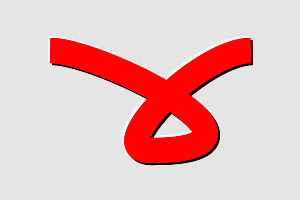
We want the rings to intertwine. At the top we will leave the red ring under the blue. At the bottom, we will repaint the red over the blue. We do this by cloning the red layer and erasing the top half. By messing with the alpha channel, anywhere we draw an opaque colour becomes transparent.
-background Red -alpha Background is because the rectangle makes a line of transparent black. This may be a bug in IM from about v6.9.1-0. See forum post
Transparent geometric shapes.
set NEGA=-channel alpha -negate +channel

%IMG7%magick ^
  -size 400x400 ^
  xc:None ^
  -fill None ^
  -strokewidth 50 -stroke Red ^
  -draw "translate 200,200 circle 0,0 0,150" ^
  ( -clone 0 ^
    -fill Blue -colorize 100 ^
    -repage +150+0 ^
  ) ^
  ( -clone 0 ^
    -fill Red -strokewidth 0 ^
    %NEGA% ^
    -draw "rectangle 0,0 399,200" ^
    -background Red -alpha Background ^
    %NEGA% ^
  ) ^
  -background gray90 -layers merge ^
  +repage ^
  kn_c2.png
|
|
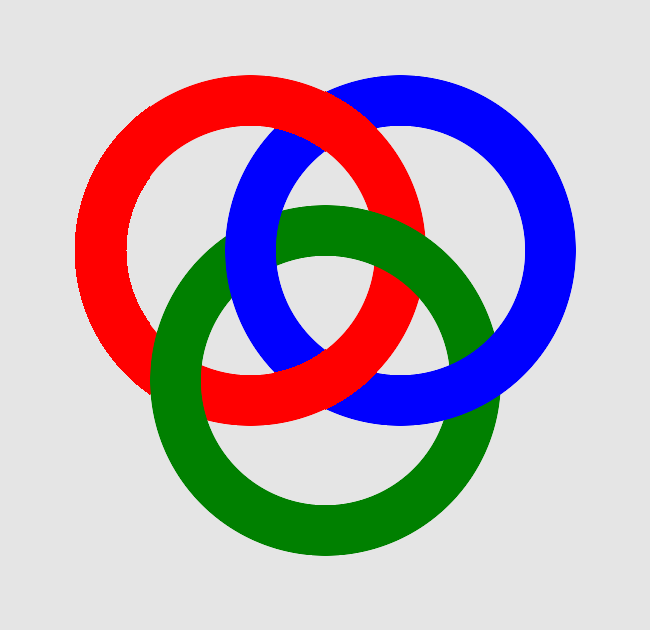
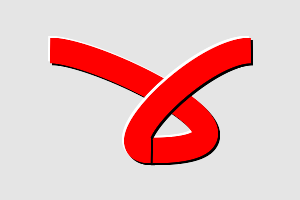
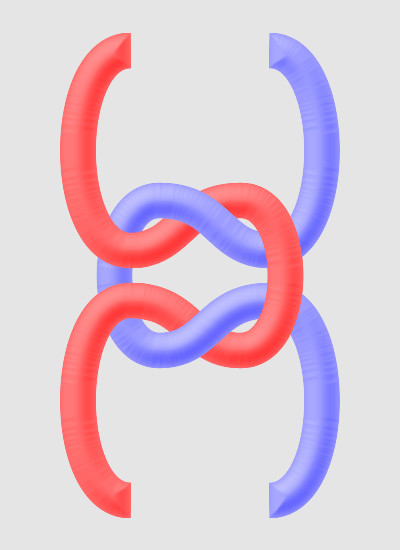
Now we do three rings. We draw red under green, green under blue, and blue under red. So the second red ring needs to be made transparent where the blue layer is fully transparent.
set BLUE_GEOM=+150+0

%IMG7%magick ^
  -size 500x500 ^
  xc:None ^
  -fill None ^
  -strokewidth 50 -stroke Red ^
  -draw "translate 250,250 circle 0,0 0,150" ^
  -background Black -alpha Background ^
  ( -clone 0 ^
    -fill Green -colorize 100 ^
    -repage +75+130 ^
  ) ^
  ( -clone 0 ^
    -fill Blue -colorize 100 ^
    -repage %BLUE_GEOM% ^
  ) ^
  ( -clone 0 ^
    ( +clone ^
      -alpha Extract ^
      -fill #fff +opaque #000 ^
      -duplicate 1 ^
      -geometry %BLUE_GEOM% ^
      -compose Multiply -composite ^
      +geometry ^
    ) ^
    -alpha off ^
    -compose CopyOpacity -composite ^
  ) ^
  -background gray90 ^
  -compose Over -layers merge ^
  +repage ^
  kn_c3.png
|
|
For setting transparency in the red, we don't actually use the blue image. The blue's alpha is exactly the same as the red's alpha, so we just clone that. On this copy, we make any partially-transparent pixels fully opaque. Otherwise, we get a halo of blue through the red ring.
This method is awkward, but easier than calculating intersecting points.
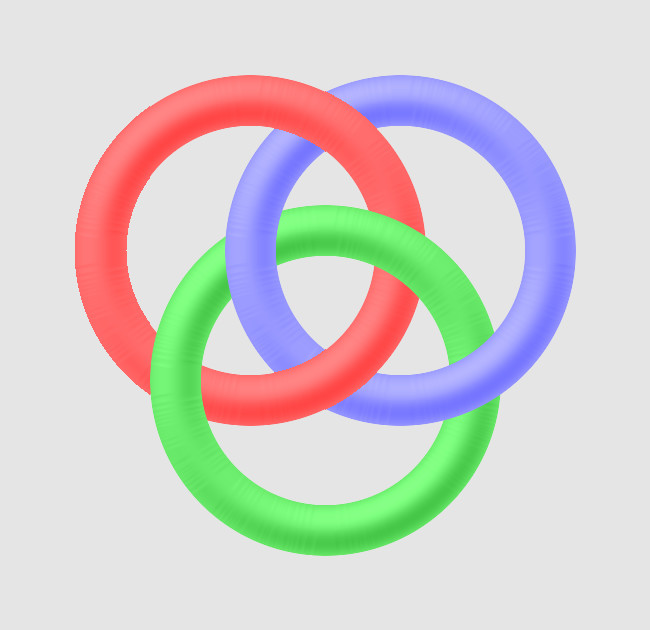
set SHADE_ROPE=^( +clone ^
    -fill #fff -colorize 100 -background #000 -alpha Background ^
    -morphology Distance Euclidean:7 ^
    -channel RGB ^
    -auto-level ^
    -function sinusoid 0.5,-90,0.5,0.5 ^
    -shade 120,45 ^
    +channel ^
  ^) ^
  -compose Luminize -composite
%IMG7%magick ^
  -size 500x500 ^
  xc:None ^
  -fill None ^
  -strokewidth 50 -stroke Red ^
  -draw "translate 250,250 circle 0,0 0,150" ^
  -background Black -alpha Background ^
  %SHADE_ROPE% ^
  ( -clone 0 ^
    -fill Green -colorize 100 ^
    -repage +75+130 ^
    %SHADE_ROPE% ^
  ) ^
  ( -clone 0 ^
    -fill Blue -colorize 100 ^
    -repage %BLUE_GEOM% ^
    %SHADE_ROPE% ^
  ) ^
  ( -clone 0 ^
    ( +clone ^
      -alpha Extract ^
      -fill #fff +opaque #000 ^
      -duplicate 1 ^
      -geometry %BLUE_GEOM% ^
      -compose Multiply -composite ^
      +geometry ^
    ) ^
    -alpha off ^
    -compose CopyOpacity -composite ^
  ) ^
  -background gray90 ^
  -compose Over -layers merge ^
  +repage ^
  kn_c4.png
|
|
This works only if the rope doesn't overlap itself.
set SPATH=M 50,50 ^
  c 50,0 250,100  100,100 ^
   -50,0  50,-100 100,-100

%IMG7%magick ^
  -size 300x200 ^
  xc:None ^
  -fill None ^
  -strokewidth 25 -stroke Red ^
  -draw "path '%SPATH%'" ^
  %SHADE_ROPE% ^
  -background gray90 ^
  -compose Over -layers merge ^
  kn_s1.png
|
|
|
A simple shade
%IMG7%magick ^
  -size 300x200 ^
  xc:None ^
  -fill None ^
  -strokewidth 25 -stroke Red ^
  -draw "path '%SPATH%'" ^
  ( +clone ^
    -fill #fff -colorize 100 -background #000 -flatten ^
    -shade 120,45 ^
  ) -alpha off -compose Luminize -composite -alpha on ^
  kn_s2.png
|
|
|
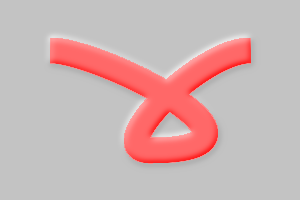
Blur, then shade
%IMG7%magick ^
  -size 300x200 ^
  xc:None ^
  -fill None ^
  -strokewidth 25 -stroke Red ^
  -draw "path '%SPATH%'" ^
  ( +clone ^
    -fill #fff -colorize 100 -background #000 -flatten ^
    -blur 0x3 ^
    -shade 120,45 ^
  ) -compose Luminize -composite ^
  -background gray90 ^
  -compose Over -layers merge ^
  kn_s3.png
|
|
|
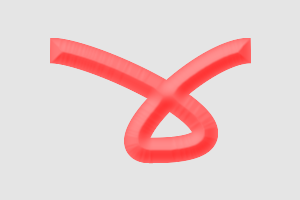
Path is doubled
%IMG7%magick ^
  -size 300x200 ^
  xc:None ^
  -fill None ^
  -strokewidth 29 -stroke Black ^
  -draw "path '%SPATH%'" ^
  -strokewidth 25 -stroke Red ^
  -draw "path '%SPATH%'" ^
  -background gray90 ^
  -compose Over -layers merge ^
  kn_s4.png
|
|
|
Path is trebled, with translations
%IMG7%magick ^
  -size 300x200 ^
  xc:None ^
  -fill None ^
  -strokewidth 25 -stroke White ^
  -draw "translate -2,-2 path '%SPATH%'" ^
  -strokewidth 25 -stroke Black ^
  -draw "translate 2,2 path '%SPATH%'" ^
  -strokewidth 25 -stroke Red ^
  -draw "path '%SPATH%'" ^
  -background gray90 ^
  -compose Over -layers merge ^
  kn_s5.png
|
|
|
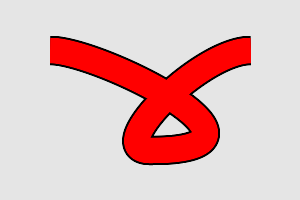
Splitting the path clarifies the crossover,
but introduces a new end (which could be erased).
set SPATH_A=M 50,50 ^
  c 50,0 250,100  100,100

set SPATH_B=M 150,150 ^
  c -50,0  50,-100 100,-100

%IMG7%magick ^
  -size 300x200 ^
  xc:None ^
  -fill None ^
  -strokewidth 25 -stroke White ^
  -draw "translate -2,-2 path '%SPATH%'" ^
  -strokewidth 25 -stroke Black ^
  -draw "translate 2,2 path '%SPATH%'" ^
  -strokewidth 25 -stroke Red ^
  -draw "path '%SPATH%'" ^
  -strokewidth 25 -stroke White ^
  -draw "translate -2,-2 path '%SPATH_B%'" ^
  -strokewidth 25 -stroke Black ^
  -draw "translate 2,2 path '%SPATH_B%'" ^
  -strokewidth 25 -stroke Red ^
  -draw "path '%SPATH_B%'" ^
  -background gray90 ^
  -compose Over -layers merge ^
  kn_s6.png
|
|
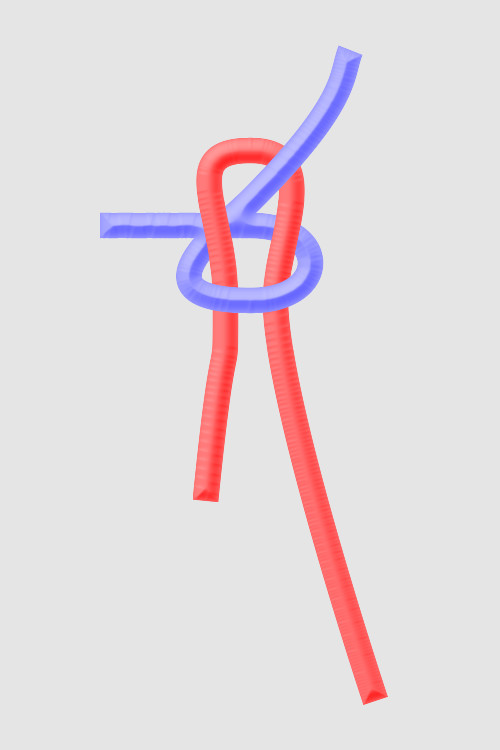
Three layers: red, blue, and red again. The second red layer is made transparent in a central vertical strip.
set TPATH=m 50,400 ^
  c 0,-100 60,-200  130,-200 ^
    60,0   60,50    110,50 ^
    60,0   100,-100 130,-200

%IMG7%magick ^
  -size 500x450 ^
  xc:None ^
  -fill None ^
  -strokewidth 25 -stroke Red ^
  -draw "path '%TPATH%'" ^
  %SHADE_ROPE% ^
  ( -clone 0 ^
    -fill Blue -colorize 100 ^
    -flop ^
    %SHADE_ROPE% ^
  ) ^
  ( -clone 0 ^
    -region 100x450+200+0 ^
    -channel A -evaluate set 0 +channel ^
  ) ^
  -background gray90 ^
  -compose Over -layers merge ^
  kn_t1.png
|
|
As with the thumb knot, we have three layers: red, blue, and red again, and again the second red layer is made transparent in a central vertical strip.
set RPATH=m 50,500 ^
  c 0,-100 60,-200   130,-200 ^
    60,0   60,50     110,50 ^
    60,0   60,-150   0,-150 ^
   -60,0  -60,50    -110,50 ^
   -60,0  -130,-100 -130,-200

%IMG7%magick ^
  -size 500x550 ^
  xc:None ^
  -fill None ^
  -strokewidth 35 -stroke Red ^
  -draw "path '%RPATH%'" ^
  %SHADE_ROPE% ^
  ( -clone 0 ^
    -fill Blue -colorize 100 ^
    -flop ^
    %SHADE_ROPE% ^
  ) ^
  ( -clone 0 ^
    %NEGA% ^
    -fill Red -strokewidth 0 -stroke Red ^
    -draw "rectangle 200,0 300,549" ^
    %NEGA% ^
  ) ^
  -background gray90 ^
  -compose Over -layers merge ^
  kn_r1.png

%IMG7%magick ^
  -size 500x550 ^
  xc:None ^
  -fill None ^
  -strokewidth 35 -stroke Red ^
  -draw "path '%RPATH%'" ^
  %SHADE_ROPE% ^
  ( -clone 0 ^
    -fill Blue -colorize 100 ^
    -flop ^
    %SHADE_ROPE% ^
  ) ^
  ( -clone 0 ^
    -region 100x550+200+0 ^
    -channel A -evaluate set 0 +channel ^
  ) ^
  -background gray90 ^
  -compose Over -layers merge ^
  kn_r1.png
|
|
If we want to repeat the knot, we can first tweak the ends:
set RPATH2=m 130,500 ^
  c -70,0 -70,-200     0,-200 ^
    60,0   60,50     110,50 ^
    60,0   60,-150   0,-150 ^
   -60,0  -60,50    -110,50 ^
   -70,0  -70,-200     0,-200

%IMG7%magick ^
  -size 400x550 ^
  xc:None ^
  -fill None ^
  -strokewidth 35 -stroke Red ^
  -draw "path '%RPATH2%'" ^
  %SHADE_ROPE% ^
  ( -clone 0 ^
    -fill Blue -colorize 100 ^
    -flop ^
    %SHADE_ROPE% ^
  ) ^
  ( -clone 0 ^
    -region 100x550+150+0 ^
    -channel A -evaluate set 0 +channel ^
  ) ^
  -background gray90 ^
  -compose Over -layers merge ^
  kn_r2.png
|
|
The result can be cropped at y=400 and y=150, and the top will match up with the bottom. Then we rotate, clone and append:
%IMG7%magick ^
  kn_r2.png ^
  -crop x250+0+150 +repage ^
  -rotate 90 ^
  ( +clone ) +append +repage ^
  kn_r3.png
|
|
set B1PATH=m 375,700 ^
  c 0,0   -100,-300 -100,-400 ^
    0,-60   50,-150  -25,-150 ^
  -75,0    -25,60    -25,150 ^
    0,100    0,0     -20,200

set B2PATH=m 350,50 ^
  c -10,25    0,50 -100,150 ^
    -25,25 -125,100   0,100 ^
     80,0    80,-75   0,-75 ^
    -25,0   -25,0  -150,0

%IMG7%magick ^
  -size 500x750 ^
  -strokewidth 25 ^
  ( xc:None ^
    -fill None ^
    -stroke Red ^
    -draw "path '%B1PATH%'" ^
    %SHADE_ROPE% ^
  ) ^
  ( xc:None ^
    -fill None ^
    -stroke Blue ^
    -draw "path '%B2PATH%'" ^
    %SHADE_ROPE% ^
  ) ^
  ( -clone 0 ^
    -region 200x100+150+100 ^
    -channel A -evaluate set 0 +channel ^
    -region 200x80+150+270 ^
    -channel A -evaluate set 0 +channel ^
    +region ^
  ) ^
  -background gray90 ^
  -compose Over -layers merge ^
  kn_b1.png
|
|
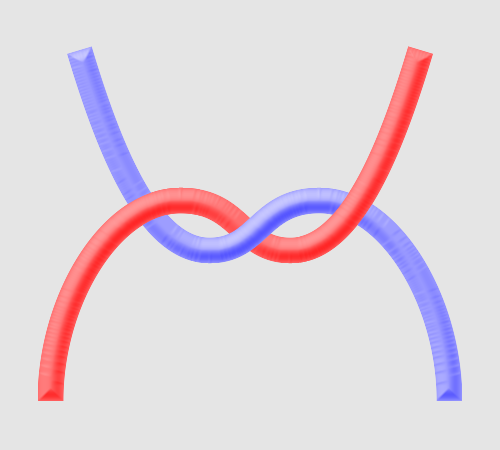
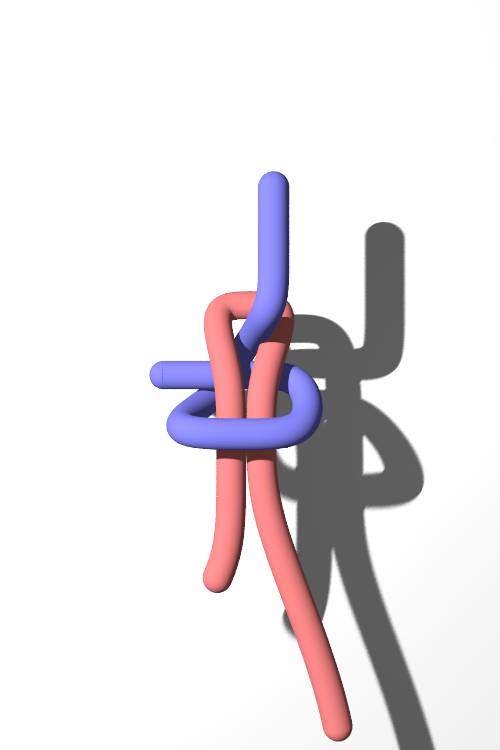
By their nature, knots have three dimensions. With care, IM can simulate the third dimension with shading and shadows, but a ray-tracer such as POV-Ray gives a better effect. The
POV-Ray files are given below.
|
This has a white background, to show the shadow.
Removing it,
and including +UA on the command line,
would create a transparent background.
%POV% ^
  -D +A0.01 +W500 +H750 +FN16 ^
  +IreefT.pov +Okn_reefT_pov.png
|
|
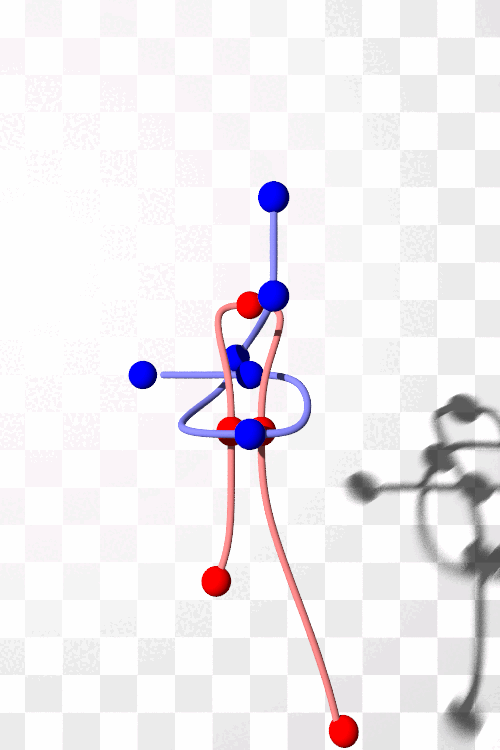
Animations are useful for setting and checking the third dimension. This one also shows control points that are nominally on the curves.
for /L %%i in (0,1,35) do (
  set LZ=00000%%i
  set LZ=!LZ:~-6!

  for /F "usebackq" %%F in (`%IMG7%magick identify ^
    -format "%%[fx:%%i/36]" xc:`) do set CLK=%%F

  %POV% ^
    -D +A0.01 +W500 +H750 +FN16 +UA +k!CLK!^
    +IreefChk.pov +Okn_reefT_pov_!LZ!.png
)

%IMG7%magick ^
  -dispose Background kn_reefT_pov_*.png ^
  -layers coalesce -layers optimize ^
  -loop 0 ^
  kn_reef.gif

del kn_reefT_pov_*.png
|
|
The background massively increases processing time.
For other uses of POV-Ray, see my page
Cylinders: Beyond the simple.
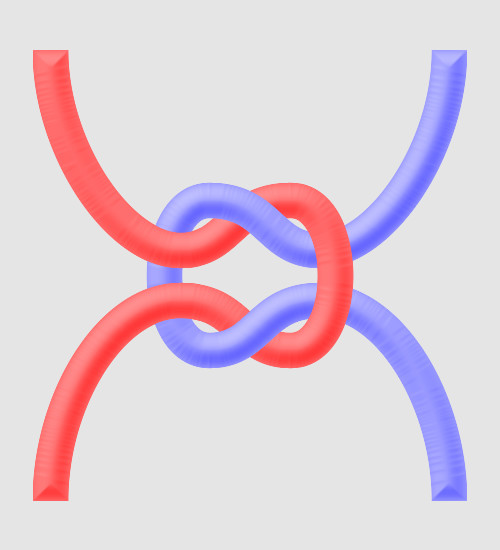
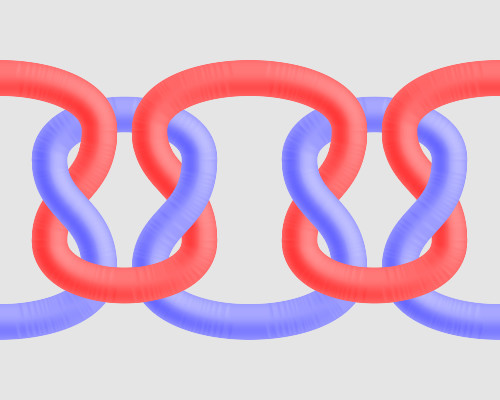
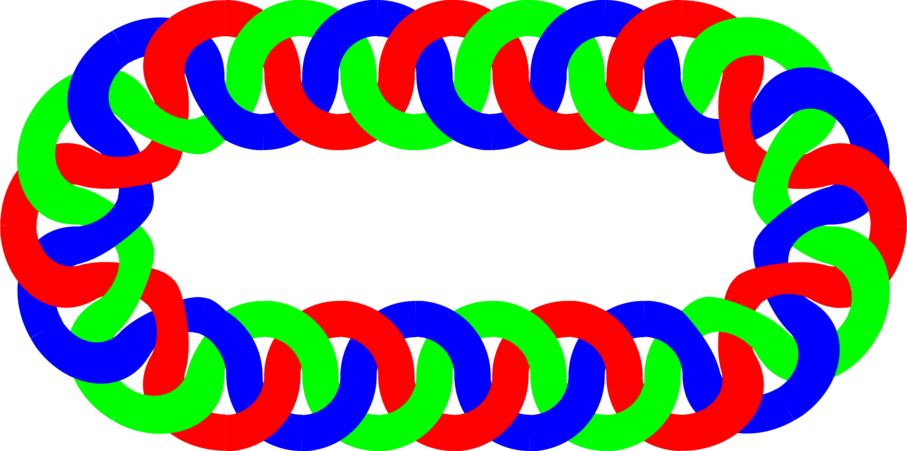
As shown above, we can append knots together to make a pattern. After appending, we can "+distort polar" to bend the pattern around corners. For example, the script
braid.bat makes a pattern from semi-circles.
call ^
  %PICTBAT%braid.bat
|
|
For convenience, .bat scripts are also available in a single zip file. See
Zipped BAT files.
@rem
@rem Updated:
@rem   5-August-2022 for IM v7.
@rem

set WH2=250
set /A WH=WH2+WH2

set THK2=60
set /A THK=%THK2%+%THK2%

set /A WHmTHK2=%WH%-%THK2%

set /A RAD=%WH2%-%THK2%
set /A WW=%WH%-%THK%


set /A TOP=60+%THK2%
set /A TOP=%WH2%*6/25+%THK2%
set /A BOT=%WH%-%TOP%

set /A X1=%WW%*1/3
set /A X2=%WW%*4/3

set /A D1=%WW%*2/3
set /A D2=%WW%*4/3

set /A SM_RAD=%THK%*4/5
set /A SM_WH=%THK%*8/5
set /A X1L=%X1%-%SM_RAD%
set /A X2L=%X2%-%SM_RAD%
set /A TOP_T=%TOP%-%SM_RAD%
set /A BOT_T=%BOT%-%SM_RAD%

set COL1=Red
set COL2=Lime
set COL3=Blue

set NEGA=-channel alpha -negate +channel

goto BadErase

%IMG7%magick ^
  -size %WW%x%WH% xc:None ^
  -fill None -stroke %COL1% -strokewidth %THK% ^
  -draw "path 'M0,%THK2% A%RAD%,%RAD% 0 0,1 %RAD%,%WH2% A%RAD%,%RAD% 0 0,0 %WW%,%WHmTHK2%'" ^
  ( +clone -flip ) +append +repage ^
  ( -clone 0 -fill %COL2% -colorize 100 -roll +%D1%+0 ) ^
  ( -clone 0 -fill %COL3% -colorize 100 -roll +%D2%+0 ^
  ) ^
  ( -clone 0 -fill %COL1% -colorize 100 ^
    %NEGA% ^
    -fill Red -stroke None ^
    -draw "translate %X1%,%TOP% circle 0,0 0,%SM_RAD%" ^
    -draw "translate %X2%,%BOT% circle 0,0 0,%SM_RAD%" ^
    %NEGA% ^
  ) ^
  -background None -layers merge ^
  ( +clone ) +append +repage ^
  kn_r.png
:BadErase

%IMG7%magick ^
  -size %WW%x%WH% xc:None ^
  -fill None -stroke %COL1% -strokewidth %THK% ^
  -draw "path 'M0,%THK2% A%RAD%,%RAD% 0 0,1 %RAD%,%WH2% A%RAD%,%RAD% 0 0,0 %WW%,%WHmTHK2%'" ^
  ( +clone -flip ) +append +repage ^
  ( -clone 0 -fill %COL2% -colorize 100 -roll +%D1%+0 ) ^
  ( -clone 0 -fill %COL3% -colorize 100 -roll +%D2%+0 ^
  ) ^
  ( -clone 0 -fill %COL1% -colorize 100 ^
    -region %SM_WH%x%SM_WH%+%X1L%+%TOP_T% ^
    -channel A -evaluate set 0 +channel ^
    -region %SM_WH%x%SM_WH%+%X2L%+%BOT_T% ^
    -channel A -evaluate set 0 +channel ^
  ) ^
  -background None -layers merge ^
  ( +clone ) +append +repage ^
  kn_r.png

set INRAD=300
set INRAD=250
set INRAD=%WH2%
set /A OUTRAD=%INRAD%+%WH%

%IMG7%magick ^
  kn_r.png ^
  ( +clone ) +append +repage ^
  -flip -flop ^
  -virtual-pixel None +distort polar %OUTRAD%,%INRAD% ^
  +repage ^
  -crop 2x2@ +repage ^
  kn_r1.png

%IMG7%magick ^
  -gravity North ^
  kn_r1-0.png ^
  kn_r.png ^
  kn_r1-1.png ^
  -background None ^
  +append +repage ^
  -write kn_rtop.png ^
  -flip -flop ^
  kn_rbot.png

%IMG7%magick ^
  kn_rtop.png ^
  kn_rbot.png ^
  -append +repage ^
  -resize 30%% ^
  kn_rtb.png
#declare RopeRad=20;

#include "knotPov.inc"

union {
  object { WhiteFloor }
  object { reef_knot
    rotate y*360*clock
  }
}
#include "knotPov.inc"

union {
  object { CheckerFloor }
  object { reef_knot_chk
    rotate y*360*clock
  }
}
#version 3.7;
global_settings { assumed_gamma 1.0 }

#include "colors.inc"
#include "textures.inc"
#include "shapes.inc"
#include "metals.inc"
#include "glass.inc"
#include "woods.inc"

camera {
   location <0, 0, -1000>
   // angle 45 // direction <0, 0,  1.7>
   right x*image_width/image_height
   look_at <0,0,0>
}

// Uncomment the area lights only if you've got lots of time.
#declare Dist=80.0;

light_source {< -600, +300, -900> color White*2
//     fade_distance Dist fade_power 2
   area_light <-40, 0, -40>, <40, 0, 40>, 3, 3
   adaptive 1
   jitter
}

//light_source {< -500, 250, -500> color White
//     fade_distance Dist fade_power 2
//   area_light <-40, 0, -40>, <40, 0, 40>, 3, 3
//   adaptive 1
//   jitter
//}

light_source {< 500, -100, -40> color Gray30
     fade_distance Dist fade_power 2
     area_light <-20, 0, -20>, <20, 0, 20>, 3, 3
     adaptive 1
     jitter
}
light_source {< 0, -1000,  0> color Gray30
     fade_distance Dist fade_power 2
//   area_light <-30, 0, -30>, <30, 0, 30>, 3, 3
//   adaptive 1
//   jitter
}

//sky_sphere {
//    pigment {
//        gradient y
//        color_map {
//            [0, 1  color Gray50 color Gray80]
//        }
//    }
//}

#declare M_Wood18B =
colour_map {
    [0.00 0.25   color rgbf < 0.50, 0.26, 0.12, 0.10>
                 color rgbf < 0.54, 0.29, 0.13, 0.20>]
    [0.25 0.40   color rgbf < 0.54, 0.29, 0.13, 0.20>
                 color rgbf < 0.55, 0.28, 0.10, 0.70>]
    [0.40 0.50   color rgbf < 0.55, 0.28, 0.10, 0.70>
                 color rgbf < 0.50, 0.23, 0.15, 0.95>]
    [0.50 0.70   color rgbf < 0.50, 0.23, 0.15, 0.95>
                 color rgbf < 0.56, 0.29, 0.17, 0.70>]
    [0.70 0.98   color rgbf < 0.56, 0.29, 0.17, 0.70>
                 color rgbf < 0.54, 0.29, 0.13, 0.20>]
    [0.98 1.00   color rgbf < 0.54, 0.29, 0.13, 0.20>
                 color rgbf < 0.50, 0.26, 0.12, 0.10>]
}


#declare Floor_Texture =
    texture { pigment { P_WoodGrain18A color_map { M_Wood18A }}}
    texture { pigment { P_WoodGrain12A color_map { M_Wood18B }}}
    texture {
        pigment { P_WoodGrain12B color_map { M_Wood18B }}
        finish { reflection 0.25 }
    }

#declare Floor =
plane { y,0
    texture { Floor_Texture
        scale 0.5
        rotate y*90
        rotate <10, 0, 15>
        translate z*4
    }
}

#declare WhiteFloor =
plane { z,0
  pigment { color White }
  translate z*200
}

#declare CheckerFloor =
plane { z,0
  pigment { checker color White, color Gray scale 100 }
  translate z*1000
}


#ifndef (RopeRad)
#declare RopeRad=5;
#end

#declare reef_a =
sphere_sweep {
  b_spline
  15,
  <375,-800,0>, RopeRad
  <375,-700,0>, RopeRad // on curve
  <325,-550,0>, RopeRad
  <265,-400,0>, RopeRad
  <265,-300,0>, RopeRad // on curve
  <265,-225,0>, RopeRad
  <310,-125,75>, RopeRad
  <250,-125,75>, RopeRad // on curve
  <190,-125,75>, RopeRad
  <225,-225,0>, RopeRad
  <225,-300,0>, RopeRad // on curve
  <225,-350,0>, RopeRad
  <225,-450,0>, RopeRad
  <205,-500,0>, RopeRad // on curve
  <195,-520,0>, RopeRad
  pigment { color <1, 0.25, 0.25> }
}

#declare reef_test_a =
union {
  sphere { <375,-700,0> 20 }
  sphere { <265,-300,0> 20 }
  sphere { <250,-125,75> 20 }
  sphere { <225,-300,0> 20 }
  sphere { <205,-500,0> 20 }
  pigment { color Red }
}

#declare reef_b =
sphere_sweep {
  b_spline
  18,
  <280,100,-50>, RopeRad
  <280,0,-50>, RopeRad // on curve
  <280,-25,-50>, RopeRad
  <280,-75,-50>, RopeRad
  <280,-125,-50>, RopeRad // on curve
  <270,-150,-50>, RopeRad
  <250,-175,100>, RopeRad
  <230,-200,100>, RopeRad // on curve
  <215,-250,125>, RopeRad
  <125,-300,-50>, RopeRad
  <250,-300,-50>, RopeRad // on curve
  <330,-300,-50>, RopeRad
  <330,-225,50>,  RopeRad
  <250,-225,50>,  RopeRad // on curve
  <225,-225,50>, RopeRad
  <225,-225,50>, RopeRad
  <100,-225,50>, RopeRad // on curve
  <150,-225,50>, RopeRad
  pigment { color rgb <0.25, 0.25, 1> }
}

#declare reef_test_b =
union {
  sphere { <280,0,-50> 20 }
  sphere { <280,-125,-50> 20 }
  sphere { <230,-200,100> 20 }
  sphere { <250,-300,-50> 20 }
  sphere { <250,-225,50> 20 }
  sphere { <100,-225,50> 20 }
  pigment { color Blue }
}

#declare reef_knot =
union {
  object { reef_a }
  object { reef_b }
  translate <-250,225,0>
}

#declare reef_knot_chk =
union {
  object { reef_a }
  object { reef_test_a }
  object { reef_b }
  object { reef_test_b }
  translate <-250,225,0>
}
All images on this page were created by the commands shown, using:
%IMG7%magick -version
Version: ImageMagick 7.1.0-42 Q16-HDRI x64 396d87c:20220709 https://imagemagick.org
Copyright: (C) 1999 ImageMagick Studio LLC
License: https://imagemagick.org/script/license.php
Features: Cipher DPC HDRI OpenCL
Delegates (built-in): bzlib cairo freetype gslib heic jng jp2 jpeg jxl lcms lqr lzma openexr pangocairo png ps raqm raw rsvg tiff webp xml zip zlib
Compiler: Visual Studio 2022 (193231332)
... and POV-Ray 3.7, with "Render, On completion, Exit POV-Ray for Windows" ticked.
"POV-Ray" is a trademark of Persistence of Vision Raytracer Pty Ltd.
To improve internet download speeds, some images may have been automatically converted (by ImageMagick, of course) from PNG or TIFF or MIFF to JPG.
Source file for this web page is knots.h1. To re-create this web page, run "procH1 knots".
This page, including the images, is my copyright. Anyone is permitted to use or adapt any of the code, scripts or images for any purpose, including commercial use.
Anyone is permitted to re-publish this page, but only for non-commercial use.
Anyone is permitted to link to this page, including for commercial use.
Page version v1.0 23-October-2014.
Page created 07-Aug-2022 10:01:53.
Copyright © 2022 Alan Gibson.