ImageMagick has two colorspaces of particular importance: sRGB ("non-linear") and RGB ("linear"). Some people argue that operations should be performed in RGB space, not sRGB. This is my take on the subject.
Create two grayscale wedges.
The first is a simple one-dimensional gradient, with added lines and numbers showing the percentage gray. The percentage increases smoothly from 0 to 100%.
set WW=1000

set TEXT_WIDTH=200

%IMG7%magick ^
  -size %WW%x50 xc:None ^
  -gravity West ^
  -pointsize 15 ^
  -fill White ^
  -annotate 0x0+0+0 "0" ^
  -gravity Center ^
  -annotate 0x0-400+0 "10" ^
  -annotate 0x0-300+0 "20" ^
  -annotate 0x0-200+0 "30" ^
  -annotate 0x0-100+0 "40" ^
  -fill Black ^
  -annotate 0x0+000+0 "50" ^
  -annotate 0x0+100+0 "60" ^
  -annotate 0x0+200+0 "70" ^
  -annotate 0x0+300+0 "80" ^
  -annotate 0x0+400+0 "90" ^
  -gravity East ^
  -annotate 0x0+0+0 "100%%" ^
  %TEMP%\gg_percentsS.png

%IMG7%magick ^
  -size 1x%WW% gradient: -rotate 90 ^
  -fx "BAR=u<0.5?1:0; int(u*500)%%50==0?BAR:u" ^
  -scale "%WW%x50^!" ^
  -size 50x%WW% ( gradient: -rotate 90 ) ^
  -append +repage ^
  -write gg_wedge_base.png ^
  -gravity South ^
  %TEMP%\gg_percentsS.png ^
  -composite ^
  -alpha off ^
  -gravity West -size %TEXT_WIDTH%x50 -pointsize 20 label:" sRGB wedge" +append +repage ^
  gg_wedgeS.png
Here is gg_wedgeS.png:

The second wedge is made from the same gradient but has the gray values changed by -set colorspace RGB -colorspace sRGB. This tells IM that the pixels represent linear RGB colours, then converts these to sRGB. The RGB=>sRGB transformation is approximately:
VsRGB = VRGB1/2.2
We create the gradient first, then pick the gray values from it for the annotations.
%IMG7%magick ^
  gg_wedge_base.png ^
  -set colorspace RGB -colorspace sRGB ^
  -write %TEMP%\gg_wL.png ^
  -alpha off ^
  gg_wedgeL.png

for /F "usebackq" %%L in (`%IMG7%magick ^
  %TEMP%\gg_wL.png -flip ^
  -format "v1=%%[fx:int(100*p{100,0}.r+0.5)]\nv2=%%[fx:int(100*p{200,0}.r+0.5)]\nv3=%%[fx:int(100*p{300,0}.r+0.5)]\nv4=%%[fx:int(100*p{400,0}.r+0.5)]\nv5=%%[fx:int(100*p{500,0}.r+0.5)]\nv6=%%[fx:int(100*p{600,0}.r+0.5)]\nv7=%%[fx:int(100*p{700,0}.r+0.5)]\nv8=%%[fx:int(100*p{800,0}.r+0.5)]\nv9=%%[fx:int(100*p{900,0}.r+0.5)]" ^
  info:`) ^
do set %%L

%IMG7%magick ^
  -size %WW%x50 xc:None ^
  -gravity West ^
  -pointsize 15 ^
  -fill White ^
  -annotate 0x0+0+0 "0" ^
  -gravity Center ^
  -annotate 0x0-400+0 "%v1%" ^
  -annotate 0x0-300+0 "%v2%" ^
  -annotate 0x0-200+0 "%v3%" ^
  -annotate 0x0-100+0 "%v4%" ^
  -fill Black ^
  -annotate 0x0+000+0 "%v5%" ^
  -annotate 0x0+100+0 "%v6%" ^
  -annotate 0x0+200+0 "%v7%" ^
  -annotate 0x0+300+0 "%v8%" ^
  -annotate 0x0+400+0 "%v9%" ^
  -gravity East ^
  -annotate 0x0+0+0 "100%%" ^
  %TEMP%\gg_percentsL.png

%IMG7%magick ^
  gg_wedgeL.png ^
  %TEMP%\gg_percentsL.png ^
  -gravity South ^
  -composite ^
  -gravity West -size %TEXT_WIDTH%x50 -pointsize 20 label:" RGB wedge" +append +repage ^
  gg_wedgeL.png
Here is gg_wedgeL.png:

The values have been pushed to the left, squishing shadow values together while spreading out highlight values. If we photographed the first wedge and looked at the raw (linear) result, it would look something like this.
The value in the centre is approximately 0.51/2.2 = 0.7297.
Here are the two wedges together:
Except for the ends, the RGB wedge is lighter then the sRGB wedge.
Create a 2x2 chequer pattern of black and white pixels, fill it out to a larger size, then blur it twice. The first blur is in the normal way, and the second is done in RGB colorspace (the image is converted to RGB before the blur, and converted back after). We also write out the mean values.
%IMG7%magick ^
  -size 1x1 ^
  xc: xc:black ^
  +append +repage ^
  ( +clone -rotate 180 ) ^
  -append +repage ^
  -write mpr:CHECKS +delete ^
  -size %WW%x50 xc: ^
  -fill mpr:CHECKS -draw "color 0,0 reset" ^
  -format "mean black/white chequer: %%[fx:mean]\n" -write info: ^
  -alpha off ^
  -write gg_cheq.png ^
  -gravity West -pointsize 20 ^
  ^
  ( -clone 0 ^
    -size %TEXT_WIDTH%x50 label:" black/white chequer" +append +repage ^
    -write gg_cheqLabl.png +delete ^
  ) ^
  ( -clone 0 ^
    -blur 0x5 ^
    -format "mean sRGB blur: %%[fx:mean]\n" -write info: ^
    -size %TEXT_WIDTH%x50 label:" sRGB blur" +append +repage ^
    -write gg_cheqbS.png +delete ^
  ) ^
  ( -clone 0 ^
    -colorspace RGB -blur 0x5 -colorspace sRGB ^
    -format "mean RGB blur: %%[fx:mean]\n" -write info: ^
    -size %TEXT_WIDTH%x50 label:" RGB blur" +append +repage ^
    -alpha off ^
    -write gg_cheqbL.png +delete ^
  ) ^
  NULL:
mean black/white chequer: 0.625
mean sRGB blur: 0.5
mean RGB blur: 0.735353


The mean of black (0) and white (1) is 0.5.
Depending on your computer, monitor and eyesight, the sRGB blur may look darker than the black/white chequer; while the RGB blur and black/white chequer may look more similar. This is the opposite result to the similarity in numbers.
%IMG7%magick ^
  gg_cheqbS.png gg_wedgeS.png gg_wedgeL.png gg_cheqbL.png ^
  -append +repage ^
  gg_cwwc.png
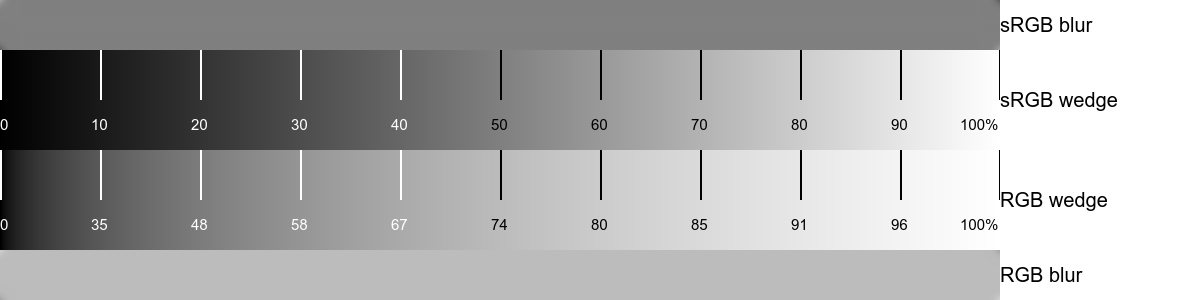
As we would expect, the sRGB blur matches with the mid point of the sRGB wedge. Similarly the RGB blur matches with the mid point of the RGB wedge. Note the optical illusion that the blur strips appear to become darker towards the right.
This example is extreme. In ordinary photography (for example) we don't often want to blur black and white entirely together. But a similar sitation is true for any operation that mixes pixels. These operations include blurring, sharpening and resizing, whether enlarging or reducing.
We can see what happens numerically to our artificial black/white chequer image.
%IMG7%magick ^
  gg_cheq.png            -format "original: %%[fx:mean]\n" -write info: ^
  ( +clone -blur 0x5     -format "    blur: %%[fx:mean]\n" -write info: +delete ) ^
  ( +clone -unsharp 0x5  -format " unsharp: %%[fx:mean]\n" -write info: +delete ) ^
  ( +clone -resize 20%%  -format "  shrink: %%[fx:mean]\n" -write info: +delete ) ^
  ( +clone -resize 500%% -format " enlarge: %%[fx:mean]\n" -write info: +delete ) ^
  NULL:
original: 0.5
blur: 0.5
unsharp: 0.5
shrink: 0.5
enlarge: 0.5
set C0=-colorspace RGB
set C1=-colorspace sRGB

%IMG7%magick ^
  gg_cheq.png                      -format "original: %%[fx:mean]\n" -write info: ^
  ( +clone %C0% -blur 0x5     %C1% -format "    blur: %%[fx:mean]\n" -write info: +delete ) ^
  ( +clone %C0% -unsharp 0x5  %C1% -format " unsharp: %%[fx:mean]\n" -write info: +delete ) ^
  ( +clone %C0% -resize 20%%  %C1% -format "  shrink: %%[fx:mean]\n" -write info: +delete ) ^
  ( +clone %C0% -resize 500%% %C1% -format " enlarge: %%[fx:mean]\n" -write info: +delete ) ^
  NULL:
original: 0.5
blur: 0.735353
unsharp: -2.63289
shrink: 0.735357
enlarge: 0.725734
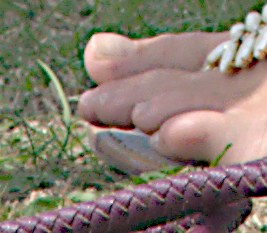
We can demonstrate the effect on a real photograph:
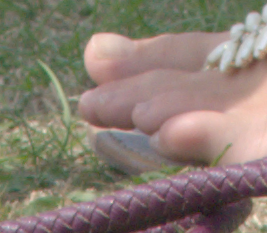
Do four operations in sRGB space:
%IMG7%magick ^
  toes.png               -format "original: %%[fx:mean]\n" -write info: ^
  ( +clone -blur 0x5     -format "    blur: %%[fx:mean]\n" -write info: -write gg_toes_blrS.png +delete ) ^
  ( +clone -unsharp 0x5  -format " unsharp: %%[fx:mean]\n" -write info: -write gg_toes_unsS.png +delete ) ^
  ( +clone -resize 20%%  -format "  shrink: %%[fx:mean]\n" -write info: -write gg_toes_shrS.png +delete ) ^
  ( +clone -resize 500%% -format " enlarge: %%[fx:mean]\n" -write info: -write gg_toes_enlS.png +delete ) ^
  NULL:
original: 0.488162
blur: 0.488213
unsharp: 0.488318
shrink: 0.488146
enlarge: 0.488162
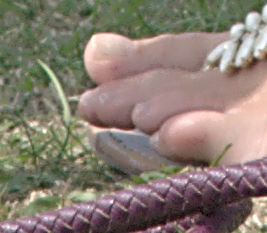
Repeat the same operations in RGB space:
set C0=-colorspace RGB
set C1=-colorspace sRGB

%IMG7%magick ^
  toes.png                         -format "original: %%[fx:mean]\n" -write info: ^
  ( +clone %C0% -blur 0x5     %C1% -format "    blur: %%[fx:mean]\n" -write info: -write gg_toes_blrL.png +delete ) ^
  ( +clone %C0% -unsharp 0x5  %C1% -format " unsharp: %%[fx:mean]\n" -write info: -write gg_toes_unsL.png +delete ) ^
  ( +clone %C0% -resize 20%%  %C1% -format "  shrink: %%[fx:mean]\n" -write info: -write gg_toes_shrL.png +delete ) ^
  ( +clone %C0% -resize 500%% %C1% -format " enlarge: %%[fx:mean]\n" -write info: -write gg_toes_enlL.png +delete ) ^
  NULL:
original: 0.488162
blur: 0.487348
unsharp: 0.489914
shrink: 0.488189
enlarge: 0.488172
Repeat the same operations in Lab space, blurring and unsharpening just the L channel:
set C0=-colorspace Lab
set C1=-colorspace sRGB
set CH0=-channel R
set CH1=+channel

%IMG7%magick ^
  toes.png                                     -format "original: %%[fx:mean]\n" -write info: ^
  ( +clone %C0% %CH0% -blur 0x5     %CH1% %C1% -format "    blur: %%[fx:mean]\n" -write info: -write gg_toes_blrLab.png +delete ) ^
  ( +clone %C0% %CH0% -unsharp 0x5  %CH1% %C1% -format " unsharp: %%[fx:mean]\n" -write info: -write gg_toes_unsLab.png +delete ) ^
  ( +clone %C0%       -resize 20%%        %C1% -format "  shrink: %%[fx:mean]\n" -write info: -write gg_toes_shrLab.png +delete ) ^
  ( +clone %C0%       -resize 500%%       %C1% -format " enlarge: %%[fx:mean]\n" -write info: -write gg_toes_enlLab.png +delete ) ^
  NULL:
original: 0.488162
blur: 0.487348
unsharp: 0.489914
shrink: 0.488189
enlarge: 0.488172
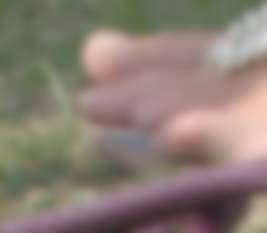
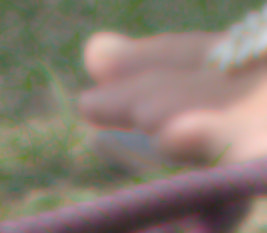
Blur, in sRGB and RGB and Lab spaces:

Unsharp, in sRGB and RGB and Lab spaces:

Resize 20%, in sRGB and RGB and Lab spaces:
Resize 500%, in sRGB and RGB and Lab spaces:


Comparing the sRGB and sRGB results, rather subjectively, I would say the only visible difference is in the unsharp pair. The operation has a stronger effect when performed in RGB space. But the difference is very slight and of no practical consequence.
I have done many other experiments comparing operations on ordinary photographs performed in sRGB or RGB space. My conclusion is that differences are only rarely noticable, and of no consequence.
Looking at the Lab results, especially the top line of the big toe:
All images on this page were created by the commands shown, using:
%IMG7%magick -version
Version: ImageMagick 7.1.0-42 Q16-HDRI x64 396d87c:20220709 https://imagemagick.org
Copyright: (C) 1999 ImageMagick Studio LLC
License: https://imagemagick.org/script/license.php
Features: Cipher DPC HDRI OpenCL
Delegates (built-in): bzlib cairo freetype gslib heic jng jp2 jpeg jxl lcms lqr lzma openexr pangocairo png ps raqm raw rsvg tiff webp xml zip zlib
Compiler: Visual Studio 2022 (193231332)
Source file for this web page is graygam.h1. To re-create this web page, execute "procH1 graygam".
This page, including the images, is my copyright. Anyone is permitted to use or adapt any of the code, scripts or images for any purpose, including commercial use.
Anyone is permitted to re-publish this page, but only for non-commercial use.
Anyone is permitted to link to this page, including for commercial use.
Page version v1.0 21-Feb-2014.
Page created 12-Aug-2022 03:08:54.
Copyright © 2022 Alan Gibson.