snibgo's ImageMagick pages
Fancy frames
Making rectangular (or circular) frames from small elements.
The script
patternFrame.bat builds a rectangular frame around an image, where the frame is built from repeated elements.
| Parameter |
Description |
| %1 |
Input image that will be framed.
Required. |
| %2 |
Element for left piece of frame.
Required. |
| %3 |
Element for top piece of frame.
Default: left element. |
| %4 |
Element for right piece of frame.
Default: left element. |
| %5 |
Element for bottom piece of frame.
Default: top element. |
| %6 |
Format for ouput filenames.
This must contain "XX", eg my_files_XX.png.
Default: pf_XX.png. |
| %7 |
Tiling method. One of: exact, floor, round, ceiling.
Default: floor. |
| %8 |
Resizing method. One of: none, image, aspect, frame.
Default: aspect. |
| %9 |
Shadow, eg 100x4+5+5.
Default: no shadow. |
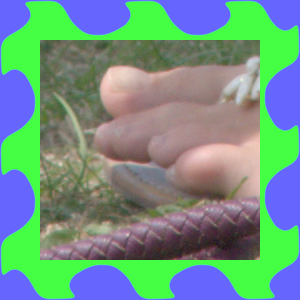
We make an opaque element that will be used for all four sides. We design the element so it is horizontally tilable. In addition, to ensure the mitred corners look good, the 45° sloping lines from the top corners are equal, and the blue/green boundary is perpendicular to these lines.
%IMG7%magick ^
  -size 1000x400 xc:White ^
  +antialias ^
  -fill None -stroke #66f ^
  -draw "bezier 0,350 100,350 250,250" ^
  -draw "bezier 250,250  450,50 0,10 499,10" ^
  -draw "bezier 499,10 650,10 650,150 750,250" ^
  -draw "bezier 750,250 850,350 900,350 999,350" ^
  -fill #66f -draw "color 0,0 floodfill" ^
  -fill #4f4 -opaque White ^
  -colorspace RGB ^
  -resize "100x40^!" ^
  -colorspace sRGB ^
  ffr_elem.png
|

|
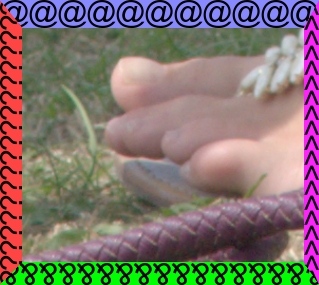
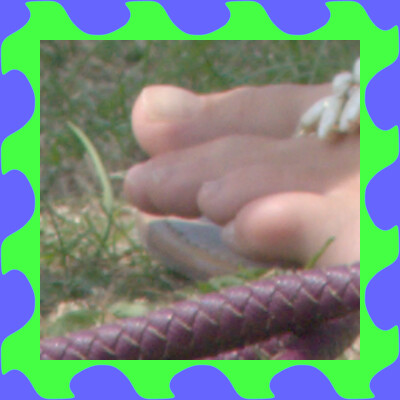
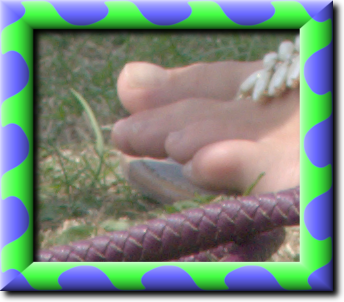
We use the script
patternFrame.bat to make a frame around toes.png.
call %PICTBAT%patternFrame ^
  toes.png ^
  ffr_elem.png . . . ^
  ffr_elem_XX.png

if ERRORLEVEL 1 goto error

set pf_
pf_FrmdH=300
pf_FrmdW=300
pf_ImgH=233
pf_ImgW=267
pf_WindH=220
pf_WindW=220
|
|
The script has repeated the element to make each of the four sides, joined these to make a frame with mitred corners, and composited that over toes.png. It has used the largest number of elements that it can without creating gaps between the image and the frame. This has made the frame's window smaller than the image, so the image has been cropped by the frame.
The script has created environment variables containing the dimensions of the input image, the overall framed image, and the window in the frame.
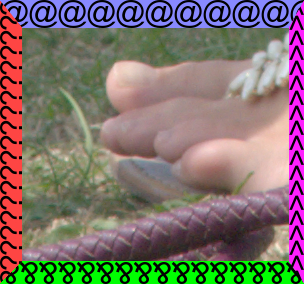
We make four elements, one for each side, so each side will be different.
%IMG7%magick ^
  -pointsize 30 ^
  -background #f44 label:"?" -trim +repage -write ffr_l.png +delete ^
  -background #88f label:"@" -trim +repage -write ffr_t.png +delete ^
  -background #f2f label:"<" -trim +repage -write ffr_r.png +delete ^
  -background #0f0 label:"&" -trim +repage -write ffr_b.png +delete ^
  NULL:
|


|
Make a frame.
call %PICTBAT%patternFrame ^
  toes.png ^
  ffr_l.png ffr_t.png ffr_r.png ffr_b.png ^
  ffr_edge_XX.png

set pf_
pf_FrmdH=270
pf_FrmdW=290
pf_ImgH=233
pf_ImgW=267
pf_WindH=219
pf_WindW=253
|

|
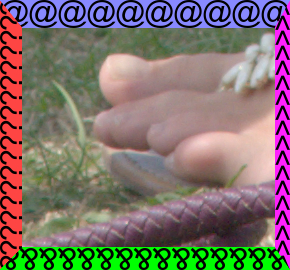
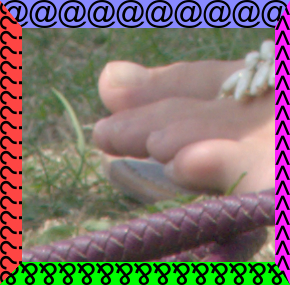
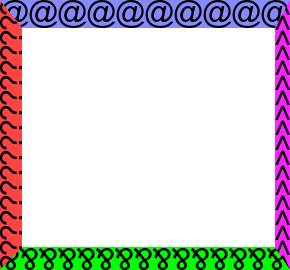
We can examine the four edge pieces, and the complete frame.
We demonstrate the four tiling methods.
call %PICTBAT%patternFrame ^
  toes.png ^
  ffr_l.png ffr_t.png ffr_r.png ffr_b.png ^
  ffr_edge_e_XX.png exact

if ERRORLEVEL 1 goto error

set pf_
pf_FrmdH=284
pf_FrmdW=304
pf_ImgH=233
pf_ImgW=267
pf_WindH=233
pf_WindW=267
|
|
call %PICTBAT%patternFrame ^
  toes.png ^
  ffr_l.png ffr_t.png ffr_r.png ffr_b.png ^
  ffr_edge_f_XX.png floor

if ERRORLEVEL 1 goto error

set pf_
pf_FrmdH=270
pf_FrmdW=290
pf_ImgH=233
pf_ImgW=267
pf_WindH=219
pf_WindW=253
|
|
call %PICTBAT%patternFrame ^
  toes.png ^
  ffr_l.png ffr_t.png ffr_r.png ffr_b.png ^
  ffr_edge_r_XX.png round

if ERRORLEVEL 1 goto error

set pf_
pf_FrmdH=285
pf_FrmdW=290
pf_ImgH=233
pf_ImgW=267
pf_WindH=234
pf_WindW=253
|
|
call %PICTBAT%patternFrame ^
  toes.png ^
  ffr_l.png ffr_t.png ffr_r.png ffr_b.png ^
  ffr_edge_c_XX.png ceiling

if ERRORLEVEL 1 goto error

set pf_
pf_FrmdH=285
pf_FrmdW=319
pf_ImgH=233
pf_ImgW=267
pf_WindH=234
pf_WindW=282
|
|
The script mitre4 takes four images for the edges, and joins them into a rectangle with mitred corners and a transparent window.
call %PICTBAT%mitre4 ^
  ffr_edge_l.png ffr_edge_t.png ffr_edge_r.png ffr_edge_b.png ^
  ffr_edge_4.png
|
|
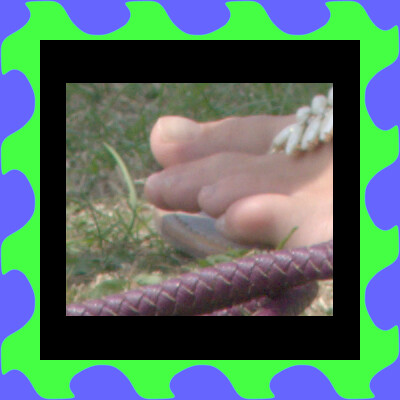
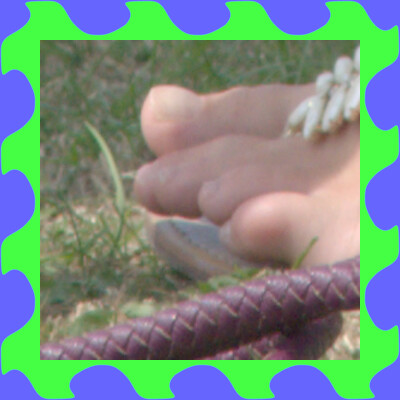
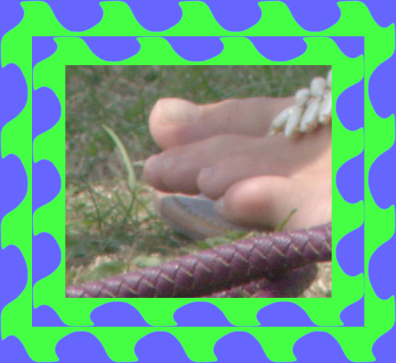
When the window width is greater than the image width. or the window height is greater than the image height, there would be a gap between the image and the frame. This can be fixed either by enlarging the image or by shrinking the frame.
We demonstrate the effect of different resizing methods. In the examples:
- none: there is a gap between the image and frame.
- image: the image is enlarged to exactly fit within the window. The image aspect ratio changes.
- aspect: the image is enlarged to enclose the window. The image aspect ratio doesn't change, but the image is cropped.
- frame: the frame shrinks to make the window size correct for the image. There is anti-aliased alpha between the image and the frame.
call %PICTBAT%patternFrame ^
  toes.png ^
  ffr_elem.png . . .  ^
  ffr_edge_cn_XX.png ceiling none

if ERRORLEVEL 1 goto error

set pf_
pf_FrmdH=400
pf_FrmdW=400
pf_ImgH=233
pf_ImgW=267
pf_WindH=320
pf_WindW=320
|
|
call %PICTBAT%patternFrame ^
  toes.png ^
  ffr_elem.png . . .  ^
  ffr_edge_ci_XX.png ceiling image

if ERRORLEVEL 1 goto error

set pf_
pf_FrmdH=400
pf_FrmdW=400
pf_ImgH=233
pf_ImgW=267
pf_WindH=320
pf_WindW=320
|
|
call %PICTBAT%patternFrame ^
  toes.png ^
  ffr_elem.png . . .  ^
  ffr_edge_ca_XX.png ceiling aspect

if ERRORLEVEL 1 goto error

set pf_
pf_FrmdH=400
pf_FrmdW=400
pf_ImgH=233
pf_ImgW=267
pf_WindH=320
pf_WindW=320
|
|
call %PICTBAT%patternFrame ^
  toes.png ^
  ffr_elem.png . . .  ^
  ffr_edge_cf_XX.png ceiling frame

if ERRORLEVEL 1 goto error

set pf_
pf_FrmdH=291
pf_FrmdW=333
pf_ImgH=233
pf_ImgW=267
pf_WindH=233
pf_WindW=267
|

|
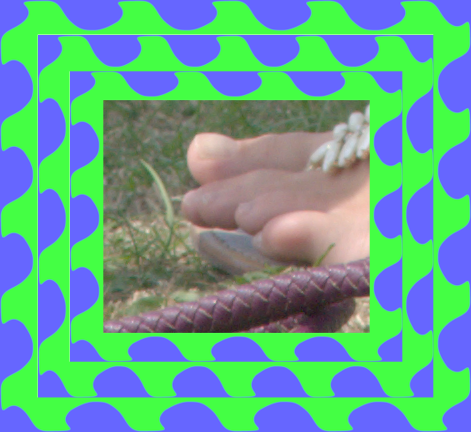
We can frame a framed image. We probably don't want the inner frame to be cropped by the outer frame, so that rules out using the default arguments.
call %PICTBAT%patternFrame ^
  ffr_edge_cf_frmd.png ^
  ffr_elem.png . . .  ^
  ffr_edge_cf2_XX.png ceiling frame
|
|
call %PICTBAT%patternFrame ^
  ffr_edge_cf2_frmd.png ^
  ffr_elem.png . . .  ^
  ffr_edge_cf3_XX.png ceiling frame
|
|
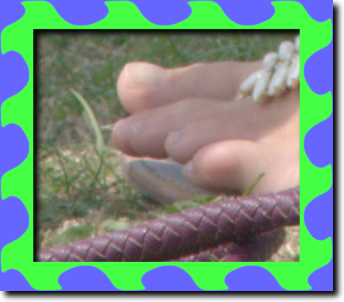
The script can add a shadow to the frame before compositing over the image. For convenience in calculating the offset for the composite, the script trims above and to the left of the frame, so it only works when the shadow is to the bottom and right.
call %PICTBAT%patternFrame ^
  toes.png ^
  ffr_elem.png . . .  ^
  ffr_shad_XX.png ceiling frame ^
  100x3+5+5
|
|
Independently of shadows, we can shade the frame. To simulate light from top-left, we can create an element for bottom and right, and another element for top and left.
%IMG7%magick ^
  ffr_elem.png ^
  ( +clone ^
    -sparse-color bilinear 0,0,black,0,%%[fx:h-1],white ^
    +sigmoidal-contrast 5,50%% +level 10,90%% ^
  ) ^
  ( -clone 1 ^
    -channel RGB -negate +channel ^
  ) ^
  ( -clone 0-1 ^
    -compose Hardlight -composite ^
    -write ffr_elem_br.png ^
    +delete ^
  ) ^
  -delete 1 ^
  -compose Hardlight -composite ^
  ffr_elem_tl.png
|


|
We then use these two elements to make a frame, which is also shadowed:
call %PICTBAT%patternFrame ^
  toes.png ^
  ffr_elem_tl.png ffr_elem_tl.png ^
  ffr_elem_br.png ffr_elem_br.png ^
  ffr_shad2_XX.png ceiling frame ^
  100x3+5+5
|
|
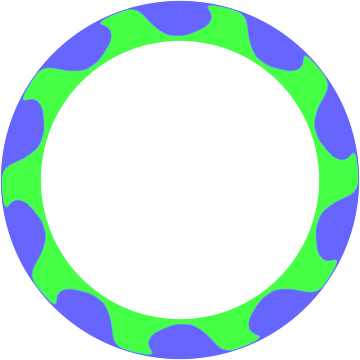
In this example, we decide the number of elements, and the dimensions follow from that. In practice, we might decide the required inner radius from the image to be framed.
set ELEMENT=ffr_elem.png

for /F "usebackq" %%L in (`%IMG7%magick ^
  %ELEMENT% ^
  -format "EleW=%%w\nEleH=%%h\n" ^
  info:`) do set %%L

set nEle=10

set /A PieceW=%nEle%*%EleW%

set OutRad=%%[fx:%PieceW%/2/Pi+%EleH%/2]
set InRad=%%[fx:%PieceW%/2/Pi-%EleH%/2]

%IMG7%magick ^
  %ELEMENT% -rotate 180 -write mpr:ELMT +delete ^
  -size %PieceW%x%EleH% xc: ^
  -tile mpr:ELMT -draw "color 0,0 reset" ^
  -virtual-pixel None ^
  +distort polar "%OutRad%,%InRad%" ^
  +repage ^
  ffr_circ_frm.png
|
|
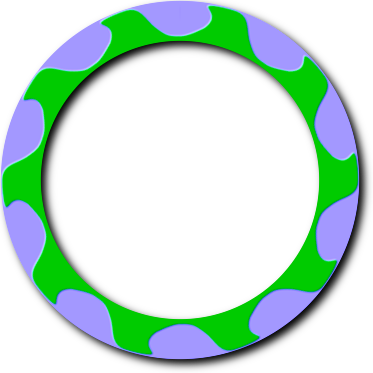
We can make a bevelled version by replacing the L channel of a Lab version with the result of a -shade. We do the -shade on an enlarged version for improved antialiasing. We also add a shadow.
%IMG7%magick ^
  ffr_circ_frm.png ^
  -write mpr:INP +delete ^
  ( mpr:INP ^
    -resize 200%% ^
    -shade 140x45 ^
    -resize 50%% ^
  ) ^
  ( mpr:INP -colorspace Lab -separate ) ^
  -delete 1 ^
  -combine ^
  -set colorspace Lab -colorspace sRGB ^
  ( +clone -background Black -shadow 100x4+5+5 ^) ^
  +swap ^
  -background None -layers Merge -layers Flatten ^
  ffr_bev_shad.png
|
|
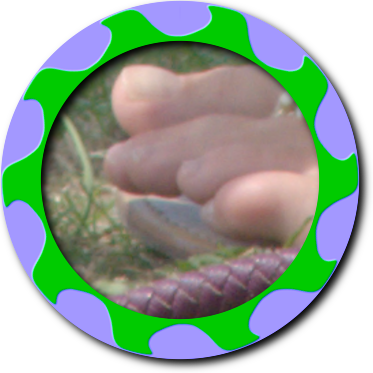
When an image is to be framed, a script would make image pixels outside the inner radius transparent. Circular frames have similar alternatives to rectangular frames: whether to ensure an integer number of elements, and whether to enlarge the image or shrink the frame to avoid a gap.
In this example, we will crop toes.png to a square, enlarge that to twice the average of the two radii, and make the pixels outside a circle transparent. Then we composite the frame over the toes.
The shadow has extended the image of the frame to the right and bottom. To ensure correct placement of the toes image and correct size of final image, we "-extent" it first to the outer diameter, then to the same size as the frame image.
%IMG7%magick ^
  toes.png ^
  -gravity Center ^
  -crop %%[fx:min(w,h)]x%%[fx:min(w,h)]+0+0 +repage ^
  -resize "%%[fx:%OutRad%+%InRad%]x%%[fx:%OutRad%+%InRad%]" ^
  ( +clone ^
    -fill Black -colorize 100 ^
    -fill White -draw ^
       "circle %%[fx:w/2],%%[fx:h/2],%%[fx:w/2],0" ^
  ) ^
  -alpha off ^
  -compose CopyOpacity -composite ^
  -compose Over -background None -gravity Center ^
  -extent %%[fx:%OutRad%*2]x%%[fx:%OutRad%*2] ^
  ffr_bev_shad.png ^
  -gravity NorthWest ^
  -extent %%[fx:v.w]x%%[fx:v.h] ^
  -composite ^
  ffr_bev_shad_toes.png
|
|
The idea could be extended to polygonal and elliptical frames.
Circular frames can easily be stretched to be elliptical, but then the frame thickness will vary. If we want a constant frame thickness, we could vary the height of the tiled image before the distortion.
Frames could be rectangular with rounded corners.
For convenience, .bat scripts are also available in a single zip file. See
Zipped BAT files.
rem %1 is an image for which a frame will be made,
rem %2 to %5 are input left, top, right and bottom elements for the frame.
rem %6 is format for outputs.
rem    Must contain XX, which will be replaced by l, t, r, b etc.
rem %7 is tiling method, one of:
rem    exact    fractional elements are used to exactly fit the image
rem    floor    may crop the image [default]
rem    round    may crop the image, and may create gaps
rem    ceiling  may create gaps
rem %8 is resizing method, one of:
rem    none     no resizing
rem    image    enlarges image exactly (ignoring aspect ratio)
rem    aspect   enlarges image, keeping aspect ratio
rem    frame    shrinks frame to fit image
rem %9 shadow OxS+X+Y eg 100x4+5+5 default no shadow
@rem
@rem The left, right and bottom pieces will be rotated.

@if "%2"=="" findstr /B "rem @rem" %~f0 & exit /B 1

@setlocal enabledelayedexpansion

rem @call echoOffSave

call %PICTBAT%setInOut %1 pf

set LFILE=%2
set TFILE=%3
set RFILE=%4
set BFILE=%5

if "%TFILE%"=="." set TFILE=
if "%RFILE%"=="." set RFILE=
if "%BFILE%"=="." set BFILE=

if "%TFILE%"=="" set TFILE=%LFILE%
if "%RFILE%"=="" set RFILE=%LFILE%
if "%BFILE%"=="" set BFILE=%TFILE%

set OUTFILE=%6
if "%OUTFILE%"=="." set OUTFILE=
if "%OUTFILE%"=="" set OUTFILE=pf_XX.png

set OUT_L=%OUTFILE:XX=l%
set OUT_T=%OUTFILE:XX=t%
set OUT_R=%OUTFILE:XX=r%
set OUT_B=%OUTFILE:XX=b%
set OUT_FRM=%OUTFILE:XX=frm%
set OUT_FRMD=%OUTFILE:XX=frmd%
set IMG_RES=%OUTFILE:XX=imgr%

if %OUT_L%==%OUT_T% (
  echo %0: Outfile must include XX.
  exit /B 1
)

set MTHD=%7
if "%MTHD%"=="." set MTHD=
if "%MTHD%"=="" set MTHD=floor

set RESMTHD=%8
if "%RESMTHD%"=="." set RESMTHD=
if "%RESMTHD%"=="" set RESMTHD=aspect

set SHAD=%9
if "%SHAD%"=="" set SHAD=

if "%SHAD%"=="" (
  set sSHAD=
) else (
  set sSHAD=^( +clone -background Black -shadow %SHAD% ^) +swap -background None -layers Merge -layers Flatten
)


set FUNC=floor
if /I %MTHD%==exact (
  set EXTRA=0
  set FUNC=
) else if /I %MTHD%==floor (
  set EXTRA=0
) else if /I %MTHD%==round (
  set EXTRA=0.5
) else if /I %MTHD%==ceiling (
  set EXTRA=0.99999
) else (
  echo %0: Bad MTHD [%MTHD%]
  exit /B 1
)

for /F "usebackq" %%L in (`%IMG7%magick ^
  %INFILE% ^
  -format "ImgW=%%w\nImgH=%%h\n" ^
  info:`) do set %%L

:: In following, assume left and right will be rotated.
::
call :getdims %LFILE% LH LW
if ERRORLEVEL 1 exit /B 1

call :getdims %TFILE% TW TH
if ERRORLEVEL 1 exit /B 1

call :getdims %RFILE% RH RW
if ERRORLEVEL 1 exit /B 1

call :getdims %BFILE% BW BH
if ERRORLEVEL 1 exit /B 1

set sFMT=^
nT=%%[fx:%FUNC%((%ImgW%+%LW%+%RW%)/%TW%+(%Extra%))]\n^
nB=%%[fx:%FUNC%((%ImgW%+%LW%+%RW%)/%BW%+(%Extra%))]\n^
nL=%%[fx:%FUNC%((%ImgH%+%TH%+%BH%)/%LH%+(%Extra%))]\n^
nR=%%[fx:%FUNC%((%ImgH%+%TH%+%BH%)/%RH%+(%Extra%))]\n

for /F "usebackq" %%L in (`%IMG7%magick identify ^
  -format "%sFMT%" ^
  xc:`) do set %%L

echo %0: n:%nL% %nT% %nR% %nB%

set sFMT=^
FrmdW=%%[fx:floor(%TW%*%nT%+0.5)]\n^
FrmdH=%%[fx:floor(%LH%*%nL%+0.5)]\n

for /F "usebackq" %%L in (`%IMG7%magick identify ^
  -format "%sFMT%" ^
  xc:`) do set %%L

set /A WindW=%FrmdW%-%LW%-%RW%
set /A WindH=%FrmdH%-%TH%-%BH%

echo %0: WindW=%WindW% WindH=%WindH%

set sRESIMG=
set sRESFRM=
set ImgRW=%ImgW%
set ImgRH=%ImgH%
set FrmdRW=%FrmdW%
set FrmdRH=%FrmdH%
if /I %RESMTHD%==none (
  rem No resizing.
  echo No res
) else if /I %RESMTHD%==image (
  set sRESIMG=-resize "%WindW%x%WindH%^^^!"
) else if /I %RESMTHD%==aspect (
  set sRESIMG=-resize "%WindW%x%WindH%^^"
) else if /I %RESMTHD%==frame (

  set sFMT=^
FrmdRW=%%[fx:floor^(%FrmdW%*%ImgW%/%WindW%^)]\n^
FrmdRH=%%[fx:floor^(%FrmdH%*%ImgH%/%WindH%^)]\n

  for /F "usebackq" %%L in (`%IMG7%magick identify ^
    -format "!sFMT!" ^
    xc:`) do set %%L

  echo %0: FrmdRW=!FrmdRW! FrmdRH=!FrmdRH!

  set sRESFRM=-resize "!FrmdRW!x!FrmdRH!^^^!"
) else (
  echo %0: Bad RESMTHD [%RESMTHD%]
  exit /B 1
)

echo %0: sRESIMG %sRESIMG%
echo %0: sRESFRM %sRESFRM%

%IMG7%magick ^
  -size %FrmdW%x%TH% xc:None ^
  -tile %TFILE% -draw "color 0,0 reset" ^
  -write %OUT_T% ^
  +delete ^
  %LFILE% -rotate -90 -write mpr:TILE +delete ^
  -size %LW%x%FrmdH% xc:None ^
  -tile mpr:TILE -draw "color 0,0 reset" ^
  -write %OUT_L% ^
  +delete ^
  %RFILE% -rotate 90 -write mpr:TILE +delete ^
  -size %RW%x%FrmdH% xc:None ^
  -tile mpr:TILE -draw "color 0,0 reset" ^
  -write %OUT_R% ^
  +delete ^
  %BFILE% -rotate 180 -write mpr:TILE +delete ^
  -size %FrmdW%x%BH% xc:None ^
  -tile mpr:TILE -draw "color 0,0 reset" ^
  %OUT_B%

call %PICTBAT%mitre4 ^
  %OUT_L% %OUT_T% %OUT_R% %OUT_B% ^
  %OUT_FRM%

set needResize=0

if %WindW% GTR %ImgW% set needResize=1
if %WindH% GTR %ImgH% set needResize=1

set INFILE2=%INFILE%
if %needResize%==1 (
  echo %0: need resize.

  if not "%sRESIMG%" EQU "" (
    for /F "usebackq" %%L in (`%IMG7%magick ^
      %INFILE% ^
      %sRESIMG% ^
      +write %IMG_RES% ^
      -format "ImgRW=%%w\nImgRH=%%h\n" ^
      info:`) do set %%L
   set INFILE2=%IMG_RES%
  )

  if not "%sRESFRM%" EQU "" (
    for /F "usebackq" %%L in (`%IMG7%magick ^
      %OUT_FRM% ^
      %sRESFRM% ^
      +write %OUT_FRM% ^
      -format "WindW=%ImgW%\nWindH=%ImgH%\nLW=%%[fx:%LW%*w/%FrmdW%]\nTH=%%[fx:%TH%*h/%FrmdH%]\nFrmdW=%%w\nFrmdH=%%h\n" ^
      info:`) do set %%L
  )
)

%IMG7%magick ^
  %OUT_FRM% ^
  %sSHAD% ^
  %INFILE2% ^
  -geometry +%%[fx:%LW%+(%WindW%-%ImgRW%)/2]+%%[fx:%TH%+(%WindH%-%ImgRH%)/2] ^
  -compose DstOver -composite ^
  %OUT_FRMD%


call echoRestore

@endlocal & set pf_ImgW=%ImgW%& set pf_ImgH=%ImgH%& set pf_FrmdW=%FrmdW%& set pf_FrmdH=%FrmdH%& set pf_WindW=%WindW%& set pf_WindH=%WindH%

@exit /B 0


::------------------------------------------
:: Subroutines

:getdims

set %2=
for /F "usebackq" %%L in (`%IMG7%magick identify ^
  -format "%2=%%w\n%3=%%H\n" ^
  %1`) do set %%L

if "!%2!"=="" exit /B 1

exit /B 0
rem Given %1 to %4 are left, top, right and bottom pieces for a frame,
rem creates output %5 with mitred corners.
rem The pieces will _not_ be rotated.

@if "%1"=="" findstr /B "rem @rem" %~f0 & exit /B 1

@setlocal enabledelayedexpansion

@call echoOffSave

set OUTFILE=%5
if "%OUTFILE%"=="" exit /B 1

for /F "usebackq" %%L in (`%IMG7%magick identify ^
  -format "LW=%%w\nLH=%%H\n" ^
  %1`) do set %%L

call :getdims %1 LW LH
if ERRORLEVEL 1 exit /B 1

call :getdims %2 TW TH
if ERRORLEVEL 1 exit /B 1

call :getdims %3 RW RH
if ERRORLEVEL 1 exit /B 1

call :getdims %4 BW BH
if ERRORLEVEL 1 exit /B 1

if %LH% NEQ %RH% (
  echo %0: left and right have different heights
)

if %TW% NEQ %BW% (
  echo %0: top and bottom have different widths
)


%IMG7%magick ^
  -size %TW%x%LH% xc:None ^
  %1 -gravity West -compose Over -composite ^
  %3 -gravity East -compose Over -composite ^
  ( %2 ^
    ( +clone ^
      -fill Black -colorize 100 ^
      -fill White -draw "polygon 0,0 %%[fx:%TW%-1],0 %%[fx:%TW%-1-%RW%],%%[fx:%TH%-1] %%[fx:%LW%],%%[fx:%TH%-1]" ^
    ) ^
    -alpha off -compose CopyOpacity -composite ^
  ) -gravity North -compose Over -composite ^
  ( %4 ^
    ( +clone ^
      -fill Black -colorize 100 ^
      -fill White -draw "polygon 0,%%[fx:%BH%-1] %%[fx:%LW%],0 %%[fx:%BW%-1-%RW%],0 %%[fx:%BW%-1],%%[fx:%BH%-1]" ^
    ) ^
    -alpha off -compose CopyOpacity -composite ^
  ) -gravity South -compose Over -composite ^
  %OUTFILE%

call echoRestore

@endlocal

@exit /B 0

::------------------------------------------
:: Subroutines

:getdims

set %2=
for /F "usebackq" %%L in (`%IMG7%magick identify ^
  -format "%2=%%w\n%3=%%H\n" ^
  %1`) do set %%L

if "!%2!"=="" exit /B 1

exit /B 0
All images on this page were created by the commands shown, using:
%IMG7%magick -version
Version: ImageMagick 7.1.0-49 Q16-HDRI x64 7a3f3f1:20220924 https://imagemagick.org
Copyright: (C) 1999 ImageMagick Studio LLC
License: https://imagemagick.org/script/license.php
Features: Cipher DPC HDRI OpenCL
Delegates (built-in): bzlib cairo freetype gslib heic jng jp2 jpeg jxl lcms lqr lzma openexr pangocairo png ps raqm raw rsvg tiff webp xml zip zlib
Compiler: Visual Studio 2022 (193331630)
To improve internet download speeds, some images may have been automatically converted (by ImageMagick, of course) from PNG or TIFF or MIFF to JPG.
Source file for this web page is fancyfr.h1. To re-create this web page, execute "procH1 fancyfr".
This page, including the images, is my copyright. Anyone is permitted to use or adapt any of the code, scripts or images for any purpose, including commercial use.
Anyone is permitted to re-publish this page, but only for non-commercial use.
Anyone is permitted to link to this page, including for commercial use.
Page version v1.0 7-February-2019.
Page created 16-Mar-2023 11:44:29.
Copyright © 2023 Alan Gibson.
