snibgo's ImageMagick pages
Subimage rectangles
An image that has been built from smaller rectangular images can be segmented back into those images.
A page of a newpaper is often composed from a number of rectangles: columns of text, photographs that span columns, and so on. Magazines and books are often similar. The boundary between rectangles is often defined by uninked paper, a background white. We can find these boundaries and cutout the rectangles.
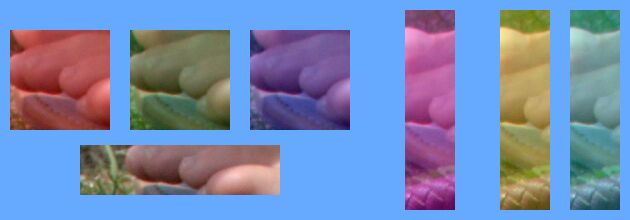
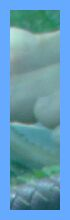
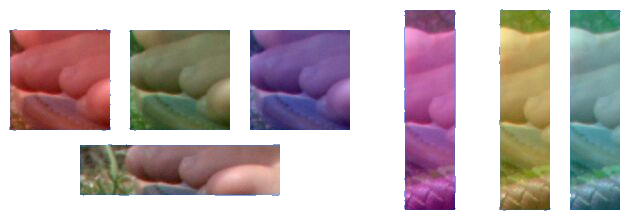
We create a source image to demonstrate techniques. Because white is a confusing colour to show on computers, we use a shade of blue to represent uninked paper.
set SRC=sir_src.jpg
set BACK_COL=#6af
%IMG7%magick ^
toes.png ^
-gravity Center ^
-background %BACK_COL% ^
+write mpr:TOES ^
+delete ^
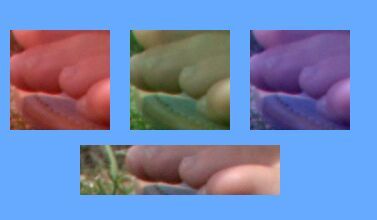
( mpr:TOES -crop 100x100+0+0 +repage ^
-auto-level ^
( -clone 0 -fill Red -colorize 25 ) ^
( -clone 0 -fill Green -colorize 25 ) ^
( -clone 0 -fill Blue -colorize 25 ) ^
-delete 0 ^
-extent 120x120 ^
+append +repage ^
) ^
( mpr:TOES -crop 200x50+0+0 +repage ^
-auto-level ^
-extent 220x60 ^
) ^
-append +repage ^
-size 20x220 xc:%BACK_COL% ^
( mpr:TOES -crop 50x200+0+0 +repage ^
-auto-level ^
( -clone 0 -fill Magenta -colorize 25 ^
-extent 100x220 ) ^
-size 10x220 xc:%BACK_COL% ^
( -clone 0 -fill Yellow -colorize 25 ^
-extent 70x220 ) ^
( -clone 0 -fill Cyan -colorize 25 ^
-extent 70x220 ) ^
-delete 0 ^
) ^
+append +repage ^
-quality 80 ^
%SRC%
|
|
The widest gap is 56 pixels, but this is reduced by the noisy JPEG compression.
%IMG7%magick ^
  %SRC% ^
  -crop 10x10+0+0 +repage ^
  -scale "1x1^!" ^
  txt:
# ImageMagick pixel enumeration: 1,1,0,255,srgb
0,0: (102,170,255)  #66AAFF  srgb(102,170,255)
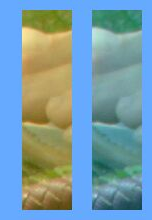
As we know the background colour, we can simplify the image to white subimages on a black background:
%IMG7%magick ^
  %SRC% ^
  -fuzz 5%% ^
  -transparent %BACK_COL% ^
  -channel RGB -evaluate set 100%% +channel ^
  -background Black -layers Flatten ^
  -alpha off ^
  sir_simp.png
|

|
Even with a 5% fuzz, some background pixels are white.
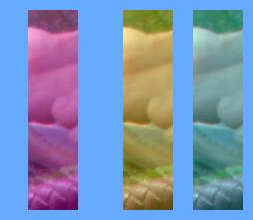
A guillotine will cut a piece of paper into two, by cutting in a straight line parallel to two of the edges. The cut is made across the entire image, between the other two edges.
We can see that this image can only be guillotined vertically at three locations, which will remove the right-hand segments. After removing those segments, we can guillotine horizontally to remove the bottom segment. The remainder can then be guillotined vertically twice to split the three square images.
If we want, we can append the guillotined pieces together to re-form the original image.
From the simplified image, we can see where to guillotine. If we scale down to a single row, the result is black where a guillotine can be made that won't also chop a subimage. For the sample input, the extreme left and right margins are also black. We stretch the output vertically to 20 rows so we can see what happens.
The threshold of 10% means that columns with less than 10% pixels white will be cut. Columns with more than 10% of pixels white will be considered as containing subimages, so won't be cut.
%IMG7%magick ^
  sir_simp.png ^
  -scale "x1^!" ^
  -threshold 10%% ^
  +write sir_simp_1.png ^
  -scale "x20^!" ^
  sir_simp_1_big.png
|

|
Instead of scaling to a single row, which finds the average value of each column, we could find the maximum value of each column. Then any white pixels in a column will prevent a cut being made there.
%IMG7%magick ^
  sir_simp.png ^
  -crop "x1^!" +repage ^
  -evaluate-sequence Max ^
  +write sir_simp_2.png ^
  -scale "x20^!" ^
  sir_simp_2_big.png
|

|
If the input is 7000 pixels high, the processing will create a list of 7000 images. This doesn't cause problems. A process module could be written that would be faster.
We could convert the image sir_simp_1.png to TXT: format, and read this in a script to find black pixels that occur between lighter pixels. Instead, we will use image-processing techniques.
[[ We find the width of any black margin on the left.
%IMG7%magick ^
  sir_simp_1.png ^
  -bordercolor Black -border 1 ^
  -format "%%@" ^
  info:
612x1+10+1
|
The left margin has width = 10-1 = 9 pixels. ]]
We [[ crop off the left margin, and ]] skeletonize:
|
The image shows what happens, but we don't need it.
[But BUG in v7 skeletonize see https://github.com/ImageMagick/ImageMagick/issues/5433]
%IMG7%magick ^
  sir_simp_1.png ^
  -alpha off -negate ^
  -morphology thinning:-1 "3x1>:1,-,0" ^
  -negate ^
  -clamp ^
  -transparent White ^
  +write sparse-color:sir_skelsp.lis ^
  +write sir_simp_skel.png ^
  -scale "x20^!" ^
  sir_simp_skel_big.png

sed -e 's/ /\n/g' sir_skelsp.lis
376,0,graya(0,1)
477,0,graya(0,1)
559,0,graya(0,1)
|

|
If the result is entirely black, a cut cannot be made anywhere. We guillotine only to separate segments, not to trim. If we have fewer than two segments, we don't make any cuts.
The coordinates [[ , 367 and 468 and 550, plus the left margin width (9) to give ]] 376 and 477 and 559, are the locations for guillotine cuts in the source image. Rather neatly, these are the centres of the boundaries between subimages. For symmetry, we want the ordinate found by skeleton to fall in the segment to the right of the ordinate, not to the left.
Hence, the first crop will be from 0 to 376, so width=377. The second crop will start at 377, width=477-376=101. The third crop will start at 478, width=559-477=82. The final crop will start at 560.
%IMG7%magick ^
  %SRC% ^
  ( +clone -crop 377x0+0+0  +repage ^
    +write sir_crp0.png +delete ) ^
  ( +clone -crop 101x0+377+0 +repage ^
    +write sir_crp1.png +delete ) ^
  ( +clone -crop 82x0+478+0  +repage ^
    +write sir_crp2.png +delete ) ^
  ( +clone -crop 0x0+560+0  +repage ^
    +write sir_crp3.png +delete ) ^
  NULL:
|

|
We implement this as the script
guillotine.bat. This is a simple script that calls two separate scripts:
guilFind.bat and
guilChop.bat. By separating these operations, we can use one image to find locations for the cuts. We can then cut at those locations in a different image by calling the script with an argument to %7. This is useful when a heavily processed image is needed to find the locations, but we want to cut the unprocessed image.
If the input image is a solid colour, there will be no cuts, so only one output image (a copy of the input image).
call %PICTBAT%guillotine ^
  %SRC% sir_guil_XX.png %BACK_COL% 5 10

if ERRORLEVEL 1 goto error

echo guilNUM_CUTS=%guilNUM_CUTS%
guilNUM_CUTS=3
|


|
A script could use this method to make vertical cuts, then horizontal cuts through each of those results, then vertical again through each of those results, and keep going until no more are possible.
This method is convenient when we know the subimages are arranged in either columns or rows. It is less convenient when subimages are scattered in a less ordered fashion.
We might want to ignore all gaps smaller than a certain width, or ignore all gaps smaller than the maximum gap. For that, we process the sir_simp_1.png image, which is Nx1 pixels, black where there is a gap and white otherwise.
|
Remove gaps smaller than 2*10=20 wide.
%IMG7%magick ^
  sir_simp_1.png ^
  -negate ^
  -morphology Distance:-1 Chebyshev:1,1 ^
  -black-threshold 10 ^
  -fill White +opaque Black ^
  -scale "x20^!" ^
  -negate ^
  sir_thr1.png
|

|
|
Remove gaps smaller than 2*25=50 wide.
%IMG7%magick ^
  sir_simp_1.png ^
  -negate ^
  -morphology Distance:-1 Chebyshev:1,1 ^
  -black-threshold 25 ^
  -fill White +opaque Black ^
  -scale "x20^!" ^
  -negate ^
  sir_thr2.png
|

|
|
Use only the widest gaps.
%IMG7%magick ^
  sir_simp_1.png ^
  -negate ^
  -morphology Distance:-1 Chebyshev:1,1 ^
  -auto-level ^
  -fill Black +opaque White ^
  -scale "x20^!" ^
  -negate ^
  sir_widest.png
|

|
We incorporate these refinements into guilFind.bat.
set guilMIN_GAP=20

call %PICTBAT%guillotine ^
  %SRC% sir_guil_m1_XX.png %BACK_COL% 5 10

if ERRORLEVEL 1 goto error

echo guilNUM_CUTS=%guilNUM_CUTS%
guilNUM_CUTS=2
|


|
set guilMIN_GAP=50

call %PICTBAT%guillotine ^
  %SRC% sir_guil_m2_XX.png %BACK_COL% 5 10

if ERRORLEVEL 1 goto error

echo guilNUM_CUTS=%guilNUM_CUTS%
guilNUM_CUTS=1
|

|
set guilMIN_GAP=

set guilWIDEST_GAP=1

call %PICTBAT%guillotine ^
  %SRC% sir_guil_w_XX.png %BACK_COL% 5 10

if ERRORLEVEL 1 goto error

echo guilNUM_CUTS=%guilNUM_CUTS%

set guilWIDEST_GAP=
guilNUM_CUTS=1
|


|
The script
rectSubimages.bat simplifies the image as above, then finds "-connected-components", directly giving the parameters for the crop of each component.
JPEG compression generally changes solid colours, but mostly within 5% of the input.
call %PICTBAT%rectSubimages ^
  %SRC% sir_cc.png %BACK_COL% 5 100

echo rsiNUM=%rsiNUM%
rsiNUM=7
|


|
When we don't know the background colour, we can guess, using various techniques.
Just one corner.
Here, we use the top-left corner.
%IMG7%magick ^
  %SRC% ^
  -crop 1x1+0+0 ^
  +repage ^
  txt:
# ImageMagick pixel enumeration: 1,1,0,255,srgb
0,0: (102,170,255)  #66AAFF  srgb(102,170,255)
Average the four corners.
%IMG7%magick ^
  %SRC% ^
  ( -clone 0 -gravity NorthWest -crop 1x1+0+0 ) ^
  ( -clone 0 -gravity NorthEast -crop 1x1+0+0 ) ^
  ( -clone 0 -gravity SouthWest -crop 1x1+0+0 ) ^
  ( -clone 0 -gravity SouthEast -crop 1x1+0+0 ) ^
  -delete 0 ^
  +append +repage ^
  +repage ^
  -scale "1x1^!" ^
  txt:
# ImageMagick pixel enumeration: 1,1,0,255,srgb
0,0: (102,170,255)  #66AAFF  srgb(102,170,255)
Average the four edges.
Here, we rather crudely count each corner twice.
%IMG7%magick ^
  %SRC% ^
  ( -clone 0 -gravity West -crop 1x0+0+0 -rotate 90 ) ^
  ( -clone 0 -gravity East -crop 1x0+0+0 -rotate 90 ) ^
  ( -clone 0 -gravity North -crop 0x1+0+0 ) ^
  ( -clone 0 -gravity South -crop 0x1+0+0 ) ^
  -delete 0 ^
  +append +repage ^
  +repage ^
  -scale "1x1^!" ^
  txt:
# ImageMagick pixel enumeration: 1,1,0,255,srgb
0,0: (102,170,254)  #66AAFE  srgb(39.9527%,66.6171%,99.711%)
Most common colour.
The script
colProp.bat can give us the N most common colours across the entire image. Here, just for fun, we find the top three.
call %PICTBAT%colProp %SRC% sir_comcol.csv . . 3

call csv2tab sir_comcol
| num |
PC |
CUM_PC |
COLOUR |
| 0 |
28.455266955267 |
28.455266955267 |
#66AAFF srgb(102 |
170 |
255 |
| 1 |
1.32106782106782 |
29.7763347763348 |
#64AAFF srgb(100 |
170 |
255 |
| 2 |
0.980519480519481 |
30.7568542568543 |
#66A9FF srgb(102 |
169 |
255 |
The most common colour, by far, is #66AAFF.
Middle and fuzz of edge pixels.
The script
edgeCols.bat finds the unique colours around the edge of the image. On the result, we use script
middleFuzz.bat which finds the middle colour and the smallest fuzz percentage that encompasses the range of colours.
call %PICTBAT%edgeCols %SRC% sir_edge.png
if ERRORLEVEL 1 goto error

call %PICTBAT%middleFuzz sir_edge.png sir_
if ERRORLEVEL 1 goto error

set sir_
sir_FUZZ=9.78821%
sir_MID=sRGB(41.1765%,66.0784%,95.6863%)
Caution: this is the middle value of the extremes, which may not be close to the mean value, although it is for this image because the JPEG distortions of a flat colour are small and fairly symmetrical.
The fuzz value is the radius of a sphere. The script calculates the radius required to cover the three orthogonal rectangles defined by the ranges of the channels.
We use those middle and fuzz values in
edgeColsTrans2.bat, to floodfill from (0,0).
call %PICTBAT%edgeColsTrans2 ^
  %SRC% sir_ect2.png
|
|
Some image processing needs a binary mask of foreground/background, where each pixel is either black or white. When that mask is used for distortions, it may be beneficial to supersample the image, create the binary mask from that, do the processing, and subsample the result. This will reduce obvious staircasing in the result.
For convenience, .bat scripts are also available in a single zip file. See
Zipped BAT files.
rem From image %1, guillotines into pieces.
@rem
@rem %2 is pattern name for output image files (must contain XX).
@rem %3 is input background colour [default White] between pieces.
@rem %4 is fuzz percentage from declared background colour (default 0).
@rem %5 is permitted percentage of non-background pixels at cut (default 0).
@rem %6 is 0 (guillotine vertically) or 1 (guillotine horizontally).
@rem %7 is optional name of file that is to be guillotined.
@rem    %1 is used to find where the cuts should be.
@rem    The cuts are applied to %7.
@rem    %7 defaults to %1.
@rem
@rem Creates guilNUM_CUTS + 1 images, named after %2, substituting XX by a number from 0.
@rem
@rem Also sets:
@rem   guilNUM_CUTS the number possible cuts. Possibly zero.
@rem
@rem Updated:
@rem   14-April-2017  Added %7.


@if "%1"=="" findstr /B "rem @rem" %~f0 & exit /B 1

@setlocal enabledelayedexpansion

@call echoOffSave

call %PICTBAT%setInOut %1 guil

if not "%2"=="" if not "%2"=="." set OUTFILE=%2

set TO_CUT=%7
if "%TO_CUT%"=="." set TO_CUT=
if "%TO_CUT%"=="" set TO_CUT=%INFILE%

call %PICTBAT%guilFind %INFILE% . %3 %4 %5 %6
if ERRORLEVEL 1 exit /B 1

call %PICTBAT%guilChop %TO_CUT% %guilOUTFILE% %OUTFILE% %6
if ERRORLEVEL 1 exit /B 1


call echoRestore

endlocal & set guilOUTFILE=%OUTFILE%& set guilNUM_CUTS=%guilNUM_CUTS%
rem From image %1, returns list of ordinates to guillotine into pieces.
@rem
@rem %2 is output text file, one line per cut.
@rem %3 is input background colour [default White] between pieces.
@rem %4 is fuzz percentage from declared background colour (default 0).
@rem %5 is permitted percentage of non-background pixels at cut (default 0).
@rem %6 is 0 (guillotine vertically) or 1 (guillotine horizontally).
@rem
@rem Also uses:
@rem   guilMIN_GAP if set, ignores gaps smaller than this.
@rem   guilWIDEST_GAP if 1, ignores gaps smaller than the widest gap.
@rem
@rem
@rem Also sets:
@rem   guilNUM_CUTS the number of possible cuts, hence lines in %2. Possibly zero.
@rem
@rem Future: This could have feature to ignore narrow strips of background,
@rem   and narrow strips of non-background.
@rem
@rem
@rem Updated:
@rem   6-August-2022 for IM v7
@rem


@if "%1"=="" findstr /B "rem @rem" %~f0 & exit /B 1

@setlocal enabledelayedexpansion

@call echoOffSave

call %PICTBAT%setInOut %1 guil

for /F %%F in ("%OUTFILE%") do set OUTFILE=%%~dpnF.lis

if not "%2"=="" if not "%2"=="." set OUTFILE=%2

set TMPTXT1=%BASENAME%_guil1.lis
set TMPTXT2=%BASENAME%_guil2.lis
set TEMP_IMG=%BASENAME%_guil.png

set BACK_COL=%3
if "%BACK_COL%"=="." set BACK_COL=
if "%BACK_COL%"=="" set BACK_COL=White

set FUZZ=%4
if "%FUZZ%"=="." set FUZZ=
if "%FUZZ%"=="" set FUZZ=0

set NON_BACK=%5
if "%NON_BACK%"=="." set NON_BACK=
if "%NON_BACK%"=="" set NON_BACK=0

set DIRN=%6
if "%DIRN%"=="." set DIRN=
if "%DIRN%"=="" set DIRN=0

if %DIRN%==0 (
  set ROT_IN=
  set ROT_OUT=
) else (
  set ROT_IN=-rotate -90
  set ROT_OUT=-rotate 90
)

if %FUZZ%==0 (
  set sFUZZ=
) else (
  set sFUZZ=-fuzz %FUZZ%%%
)

:: Make pixels with FUZZ of background colour black; all others white.
:: Then make single row, with black where less than NON_BACK non-background colours black.

%IMG7%magick ^
  %INFILE% ^
  -strip ^
  %ROT_IN% ^
  %sFUZZ% ^
  -alpha set ^
  -transparent %BACK_COL% ^
  -channel RGB -evaluate set 100%% +channel ^
  -background Black -layers Flatten ^
  -scale "x1^!" ^
  -fuzz %NON_BACK%%% ^
  -fill Black -opaque Black ^
  -fill White +opaque Black ^
  -alpha off ^
  %TEMP_IMG%

:: Possibly refine this.

if not "%guilMIN_GAP%"=="" (
  set /A MG=%guilMIN_GAP%/2

  %IMG7%magick ^
    %TEMP_IMG% ^
    -negate ^
    -morphology Distance:-1 Chebyshev:1,1 ^
    -black-threshold !MG! ^
    -fill White +opaque Black ^
    -alpha off ^
    -negate ^
    %TEMP_IMG%
)

if "%guilWIDEST_GAP%"=="1" %IMG7%magick ^
  %TEMP_IMG% ^
  -negate ^
  -morphology Distance:-1 Chebyshev:1,1 ^
  -auto-level ^
  -fill Black +opaque White ^
  -alpha off ^
  -negate ^
  %TEMP_IMG%

:: trim black

for /F "usebackq tokens=3 delims=x+" %%C in (`%IMG7%magick ^
  %TEMP_IMG% ^
  -quiet ^
  -bordercolor Black -border 1 ^
  -format "%%@" ^
  info:`) do (
  set /A OFFSET=%%C-1
)

echo %~n0: OFFSET=%OFFSET%

:: "-clamp" is for possible bug https://github.com/ImageMagick/ImageMagick/issues/5433
:: Clamping doesn't solve the problem.
:: Was: -morphology Thicken:-1 Skeleton
:: Now: -alpha off -negate -morphology thinning:-1 "3x1>:1,-,0" -negate
::
%IMG7%magick ^
  %TEMP_IMG% ^
  -quiet ^
  -crop 0x1+%OFFSET%+0 +repage ^
  -alpha off -negate ^
  -morphology thinning:-1 "3x1>:1,-,0" -clamp ^
  -negate ^
  -transparent White ^
  sparse-color:%TMPTXT1%

sed -e 's/ /\n/g' %TMPTXT1% >%TMPTXT2%

type %TMPTXT2%

set nCUTS=0
(
  for /F "tokens=1 delims=, " %%X in (%TMPTXT2%) do (
    set /A V=%%X+%OFFSET%
    echo !V!
    set /A nCUTS+=1
  )
) >%OUTFILE%

echo %~n0: nCUTS=%nCUTS%

type %OUTFILE%

call echoRestore

endlocal & set guilOUTFILE=%OUTFILE%& set guilNUM_CUTS=%nCUTS%
rem From image %1 and text file %2,
rem makes %guilNUM_CUTS% + 1 images,
rem named after pattern in %3, substituting XX by a sequential number from zero.
rem %4 is 0 (guillotine vertically) or 1 (guillotine horizontally).
rem %5 is 0 (discard canvas metadata) or 1 (re-calculate canvas metadata).
@rem
@rem Updated:
@rem   11-August-2022 for IM v7
@rem

@if "%2"=="" findstr /B "rem @rem" %~f0 & exit /B 1

@setlocal enabledelayedexpansion

call %PICTBAT%setInOut %1 guil

rem @call echoOffSave

set ORD_LIST=%2

set FILE_PTN=%3
if "%FILE_PTN%"=="" set FILE_PTN=
if "%FILE_PTN%"=="" set FILE_PTN=%BASENAME%_guilc_XX.png

set DIRN=%4
if "%DIRN%"=="." set DIRN=
if "%DIRN%"=="" set DIRN=0

set CALC_CANV=%4
if "%CALC_CANV%"=="." set CALC_CANV=
if "%CALC_CANV%"=="" set CALC_CANV=0

set SCR_FILE=guilc_tmp.bat

if %DIRN%==0 (
  set ROT_IN=
  set ROT_OUT=
) else (
  set ROT_IN=-rotate -90
  set ROT_OUT=-rotate 90
)

if "%guilNUM_CUTS%"=="0" (
  rem Make one image
  set OUTNAME=!FILE_PTN:XX=0!

  %IMG7%magick %1 !OUTNAME!
  if ERRORLEVEL 1 exit /B 1

  goto end
)

if not exist %INFILE% exit /B 1

if "%CALC_CANV%"==0 (
  set sCANV=+repage
) else (

  for /F "usebackq" %%L in (`%IMG7%magick identify ^
    -format "sCANV=-repage %%P%%O^^!" ^
    %INFILE%`) do set %%L

  set sCANV=+repage
)

echo %0: sCANV=%sCANV%

echo %IMG7%magick %INFILE% %ROT_IN% >%SCR_FILE%

:: For symmetry each crop is up to and _including_ the ordinate.

set START_NEXT=0
set nCUTS=0
for /F "tokens=1 delims=, " %%X in (%ORD_LIST%) do (
  for %%A in (!nCUTS!) do set OUTNAME=!FILE_PTN:XX=%%A!
  set /A WW=%%X-!START_NEXT!+1
  echo ^( +clone -crop !WW!x+!START_NEXT!+0 +repage %ROT_OUT% %sCANV% -write !OUTNAME! +delete ^) >>%SCR_FILE%
  set /A START_NEXT=%%X+1
  set /A nCUTS+=1
)
:: And the final one.
set OUTNAME=!FILE_PTN:XX=%nCUTS%!
echo ^( +clone -crop +!START_NEXT!+0 +repage %ROT_OUT% %sCANV% -write !OUTNAME! ^) >>%SCR_FILE%

rem cPrefix /p0 /i%SCR_FILE% /r"^"

set SCR_FILE2=guilc_tmp2.bat
copy %SCR_FILE% %SCR_FILE2%
@( @for /F "tokens=*" %%L in (%SCR_FILE2%) do @echo %%L ^^) >%SCR_FILE%


echo NULL: >>%SCR_FILE%

type %SCR_FILE%
call %SCR_FILE%

if ERRORLEVEL 1 exit /B 1

:end

call echoRestore

endlocal
rem Given image %1 is a number of rectangular subimages on solid-colour background,
rem crops to each one.
@rem %2 is output files
@rem %3 is background colour [default White].
@rem %4 is fuzz factor.
@rem %5 is threshold for minumum size of subimages (area, in pixels).
@rem   %5 may have suffix 'c' or '%' for percentage or 'p' for proportion of image w*h.
@rem   Default 0.
@rem %6 Image to be cropped. Default: %1.
@rem
@rem Any pair of subimages may overlap in x or y directions.
@rem
@rem First written: 11-June-2016
@rem Updated:
@rem   29-October-2016 added optional suffix for %5.
@rem   6-September-2019 added optional %6
@rem   6-August-2022 for IM v7
@rem

@if "%1"=="" findstr /B "rem @rem" %~f0 & exit /B 1

@setlocal enabledelayedexpansion

@call echoOffSave

call %PICTBAT%setInOut %1 rsi

if not "%2"=="" if not "%2"=="." set OUTFILE=%2

set BACK_COL=%3
if "%BACK_COL%"=="." set BACK_COL=
if "%BACK_COL%"=="" set BACK_COL=White

set FUZZ=%4
if "%FUZZ%"=="." set FUZZ=
if "%FUZZ%"=="" set FUZZ=0

set THRESH=%5
if "%THRESH%"=="." set THRESH=
if "%THRESH%"=="" set THRESH=0

set TOCROP=%6
if "%TOCROP%"=="." set TOCROP=
if "%TOCROP%"=="" set TOCROP=%INFILE%

if %FUZZ%==0 (
  set sFUZZ=
) else (
  set sFUZZ=-fuzz %FUZZ%%%
)


set TH_LAST=%THRESH:~-1%

if "%TH_LAST%"=="^%" set TH_LAST=c

if /I "%TH_LAST%"=="c" (

  for /F "usebackq" %%L in (`%IMG7%magick identify ^
    -precision 16 ^
    -format "nTHRESH=%%[fx:int(w*h*%THRESH:~0,-1%/100)]" ^
    %INFILE%`) do set %%L

) else if /I "%TH_LAST%"=="p" (

  for /F "usebackq" %%L in (`%IMG7%magick identify ^
    -format "nTHRESH=%%[fx:int(w*h*%THRESH:~0,-1%)]" ^
    %INFILE%`) do set %%L

) else (
  set nTHRESH=%THRESH%
)

echo %0: nTHRESH=%nTHRESH%

if %nTHRESH%==0 (
  set sTHRESH=
) else (
  set "sTHRESH=-define connected-components:area-threshold^=%nTHRESH%"
)

echo %0: sTHRESH=%sTHRESH%


set IMG_NUM=0
for /F "usebackq skip=1 tokens=2,5" %%A in (`%IMG7%magick ^
  %INFILE% ^
  -strip ^
  %sFUZZ% ^
  -transparent %BACK_COL% ^
  -channel RGB -evaluate set 100%% +channel ^
  -background Black -layers Flatten ^
  +depth ^
  -fuzz 0 ^
  -define connected-components:verbose^=true ^
  %sTHRESH% ^
  -connected-components 4 ^
  NULL:`) do (

  for /F "usebackq" %%L in (`%IMG7%magick ^
    xc:%%B -format "IS_BLACK=%%[fx:mean>0.5?1:0]\n" ^
    info:`) do set %%L

  rem echo !IMG_NUM!, %%A, %%B, IS_BLACK=!IS_BLACK!

  if !IS_BLACK!==1 (
    set sCROP_!IMG_NUM!=%%A
    set sCOL_!IMG_NUM!=%%B
    set /A IMG_NUM+=1
  )

)

echo %0: IMG_NUM=%IMG_NUM%

set /A LAST_IMG=%IMG_NUM%-1

set sCROPS=

for /L %%I in (0,1,%LAST_IMG%) do (
  set N=%%I
  echo %%I, !sCROP_%%I!, !sCOL_%%I!

  set sCROPS=!sCROPS! ^( -clone 0 -crop !sCROP_%%I! ^)
)

echo %0: sCROPS=%sCROPS%

%IMG7%magick ^
  %TOCROP% ^
  %sCROPS% ^
  -delete 0 ^
  %sFUZZ% -trim +repage ^
  %OUTFILE%


call echoRestore

@endlocal & set rsiOUTFILE=%OUTFILE%& set rsiNUM=%IMG_NUM%& set rsiCROPS=%sCROPS%
rem Finds proportions of colours in image %1.
rem   using Cygwin sort.exe.
rem Output to %2, a CSV file, columns:
rem   a number, from 0
rem   percentage of pixels that have this colour
rem   cumulative percentage so far
rem   a colour, beginning with #.
rem
rem Stops when any of these is true:
rem   individual PC less than a limit %3 [default no limit];
rem   cumulative PC reaches threshold %4 [default no limit];
rem   number of output colours reaches %5 [default 999999].
rem
rem %6 Optional output image file for map of the found colours.
rem %7 Optional pre-processing.
@rem
@rem Updated:
@rem   2-August-2017 Added %7.
@rem   6-August-2022 for IM v7
@rem   4-January-2023 added +repage after append; add "-precision".


@if "%2"=="" findstr /B "rem @rem" %~f0 & exit /B 1

@setlocal enabledelayedexpansion

@call echoOffSave

call %PICTBAT%setInOut %1 cp

if not "%2"=="" if not "%2"=="." set OUTFILE=%2

set LIM_PC=%3
if "%LIM_PC%"=="." set LIM_PC=
if "%LIM_PC%"=="" set LIM_PC=0

set LIM_CUM=%4
if "%LIM_CUM%"=="." set LIM_CUM=
if "%LIM_CUM%"=="" set LIM_CUM=101

set LIM_CNT=%5
if "%LIM_CNT%"=="." set LIM_CNT=
if "%LIM_CNT%"=="" set LIM_CNT=999999

set OUT_MAP=%6
if "%OUT_MAP%"=="." set OUT_MAP=

set PRE_PROC=%~7
if "%PRE_PROC%"=="." set PRE_PROC=

set TMP_HIST_1=%TEMP%\cp_hist_1.txt
set TMP_HIST_2=%TEMP%\cp_hist_2.txt

:: Get a histogram of all the colours present.

set WW=
for /F "usebackq" %%L in (`%IMG7%magick identify ^
  -precision 15 ^
  -format "WW=%%w\nHH=%%h\nWH=%%[fx:w*h]" ^
  %INFILE%`) do set %%L
if "%WW%"=="" exit /B 1

echo %0: WH=%WH%


%IMG7%magick ^
  %INFILE% ^
  %PRE_PROC% ^
  -precision 15 ^
  -define histogram:unique-colors=true -format "%%c" ^
  histogram:info:%TMP_HIST_1%

sort -r <%TMP_HIST_1% >%TMP_HIST_2%

set CUM_PC=0
set CNT=0
set ENDIT=0

for /F "usebackq" %%L in (`%IMG7%magick identify ^
  -precision 19 ^
  -format "PCWH=%%[fx:100/%WH%]" ^
  xc:`) do set %%L

echo num,PC,CUM_PC,COLOUR >%OUTFILE%

:: FIXME: for v7, we might have single number within the parenthesis.
(
  for /F "tokens=1,3 delims=:)" %%A in (%TMP_HIST_2%) do (
    if !ENDIT!==0 (

      set FMT=^
PC=%%[fx:%%A*%PCWH%]\n^
CUM_PC=%%[fx:!CUM_PC!+%%A*%PCWH%]\n^
ENDIT=%%[fx:!CNT!^>=%LIM_CNT%^|^|%%A*%PCWH%^<=%LIM_PC%^|^|!CUM_PC!+%%A*%PCWH%^>=%LIM_CUM%?1:0]

      for /F "usebackq" %%L in (`%IMG7%magick identify ^
        -precision 15 ^
        -format "!FMT!" ^
        xc:`) do set %%L

      if !ENDIT!==0 (
        echo !CNT!,!PC!,!CUM_PC!,%%B

        if not "%OUT_MAP%"=="" (
          for /F "delims= " %%H in ("%%B") do set HASH=%%H

          if !CNT!==0 (
            %IMG7%magick xc:!HASH! %OUT_MAP%
          ) else (
            %IMG7%magick %OUT_MAP% xc:!HASH! +append +repage %OUT_MAP%
          )
        )

        set /A CNT+=1
      )
    )
  )
) >>%OUTFILE%

echo %0: CNT=%CNT% PC=%PC% CUM_PC=%CUM_PC%

call echoRestore

endlocal & set cpOUTFILE=%OUTFILE%& set /A cpCNT=%CNT%
rem From image %1,
rem make output of the unique colours from the edges.
@rem %2 is output file.
@rem %3 is any of LTRB, any case. Default LTRB.
@rem
@rem Updated:
@rem   11-August-2022 for IM v7
@rem

@if "%1"=="" findstr /B "rem @rem" %~f0 & exit /B 1

@setlocal enabledelayedexpansion

@call echoOffSave

call %PICTBAT%setInOut %1 ec

if not "%2"=="" if not "%2"=="." set OUTFILE=%2

set EDGES=%3
if "%EDGES%"=="." set EDGES=
if "%EDGES%"=="" set EDGES=LTRB

call %PICTBAT%getLtrb %EDGES%
if not "%ltrbERR%"=="0" exit /B 1

set /A nEdges=%ltrbL%+%ltrbT%+%ltrbR%+%ltrbB%

set sL=
set sT=
set sR=
set sB=

if %ltrbL%==1 set sL=^
  ( -clone 0 ^
    -gravity West ^
    -crop 1x+0+0 ^
    +repage ^
    -rotate 90 ^
  )

if %ltrbT%==1 set sT=^
  ( -clone 0 ^
    -gravity North ^
    -crop x1+0+0 ^
    +repage ^
  )

if %ltrbR%==1 set sR=^
  ( -clone 0 ^
    -gravity East ^
    -crop 1x+0+0 ^
    +repage ^
    -rotate 90 ^
  )

if %ltrbB%==1 set sB=^
  ( -clone 0 ^
    -gravity South ^
    -crop x1+0+0 ^
    +repage ^
  )

%IMG7%magick ^
  %INFILE% ^
  %sL% %sT% %sR% %sB% ^
  -delete 0 ^
  +append ^
  -unique-colors ^
  %OUTFILE%

call echoRestore

@endlocal & set ecOUTFILE=%OUTFILE%
rem Given image %1,
rem finds middle colour and a fuzz percentage that includes all the pixels.
rem %2 is prefix for output environment variable.
rem %3 is extra fuzz percentage. Default zero (no extra fuzz).
@rem
@rem Updated:
@rem   11-August-2022 for IM v7
@rem

setlocal

set INFILE=%1

rem echo %0: INFILE=%INFILE%

set ENV_PREF=%2
if "%ENV_PREF%"=="." set ENV_PREF=
if "%ENV_PREF%"=="" set ENV_PREF=mf_

set EXTRA_FUZZ=%3
if "%EXTRA_FUZZ%"=="." set EXTRA_FUZZ=
if "%EXTRA_FUZZ%"=="" set EXTRA_FUZZ=0


set FMT=^
RNG_R=%%[fx:maxima.r-minima.r]\n^
RNG_G=%%[fx:maxima.g-minima.g]\n^
RNG_B=%%[fx:maxima.b-minima.b]\n^
MID_R=%%[fx:50*(maxima.r+minima.r)]\n^
MID_G=%%[fx:50*(maxima.g+minima.g)]\n^
MID_B=%%[fx:50*(maxima.b+minima.b)]\n

for /F "usebackq" %%L in (`%IMG7%magick ^
  %INFILE% ^
  -set colorspace sRGB ^
  -format "%FMT%" ^
  info:`) do set %%L

set FMT=^
FUZZ=%%[fx:100*sqrt((%RNG_R%*%RNG_R%+%RNG_G%*%RNG_G%+%RNG_B%*%RNG_B%)/3)+(%EXTRA_FUZZ%)]

rem echo %0: FMT=%FMT%

for /F "usebackq" %%L in (`%IMG7%magick identify ^
  -format "%FMT%" ^
  xc:`) do set %%L

rem echo %0: FUZZ=%FUZZ%

endlocal & set %ENV_PREF%MID=sRGB(%MID_R%%%,%MID_G%%%,%MID_B%%%)& set %ENV_PREF%FUZZ=%FUZZ%%%
rem From image %1, fills transparent from 0,0
rem  all pixels that are in fuzz range of edge pixels.
@rem %2 is output file.
@rem %3 is any of LTRB, any case. Default LTRB.
@rem %4 is extra fuzz percentage. Default zero (no extra fuzz).
@rem
@rem Updated:
@rem   11-August-2022 for IM v7
@rem


@if "%1"=="" findstr /B "rem @rem" %~f0 & exit /B 1

@setlocal enabledelayedexpansion

@call echoOffSave

call %PICTBAT%setInOut %1 ect2


if not "%2"=="" if not "%2"=="." set OUTFILE=%2

set sLTRB=%3
if "%sLTRB%"=="" set sLTRB=.

set EXTRA_FUZZ=%4
if "%EXTRA_FUZZ%"=="." set EXTRA_FUZZ=
if "%EXTRA_FUZZ%"=="" set EXTRA_FUZZ=0

call %PICTBAT%edgeCols %INFILE% %OUTFILE% %3
if ERRORLEVEL 1 exit /B 1

call %PICTBAT%middleFuzz %OUTFILE% ect2_ %sLTRB% %EXTRA_FUZZ%
if ERRORLEVEL 1 exit /B 1

set ect2_


%IMG7%magick ^
  %INFILE% ^
  -fill None ^
  -fuzz %ect2_FUZZ% ^
  -floodfill +0+0 %ect2_MID%  ^
  %OUTFILE%

call echoRestore

@endlocal & set ect2OUTFILE=%OUTFILE%
All images on this page were created by the commands shown, using:
%IMG7%magick -version
Version: ImageMagick 7.1.0-49 Q16-HDRI x64 7a3f3f1:20220924 https://imagemagick.org
Copyright: (C) 1999 ImageMagick Studio LLC
License: https://imagemagick.org/script/license.php
Features: Cipher DPC HDRI OpenCL
Delegates (built-in): bzlib cairo freetype gslib heic jng jp2 jpeg jxl lcms lqr lzma openexr pangocairo png ps raqm raw rsvg tiff webp xml zip zlib
Compiler: Visual Studio 2022 (193331630)
To improve internet download speeds, some images may have been automatically converted (by ImageMagick, of course) from PNG or TIFF or MIFF to JPG.
Source file for this web page is subimrect.h1. To re-create this web page, run "procH1 subimrect".
This page, including the images, is my copyright. Anyone is permitted to use or adapt any of the code, scripts or images for any purpose, including commercial use.
Anyone is permitted to re-publish this page, but only for non-commercial use.
Anyone is permitted to link to this page, including for commercial use.
Page version v1.0 11-June-2016.
Page created 16-Mar-2023 11:57:31.
Copyright © 2023 Alan Gibson.