set SRC=s2lsrc.png

call %PICTBAT%gridOver ^
  toes.png %SRC% 8 8 1 yellow
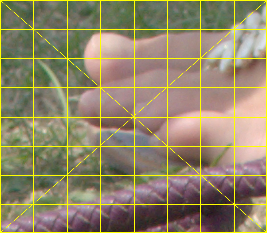
When an image has two wobbly lines that are roughly horizontal, we can distort the image such that both lines become straight and horizontal.
The distortion is in the vertical direction only. It shrinks columns so that both lines become straight and horizontal. Within each column the shrinkage is constant, so pixels above and below the input lines will also be distorted.
Scripts on this page assume that "magick" is HDRI.
This page was developed in response to a forum question: how to remove vertical and horizontal line in this image.
We use an image with a grid so we can see what is happening.
set SRC=s2lsrc.png call %PICTBAT%gridOver ^ toes.png %SRC% 8 8 1 yellow |

|
We draw two non-intersecting aliased blue lines across the input image. The lines are aliased, so the pixels on the line are exactly blue. The lines can be straight or curved, but mustn't double-back on themselves. The goal is to distort the image to make those lines straight and horizontal. The lines divide the image onto three areas: top, middle and bottom.
We use blue lines, that is, pixels of colour sRGB(0,0,100%). However, the method only examines the blue channel, and other colours such as sRGB(0,50%,100%) or sRGB(0,100%,100%) or sRGB(100%,100%,100%) could be used.
No other pixels in the image should have 100% in the blue channel. To ensure this is true, we subtract 0.5% from all pixel values.
%IMG7%magick ^ %SRC% ^ -evaluate Subtract 0.5%% ^ -stroke Blue +antialias ^ -draw "line 0,%%[fx:h*0.1],%%[fx:w-1],%%[fx:h*0.4]" ^ -draw "line 0,%%[fx:h*0.8],%%[fx:w/2],%%[fx:h*0.6]" ^ -draw "line %%[fx:w/2],%%[fx:h*0.6],%%[fx:w-1],%%[fx:h*0.9]" ^ s2l_bl1.png |
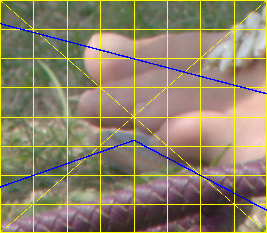
|
The image will be distorted to make the inner edges of both blue lines straight and horizontal.
The lines can be any thickness, or even fill the entire top and bottom areas. Only the inner edges (the bottom of the top line, and the top of the bottom line) matter.
This method distorts by shrinking columns.
Pixels in the top line that are higher then the lowest part of that line will be lowered.
Pixels in the bottom line that are lower then the highest part of that line will be raised.
The script blue2cluts.bat takes the marked image and makes two grayscale images the same width but only one pixel high. They represent the proportion of the image that is in the top and bottom areas. The script works by flood-filling from the top-left and bottom-left corners, so it assumes the lines do not pass through those pixels, and that the two areas can be flood-filled from those pixels.
We need high precision, so we write to floating-point miff files.
The main outputs are two Nx1 images:
call %PICTBAT%blue2cluts ^ s2l_bl1.png s2l_blc_XX.miff |
[No image] |
|
Convert to PNG so we can see the images. %IMG7%magick s2l_blc_1.miff s2l_blc_1.png %IMG7%magick s2l_blc_2.miff s2l_blc_2.png |
|
These images are the relative displacement maps for the rows that will contain the top and bottom blue lines.
For the top line, pixels are generally pulled down, so the relative displacement values are 50% or lower. If P is the proportion of a column that is in the top area, 0<=P<=1, and max(P) is the maximal P across all columns, the resulting value V(0<=V<=1) in that column is V = P - max(P) + 0.5.
For the bottom line, pixels are generally pulled up, so the relative displacement values are 50% or higher. The resulting value is V = max(P) - P + 0.5.
If b2cDEBUG is set, the script will also create debug images like these:
set b2cDEBUG=s2l_dbg_XX.png call %PICTBAT%blue2cluts ^ s2l_bl1.png s2l_blc_XX.miff set b2cDEBUG= |


|
The first debug image shows the top area (including the blue line) as white. The second debug image is for the bottom area.
The script also sets environment variables:
set b2c
b2cBOTHH=93
b2cBOTY=140
b2cHH=233
b2cMAXBOT=39.91416204127565
b2cMAXGAP=233
b2cMAXTOP=40.34334885461967
b2cMINGAP=80
b2cNEWHH=46
b2cNEWY=94
b2cWW=267
b2cXTRABOT=302.1739094336239
b2cXTRATOP=-204.3478339630024
The heights in pixels of the top, middle and bottom areas are NEWY, NEWHH and BOTHH respectively. The y-offset to the bottom area is BOTY.
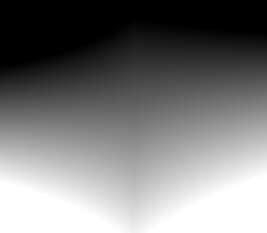
The script interpClut.bat takes those two Nx1 images as input, and makes an Nx%3 output interpolating linearly in the middle area between these lines, and also extrapolates for the pixels in the top and bottom areas. The output is a relative displacement map.
call %PICTBAT%interpClut ^ s2l_blc_1.miff s2l_blc_2.miff ^ %b2cHH% ^ s2l_lt1.miff ^ %b2cXTRATOP% %b2cXTRABOT% %IMG7%magick s2l_lt1.miff s2l_lt1.png |
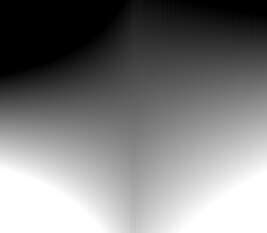
|
The script interpClut.bat is a general-purpose linear interpolator. In each column, where i ranges from 0 at the top to h-1 at the bottom, the output pixel value mi is calculated:
mi = (v2 - v1) * gi + v1
... where:
The values given for %5 and %6 should be percentages such that the gradient gi is 0 at the top blue line and 100 at the bottom blue line. The previous script blue2cluts.bat has calculated these two values, as %b2cXTRATOP% and %b2cXTRABOT%.
%b2cXTRATOP% will often be negative, and IM's "gradient:" doesn't like negative values, so the script has a workaround.
The output from interpClut.bat will contain values outside the range [0,100%]; these are effectively clamped in the next step.
This interpolation step could be performed with "-morph", but there is no simple way of using that for extrapolation in the top and bottom areas.
We use the displacement map to distort an image. We would normally use the source image but for demonstration we use the version with blue lines so we can see what has happened.
%IMG7%magick ^
  s2l_bl1.png ^
  s2l_lt1.miff ^
  -virtual-pixel None ^
  -compose Displace ^
    -set option:compose:args 0x100%% ^
    -composite ^
  s2l_d1.png
|
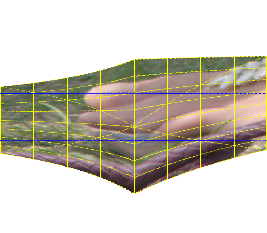
|
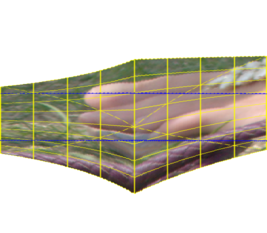
We can see the effects of the transformation:
The environment variables give the height and y-offset for a crop of the middle area:
%IMG7%magick ^ s2l_d1.png ^ -crop x%b2cNEWHH%+0+%b2cNEWY% +repage ^ s2l_d1_crop.png |
|
Supersampling improves the results for graphics (including grid lines), making edges less aliased, but makes little difference to ordinary photos:
%IMG7%magick ^
  s2l_bl1.png ^
  s2l_lt1.miff ^
  -resize 200%% ^
  -virtual-pixel None ^
  -compose Displace ^
    -set option:compose:args 0x100%% ^
    -composite ^
  -resize 50%% ^
  s2l_d1s.png
|
|
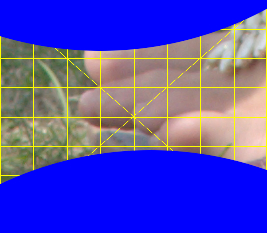
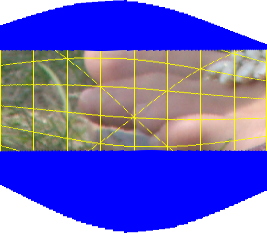
For convenience, the script str2lines3.bat runs the three steps. In this example, we fill the area above the top line with blue, and the area below the bottom line with blue.
|
Make a source image. %IMG7%magick ^ %SRC% ^ -evaluate Subtract 0.5%% ^ -fill Blue ^ -draw "circle 100,-300,100,50" ^ -draw "circle 150,500,150,150" ^ s2l_src2.png |
|
|
Process and distort it. call %PICTBAT%str2lines3 ^ s2l_src2.png . s2l_src2_out.png |
|
The method shown above shrinks vertically. The distance between the blue lines will generally reduce. The script blue2cluts.bat has set environment variables:
echo b2cNEWHH=%b2cNEWHH% b2cMINGAP=%b2cMINGAP% b2cMAXGAP=%b2cMAXGAP%
b2cNEWHH=46 b2cMINGAP=80 b2cMAXGAP=233
b2cNEWHH is the gap between the parallel lines in the output image.
b2cMINGAP is the smallest gap between the blue lines in the input image, and b2cMAXGAP is the maximum gap.
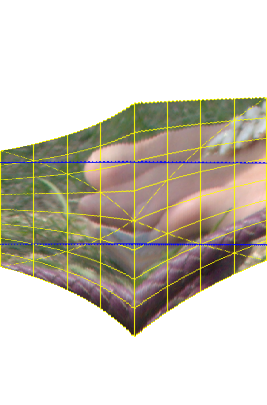
So we could stretch the output image vertically by some factor between b2cMINGAP/b2cNEWHH and b2cMAXGAP/b2cNEWHH. The factor we choose will determine which part of the image will be overall unchanged in the vertical dimension. But shrinking an image then stretching it gives poor quality; stretching first gives better quality. We could stretch vertically then re-run the entire process.
Instead, we will re-run just step 3, stretching so the lines are %b2cMINGAP% pixels apart.
%IMG7%magick ^
  s2l_bl1.png ^
  s2l_lt1.miff ^
  -resize "x%%[fx:%b2cHH%*%b2cMINGAP%/%b2cNEWHH%]^!" ^
  -virtual-pixel None ^
  -compose Displace ^
    -set option:compose:args 0x100%% ^
    -composite ^
  s2l_d2.png
|
|
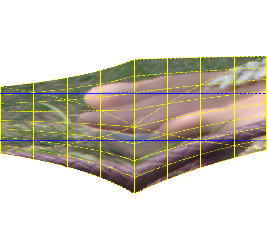
The method shown above shrinks the gap in each column between the blue lines to make them parallel and horizontal. The lowest part of the edge of the top blue line and the highest part of the edge of the bottom blue line do not move.
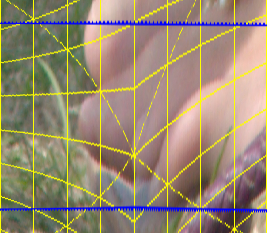
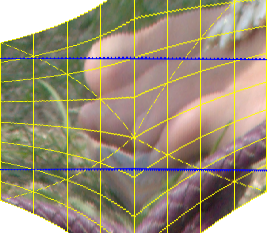
Two variations are provided:
call %PICTBAT%str2lines3 ^ s2l_bl1.png . ^ s2l_var1.png . shrink |
|
call %PICTBAT%str2lines3 ^ s2l_bl1.png . ^ s2l_var2.png . stretch |
|
call %PICTBAT%str2lines3 ^ s2l_bl1.png . ^ s2l_var3.png . mean |
|
In all methods, the output is the same size as the input.
Shrink is the only method that copies all of the input image into the output (provided tt>=0). The other two methods will generally truncate the input.
In principle, we could combine these methods, eg shrink for the top line and stretch for the bottom line, but the script has no facility for this.
The scripts shown here will straighten two lines that span the image width, and make them horizontal. If we want to operate with vertical lines, stretching or shrinking horizontally, first rotate the original image and the marked-up image by 90°, and rotate back afterwards.
If we have more than two lines that we want to make straight and horizontal, these scripts won't do the job. The scripts work by creating a displacement map that varies in a linear manner from top to bottom. This linear gradient can be made to pass through any two points; it can't be made to pass through any three or more general points.
The ideas could be extended so the displacement curve was non-linear, such as a Bezier spline or polynomial.
Instead of moving to the inner edges of the blue lines, we might move to the average of the blue lines.
If we want to make one pair of lines straight and horizontal, and make another pair of lines straight and vertical, we draw the lines in different channels such as blue for the horizontal lines and green for the vertical lines, so the intersections are cyan.
Then we can run the str2lines3.bat script three times, to:
Before and after the third step, we rotate the images.
The script str4lines.bat does these steps, taking the marked-up image and a source image, and distorting the source accordingly.
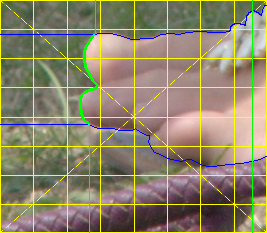
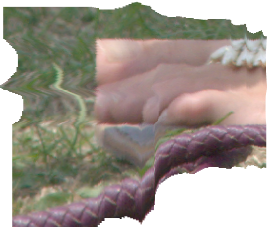
In this example, we mark up the image in Gimp with blue lines between left and right edges, and green lines between top and bottom edges. Where the lines intersect, we make the pixels cyan. The green lines will be distorted vertically, so we make them thick enough that they stay fully green.
The mark-up outlines the foot, so the foot becomes rectangular in the result.
|
s2lmk4.png |
|
call %PICTBAT%str4lines ^ s2lmk4.png toes.png s2l_mk4.png |
|
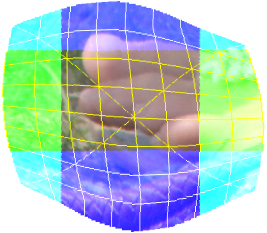
In the next example, we set the blue channel to maximum in parts of circles at the top and bottom, and green channel to maximum in parts of circles at left and right. We copy just the required channel.
%IMG7%magick ^
  %SRC% ^
  -evaluate Subtract 0.5%% ^
  ( +clone ^
    -fill White ^
    -draw "circle 100,-300,100,50" ^
    -draw "circle 150,500,150,150" ^
  ) ^
  -compose CopyBlue -composite ^
  ( +clone ^
    -fill White ^
    -draw "circle -500,75,60,100" ^
    -draw "circle 700,150,200,150" ^
  ) ^
  -compose CopyGreen -composite ^
  s2l_src4.png
|
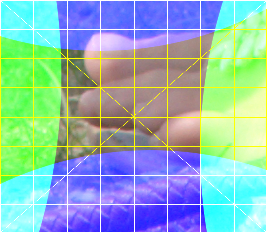
|
call %PICTBAT%str4lines ^ s2l_src4.png s2l_src4.png s2l_4l.png |
|
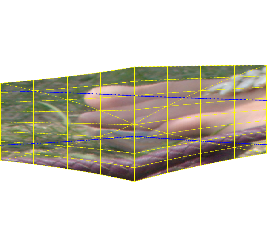
We can make any intermediate result by blending the full displacement map with 50%. However, we can do the job with less work by blending pixels in just the two Nx1 maps with 50%. We use a blending parameter tt where 0<=tt<=1.
When tt=0, we have no effect: both Nx1 maps are entirely 50%, so the full interpolated and extrapolated map is also entirely 50%.
When tt=1, we have the full effect.
In the Nx1 images we change each value V to V' where:
V' = 0.5 + (V - 0.5) * tt
   = 0.5 + V*tt - 0.5*tt
   = V*tt + 0.5*(1-tt)
We can use -function Polynomial for this.
The script str2lines3.bat has a parameter for tt, but we show the individual steps. For example, we interpolate three-quarters towards the full effect:
Step 1 is run in the usual way:
call %PICTBAT%blue2cluts ^
  s2l_bl1.png s2l_blc_XX.miff . . s2l_34_
set tt=0.75

%IMG7%magick ^
  s2l_blc_1.miff ^
  -function Polynomial "%tt%,%%[fx:0.5*(1-%tt%)]" ^
  s2l_blct_1.miff

%IMG7%magick ^
  s2l_blc_2.miff ^
  -function Polynomial "%tt%,%%[fx:0.5*(1-%tt%)]" ^
  s2l_blct_2.miff
We then follow steps 2 and 3 as before, using these new Nx1 maps:
call %PICTBAT%interpClut ^ s2l_blct_1.miff s2l_blct_2.miff ^ %s2l_34_HH% ^ s2l_lt1t.miff ^ %s2l_34_XTRATOP% %s2l_34_XTRABOT% %IMG7%magick s2l_lt1t.miff s2l_lt1t.png |
|
%IMG7%magick ^
  s2l_bl1.png ^
  s2l_lt1t.miff ^
  -virtual-pixel None ^
  -compose Displace ^
    -set option:compose:args 0x100%% ^
    -composite ^
  s2l_d1t.png
|
|
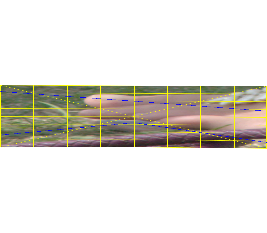
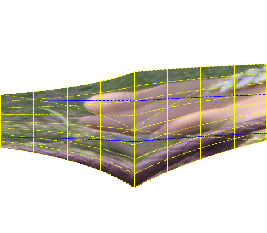
We can use t<0 or t>1 for extrapolated distortion:
call %PICTBAT%str2lines3 ^ s2l_bl1.png . s2l_dex.png -0.1 |
|
call %PICTBAT%str2lines3 ^ s2l_bl1.png . s2l_dex2.png 1.4 |
|
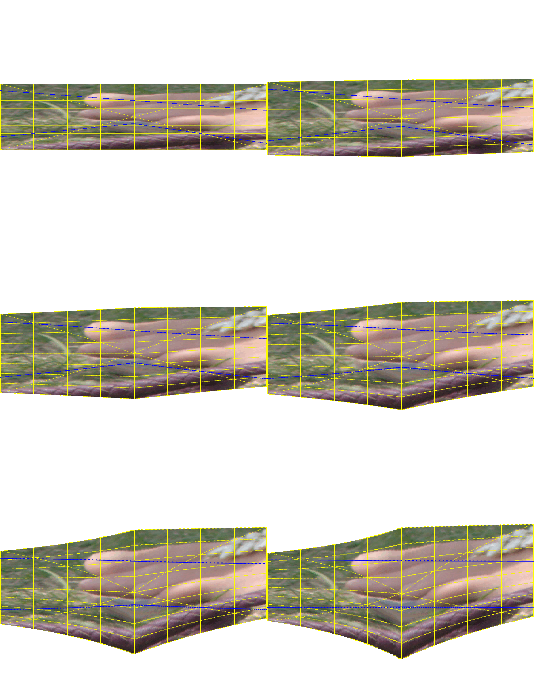
We can animate by varying tt between 0.0 and 1.0, or any values we want. For convenience, we use %%I/100 where 0<=%%I<=100. Step one does not need to be repeated within the loop.
for /L %%I in (0,1,100) do (
  set /A LZ=%%I+1000
  set LZ=000000!LZ!
  set LZ=!LZ:~-6!
  echo LZ=!LZ!

  %IMG7%magick ^
    s2l_blc_1.miff ^
    -function Polynomial "%%[fx:%%I/100],%%[fx:0.5*(1-%%I/100)]" ^
    s2l_blca_1.miff

  %IMG7%magick ^
    s2l_blc_2.miff ^
    -function Polynomial "%%[fx:%%I/100],%%[fx:0.5*(1-%%I/100)]" ^
    s2l_blca_2.miff

  call %PICTBAT%interpClut ^
    s2l_blca_1.miff s2l_blca_2.miff ^
    %b2cHH% ^
    s2l_lt1a.miff ^
    %b2cXTRATOP% %b2cXTRABOT%

  %IMG7%magick ^
    s2l_bl1.png ^
    s2l_lt1a.miff ^
    -virtual-pixel None ^
    -compose Displace ^
      -set option:compose:args 0x100%% ^
      -composite ^
    s2l_frm_!LZ!.tiff
)
Make a GIF from the frames:
%IMG7%magick ^ s2l_frm_*.tiff ^ -duplicate 10 ^ -set dispose previous ^ s2l_frms.gif |
|
In the course of the animation, the lowest part of the top blue line and the highest part of the bottom blue line do not move.
Cleanup: delete the frames.
del s2l_frm_*.tiff
For convenience, .bat scripts are also available in a single zip file. See Zipped BAT files.
rem %1 is image with two non-intersecting aliased blue lines.
rem %2 is template name for the two output Nx1 files. Must contain XX.
rem %3 channel for separation: R or G or B [default B].
rem %4 method shrink or stretch or mean [shrink]
rem %5 prefix for environment variables [b2c]
@rem
@rem Also uses:
@rem   b2cDEBUG name for debugging outputs. Must contain XX.
@rem
@rem Updated:
@rem   11-July-2021 Corrected ShrStr error message.


@if "%1"=="" findstr /B "rem @rem" %~f0 & exit /B 1

@setlocal

@call echoOffSave

call %PICTBAT%setInOut %1 b2c

set OUTTMPLT=%2
if "%OUTTMPLT%"=="." set OUTTMPLT=
if "%OUTTMPLT%"=="" set OUTTMPLT=b2c_XX.miff

set OUT1=%OUTTMPLT:XX=1%
set OUT2=%OUTTMPLT:XX=2%

set chSEP=%3
if "%chSEP%"=="." set chSEP=
if "%chSEP%"=="" set chSEP=B

set ShrStr=%4
if "%ShrStr%"=="." set ShrStr=
if "%ShrStr%"=="" set ShrStr=shrink

set ENVPREF=%5
if "%ENVPREF%"=="." set ENVPREF=
if "%ENVPREF%"=="" set ENVPREF=b2c

if /I %ShrStr%==shrink (
  set MINMAX=maxima
) else if /I %ShrStr%==stretch (
  set MINMAX=minima
) else if /I %ShrStr%==mean (
  set MINMAX=mean
) else (
  echo %0: ShrStr is neither shrink nor stretch nor mean
  exit /B 1
)

if "%b2cDEBUG%"=="" (
  set WRDBG1=
  set WRDBG2=
) else (
  set WRDBG1=+write %b2cDEBUG:XX=1%
  set WRDBG2=+write %b2cDEBUG:XX=2%
)

set MAXGAP=

for /F "usebackq" %%L in (`%IMG7%magick ^
  %INFILE% ^
  -format "WW=%%[w]\nHH=%%[h]\n" ^
  +write info: ^
  -define quantum:format^=floating-point ^
  -depth 32 ^
  -precision 16 ^
  -channel %chSEP% -separate +channel ^
  -fill Black +opaque White ^
  ^( -clone 0 ^
     -fill White -draw "color 0,0 floodfill" ^
     -fill Red -draw "color 0,0 floodfill" ^
     -fill Black -opaque White ^
     -fill White -draw "color 0,0 floodfill" ^
     +write mpr:WtTOP ^
     %WRDBG1% ^
     -scale "x1^!" ^
     -channel RGB ^
     -format "MAXTOP=%%[fx:%MINMAX%*100]\n" +write info: ^
     -evaluate Subtract %%[%MINMAX%] ^
     -function polynomial "1,0.5" ^
     +channel ^
     -write %OUT1% ^
     +delete ^
  ^) ^
  -fill White -draw "color 0,%%[fx:h-1] floodfill" ^
  -fill Red -draw "color 0,%%[fx:h-1] floodfill" ^
  -fill Black -opaque White ^
  -fill White -draw "color 0,%%[fx:h-1] floodfill" ^
  +write mpr:WtBOT ^
  %WRDBG2% ^
  -scale "x1^!" ^
  -channel RGB ^
  -format "MAXBOT=%%[fx:%MINMAX%*100]\n" +write info: ^
  -evaluate Subtract %%[%MINMAX%] ^
  -function polynomial "-1,0.5" ^
  +channel ^
  -write %OUT2% ^
  +delete ^
  mpr:WtTOP ^
  mpr:WtBOT ^
  -compose Lighten -composite ^
  -channel RGB -negate +channel ^
  -scale "x1^!" ^
  -format "MINGAP=%%[fx:minima]\n" +write info: ^
  -format "MAXGAP=%%[fx:maxima]\n" +write info: ^
  NULL:`) do set %%L

if "%MAXGAP%"=="" (
  echo %0: MAXGAP not set
  exit /B 1
)

set sFMT=^
XTRATOP=%%[fx:0-100/(100-%MAXTOP%-%MAXBOT%)*%MAXTOP%]\n^
XTRABOT=%%[fx:100+100/(100-%MAXTOP%-%MAXBOT%)*%MAXBOT%]\n^
NEWHH=%%[fx:int(%HH%*(100-%MAXTOP%-%MAXBOT%)/100+0.5)]\n^
NEWY=%%[fx:int(%HH%*%MAXTOP%/100+0.5)]\n^
MINGAP=%%[fx:int(%HH%*%MINGAP%+0.5)]\n^
MAXGAP=%%[fx:int(%HH%*%MAXGAP%+0.5)]\n

for /F "usebackq" %%L in (`%IMG7%magick identify ^
  -precision 16 ^
  -format "%sFMT%" ^
  xc:`) do set %%L

set /A BOTHH=%HH%-%NEWHH%-%NEWY%

set /A BOTY=%NEWHH%+%NEWY%

call echoRestore

@endlocal & set %ENVPREF%WW=%WW%& set %ENVPREF%HH=%HH%& ^
set %ENVPREF%NEWHH=%NEWHH%& set %ENVPREF%NEWY=%NEWY%& ^
set %ENVPREF%MAXTOP=%MAXTOP%& set %ENVPREF%MAXBOT=%MAXBOT%& ^
set %ENVPREF%XTRATOP=%XTRATOP%& set %ENVPREF%XTRABOT=%XTRABOT%& ^
set %ENVPREF%MINGAP=%MINGAP%& set %ENVPREF%MAXGAP=%MAXGAP%& ^
set %ENVPREF%BOTHH=%BOTHH%& set %ENVPREF%BOTY=%BOTY%
rem Given %1 and %2 are Nx1 images,
rem makes linearly interpolated image Nx%3 pixels,
rem named %4.
rem %5 is percentage of gradient at image top [0].
rem %6 is percentage of gradient at image bottom [100].
rem
rem Assumes magick is HDRI.

@if "%2"=="" findstr /B "rem @rem" %~f0 & exit /B 1

@setlocal enabledelayedexpansion

@call echoOffSave

call %PICTBAT%setInOut %1 ic

set IMG1=%INFILE%
set IMG2=%2

set HH=%3
if "%HH%"=="." set HH=
if "%HH%"=="" set HH=10

if not "%4"=="" if not "%4"=="." set OUTFILE=%4

set PCTOP=%5
if "%PCTOP%"=="." set PCTOP=
if "%PCTOP%"=="" set PCTOP=0

set PCBOT=%6
if "%PCBOT%"=="." set PCBOT=
if "%PCBOT%"=="" set PCBOT=100

rem IM v7.0.7-28 can't handle negatives in "gradient:".
rem See https://www.imagemagick.org/discourse-server/viewtopic.php?f=3&t=36160

if "%PCTOP:~0,1%"=="-" (

  set sFMT=^
POS=%%[fx:-^(%PCTOP%^)]\n^
PCBOT=%%[fx:%PCBOT%-^(%PCTOP%^)]

  for /F "usebackq" %%L in (`%IMG7%magick identify ^
    -precision 16 ^
    -format "!sFMT!" ^
    %IMG1%`) do set %%L

  set SUB=-evaluate subtract !POS!%%
  set PCTOP=0
) else (
  set SUB=
)

echo %0: top=%PCTOP% bot=%PCBOT% sub=%SUB%

%IMG7%magick ^
  %IMG1% ^
  -set option:MYSIZE %%[fx:w]x%HH% ^
  ( +clone ^
    -scale "%%[MYSIZE]^!" ^
    -write mpr:IMG1 ^
    +delete ^
  ) ^
  %IMG2% ^
  -define compose:clamp=off ^
  -compose MinusDst -composite ^
  -scale "%%[MYSIZE]^!" ^
  -size "%%[MYSIZE]" ^
  ( gradient:gray(%PCTOP%%%)-gray(%PCBOT%%%) ^
    %SUB% ^
  ) ^
  -compose Multiply -composite ^
  mpr:IMG1 ^
  -compose Plus -composite ^
  -define quantum:format=floating-point ^
  -depth 32 ^
  %OUTFILE%

if ERRORLEVEL 1 exit /B 1

call echoRestore

@endlocal & set icOUTFILE=%OUTFILE%
rem Straighten two lines: three steps combined.

rem %1 is image with two non-intersecting aliased blue lines.
rem %2 image to be distorted.
rem %3 is output.
rem %4 proportion of effect (typically 0.0 to 1.0) [1.0]
rem %5 shrink or stretch or mean
rem %6 prefix for environment variables [s2l3]
rem %7 channel for separation: R or G or B [default B].
rem %8 interpolation method: linear, linear3, hermite [linear].
rem %9 virtual-pixel method [default None].

@rem Updated:
@rem   8-June-2021 Changed final "magick" to read input from %INDIST% instead of %INFILE%.
@rem   11-July-2021 Added parameters %7 and %8.
@rem   27-April-2023 Allow negative values in %4, FCTPROP.

@if "%1"=="" findstr /B "rem @rem" %~f0 & exit /B 1

@setlocal enabledelayedexpansion

@call echoOffSave

call %PICTBAT%setInOut %1 s2l3

set OUTTMPLT=b2c_XX.miff

set INDIST=%2
if "%INDIST%"=="." set INDIST=
if "%INDIST%"=="" set INDIST=%INFILE%

if not "%3"=="" if not "%3"=="." set OUTFILE=%3

set FCTPROP=%4
if "%FCTPROP%"=="." set FCTPROP=
if "%FCTPROP%"=="1.0" set FCTPROP=1
if "%FCTPROP%"=="" set FCTPROP=1

set FCTPROP=(%FCTPROP%)

set ShrStr=%5
if "%ShrStr%"=="." set ShrStr=
if "%ShrStr%"=="" set ShrStr=shrink

set ENVPREF=%6
if "%ENVPREF%"=="." set ENVPREF=
if "%ENVPREF%"=="" set ENVPREF=s2l3

set chSEP=%7
if "%chSEP%"=="." set chSEP=
if "%chSEP%"=="" set chSEP=B

set INTERP=%8
if "%INTERP%"=="." set INTERP=
if "%INTERP%"=="" set INTERP=linear

set VIRTPIX=%9
if "%VIRTPIX%"=="." set VIRTPIX=
if "%VIRTPIX%"=="" set VIRTPIX=None

set TMPDIR=\temp

call %PICTBAT%blue2cluts ^
  %INFILE% ^
  %TMPDIR%\s2l3_blc_XX.miff ^
  %chSEP% ^
  %ShrStr% ^
  %ENVPREF%

if ERRORLEVEL 1 exit /B 1

if not %FCTPROP%==(1) (
  %IMG7%magick ^
    %TMPDIR%\s2l3_blc_1.miff ^
    -function Polynomial "%%[fx:%FCTPROP%],%%[fx:0.5*(1-%FCTPROP%)]" ^
    %TMPDIR%\s2l3_blc_1.miff

  %IMG7%magick ^
    %TMPDIR%\s2l3_blc_2.miff ^
    -function Polynomial "%%[fx:%FCTPROP%],%%[fx:0.5*(1-%FCTPROP%)]" ^
    %TMPDIR%\s2l3_blc_2.miff
)

if /I %INTERP%==linear (
  echo linear
) else if /I %INTERP%==linear3 (
  echo linear3
) else if /I %INTERP%==hermite (
  echo hermite
) else (
  echo %0: Bad INTERP [%INTERP%]
  exit /B 1
)

call %PICTBAT%interpClut ^
  %TMPDIR%\s2l3_blc_1.miff %TMPDIR%\s2l3_blc_2.miff ^
  !%ENVPREF%HH! ^
  %TMPDIR%\s2l3_lt1.miff ^
  !%ENVPREF%XTRATOP! !%ENVPREF%XTRABOT!

if ERRORLEVEL 1 exit /B 1

%IMG7%magick ^
  %INDIST% ^
  %TMPDIR%\s2l3_lt1.miff ^
  -virtual-pixel %VIRTPIX% ^
  -compose Displace ^
    -set option:compose:args 0x100%% ^
    -composite ^
  %OUTFILE%

if ERRORLEVEL 1 exit /B 1


call echoRestore

@endlocal & set s2l3OUTFILE=%OUTFILE%
rem Straighten two (blue) lines horizontally and two (green) lines vertically.

rem %1 is image with two non-intersecting aliased blue lines, and two green.
rem %2 image to be distorted.
rem %3 is output.
rem %4 proportion of effect (typically 0.0 to 1.0) [1.0]
rem %5 shrink or stretch or mean
rem %6 prefix for environment variables [s2l3]

@if "%1"=="" findstr /B "rem @rem" %~f0 & exit /B 1

@setlocal enabledelayedexpansion

@call echoOffSave

call %PICTBAT%setInOut %1 s4l

set OUTTMPLT=b2c_XX.miff

set INDIST=%2
if "%INDIST%"=="." set INDIST=
if "%INDIST%"=="" set INDIST=%INFILE%

if not "%3"=="" if not "%3"=="." set OUTFILE=%3

set FCTPROP=%4
if "%FCTPROP%"=="." set FCTPROP=
if "%FCTPROP%"=="1.0" set FCTPROP=1
if "%FCTPROP%"=="" set FCTPROP=1

set ShrStr=%5
if "%ShrStr%"=="." set ShrStr=
if "%ShrStr%"=="" set ShrStr=shrink

set ENVPREF=%6
if "%ENVPREF%"=="." set ENVPREF=
if "%ENVPREF%"=="" set ENVPREF=s2l3

set TMPDIR=\temp

set TMPRSLT_B1=%TMPDIR%\s4l_rslt_b1.miff
set TMPRSLT_B2=%TMPDIR%\s4l_rslt_b2.miff
set TMPRSLT_G2=%TMPDIR%\s4l_rslt_g2.miff
set TMP_ROT1=%TMPDIR%\s4l_rot_1.miff
set TMP_ROT2=%TMPDIR%\s4l_rot_2.miff

:: Following is inefficient, with repeated work.
::
set b2cDEBUG=b2c1.png
call %PICTBAT%str2lines3 %INFILE% %INFILE% %TMPRSLT_B1% %FCTPROP% %ShrStr% %ENVPREF% B . Edge
if ERRORLEVEL 1 exit /B 1
set b2cDEBUG=b2c2.png
call %PICTBAT%str2lines3 %INFILE% %INDIST% %TMPRSLT_B2% %FCTPROP% %ShrStr% %ENVPREF% B
if ERRORLEVEL 1 exit /B 1

%IMG7%magick %TMPRSLT_B1% -rotate 90 %TMP_ROT1%
%IMG7%magick %TMPRSLT_B2% -rotate 90 %TMP_ROT2%

set b2cDEBUG=b2c3.png
call %PICTBAT%str2lines3 %TMP_ROT1% %TMP_ROT2% %TMPRSLT_G2% %FCTPROP% %ShrStr% %ENVPREF% G
if ERRORLEVEL 1 exit /B 1
%IMG7%magick %TMPRSLT_G2% -rotate -90 %OUTFILE%

call echoRestore

@endlocal & set s4lOUTFILE=%OUTFILE%
All images on this page were created by the commands shown, using:
%IMG7%magick identify -version
Version: ImageMagick 7.1.1-15 Q16-HDRI x64 a0a5f3d:20230730 https://imagemagick.org
Copyright: (C) 1999 ImageMagick Studio LLC
License: https://imagemagick.org/script/license.php
Features: Cipher DPC HDRI OpenCL OpenMP(2.0)
Delegates (built-in): bzlib cairo freetype gslib heic jng jp2 jpeg jxl lcms lqr lzma openexr pangocairo png ps raqm raw rsvg tiff webp xml zip zlib
Compiler: Visual Studio 2022 (193532217)
To improve internet download speeds, some images may have been automatically converted (by ImageMagick, of course) from PNG or TIFF or MIFF to JPG.
Source file for this web page is str2lines.h1. To re-create this web page, run "procH1 str2lines".
This page, including the images, is my copyright. Anyone is permitted to use or adapt any of the code, scripts or images for any purpose, including commercial use.
Anyone is permitted to re-publish this page, but only for non-commercial use.
Anyone is permitted to link to this page, including for commercial use.
Page version v1.0 14-June-2019.
Page created 20-Sep-2023 09:50:51.
Copyright © 2023 Alan Gibson.