%IMG7%magick ^
  -size 100x200 ^
  xc:rgb(10%%,15%%,20%%) ^
  xc:rgb(60%%,50%%,40%%) ^
  xc:rgb(80%%,85%%,90%%) ^
  +append +repage ^
  jm_src1.png

How many colours do we need?
Complex images such as photographs can be reduced to a smaller number of colours. But how many colours should that be? This method provides an answer to that question.
How many different colours does this image have?
%IMG7%magick ^ -size 100x200 ^ xc:rgb(10%%,15%%,20%%) ^ xc:rgb(60%%,50%%,40%%) ^ xc:rgb(80%%,85%%,90%%) ^ +append +repage ^ jm_src1.png |
|
Answer: it has three colours. IM can count them, and list them:
%IMG7%magick ^
  jm_src1.png ^
  -unique-colors ^
  -format "numCols=%%w\n" ^
  +write info: ^
  txt:
numCols=3
# ImageMagick pixel enumeration: 3,1,0,65535,srgb
0,0: (6554,9830,13107)  #199A26663333  srgb(10.0008%,14.9996%,20%)
1,0: (39321,32768,26214)  #999980006666  srgb(60%,50.0008%,40%)
2,0: (52428,55705,58982)  #CCCCD999E666  srgb(80%,85.0004%,90.0008%)
We make the problem more difficult. How many colours does this image have?
%IMG7%magick ^ -seed 1234 ^ jm_src1.png ^ -blur 0x10 ^ -attenuate 30% ^ +noise uniform ^ jm_src2.png |
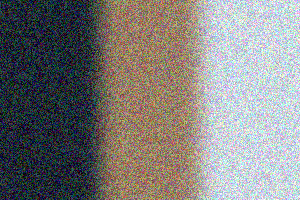
|
We can see there are, essentially, just three colours. If we imagine the pixels occuping positions within a hollow 3D colour cube, there would be three clouds of pixels, three clusters. As before, IM can count the unique colours:
%IMG7%magick ^
  jm_src2.png ^
  -unique-colors ^
  -format "numCols=%%w\n" ^
  info:
numCols=59859
There are nearly as many colours as pixels. Perhaps the histogram can help us find the "real" colours.
%IMG7%magick ^
  jm_src2.png ^
  -define histogram:unique-colors=true -format "%%c" ^
  histogram:info:jm_hist1.lis

%windir%\system32\sort /R <jm_hist1.lis >jm_hist2.lis

cHead /ijm_hist2.lis /h15
The first 15 entries in the histogram:
            61: (65535,65535,65535) #FFFFFFFFFFFF white
            50: (0,0,0) #000000000000 black
             3: (0,0,18827) #00000000498B srgb(0%,0%,28.7282%)
             3: (0,0,11506) #000000002CF2 srgb(0%,0%,17.557%)
             2: (65535,65535,61319) #FFFFFFFFEF87 srgb(100%,100%,93.5668%)
             2: (65535,65535,57677) #FFFFFFFFE14D srgb(100%,100%,88.0095%)
             2: (65535,58827,65535) #FFFFE5CBFFFF srgb(100%,89.7642%,100%)
             2: (65169,65535,65535) #FE91FFFFFFFF srgb(99.4415%,100%,100%)
             2: (62434,65535,65535) #F3E2FFFFFFFF srgb(95.2682%,100%,100%)
             2: (61541,65535,65535) #F065FFFFFFFF srgb(93.9055%,100%,100%)
             2: (61285,65535,65535) #EF65FFFFFFFF srgb(93.5149%,100%,100%)
             2: (56139,65535,65535) #DB4BFFFFFFFF srgb(85.6626%,100%,100%)
             2: (49257,65535,65535) #C069FFFFFFFF srgb(75.1614%,100%,100%)
             2: (44933,65535,65535) #AF85FFFFFFFF srgb(68.5634%,100%,100%)
             2: (44931,65535,65535) #AF83FFFFFFFF srgb(68.5603%,100%,100%)
The histogram doesn't help us much.
Let's reduce the number of colours using "-colors N", where N=1,2,3,4, and compare each result to the input. We show the RMSE distortion; 0.0 means there is no distortion, with larger numbers up to 1.0 meaning the distortion is worse.
%IMG7%magick ^
  jm_src2.png ^
  ( +clone ^
    +dither -colors 1 ^
    +write jm_col1.png ^
  ) ^
  -metric RMSE ^
  -format %%[distortion] ^
  -compare ^
  info:
0.304303 |

|
%IMG7%magick ^
  jm_src2.png ^
  ( +clone ^
    +dither -colors 2 ^
    +write jm_col2.png ^
  ) ^
  -metric RMSE ^
  -format %%[distortion] ^
  -compare ^
  info:
0.185066 |
|
%IMG7%magick ^
  jm_src2.png ^
  ( +clone ^
    +dither -colors 3 ^
    +write jm_col3.png ^
  ) ^
  -metric RMSE ^
  -format %%[distortion] ^
  -compare ^
  info:
0.132678 |
|
%IMG7%magick ^
  jm_src2.png ^
  ( +clone ^
    +dither -colors 4 ^
    +write jm_col4.png ^
  ) ^
  -metric RMSE ^
  -format %%[distortion] ^
  -compare ^
  info:
0.127757 |
|
None of the RMSE metrics are particularly close. With one colour, the distortion is bad. It improves greatly with two colors, and again with three colours. But the improvement with four colours is very slight. We could continue with more colours, getting a slight improvement each time, but it would be only slight. The last big improvement comes from "-colors 3", and this is the solution.
(Caution: even when the image has more than N colours, -colors N may find fewer than N colours.)
The script jumpMethod.bat reads an input image and creates an output, by running an IM transformation a number of times, seeking the biggest improvement. It can also create explanatory graphs, if we want.
| Parameter | Description |
|---|---|
| %1 | Input image |
| %2 | Output image |
| %3 | Initial trial value for k. |
| %4 | Final trial value for k. |
| %5 | Any IM process that will transform an image. It should contain the four characters _XX_ which will be substituted by a value of k. |
| %6 | A skeleton filename for output graphs. Leave blank or "." if graphs are not wanted. Should contain _XX_, which will be substituted by 1, 2 or 3. |
(The graphs are made by gnuplot. If gnuplot isn't installed, the script won't create graphs.)
We continue the tests to "-colors 19", and plot the distortions.
call %PICTBAT%jumpMethod jm_src2.png jm_src2_x.png 1 19 "+dither -colors _XX_" jm_col_gr_XX_.png
The graph shows an "elbow" at "-colors 3". Distortion improves from 1 to 2, and improves more (proportionally) from 2 to 3. After that, the improvement is slight.
Caution: the graph is truncated, and doesn't include the origin, at distortion=0.
We quantify this in two stages. First, we transform the graph by raising to a negative power: D = dist-1.5.
For a distribution with no clustering, the distortion graph would be a hyperbolic. Raising this to a negative power would produce roughly a straight line, in the absence of clustering: D = a*N + b where a and b are constants.
The positive part of the power is called "Y", so D = dist-Y where Y=1.5. Okay, so why 1.5? Because colours have three dimensions (eg red, green and blue) and half of 3 is 1.5.
One way to view this graph is to observe that the line is is two portions, each more or less straight. The first is from N=0 to N=3; the second is from N=3 to N=19. But later examples on this page are not so simple: are there more than two portions? Or just one single portion with no definite elbow? If there is an elbow, exactly where is it?
Further analysis provides definite answers.
We differentiate the graph of D: JN = DN - DN-1, but we define D0 to be zero. We look for the maximum value, the peak value, of J. The value of N at the peak gives us the number of clusters.
The position of the peak shows the value of N that gives us the best improvement in quality. This isn't the least distortion -- the distortion keeps improving with increasing N. The peak is at the best improvement in distortion.
In the absence of a cluster, J1 will be a high value, and following values will be roughly constant and lower than J1.
This chart shows a clear peak in the value of J at N=3.
The script has created an image using just the colours of the three clusters, with each pixel the appropriate colour.

We can count the colours, and list them:
%IMG7%magick ^
  jm_src2_x.png ^
  -unique-colors ^
  -format "numCols=%%w\n" ^
  +write info: ^
  txt:
numCols=3
# ImageMagick pixel enumeration: 3,1,0,65535,srgb
0,0: (10854,12611,14487)  #2A6631433897  srgb(16.5621%,19.2432%,22.1057%)
1,0: (39532,32693,25980)  #9A6C7FB5657C  srgb(60.322%,49.8863%,39.6429%)
2,0: (51178,53174,54723)  #C7EACFB6D5C3  srgb(78.0926%,81.1383%,83.5019%)
Some images don't have any number of clusters.
%IMG7%magick ^ -seed 1234 ^ -size 300x200 xc: ^ +noise random ^ jm_rand.png |
|
call %PICTBAT%jumpMethod jm_rand.png jm_rand_x.png 1 19 "+dither -colors _XX_" jm_rand_gr_XX_.png

if ERRORLEVEL 1 goto error

echo jmNatMax=%jmNatMax%
jmNatMax=1
The final graph shows a peak in J at N=1, which indicates there is no division into clusters, which is a good conclusion to make for an image of random pixels. If we don't want that solution, we can search again, starting at 2:
call %PICTBAT%jumpMethod jm_rand.png jm_rand2_x.png 2 19 "+dither -colors _XX_" jm_rand2_gr_XX_.png

if ERRORLEVEL 1 goto error

echo jmNatMax=%jmNatMax%
jmNatMax=7
The script has created the result with seven colours:
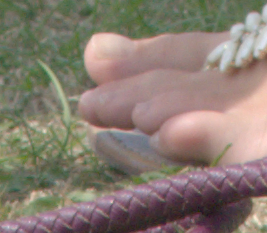
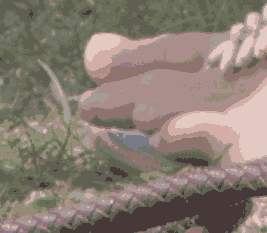
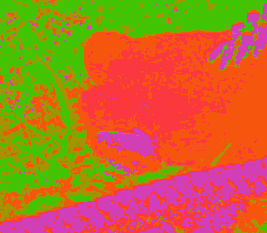
set SRC=toes.png |
|
call %PICTBAT%jumpMethod %SRC% jm_toes_x.png 1 19 "+dither -colors _XX_" jm_toes_gr_XX_.png

if ERRORLEVEL 1 goto error

echo jmNatMax=%jmNatMax%
jmNatMax=6
The final graph shows a peak in J at N=6, a lesser peak at N=14, with N=2 and N=1 very close behind, and so on.
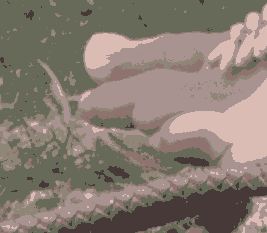
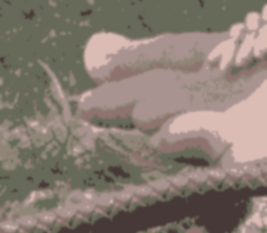
The script has created the version with N=6:
We could repeat the search, starting at N=7. Instead, we simply create the N=14 version:
%IMG7%magick ^ toes.png ^ +dither -colors 14 ^ jm_toes_14.png |
|
We can see that doubling the number of colours has improved the reslut, but not by much. So N=7 is a reasonable answer to "How many colours do we need?"
We repeat the test, but with dithering.
call %PICTBAT%jumpMethod %SRC% jm_toesd_x.png 1 19 "-colors _XX_" jm_toesd_gr_XX_.png

if ERRORLEVEL 1 goto error

echo jmNatMax=%jmNatMax%
jmNatMax=6
The first graph, of "distortion", shows more distortion at every N, compared to the graph above without dithering. Dithering always increases RMSE distortion. Therefore, the graph of "D" shows decreased values at every N compared to no dithering. Also note that increasing N sometimes increases distortion, which decreases D, and hence makes J negative.
This time, the largest peak is at N=16. The result is:

And we can create the N=6 version:
%IMG7%magick ^ toes.png ^ -colors 6 ^ jm_toesd_6.png |

|
Dithering works because the human eye doesn't evaluate individual pixels, but groups of pixels together.
Why does dithering always increase RMSE distortion? IM finds the best set of N colours, then changes each output pixel to the closest of this set. When dithering is used, the error at each pixel is carried to adjacent pixels, and they may be adjusted if this will reduce the cumulative error. Thus, we get the best possible RMSR score without dithering, and dithering can only make it worse.
Can we devise a scoring system that more closely matches the human visual system? This is rather subjective, but it seems to me that a small blur after the dithering does the trick.
call %PICTBAT%jumpMethod %SRC% jm_toesdb_x.png 1 19 "-colors _XX_ -blur 0x1" jm_toesdb_gr_XX_.png

if ERRORLEVEL 1 goto error

echo jmNatMax=%jmNatMax%
jmNatMax=6
The distortion at every N is lower than for the "no dither, no blur" case. It is also better than for the "dither only" case.
So, I suggest that to use the "jump" method to find the best N for dithering, we should use "-blur 0x1" in the jump process. This gives us a good value for N. When using this to make the final image, we would omit the blur. (Or we could include it, if we want, of course.)
This raises the obvious question: what happens if we blur, without dithering?
call %PICTBAT%jumpMethod %SRC% jm_toesb_x.png 1 19 "+dither -colors _XX_ -blur 0x1" jm_toesb_gr_XX_.png

if ERRORLEVEL 1 goto error

echo jmNatMax=%jmNatMax%
jmNatMax=6
Again, the distortions are better than with the non-dither non-blur process, though worse than the dither-plus-blur process.
(Blurring smooths the boundaries between colours, which is usually where distortion is worst, and the act of smoothing will create intermediate colours that are likely to be more accurate, thus reducing overall distortion.)
Here is the best result, at N=6:

Here is the next best result, at N=2:
%IMG7%magick ^ toes.png ^ +dither -colors 2 ^ -blur 0x1 ^ jm_toesb_2.png |

|
A 3D object, illuminated by white light, varies in lightness and chroma (or saturation) because of shadowing, but the hue is reasonably constant.
The script justHue.bat reduces the image to just the hue:
call %PICTBAT%justHue ^ toes.png ^ jm_justhue.png |
|
Use the jump method, without dithering or blurring. We have only one dimension.
set jmPdims=1

call %PICTBAT%jumpMethod jm_justhue.png jm_toesjh_x.png 1 19 "+dither -colors _XX_" jm_toesjh_gr_XX_.png

if ERRORLEVEL 1 goto error

echo jmNatMax=%jmNatMax%
jmNatMax=1
The best N=1, which isn't particularly useful.
Here is the best result, at N=1:

Try again, starting at 2:
call %PICTBAT%jumpMethod jm_justhue.png jm_toesjh2_x.png 2 19 "+dither -colors _XX_" jm_toesjh2_gr_XX_.png

if ERRORLEVEL 1 goto error

echo jmNatMax=%jmNatMax%
jmNatMax=6
Here is the best result, at N=6:
N=5 isn't far behind, so let's try that:
%IMG7%magick ^ jm_justhue.png ^ +dither -colors 5 ^ jm_justhue_5.png |
|
The N=5 solution has no gray pixels, so N=6 is indeed the best solution.
This is a simple but powerful method for answering the question, "How many colours are really in this image?"
The jump method is one component of K-clustering. A variation is used in Multi-phase searching.
For convenience, .bat scripts are also available in a single zip file. See Zipped BAT files.
rem Applies a series of distortions,
rem   using "jump" method to find the best improvement.
rem %1 input image
rem %2 output image
rem %3 first number
rem %4 last number
rem %5 IM command, with _XX_, which will be substituted.
rem      For example: "-colors _XX_"
rem %6 optional template for gnuplot graph images, with _XX_
@rem
@rem Also uses:
@rem   jmPdims [3] Smaller values give more weight to jumps at high distortions.
@rem
@rem See https://en.wikipedia.org/wiki/Determining_the_number_of_clusters_in_a_data_set
@rem
@rem Updated:
@rem   6-August-2022 for IM v7
@rem

@if "%~5"=="" findstr /B "rem @rem" %~f0 & exit /B 1

@setlocal

@call echoOffSave

call %PICTBAT%setInOut %1 jm


set INFILE=%1
set OUTFILE=%2

set nStart=%3
set nEnd=%4

set CMD=%~5

set TMPLT=%6
if "%TMPLT%"=="." set TMPLT=

set TMPLT_SVG=%~dpn6.svg

set TMPDIR=\temp\

set GPDATA1=%TMPDIR%jm_gp1.csv
set GPDATA2=%TMPDIR%jm_gp2.csv
set GPDATA3=%TMPDIR%jm_gp3.csv
set GPDATA4=%TMPDIR%jm_gp4.csv
set GPDATA5=%TMPDIR%jm_gp5.csv

set GPSVG1=%TMPLT_SVG:_XX_=1%
set GPSVG2=%TMPLT_SVG:_XX_=2%
set GPSVG3=%TMPLT_SVG:_XX_=3%
set GPSVG4=%TMPLT_SVG:_XX_=4%
set GPSVG5=%TMPLT_SVG:_XX_=5%

echo i,v >%GPDATA1%
echo i,v >%GPDATA2%
echo i,v >%GPDATA3%
echo i,v >%GPDATA4%
echo i,v >%GPDATA5%

if "%jmPdims%"=="" set jmPdims=3
set Y=%jmPdims%/2

set DPREV=0
set maxJ=0
set NatMax=0

if %nStart% LEQ %nEnd% (
  set nStep=1
) else (
  set nStep=-1
)

if %nStart%==1 (
  set ignoreThis=0
) else (
  set ignoreThis=1
  set /A nStart-=%nStep%
)

echo nStart=%nStart% ignoreThis=%ignoreThis%

for /L %%N in (%nStart%,%nStep%,%nEnd%) do (

  set sCMD=!CMD:_XX_=%%N!
  echo sCMD=!sCMD!

  for /F "usebackq" %%L in (`%IM7DEV%magick ^
    %INFILE% ^
    ^( +clone ^
       !sCMD! ^
    ^) ^
    -metric RMSE ^
    -precision 19 ^
    -format %%[distortion] ^
    -compare ^
    info:`) do set DIST=%%L

rem FIXME: Beware DIST=0

  for /F "usebackq" %%L in (`%IMG7%magick identify ^
    -precision 19 ^
    -format "D=%%[fx:pow(!DIST!,-(%Y%))]\n" ^
    xc:`) do set %%L

  for /F "usebackq" %%L in (`%IMG7%magick identify ^
    -precision 19 ^
    -format "J=%%[fx:!D!-!DPREV!]\nBPB=%%[fx:!D!/%%N]\n" ^
    xc:`) do set %%L

  for /F "usebackq" %%L in (`%IMG7%magick identify ^
    -format "isMax=%%[fx:!J!>!maxJ!?1:0]" ^
    xc:`) do set %%L

  if !ignoreThis!==0 (
    if !isMax!==1 (
      set maxJ=!J!
      set NatMax=%%N
      echo %%N,!j! >>%GPDATA4%
    )
    if not "%TMPLT%"=="" (
      echo %%N,!DIST! >>%GPDATA1%
      echo %%N,!D! >>%GPDATA2%
      echo %%N,!j! >>%GPDATA3%
      echo %%N,!BPB! >>%GPDATA5%
    )
  )
  echo %%N, DIST=!DIST!  D=!D! J=!J!  BPB=!BPB!  isMax=!isMax!

  set DPREV=!D!

  set ignoreThis=0
)

echo maxJ=%maxJ%  NatMax=%NatMax%

set sCMD=!CMD:_XX_=%NatMax%!
echo sCMD=!sCMD!

%IM7DEV%magick ^
  %INFILE% ^
  !sCMD! ^
  %OUTFILE%

if "%TMPLT%"=="" goto end

gnuplot-base ^
  -c %PICTBAT%plotScr.gp ^
  %GPDATA1% %GPSVG1% 450 400 "2" ^
  "N" "distortion" ^
  "set key off"

gnuplot-base ^
  -c %PICTBAT%plotScr.gp ^
  %GPDATA2% %GPSVG2% 450 400 "2" ^
  "N" "D" ^
  "set key off"

gnuplot-base ^
  -c %PICTBAT%plotScr.gp ^
  %GPDATA3% %GPSVG3% 450 400 "2" ^
  "N" "J" ^
  "set key off"

gnuplot-base ^
  -c %PICTBAT%plotScr.gp ^
  %GPDATA4% %GPSVG4% 450 400 "2" ^
  "N" "best J so far" ^
  "set key off"

gnuplot-base ^
  -c %PICTBAT%plotScr.gp ^
  %GPDATA5% %GPSVG5% 450 400 "2" ^
  "N" "BPB" ^
  "set key off"

set GR1=%TMPLT:_XX_=1%
set GR2=%TMPLT:_XX_=2%
set GR3=%TMPLT:_XX_=3%
set GR4=%TMPLT:_XX_=4%
set GR5=%TMPLT:_XX_=5%
set GRALL=%TMPLT:_XX_=all%

call %PICTBAT%gpTrimY %GPSVG1% %GR1%
call %PICTBAT%gpTrimY %GPSVG2% %GR2%
call %PICTBAT%gpTrimY %GPSVG3% %GR3%
call %PICTBAT%gpTrimY %GPSVG4% %GR4%
call %PICTBAT%gpTrimY %GPSVG5% %GR5%

%IMG7%magick  %GR1% %GR2% %GR3% +append +repage %GRALL%

:end

call echoRestore

endlocal &set jmOUTFILE=%OUTFILE%& set jmNatMax=%NatMax%
rem From image %1, makes version with just hue.
@rem
@rem Updated:
@rem   25-September-2022 for IM v7.
@rem

@if "%1"=="" findstr /B "rem @rem" %~f0 & exit /B 1

@setlocal

@call echoOffSave

@call %PICTBAT%setInOut %1 jh

if not "%2"=="" if not "%2"=="." set OUTFILE=%2

%IMG7%magick ^
  %INFILE% ^
  -colorspace HCL ^
  -channel G -level 3%%,5%% ^
  -channel B -evaluate set 50%% ^
  +channel ^
  -colorspace sRGB ^
  %OUTFILE%


call echoRestore
All images on this page were created by the commands shown, using:
%IMG7%magick -version
Version: ImageMagick 7.1.0-49 Q16-HDRI x64 7a3f3f1:20220924 https://imagemagick.org
Copyright: (C) 1999 ImageMagick Studio LLC
License: https://imagemagick.org/script/license.php
Features: Cipher DPC HDRI OpenCL
Delegates (built-in): bzlib cairo freetype gslib heic jng jp2 jpeg jxl lcms lqr lzma openexr pangocairo png ps raqm raw rsvg tiff webp xml zip zlib
Compiler: Visual Studio 2022 (193331630)
To improve internet download speeds, some images may have been automatically converted (by ImageMagick, of course) from PNG or TIFF or MIFF to JPG.
Source file for this web page is jumpmeth.h1. To re-create this web page, execute "procH1 jumpmeth".
This page, including the images, is my copyright. Anyone is permitted to use or adapt any of the code, scripts or images for any purpose, including commercial use.
Anyone is permitted to re-publish this page, but only for non-commercial use.
Anyone is permitted to link to this page, including for commercial use.
Page version v1.0 13-August-2017.
Page created 26-Sep-2022 15:54:54.
Copyright © 2022 Alan Gibson.