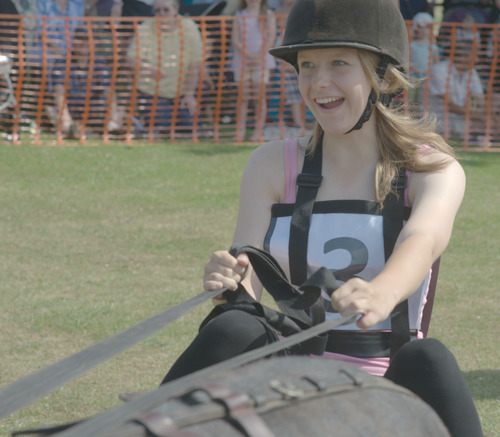
A source image.
%IMG7%magick ^ %DT_SRC% ^ %WEB_SIZE% ^ dt_src_sm.jpg
Detail draws the eye into a photograph, or distracts the gaze. It is also useful for aligning (registering) photos or video frames.
I show one use for detail at Adding zing to photographs: Light Blur Difference Mask, with a script that is light where the source image has detail, by finding the difference with a blur, and blurring again more heavily. It is a smoothed rectified high-pass filter.
Detail is also useful for image alignment.
This page shows some alternative methods of finding detail in an image. A related problem is that of measuring detail.
I bracket some commands with "call StopWatch". This shows approximately how long the command took, in the format "d hh:mm:ss", ie days, hours, minutes and seconds. This is for an input image approximately 5000x5000 pixels.
Set up initial conditions:
set WEB_SIZE=-resize 500x500

rem set DT_SRC=\web\im\fromNef\AGA_1468_ssd.tiff
set DT_SRC=%PICTLIB%20130713\aga_1468_srgb.tiff

if not exist %DT_SRC% (
  echo Can't find DT_SRC [%DT_SRC%]
  exit /B 1
)

set DT_CROP=-crop 5632x4924+0+0 +repage

%IMG7%magick %DT_SRC% %DT_CROP% -compress Zip dt_src.tiff

set DT_SRC=dt_src.tiff

set nlDEBUG=1

call %PICTBAT%getPointsize %DT_SRC% 50

set nlPOINTSIZE=%gpPointsize%
set nlSTROKEWIDTH=10
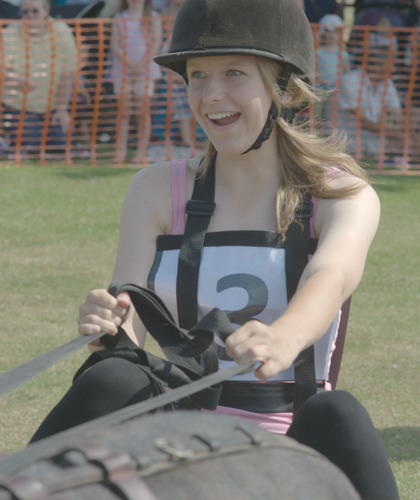
The source photograph for this page has had minimal processing from the raw camera image. It has been given a reasonable gamma and sigmoidal contrast, and is cropped. It needs a slight warming up (colour shift towards red) and saturation boost.
The (manual) focus isn't great.
On this page, all operations are performed on the full-size image, roughly 5000x5000 pixels. Results are resized for display on the web.
|
A source image. %IMG7%magick ^ %DT_SRC% ^ %WEB_SIZE% ^ dt_src_sm.jpg |
|
Some of the techniques shown here include "-auto-level -auto-gamma". This is only for display on the web page. In normal use, "-auto-level" is unnecessary and prevents true comparisons, and "-auto-gamma" may create false results (as some values may get squished together).
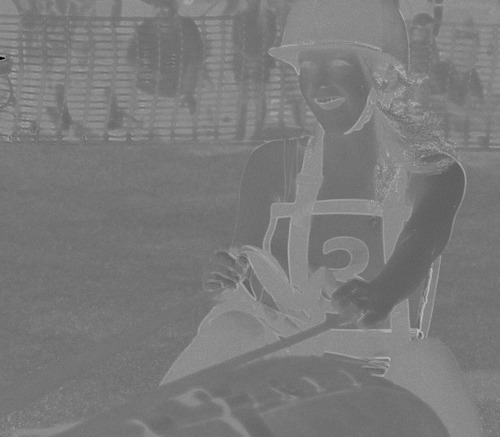
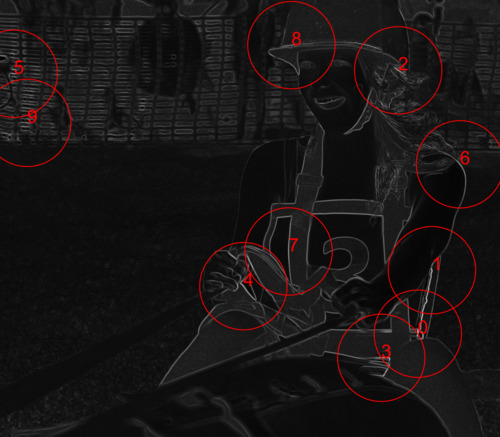
The script ltBlrDiff.bat finds the difference between an image and a light blur of the image.
|
Use a difference from blur to find detail. call StopWatch call %PICTBAT%ltBlrDiff %DT_SRC% call StopWatch %IMG7%magick ^ dt_src_lbd.tiff ^ %WEB_SIZE% ^ dt_src_lbd_sm.jpg 0 00:01:12 |
|
|
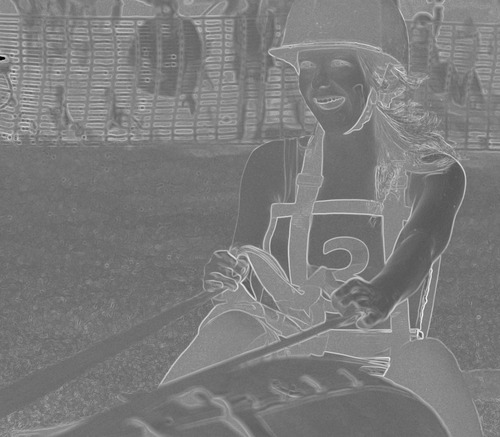
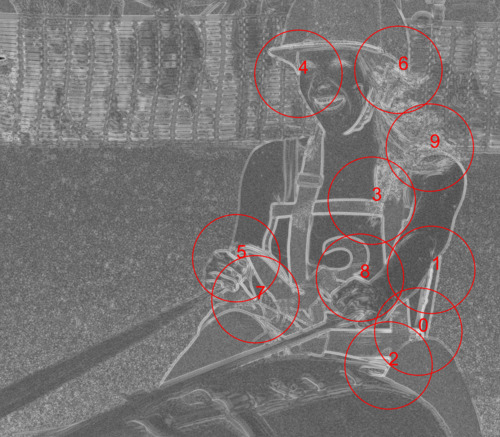
Use standard deviation to find detail. call StopWatch %IMG7%magick ^ %DT_SRC% ^ -statistic standard-deviation 10x10 ^ -grayscale RMS -auto-level ^ -write dt_stddev.tiff ^ -auto-gamma ^ %WEB_SIZE% ^ dt_stddev_sm.jpg call StopWatch 0 00:00:56 -auto-gamma might lose a little bit of data,
|
|
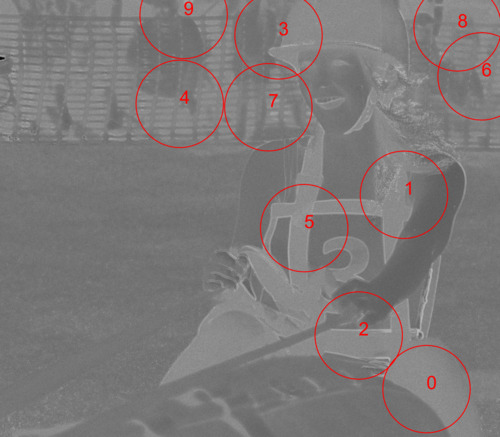
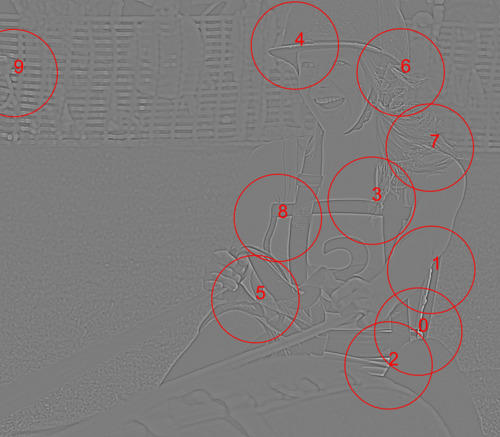
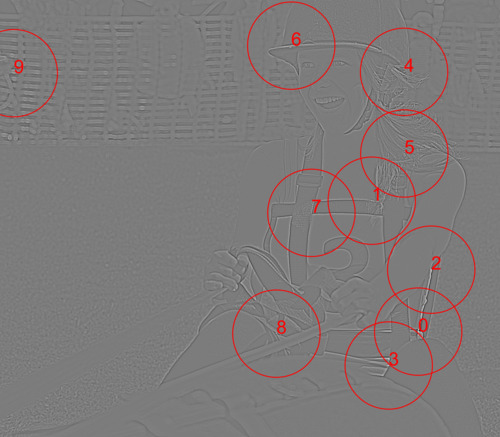
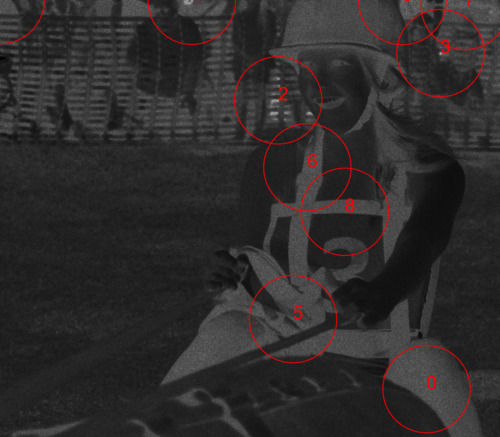
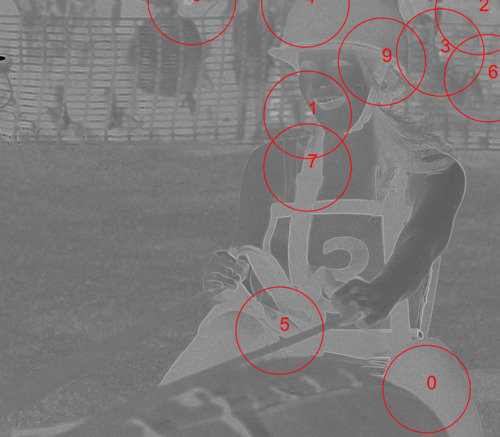
For the two methods, we can find the ten lightest pixels. For each pixel found, an exclusion zone is made, so pixels within a certain radius will not be considered. (The default radius is 10% of the shortest image dimension.) The exclusion circles are shown. The brightest pixel is labelled "0", the next is labelled "1", etc.
|
Find the lightest pixels of the blur-difference. call %PICTBAT%nLightest dt_src_lbd.tiff %IMG7%magick ^ dt_src_lbd_nl_dbg.tiff ^ %WEB_SIZE% ^ dt_src_lbd_nl_dbg_sm.jpg |
|
|
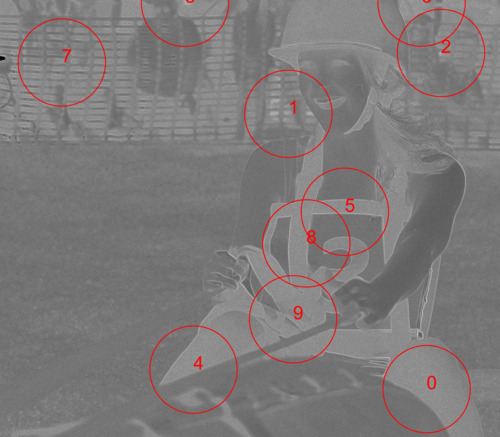
Find the lightest pixels of the standard deviation. call %PICTBAT%nLightest dt_stddev.tiff %IMG7%magick ^ dt_stddev_nl_dbg.tiff ^ %WEB_SIZE% ^ dt_stddev_nl_dbg_sm.jpg |
|
The script nLightest.bat takes three parameters:
This image is roughly square so, at the default radius of 10%, the maximum number of points that will be found is roughly 5 * 5 = 25.
If the input image was entirely black, the script would find no points. The primary output is an list of (x,y) coordinates, echoed to stdout. For example, the output for blur-difference is:
4804,4384
4550,2194
4040,3780
3137,398
2024,1170
3426,2570
5424,860
3022,1208
5154,308
2068,168
When the script is run with set nlDEBUG=1, it creates the images shown above, with the red circles and numbers. This slows down the script.
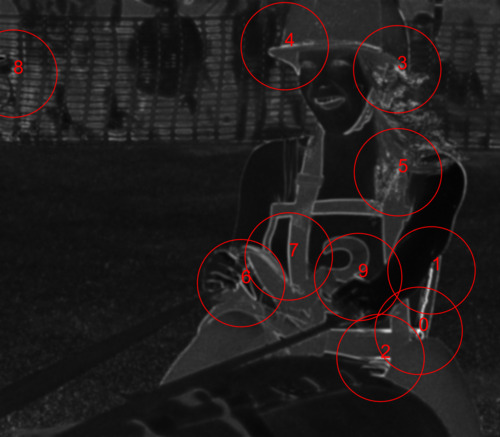
We can use a difference of two blurs to find detail. This will eliminate very fine detail, as well as large-scale variations. It is a mid-pass filter.
|
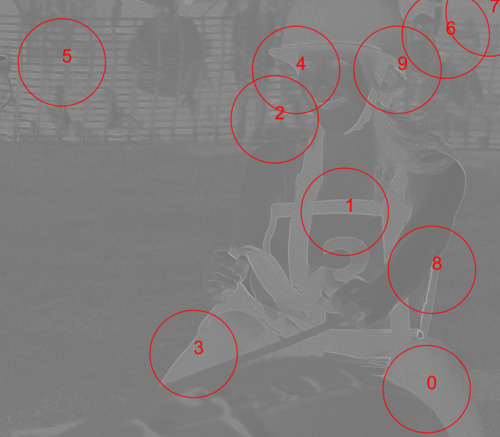
Use a difference between two blurs to find detail. call StopWatch call %PICTBAT%twoBlrDiff %DT_SRC% call StopWatch 0 00:02:13 What are the ten lightest points? call %PICTBAT%nLightest dt_src_2bd.tiff %IMG7%magick ^ dt_src_2bd_nl_dbg.tiff ^ %WEB_SIZE% ^ dt_src_2bd_nl_dbg_sm.jpg |
|
DoG Difference of Gaussians:
|
Use a DoG to find detail. This is quite slow. call StopWatch %IMG7%magick ^ %DT_SRC% ^ -bias 50%% -morphology Convolve DoG:0,4.0,6.0 ^ -grayscale RMS -auto-level ^ dt_src_dog.tiff call StopWatch 0 00:11:09 What are the ten lightest points? call %PICTBAT%nLightest dt_src_dog.tiff %IMG7%magick ^ dt_src_dog_nl_dbg.tiff ^ %WEB_SIZE% ^ dt_src_dog_nl_dbg_sm.jpg |
|
LoG Laplacian of Gaussians:
|
Use a LoG to find detail. This is quite slow. call StopWatch %IMG7%magick ^ %DT_SRC% ^ -bias 50%% -morphology Convolve LoG:0x4 ^ -grayscale RMS -auto-level ^ dt_src_log.tiff call StopWatch 0 00:04:52 What are the ten lightest points? call %PICTBAT%nLightest dt_src_log.tiff %IMG7%magick ^ dt_src_log_nl_dbg.tiff ^ %WEB_SIZE% ^ dt_src_log_nl_dbg_sm.jpg |
|
Edge creates a limited range of gray, with a large proportion being white, so we blur the result.
According to the source code effect.c, the function EdgeImage uses morphology convolve with a Laplacian kernel of the given radius, 1 iteration, 0.0 bias.
|
Use -edge2 to find detail. call StopWatch %IMG7%magick ^ %DT_SRC% ^ -edge 2 ^ -grayscale RMS ^ -blur 0x2 ^ -auto-level ^ dt_src_edge2.tiff call StopWatch 0 00:00:21 What are the ten lightest points? call %PICTBAT%nLightest dt_src_edge2.tiff %IMG7%magick ^ dt_src_edge2_nl_dbg.tiff ^ %WEB_SIZE% ^ dt_src_edge2_nl_dbg_sm.jpg |
|
|
Use -edge 10 to find detail. call StopWatch %IMG7%magick ^ %DT_SRC% ^ -edge 10 ^ -grayscale RMS ^ -blur 0x10 ^ -auto-level ^ dt_src_edge10.tiff call StopWatch 0 00:04:15 What are the ten lightest points? call %PICTBAT%nLightest dt_src_edge10.tiff %IMG7%magick ^ dt_src_edge10_nl_dbg.tiff ^ %WEB_SIZE% ^ dt_src_edge10_nl_dbg_sm.jpg |
|
For the purpose of finding detail, "-edge 10" is a disaster.
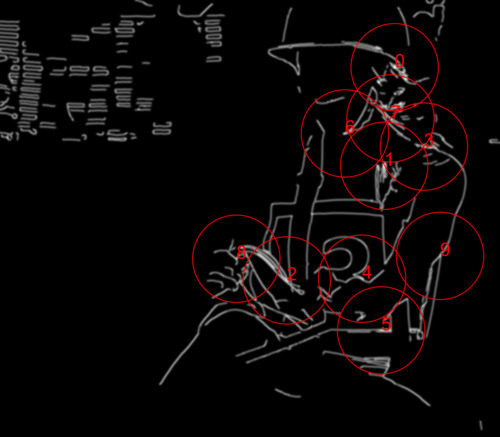
Canny makes thin white lines on a black background. Blurring this will emphasise intersections.
|
Use -canny to find detail. call StopWatch %IMG7%magick ^ %DT_SRC% ^ -canny 0x4+10%%+30%% ^ -grayscale RMS ^ -blur 0x10 ^ -auto-level ^ dt_src_can.tiff call StopWatch 0 00:01:12 What are the ten lightest points? call %PICTBAT%nLightest dt_src_can.tiff %IMG7%magick ^ dt_src_can_nl_dbg.tiff ^ %WEB_SIZE% ^ dt_src_can_nl_dbg_sm.jpg |
|
This is a good result. Tweaking the "-canny" parameters might also find some features in the face.
We can use "-morhpology Convolve Sobel" to find a gradient magnitude. The result is similar to the difference of two blurs, but this doesn't give a zero result in the centre of edges, so doesn't need a further blur.
|
Slope magnitude. call StopWatch call %PICTBAT%slopeMag %DT_SRC% call StopWatch 0 00:00:29 What are the ten lightest points? call %PICTBAT%nLightest %smOUTFILE% %IMG7%magick ^ %nlDEBUG_FILE% ^ %WEB_SIZE% ^ dt_src_sm_nl_dbg_sm.jpg |
|
Prewitt
See Convolution of Images: Prewitt.
|
Slope magnitude by Prewitt. call StopWatch %IMG7%magick ^ %DT_SRC% ^ -alpha off ^ -define convolve:scale="50%%^!" -bias 50%% ^ ( -clone 0 -morphology Convolve Prewitt:0 ) ^ ( -clone 0 -morphology Convolve Prewitt:90 ) ^ -delete 0 -solarize 50%% -level 50,0%% ^ +level 0,70.7%% ^ -evaluate Pow 2 ^ -compose plus -composite ^ -evaluate Pow 0.5 ^ -separate -evaluate-sequence Max ^ -auto-level -auto-gamma ^ dt_src_prew.tiff call StopWatch 0 00:00:35 What are the ten lightest points? call %PICTBAT%nLightest dt_src_prew.tiff %IMG7%magick ^ %nlDEBUG_FILE% ^ %WEB_SIZE% ^ dt_src_prew_sm.jpg |
|
Compass
See Convolution of Images: Compass.
|
Slope magnitude by Compass. call StopWatch %IMG7%magick ^ %DT_SRC% ^ -alpha off ^ -define convolve:scale="50%%^!" -bias 50%% ^ ( -clone 0 -morphology Convolve Compass:0 ) ^ ( -clone 0 -morphology Convolve Compass:90 ) ^ -delete 0 -solarize 50%% -level 50,0%% ^ +level 0,70.7%% ^ -evaluate Pow 2 ^ -compose plus -composite ^ -evaluate Pow 0.5 ^ -separate -evaluate-sequence Max ^ -auto-level -auto-gamma ^ dt_src_comp.tiff call StopWatch 0 00:00:50 What are the ten lightest points? call %PICTBAT%nLightest dt_src_comp.tiff %IMG7%magick ^ %nlDEBUG_FILE% ^ %WEB_SIZE% ^ dt_src_comp_sm.jpg |
|
Roberts
See Convolution of Images: Roberts.
|
Slope magnitude by Roberts. call StopWatch %IMG7%magick ^ %DT_SRC% ^ -define convolve:scale="50%%^!" -bias 50%% ^ -define morphology:compose=Lighten ^ -morphology Convolve "Roberts:@" ^ -grayscale RMS ^ -auto-level -auto-gamma ^ dt_src_rob.tiff call StopWatch 0 00:00:29 What are the ten lightest points? call %PICTBAT%nLightest dt_src_rob.tiff %IMG7%magick ^ %nlDEBUG_FILE% ^ %WEB_SIZE% ^ dt_src_rob_sm.jpg |
|
Kirsch
See Convolution of Images: Kirsch.
|
Slope magnitude by Kirsch. call StopWatch %IMG7%magick ^ %DT_SRC% ^ -define convolve:scale="50%%^!" -bias 50%% ^ -define morphology:compose=Lighten ^ -morphology Convolve "Kirsch:@" ^ -grayscale RMS ^ -auto-level -auto-gamma ^ dt_src_kir.tiff call StopWatch 0 00:01:10 What are the ten lightest points? call %PICTBAT%nLightest dt_src_kir.tiff %IMG7%magick ^ %nlDEBUG_FILE% ^ %WEB_SIZE% ^ dt_src_kir_sm.jpg |
|
We have seen techniques for expressing the level of detail, expressed as a grayscale image, where "lighter" means "more detail".
The basic techniques are:
We can rank these in order of speed, with the fastest first:
cGrep /p0 /idt_sw_*.lis /s*:* /f\r,\m\n |cSort /p0 /i- /k0 /o- |chStrs /p0 /i- /odt_rank.lis /f"dt_sw_"
0 00:00:21,edge2
0 00:00:29,sm
0 00:00:35,prew
0 00:00:50,comp
0 00:00:52,rob
0 00:00:56,stdDev
0 00:01:10,kir
0 00:01:12,blrDiff
0 00:01:12,can
0 00:02:13,2bd
0 00:04:15,edge10
0 00:04:52,log
0 00:11:09,dog
We have seen that the results of these methods can be processed to find positions of high detail. We want the process to identify the positions that a human viewer would consider interesting, and not to identify "boring" positions. I would rank the process in this order, with the best first:
Tweaking the parameters to each method would change the rankings of speed and quality.
For my purposes, difference between two blurs works well.
Human viewers tend to be most interested in faces. None of these methods rank facial detail within the top ten.
Other possibilities include: Laplacian:{type} (where type=0, 1, 2, 3, 5, 7, 15, 19), Roberts:{angle}, Prewitt:{angle}, Compass:{angle}, Kirsch:{angle}, Frei-Chen:[{type},][{angle}] (type=1, 2, 10, 11-19).
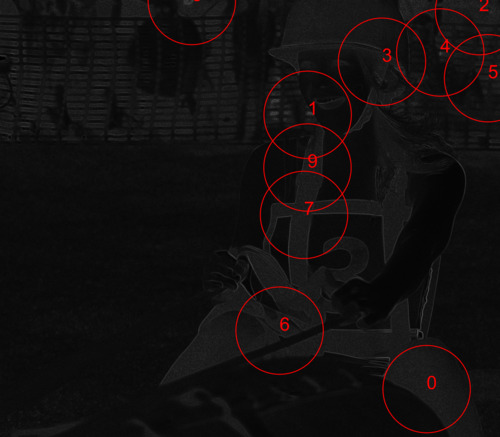
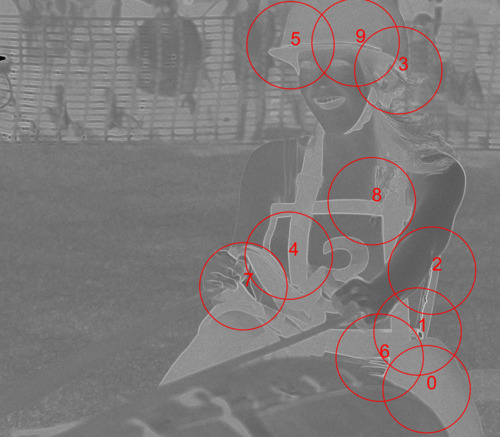
The debug image is intended as a visual aid, but it can be used for other purposes. It is greyscale, apart from the red circles and numbers. By taking the difference between the red and green channels and trimming, we find the boundary box of the first ten circles. This will be at least 10/25 of the area of a square source image.
|
Crop the source image to the boundary of the red circles. for /F "usebackq" %%L ^ in (`%IMG7%magick ^ dt_src_lbd_nl_dbg.tiff ^ -separate -delete 2 -compose Difference -composite ^ -bordercolor Black -border 1 ^ -format "TRIM_CROP=%%@" ^ info:`) ^ do set %%L echo TRIM_CROP=%TRIM_CROP% TRIM_CROP=4105x4882+1528+1 %IMG7%magick ^ %DT_SRC% ^ -crop %TRIM_CROP% ^ %WEB_SIZE% ^ dt_trimmed_sm.jpg |
|
We have trimmed the image back to where detail apears, more or less. But the bottom of the image doesn't appear to have any detail. It is included because of red circle number 2, which is caused by a small patch of white on the otherwise black leggings, which isn't visible in the reduced image.
When we want to align one image to another, we generally start by matching points in one image with points in the other. We can use one of the above methods to identify features in one image, ie areas of high variation, high entropy. These are likely to be distinctive in the other image, reducing false matches.
This is developed on the Simple alignment by matching areas page.
We don't need to keep all those large TIFF or MIFF files, so delete them.
rem del dt_*_*.tiff
del dt_stddev.tiff
del dt_*_*.miff
del %TEMP%\dt_*nl.miff
del %TEMP%\dt_*nl_dbgdrw.txt
For convenience, .bat scripts are also available in a single zip file. See Zipped BAT files.
@set STOP_WATCH_SUB=
@if not "%STOP_WATCH_TIME%"=="" set STOP_WATCH_SUB=/S "%STOP_WATCH_TIME%"

@cDate %STOP_WATCH_SUB% /f"\q \H:\M:\s"

@for /F "usebackq tokens=*" %%L IN (`cDate /f"\d-\b-\Y \H:\M:\s"`) do @set STOP_WATCH_TIME=%%L
@rem echo %STOP_WATCH_TIME%

@if not "%1"=="" @echo %STOP_WATCH_TIME% %1 %2 %3 %4 %5 %6 %7 %8 %9>>stopwatch.lis
rem %1 is image, %2 is height in pixels, sets gpPointsize to height in points.

call %PICTBAT%getDpi %1

if "%gdDpi%"=="0" (
  set gpPointsize=%2
) else (
  for /F "usebackq" %%L in (`%IMG7%magick identify -format "gpPointsize=%%[fx:%2*%gdDpi%/72]" xc:`) do set %%L
)
for /F "usebackq" %%L in (`%IMG7%magick identify -format "gdDpi=%%x\ngdUnits=%%U" %1`) do set %%L

if /I "%gdUnits%"=="PixelsPerCentimeter" (
  for /F "usebackq" %%L in (`%IMG7%magick identify -format "gdDpi=%%[fx:%gdDpi%*2.54]" xc:`) do set %%L
)
@rem From image %1, finds (%2) lightest points.
@rem
@rem After each point is found,
@rem    blacks out pixels within radius (r) of that point
@rem where r = min(width,height) * %3/100
@rem %3 defaults to 10 (percent).
@rem
@rem Returns number of points found. Could be < n, or even zero (?).
@rem
@rem Also uses:
@rem   nlDEBUG if 1, creates debugging image.
@rem   nlPOINTSIZE optional, pointsize for debug images.
@rem   nlSTROKEWIDTH for debug.
@rem   nlONLY_WHITE if 1, doesn't auto-level,
@rem      so finds only points that are exactly white.
@rem
@rem Returns:
@rem   nl_nFound number of points found, integer >= 0
@rem   echos list of coordinates.
@rem
@rem Updated:
@rem   24-May-2016 v7 needs -channel RGB for -auto-level.
@rem   7-May-2017 "+antialias" the circles.
@rem   2-August-2022 for IM v7 magick.
@rem


@if "%1"=="" findstr /B "rem @rem" %~f0 & exit /B 1

@setlocal enabledelayedexpansion

@call echoOffSave

call %PICTBAT%setInOut %1 nl

for /F "usebackq" %%L in (`cygpath %TEMP%`) do set CYGTEMP=%%L

set TMPFILE=%TEMP%\%~n1_%sioCODE%.miff
set CYGTMPFILE=%CYGTEMP%\%~n1_%sioCODE%.miff
set LISTFILE=%BASENAME%_%sioCODE%.lis
set TMPDEBUGFILE=%BASENAME%_%sioCODE%_dbg.miff
set DEBUGFILE=%BASENAME%_%sioCODE%_dbg%EXT%
set DEBUGDRAW=%TEMP%\%~n1_%sioCODE%_dbgdrw.txt

del %DEBUGDRAW% 2>nul

if "%nlPOINTSIZE%"=="" set nlPOINTSIZE=20

if "%nlSTROKEWIDTH%"=="" set nlSTROKEWIDTH=1

set MAX_FIND=%2
if "%MAX_FIND%"=="" set MAX_FIND=10

set PC_RAD=%3
if "%PC_RAD%"=="" set PC_RAD=10

set AUTOLEV=-channel RGB -auto-level +channel
if "%nlONLY_WHITE%"=="1" set AUTOLEV=

for /F "usebackq" %%L in (`%IMG7%magick ^
  %INFILE% ^
  -format "PIX_RAD=%%[fx:int(min(w,h)*%PC_RAD%/100+0.5)]" ^
  info:`) do set %%L

%IMG7%magick %INFILE% -colorspace Gray %AUTOLEV% %TMPFILE%

if "%nlDEBUG%"=="1" %IMG7%magick %INFILE% %TMPDEBUGFILE%

set /A nFound=0

:loop

set MAX=
set whiteX=

for /F "usebackq tokens=1-3 delims=:, " %%W ^
in (`%IM7DEV%magick ^
    %TMPFILE% ^
    -process onewhite ^
    NULL: 2^>^&1`) ^
do (
  if "%%W"=="onewhite" (
    set MAX=%%W
    set whiteX=%%X
    set whiteY=%%Y
    set /A whiteX2=%%X+%PIX_RAD%
  )
)

if "!MAX!"=="onewhite" if "!whiteX!" neq "none" (
  %IMG7%magick ^
    %TMPFILE% ^
    +antialias -fill #000 ^
    -draw "circle %whiteX% %whiteY% %whiteX2% %whiteY%" ^
    %AUTOLEV% ^
    %TMPFILE%

  if "%nlDEBUG%"=="1" (
    (
      echo fill None stroke #f00 circle %whiteX%,%whiteY%,%whiteX2%,%whiteY%
      echo fill #f00 stroke None text %whiteX%,%whiteY% '!nFound!'
    ) >>%DEBUGDRAW%
  )

  set /A nFound+=1
  echo %whiteX%,%whiteY%
  if !nFound! LSS %MAX_FIND% goto loop
)

if "%nlDEBUG%"=="1" if exist %DEBUGDRAW% %IMG7%magick ^
  %INFILE% ^
  -strokewidth %nlSTROKEWIDTH% ^
  -pointsize %nlPOINTSIZE% ^
  -draw @%DEBUGDRAW% ^
  %DEBUGFILE%

rem echo %0: nFound=%nFound%

call echoRestore

@endlocal & set nl_nFound=%nFound%& set nlDEBUG_FILE=%DEBUGFILE%
rem Difference from light blur, resulting in monochrome RMS.
rem
rem %2 is blur sigma in pixels.
@rem
@rem See also hvyBlrDiff and lbdMask.
@rem
@rem Updated:
@rem   2-August-2022 for IM v7 magick.
@rem

@if "%1"=="" findstr /B "rem @rem" %~f0 & exit /B 1

@setlocal

@call echoOffSave

call %PICTBAT%setInOut %1 lbd

set BLUR_SIG=%2
if "%BLUR_SIG%"=="" set BLUR_SIG=4

%IMG7%magick ^
  %INFILE% ^
  ^( +clone -blur 0x%BLUR_SIG% ^) ^
  -compose Difference -composite ^
  -grayscale RMS ^
  -auto-level ^
  -auto-gamma ^
  %OUTFILE%

call echoRestore

@endlocal
This script is based on Convolution of Images: Directional Kernels, under "vector addition of the two X and Y derivatives".
Each Sobel gives grey where there is no detail, and black or white at maximum detail. Solarize and level make this black where no detail, and white at maximum detail. Calling these X and Y, we then set result = sqrt(X^2+Y^2). This could give a result of 2. To ensure the result is <=1, we initially multiply both X and Y by sqrt(2)/2 = 0.7071 before squaring.
Bias 50% puts no-detail at mid-grey, so we also normalize the kernel and scale it by 50%.
rem Slope magnitude
rem
rem Returns the magnitude of the slope.
@rem
@rem  If %2 is given, uses this as the output filename.
@rem
@rem Also uses:
@rem   smAUTO if 0, doesn't "-auto-level -auto-gamma"
@rem
@rem Updated:
@rem   14-July-2022 for IM v7.
@rem   26-July-2022 Replace "-evaluate Pow 2 -compose plus -composite -evaluate Pow 0.5" by "-fx hypot(u,v)"
@rem

@if "%1"=="" findstr /B "rem @rem" %~f0 & exit /B 1

@setlocal

@call echoOffSave

call %PICTBAT%setInOut %1 sm

if not "%2"=="" if not "%2"=="." set OUTFILE=%2

if "%smAUTO%"=="0" (
  set AUTO=
) else (
  set AUTO=-auto-level -auto-gamma
  set AUTO=-auto-level
)

%IMG7%magick ^
  %INFILE% ^
  -alpha off ^
  -define convolve:scale="50%%^!" -bias 50%% ^
  ( -clone 0 -morphology Convolve Sobel:0 ) ^
  ( -clone 0 -morphology Convolve Sobel:90 ) ^
  -delete 0 ^
  -solarize 50%% -level 50,0%% ^
  +level 0,70.71067811865475%% ^
  -fx "hypot(u,v)" ^
  -separate -evaluate-sequence Max ^
  %AUTO% ^
  +depth ^
  -define quantum:format=integer ^
  %OUTFILE%

if ERRORLEVEL 1 exit /B 1

call echoRestore

endlocal & set smOUTFILE=%OUTFILE%
All images on this page were created by the commands shown, using:
%IMG7%magick -version
Version: ImageMagick 7.1.0-49 Q16-HDRI x64 7a3f3f1:20220924 https://imagemagick.org
Copyright: (C) 1999 ImageMagick Studio LLC
License: https://imagemagick.org/script/license.php
Features: Cipher DPC HDRI OpenCL
Delegates (built-in): bzlib cairo freetype gslib heic jng jp2 jpeg jxl lcms lqr lzma openexr pangocairo png ps raqm raw rsvg tiff webp xml zip zlib
Compiler: Visual Studio 2022 (193331630)
Source file for this web page is detail.h1. To re-create this web page, run "procH1 detail".
This page, including the images, is my copyright. Anyone is permitted to use or adapt any of the code, scripts or images for any purpose, including commercial use.
Anyone is permitted to re-publish this page, but only for non-commercial use.
Anyone is permitted to link to this page, including for commercial use.
Page version v1.0 29-May-2014.
Page created 27-Sep-2022 16:50:06.
Copyright © 2022 Alan Gibson.