
How can we superimpose an image on to a coffee mug? If the mug can be modelled in POV-Ray, there are two obvious methods.
This page demonstrates both methods.
The version of IM used must be at least Q16. Q8 should work but results will be disappointing as this permits only 256 values for displacement in each direction.
The methods shown on this page can be applied with any 3D modelling software, on any object that can be modelled. The Painting people page shows the same methods applied with Blender and ImageMagick.
We create an image that we will wrap around a mug.
%IMG7%magick ^
  ( -size 1200x400 gradient:#88f-#8f8 ) ^
  ( -size 1200x400 ^
    -background None ^
    -fill Black label:snibgo ^
    -fill White -page -10-10 label:snibgo ^
    -layers merge +repage ^
    -trim +repage -resize "1200x400^!" ) ^
  -composite ^
  +write cm_samp_srgb.png ^
  -colorspace RGB ^
  cm_samp.png
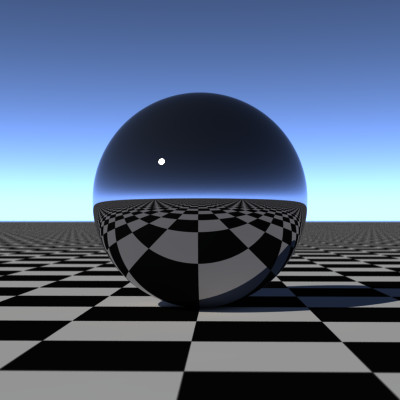
This is the sRGB version, cm_samp_srgb.png:
|
|
The RGB version is to incorporate as an element in a scene for POV-Ray to render.
The POV-Ray library has a suitable mug, CoffeeMug, "version: Cousin Ricky 2.0". That webpage has a downloadable zip that contains three files we will use:
Those files are: Copyright 2008 - 2015 Richard Callwood III. Some rights reserved. Licensed under the terms of the CC-LGPL. See http://creativecommons.org/licenses/LGPL/2.1/ for more information.
As delivered, coffeemug.pov takes a square image, and wraps two copies of that image around the mug: one on the front, the other on the back. It also rounds the corners of the image. (With default arguments, it also draws copies of the POV-Ray "P" logo.)
|
coffeemug_map.jpg This image, supplied in the zip file, is encoded as sRGB. |
|
|
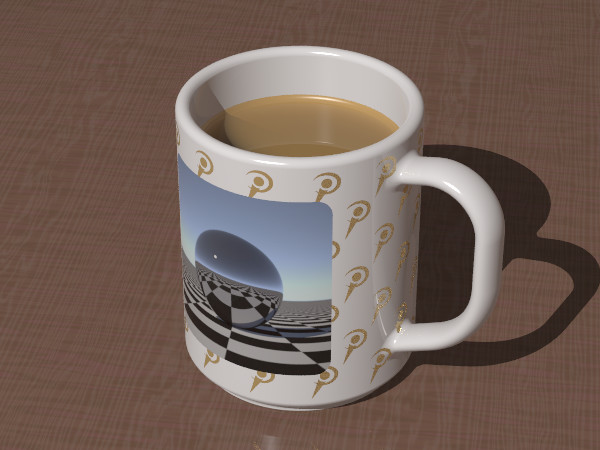
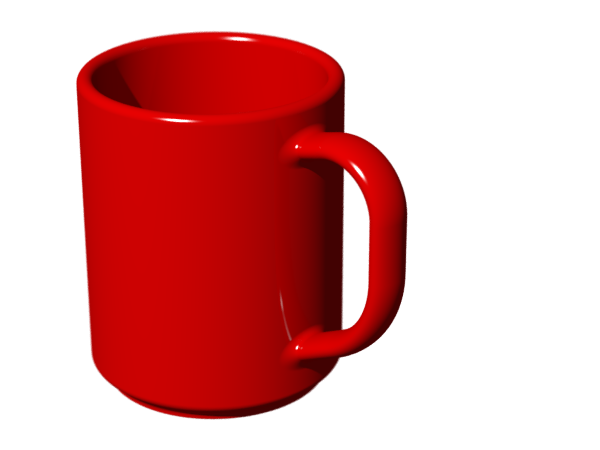
Default rendering of coffeemug.pov: POV-Ray assumes the image is encoded as RGB, so the result is too light. %POV% ^ -D +A0.01 +W600 +H450 +FN16 +UA ^ +Icoffeemug.pov +Ocm_coffeemug.png |
|
For convenience, I use environment variables for POV-Ray:
set POV
POV=c:\ProgramFiles\POV-Ray\v3.7\bin\pvengine64
POVDIR=c:\ProgramFiles\POV-Ray\v3.7\bin\
POVUSER=C:\Users\Alan\documents\POV-Ray\v3.7\
I wanted one wide image that would wrap around most of the mug. That image could be built in ImageMagick, either as a wide crop from a photograph, or two images side-by-side, or whatever I wanted. So I copied coffeemug.pov to a new file cm_coffeemug.inc which I hacked about, removing stuff I didn't want, adding other stuff.
When editing scripts, remember that POV-Ray numbers represent transparency but ImageMagick numbers represent opacity. In POV-Ray, zero is opaque. In ImageMagick, zero is transparent.
For the mug modelled here, and the real mug I use daily, an image of aspect ratio 3:1 fits neatly.
Then I created a few simple scene files named cm_*.pov that use cm_coffeemug.inc. They also use cm_trans.inc, which creates whatever transformation I want to the mugs in all the scenes. By putting the transformation in an included file, I only need to update it once if I want all mugs at a different angle.
|
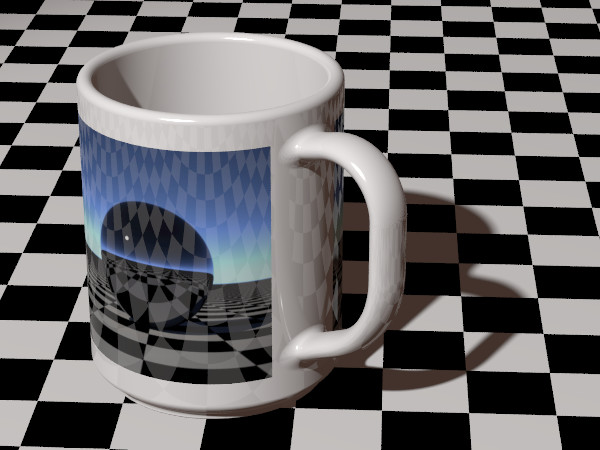
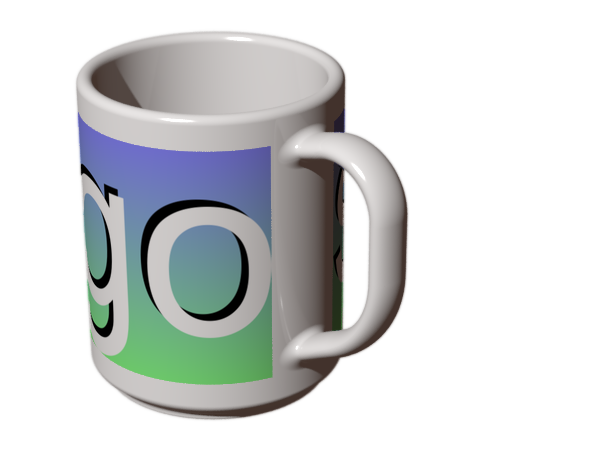
Default rendering of cm_scene.pov: We append three copies of the square image to make the aspect ratio 3:1. We encode it as RGB, as POV-RAY requires. %IMG7%magick ^ coffeemug_map.jpg ^ -duplicate 2 +append +repage ^ -colorspace RGB ^ cm_3.png %POV% ^ -D +A0.01 +W600 +H450 +FN16 +UA ^ +Icm_scene.pov +Ocm_coffeemug2.png |
|
|
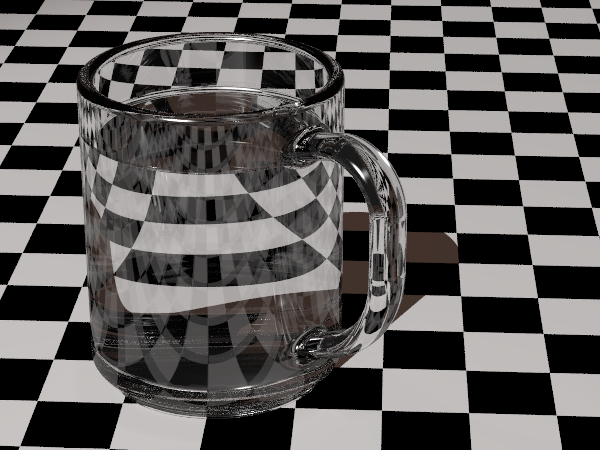
No page on ray-tracing is complete without: %POV% ^ -D +A0.01 +W600 +H450 +FN16 +UA ^ +Icm_mug_trans.pov +Ocm_mug_trans.png |
|
The image that is to be wrapped around the mug must have certain characteristics:
With POV-Ray option +Q0, the only lighting is a fixed ambient, with no shading or shadows or reflections or transparency, so we get the exact colours that were specified for the mug and image. With a black mug and floor, and white image, we get a mask for just the image. With a black floor, white mug and image, we get a mask for just the mug. With a linear gradient for the image (horizontal or vertical, or using the red and green channels), we get an absolute displacement map that is directly usable by ImageMagick.
From the POV-Ray command line, we can assign floating-point values to identifiers that are used in a .pov script. We can't pass string values, or vectors or any other type in the command line.
The best way to pass string argument seems to be:
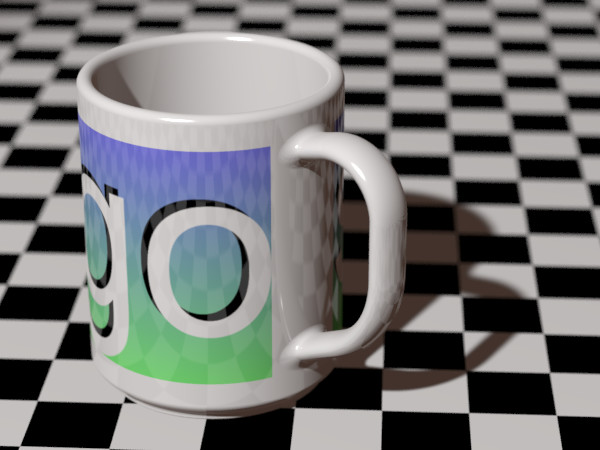
Ray-tracing the mug with our "snibgo" image wrapped around it:
echo #declare Image_File = "cm_samp.png" ^
  >coffeemug_extra.inc

call StopWatch

%POV% ^
  -D +A0.01 +W600 +H450 +FN16 +UA ^
  Declare=cm_extra_inc=1 ^
  Declare=FocalBlur=1 ^
  +Icm_scene.pov +Ocm_snibgo_mug_pov.png

call StopWatch
0 00:01:40 Focal blur makes this very slow. Without focal blur, it only takes a couple of seconds. The foreground floor chequer pattern is reflected in the mug. |
|
Suppose we have a web server, and want to offer a facility where users can upload an image, and we create a picture of a mug with the user's image wrapped around it. Suppose the web server has ImageMagick loaded, but not POV-Ray.
The solution is simple, in concept. Offline, we make an identity absolute displacement map, and wrap that around the mug with POV-Ray. This gives us the displacement map that IM can use on the server to wrap any image of the same aspect ratio around that mug.
An identity absolute displacement map has a horizontal gradient increasing left-to-right in the red channel, and a vertical gradient increasing top-to-bottom in the green channel.
We start by making some ray-tracings. These are done once only, on any computer that can run POV-Ray. We make:
The absolute displacement map must be high precision: at least 16 bits/channel/pixel, possibly 32-bit floating point. If this image must be edited, such as to remove items that should be wrapped, be careful that the colours don't change. Any slight colour change invisible to the human eye will cause a displacement change that is highly visible. Photo editors are often "colour-managed", which means they mess around changing colorspace and dot-gain, so the pixel values change. But this "image" isn't really an image, and such processing will damage the data.
Using ImageMagick, we take the ray-traced mug and make a lighting model.
For each image that a user uploads, we can displace it, implement the lighting model, and compose it over the mug using just ImageMagick.
|
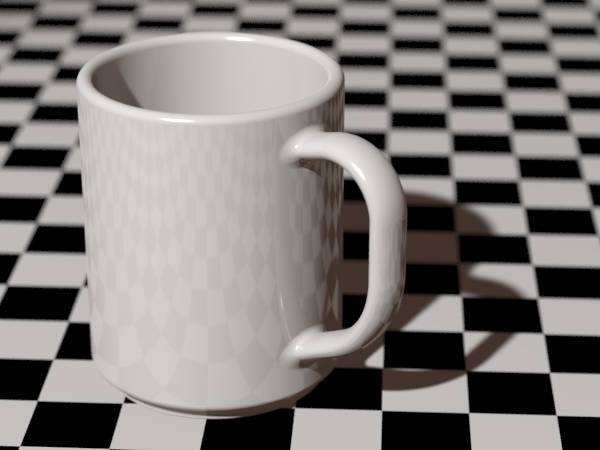
Render cm_scene.pov with white image: %IMG7%magick -size 3x1 xc:White cm_i_white.png echo #declare Image_File = "cm_i_white.png" ^ >coffeemug_extra.inc %POV% ^ -D +A0.01 +W600 +H450 +FN16 +UA ^ Declare=cm_extra_inc=1 ^ Declare=FocalBlur=1 ^ +Icm_scene.pov +Ocm_white_mug.png The foreground floor chequer pattern is reflected in the mug. |
|
|
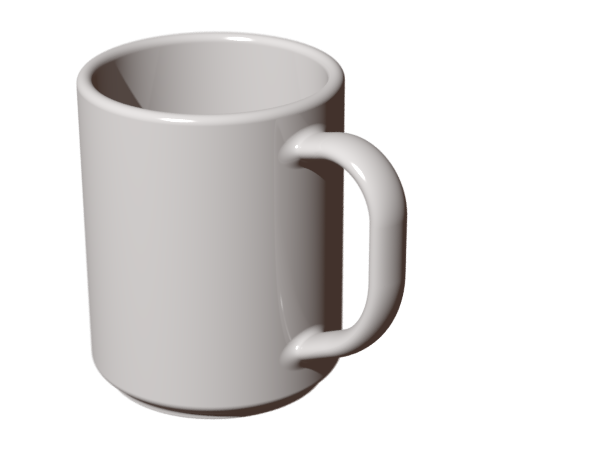
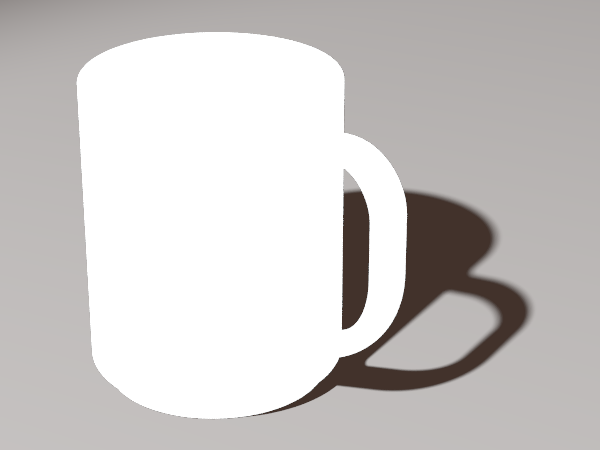
White mug on no floor, so the background is transparent: %POV% ^ -D +A0.01 +W600 +H450 +FN16 +UA ^ Declare=FocalBlur=1 ^ +Icm_mug_plain.pov +Ocm_plain_mug.png Highlights from the handle are apparent in the body of the mug. |
|
|
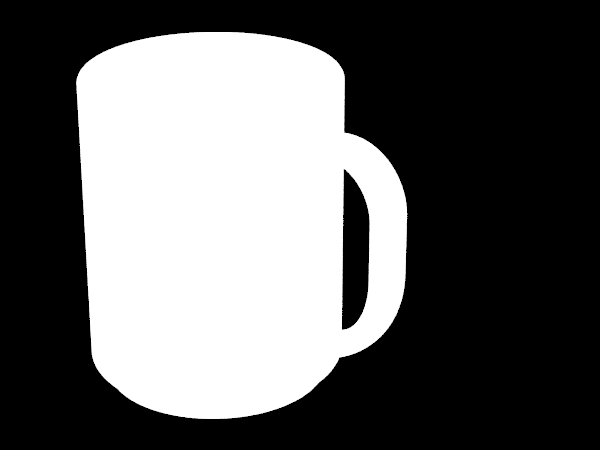
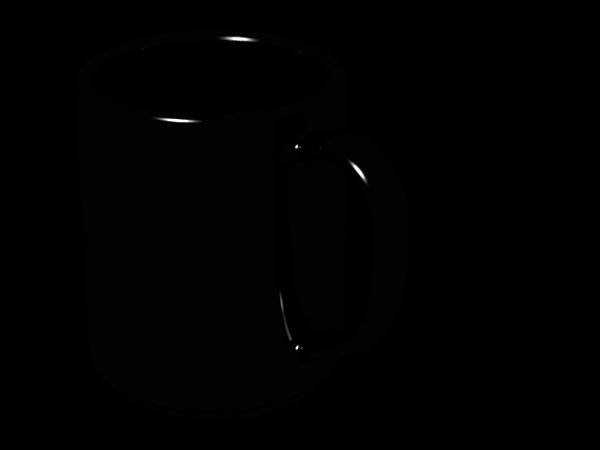
Mug mask: %POV% ^ -D +A0.01 +W600 +H450 +FN16 +UA ^ +Q0 ^ +Icm_mug_mask.pov +Ocm_mug_mask.png |
|
|
Image mask (we use a white image on a black mug): %IMG7%magick -size 3x1 xc:White cm_i_white.png echo #declare Image_File = "cm_i_white.png" ^ >coffeemug_extra.inc %POV% ^ -D +A0.01 +W600 +H450 +FN16 +UA ^ Declare=MugColR=0 ^ Declare=MugColG=0 ^ Declare=MugColB=0 ^ Declare=cm_extra_inc=1 ^ +Q0 ^ +Icm_image_mask.pov +Ocm_image_mask.png |
|
|
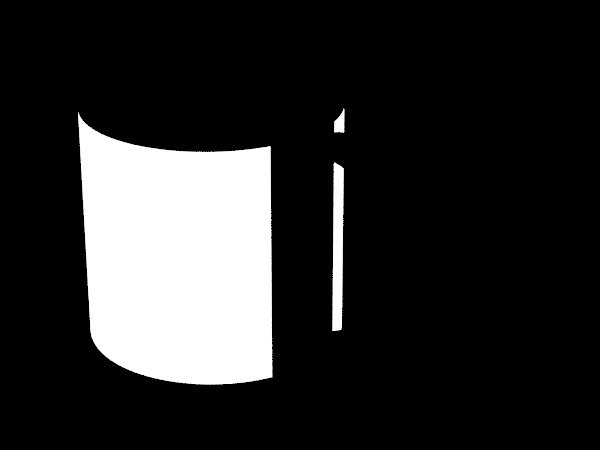
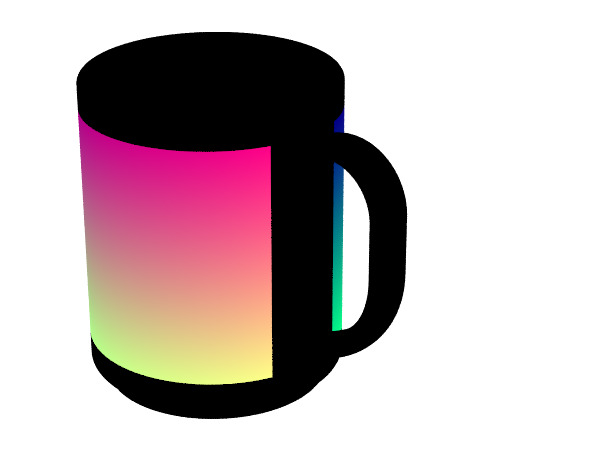
Create an identity displacement map,
%IMG7%magick ^ cm_samp.png ^ -sparse-color Bilinear ^ 0,0,#008,^ %%[fx:w-1],0,#f08,^ 0,%%[fx:h-1],#0f8,^ %%[fx:w-1],%%[fx:h-1],#ff8 ^ -set colorspace sRGB ^ -colorspace RGB ^ +depth ^ cm_i_disp.png echo #declare Image_File = "cm_i_disp.png" ^ >coffeemug_extra.inc %POV% ^ -D +A0.01 +W600 +H450 +FN16 +UA ^ Declare=MugColR=0 ^ Declare=MugColG=0 ^ Declare=MugColB=0 ^ Declare=cm_extra_inc=1 ^ +Q0 ^ +Icm_map_mask.pov +Ocm_disp_map.png |
|
The displacement maps must be at least 16 bits/channel/pixel. If they were only 8 b/c/p, they would have only 256 different horizontal displacements and we need at least 1200, so we would get blocky results.
%IMG7%magick identify cm_i_disp.png
%IMG7%magick identify cm_disp_map.png
cm_i_disp.png PNG 1200x400 1200x400+0+0 16-bit RGB 6596B 0.000u 0:00.001
cm_disp_map.png PNG 600x450 600x450+0+0 16-bit sRGB 98432B 0.016u 0:00.001
16 bits, integer, is sufficient for web-size images. Larger images need more precision, eg 7500x5000 pixels need Q32 HDRI.
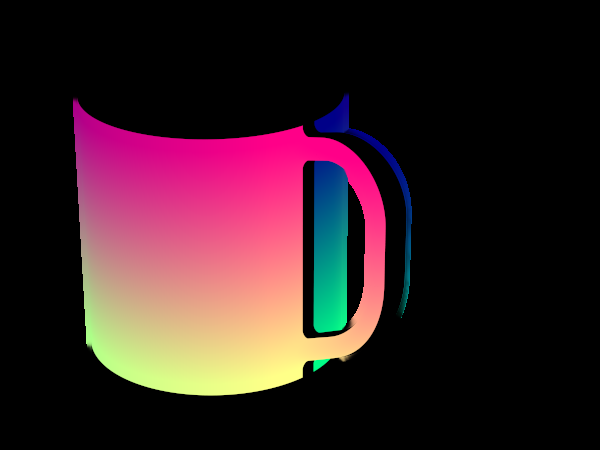
In the displacement map, POV-Ray has antialiased between the colour and black. This will give an incorrect distortion at the edge of the image. We need to extend the colour portion slightly into the black area. I will increase the size by 5% on each side, so 10% in each dimension, using distort:viewport. The POV-Ray script is independent of the image size, so we also need to tell the script to make the image 10% larger on the mug, using a POV-Ray script variable I have called Image_Mult.
A small problem remains at the edge of the map, against the transparent background. This is solved by compositing the map over a slight blur of itself.
|
Extended displacement map: %IMG7%magick ^ cm_i_disp.png ^ -virtual-pixel Edge ^ -define distort:viewport=1320x440-60-20 ^ -distort SRT 1,0 +repage ^ cm_i_extdisp.png echo #declare Image_File = "cm_i_extdisp.png" ^ >coffeemug_extra.inc %POV% ^ -D +A0.001 +AM2 +R5 +W600 +H450 +FN16 +UA ^ Declare=MugColR=0 ^ Declare=MugColG=0 ^ Declare=MugColB=0 ^ Declare=cm_extra_inc=1 ^ Declare=Image_Mult=1.1 ^ +Q0 ^ +Icm_map_mask.pov +Ocm_extdisp_map.png %IMG7%magick ^ cm_extdisp_map.png ^ +repage ^ ( +clone -blur 0x1 -alpha off ) ^ -compose DstOver -composite ^ -background Black -alpha Background -alpha Off ^ cm_extdisp_map.png |
|
This has expanded the distortion map so it partly wraps around the handle, and we can clearly see the start of the map (or the right side of the image). This excess will be removed by the mask.
+UA tells POV-Ray to write transparency. This makes the colour carry to the left and right edges of the distorted area, instead of anti-aliasing. We then remove transparency with IM. If, instead, we had ray-traced a black floor, we would have had a darkened edge to the map, so the displacement would be wrong.
Check the precision of the extended map:
%IMG7%magick identify cm_extdisp_map.png
cm_extdisp_map.png PNG 600x450 600x450+0+0 16-bit sRGB 139218B 0.000u 0:00.001
Distorting the image by the map is slightly messy, because we want the image to be at least as tall as the map, and at least as wide. The script wrapImage.bat calculates a resizing percentage for the image.
The script uses ImageMagick, not POV-Ray. It takes a conventional rectangular image and wraps it around a mug that has been pre-prepared with POV-Ray.
|
Use IM to wrap the image around the mug: call StopWatch call %PICTBAT%wrapImage ^ cm_samp_srgb.png ^ cm_white_mug.png ^ cm_extdisp_map.png ^ cm_image_mask.png ^ 2 ^ cm_snibgo_mug_im.png call StopWatch 0 00:00:05 |

|
How different is this from the version entirely created by POV-Ray?
%IMG7%magick compare -metric RMSE cm_snibgo_mug_pov.png cm_snibgo_mug_im.png NULL:

cmd /c exit /B 0
1212.85 (0.0185068)
The difference is entirely within the distorted image, of course. Comparing crops of the main area:
%IMG7%magick ^ cm_snibgo_mug_pov.png ^ -crop 250x300+65+102 +repage ^ cm_snibgo_mug_pov_crop.png 
|
%IMG7%magick ^ cm_snibgo_mug_im.png ^ -crop 250x300+65+102 +repage ^ cm_snibgo_mug_im_crop.png 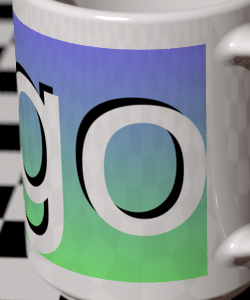
|
The geometry and colours are correct. The main differences are:
When light hits a shiny surface, some is immediately reflected without taking the colour of surface. When this hits the camera, we see a patch the same colour as the light (in this case, white) even when the surface has a strong colour.
We ray-trace a red mug. Most light that reaches the camera has been diffusely reflected from the mug, which has absorbed green and blue wavelengths, so only red light hits the camera.
Where the normal of the surface is mid-way between the ray arriving from the light source and the ray leaving towards the camera, we have a specular highlight. The surface reflects the light more like a mirror, without absorbing wavelengths, so it remains white.
%POV% ^ -D +A0.01 +W600 +H450 +FN16 +UA ^ Declare=MugColR=1 ^ Declare=MugColG=0 ^ Declare=MugColB=0 ^ Declare=FocalBlur=1 ^ +Icm_mug_plain.pov +Ocm_spec_mug.png |
|
|
Make a mask from the specular highlights: %IMG7%magick ^ cm_spec_mug.png ^ -channel G -separate ^ cm_spec_mask.png |
|
Highlights are visible on the rim and handle. Light has hit the lower part of the handle, reflected in a specular way towards the body of the mug, and reflected from there to the camera.
In this example, no specular highlights are reflected by the graphic image on the mug, so we will not process this further. The script wrapImageH.bat can be used when highlights are to be added.
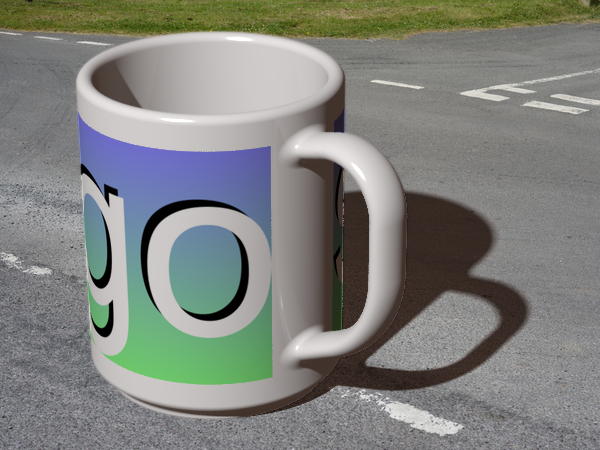
To create a realistic composition, say of a large coffee mug in a road, we need to model the real world in POV-Ray. Here, I make the simple assumption that the road is a smooth horizontal plane.
The mug casts a shadow on the ground. To get a shadow that is softer when it is further away from the mug, we use #declare Soft=on in the POV-Ray script to create an area light. The command line could also have Declare=FocalBlur=1, but this heavily increases processing time and makes hardly any difference.
|
Create the shadow of the mug on the floor. %POV% ^ -D +A0.01 +W600 +H450 +FN16 +UA ^ +Icm_mug_shad.pov +Ocm_mug_shad.png %IMG7%magick ^ cm_mug_shad.png ^ cm_mug_mask.png ^ -compose Lighten -composite ^ cm_mug_shad.png |
|
|
To use this as a multiplier in a composite,
The darkest floor pixel that is not in shadow is the NorthWest corner. for /F "usebackq" %%V in (`%IMG7%magick ^ cm_mug_shad.png ^ -gravity NorthWest -crop 1x1+0+0 ^ -format "%%[fx:mean*100]" ^ info:`) do set FLOOR_GRAY=%%V %IMG7%magick ^ cm_mug_shad.png ^ -level 0,%FLOOR_GRAY%%% ^ cm_mug_shad_wh.png |
|
|
Use IM to wrap the image around the mug, with no floor: call %PICTBAT%wrapImage ^ cm_samp_srgb.png ^ cm_plain_mug.png ^ cm_extdisp_map.png ^ cm_image_mask.png ^ 2 ^ cm_snibgo_mug_im_nf.png |
|
|
Composite a photo, the mug and its shadow. set PHOTO=%PICTLIB%20150618\AGA_2352.JPG %IMG7%magick ^ %PHOTO% ^ -resize 600x450^^ ^ -crop 600x450+0+0 +repage ^ cm_snibgo_mug_im_nf.png ^ -compose Over -composite ^ cm_mug_shad_wh.png ^ -compose Multiply -composite ^ +depth ^ cm_mug_road.png |
|
|
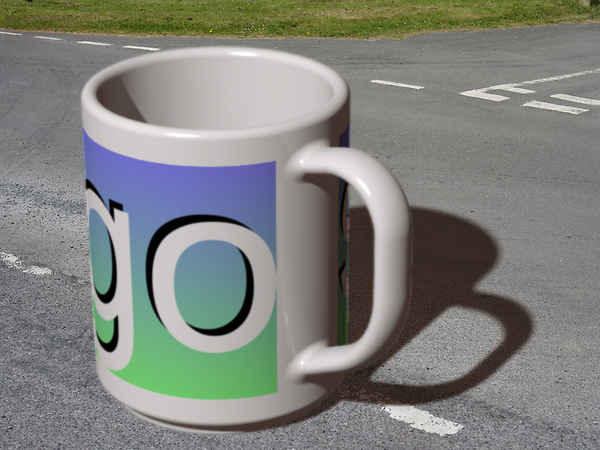
For a better match between the images,
We also blur the shadow slightly more than the mug,
set POSN_MUG=+5+15 set GEOM_MUG=-geometry %POSN_MUG% set REPAGE_MUG=-repage %POSN_MUG% %IMG7%magick ^ %PHOTO% ^ -resize 600x450^^ ^ -crop 600x450+0+0 +repage ^ -unsharp 0x0.5 ^ ( cm_snibgo_mug_im_nf.png -blur 0x0.5 ) ^ %GEOM_MUG% ^ -compose Over -composite ^ ( cm_mug_shad_wh.png -blur 0x1 ) ^ %GEOM_MUG% ^ -compose Multiply -composite ^ +depth ^ cm_mug_road2.png |
|
The base looks somewhat "pasted-on". We want to blur and darken this edge.
To do this, we first make a mask of this edge from cm_mug_mask.png. There are many ways to do this. Here, we subtract the image from a copy shifted down by one pixel. This gives us the bottom edge, and not the top edge. We smear vertically with -motion-blur and reduce isolated pixels at the mug edge with median.
We modulate the effect, reducing the effect towards the top, by multiplying by a gradient.
|
Make a shadow and mask for the base. %IMG7%magick ^
cm_mug_mask.png ^
( +clone ) ^
-geometry +0+1 ^
-compose MinusDst -composite ^
-motion-blur 0x1+90 ^
-motion-blur 0x1+270 ^
-auto-level ^
-statistic median 3x3 ^
( +clone ^
-sparse-color bilinear ^
"0,0,#000 0,%%[fx:h-1],#fff" ^
-sigmoidal-contrast 5,50%% ^
) ^
-compose Multiply -composite ^
-auto-level ^
%REPAGE_MUG% ^
-background Black -compose Over -flatten ^
cm_base.png
|
|
|
Blur and darken the base. %IMG7%magick ^ cm_mug_road2.png ^ ( -clone 0 -blur 0x3 ) ^ ( cm_base.png ) ^ -alpha off ^ -compose Over -composite ^ ( cm_base.png -negate +level 25%%,100%% ) ^ -compose Multiply -composite ^ cm_mug_road3.png |

|
The result is a plausible illusion. The base, where the mug is in contact wth the road, isn't quite right. Otherwise, the mug boundary looks good. Although the sharpness appears balanced, a close examination shows the background photo has been sharpened (the white road markings have bright edges) whereas the mug hasn't. If the photo had been resized with a method shown in Resampling with halo minimization, the photo sharpening would be less obvious.
For convenience, .bat scripts are also available in a single zip file. See Zipped BAT files.
rem Wraps (distorts, warps) an image onto another image.
rem
rem %1 Image to be wrapped.
rem %2 Image to be overlaid.
rem %3 Absolute distortion map.
rem %4 Mask of image after distortion.
rem %5 Optional supersampling factor, eg 2. [Default = 1 = no supersampling.]
rem %6 Optional output file.
@rem
@rem Updated:
@rem   5-August-2022 for IM v7.
@rem


@if "%4"=="" findstr /B "rem @rem" %~f0 & exit /B 1

@setlocal

@call echoOffSave

rem call %PICTBAT%setInOut %1 wi

set IMAGE=%1

set MUG=%2

set MAP=%3

set MASK=%4

set nSUPERSAMP=%5
if "%nSUPERSAMP%"=="." set nSUPERSAMP=
if "%nSUPERSAMP%"=="" set nSUPERSAMP=1

if %nSUPERSAMP% GEQ 10 (
  echo nSUPERSAMP is suspiciously large: %nSUPERSAMP%
  exit /B 1
)

if not "%6"=="" if not "%6"=="." set OUTFILE=%6


for /F "usebackq" %%L in (`%IMG7%magick identify ^
  -precision 16 ^
  -format "SUPERSAMPpc=%%[fx:%nSUPERSAMP%*100]" ^
  xc:`) do set %%L

for /F "usebackq" %%L in (`%IMG7%magick identify ^
  -format "WI=%%w\nHI=%%h" ^
  %IMAGE%`) do set %%L

for /F "usebackq" %%L in (`%IMG7%magick identify ^
  -format "WM=%%w\nHM=%%h" ^
  %MAP%`) do set %%L

rem We want WI >= WM and HI >= HM.
rem If this isn't true, we will resize the image.
rem Even if it is true, we might resize it for super-sampling.

for /F "usebackq" %%L in (`%IMG7%magick identify ^
  -precision 16 ^
  -format "resPc=%%[fx:FW=%WM%/%WI%;FH=%HM%/%HI%;MF=FW>FH?FW:FH;MF>1?MF*100:100]" ^
  xc:`) do set %%L

for /F "usebackq" %%L in (`%IMG7%magick identify ^
  -precision 16 ^
  -format "resPc=%%[fx:%resPc%*%SUPERSAMPpc%/100]" ^
  xc:`) do set %%L

for /F "usebackq" %%L in (`%IMG7%magick identify ^
  -precision 16 ^
  -format "DX=%%[fx:w*%resPc%/200]\nDY=%%[fx:h*%resPc%/200]" ^
  %IMAGE%`) do set %%L

for /F "usebackq" %%L in (`%IMG7%magick identify ^
  -precision 16 ^
  -format "invSUPERSAMPpc=%%[fx:10000/%SUPERSAMPpc%]" ^
  xc:`) do set %%L

if %SUPERSAMPpc%==100 (
  set sSUP=
  set sINVSUP=
) else (
  set sSUP=-resize %SUPERSAMPpc%%%
  set sINVSUP=-resize %invSUPERSAMPpc%%%
)

if %resPc%==100 (
  set sRES=
) else (
  set sRES=-resize %resPc%%%
)

:: Following works best with HDRI.
::
%IMG7%magick ^
  ( %IMAGE% %sRES% ) ^
  ( %MAP% %sSUP% ) ^
  -gravity Center ^
  -virtual-pixel Edge ^
  -compose Distort -define compose:args=%DX%x%DY% -composite ^
  %sINVSUP% ^
  -crop %WM%x%HM%+0+0 +repage ^
  -compose Over -extent %WM%x%HM% ^
  %MASK% ^
  -alpha off ^
  -compose CopyOpacity -composite ^
  %MUG% ^
  -compose Multiply -composite ^
  ( +clone -blur 0x1 ) ^
  -compose DstOver -composite ^
  -depth 32 ^
  -compress Zip ^
  %OUTFILE%

rem Alternatives: Multiply, LinearBurn, ColorBurn

if ERRORLEVEL 1 exit /B 1

call echoRestore

endlocal & set wiOUTFILE=%OUTFILE%
An expanded version of the previous, that also adds highlights:
rem Wraps (distorts, warps) an image onto another image.
rem
rem %1 Image to be wrapped.
rem %2 Image to be overlaid.
rem %3 Absolute distortion map.
rem %4 Mask of image after distortion.
rem %5 Highlight (and shadows) mask.
rem %6 Optional supersampling factor, eg 2. [Default = 1 = no supersampling.]
rem %7 Optional output file.
@rem
@rem This is like wrapImage, but with highlight mask.
@rem This is mid-gray for no-change, up to white.
@rem It is applied with overlay, so darkness in the mask darkens the image.
@rem
@rem
@rem Updated:
@rem   5-August-2022 for IM v7.
@rem


@if "%4"=="" findstr /B "rem @rem" %~f0 & exit /B 1

@setlocal

@call echoOffSave

rem call %PICTBAT%setInOut %1 wi

set IMAGE=%1

set MUG=%2

set MAP=%3

set MASK=%4

set HIGHLIGHT=%5
if "%HIGHLIGHT%"=="." set HIGHLIGHT=
if "%HIGHLIGHT%"=="" set HIGHLIGHT=

set nSUPERSAMP=%6
if "%nSUPERSAMP%"=="." set nSUPERSAMP=
if "%nSUPERSAMP%"=="" set nSUPERSAMP=1

if %nSUPERSAMP% GEQ 10 (
  echo nSUPERSAMP is suspiciously large: %nSUPERSAMP%
  exit /B 1
)

if not "%7"=="" if not "%7"=="." set OUTFILE=%7


for /F "usebackq" %%L in (`%IMG7%magick identify ^
  -precision 16 ^
  -format "SUPERSAMPpc=%%[fx:%nSUPERSAMP%*100]" ^
  xc:`) do set %%L

for /F "usebackq" %%L in (`%IMG7%magick identify ^
  -format "WI=%%w\nHI=%%h" ^
  %IMAGE%`) do set %%L

for /F "usebackq" %%L in (`%IMG7%magick identify ^
  -format "WM=%%w\nHM=%%h" ^
  %MAP%`) do set %%L

rem We want WI >= WM and HI >= HM.
rem If this isn't true, we will resize the image.
rem Even if it is true, we might resize it for super-sampling.

for /F "usebackq" %%L in (`%IMG7%magick identify ^
  -precision 16 ^
  -format "resPc=%%[fx:FW=%WM%/%WI%;FH=%HM%/%HI%;MF=FW>FH?FW:FH;MF>1?MF*100:100]" ^
  xc:`) do set %%L

for /F "usebackq" %%L in (`%IMG7%magick identify ^
  -precision 16 ^
  -format "resPc=%%[fx:%resPc%*%SUPERSAMPpc%/100]" ^
  xc:`) do set %%L

for /F "usebackq" %%L in (`%IMG7%magick identify ^
  -precision 16 ^
  -format "DX=%%[fx:w*%resPc%/200]\nDY=%%[fx:h*%resPc%/200]" ^
  %IMAGE%`) do set %%L

for /F "usebackq" %%L in (`%IMG7%magick identify ^
  -precision 16 ^
  -format "invSUPERSAMPpc=%%[fx:10000/%SUPERSAMPpc%]" ^
  xc:`) do set %%L

if %SUPERSAMPpc%==100 (
  set sSUP=
  set sINVSUP=
) else (
  set sSUP=-resize %SUPERSAMPpc%%%
  set sINVSUP=-resize %invSUPERSAMPpc%%%
)

if %resPc%==100 (
  set sRES=
) else (
  set sRES=-resize %resPc%%%
)

if "%HIGHLIGHT%"=="" (
  set sHILI=
) else (
  set sHILI=%HIGHLIGHT% +swap -compose Overlay -composite
)

echo DX=%DX%  DY=%DY%

%IM7DEV%magick ^
  ( %IMAGE% %sRES% ) ^
  ( %MAP% %sSUP% ) ^
  -gravity Center ^
  -virtual-pixel Edge ^
  -compose Distort -define compose:args=%DX%x%DY% -composite ^
  %sINVSUP% ^
  -crop %WM%x%HM%+0+0 +repage ^
  -compose Over -extent %WM%x%HM% ^
  %MASK% ^
  -alpha off ^
  -compose CopyOpacity -composite ^
  %MUG% ^
  -compose Multiply -composite ^
  ( +clone -blur 0x1 ) ^
  -compose DstOver -composite ^
  %sHILI% ^
  -depth 32 ^
  -compress Zip ^
  %OUTFILE%

rem Alternatives: Multiply, LinearBurn, ColorBurn

if ERRORLEVEL 1 exit /B 1

call echoRestore

endlocal & set wiOUTFILE=%OUTFILE%
#version 3.5;

/*
 * #declare Ph=on;
 * #declare Rad=on;
 * #declare Soft=on;
*/

#declare Soft=on;

#include "cm_coffeemug.inc"

#include "cm_trans.inc"

#declare Ph=on;

union {
  object { Chq_Floor }
  object { Coffee_Mug transform MugTrans }
}
#version 3.5;

#include "cm_coffeemug.inc"

#include "cm_trans.inc"

union {
  object { Coffee_Mug_Plain transform MugTrans }
}
#version 3.5;

#declare Ph=on;

#include "cm_coffeemug.inc"

#include "cm_trans.inc"

union {
  object { Chq_Floor }
  object { Coffee_Mug_Trans transform MugTrans }
  object { Bev_Water }
}
This is called by all the coffee mug POV files, and creates whatever transformation I want for the mug.
#declare MugTrans = transform { rotate -50 * y }
#version 3.5;

#include "cm_coffeemug.inc"

#include "cm_trans.inc"

object { MugImage transform MugTrans }
#version 3.5;

#include "cm_coffeemug.inc"

#include "cm_trans.inc"

union {
  object { Black_Floor }
  object { Coffee_Mug_Plain transform MugTrans }
}
#version 3.5;

#include "cm_coffeemug.inc"

#include "cm_trans.inc"

union {
  object { Black_Floor }
  object { MugImage transform MugTrans }
}
#version 3.5;

#declare Soft=on;

#include "cm_coffeemug.inc"

#include "cm_trans.inc"

union {
  object { White_Floor }
  object { Coffee_Mug_Plain transform MugTrans }
}
/* cm_coffeemug.inc
 * 2015 Alan Gibson (snibgo applied arts).
 *
 * Derived from:
 *   coffeemug.pov version 2.0 by Richard Callwood III.
 *
 */

#include "strings.inc"
#include "colors.inc"
#include "woods.inc"
#include "shapes.inc"
#include "glass.inc"
#include "coffeemug.inc"

#ifndef (cm_extra_inc) #declare cm_extra_inc = 0; #end

#if (cm_extra_inc = 1)
#include "coffeemug_extra.inc"
#end

#ifndef (Ph) #declare Ph = off; #end // photons
#ifndef (Rad) #declare Rad = off; #end // radiosity
#ifndef (Soft) #declare Soft = off; #end // soft shadows

#ifndef (Texture) #declare Texture = 1; #end

#ifndef (FocalBlur) #declare FocalBlur = 0; #end

#declare C_SKY = rgb 0.01;

#ifndef (MugColR) #declare MugColR = 1; #end
#ifndef (MugColG) #declare MugColG = 1; #end
#ifndef (MugColB) #declare MugColB = 1; #end

#declare MugCol = rgb <MugColR, MugColG, MugColB>;

#default // for wood texture only
{ finish
  { reflection { 0 0.2 fresnel } conserve_energy
    ambient (Rad? 0: C_SKY)
  }
}

#ifndef (MugRad) #declare MugRad = 1.5; #end
#ifndef (MugHt) #declare MugHt = 3.75; #end

#ifndef (Image_File) #declare Image_File = "cm_3.png"; #end
#ifndef (Image_Mult) #declare Image_Mult = 1; #end

//=============================== ENVIRONMENT ==================================

global_settings
{ assumed_gamma 1
  #if (Rad)
    radiosity
    { count 100
      error_bound 0.5
      pretrace_start 0.08
      pretrace_end 0.01
      recursion_limit 2
    }
  #end
  #if (Ph) photons { spacing 0.005 autostop 0 } #end
  max_trace_level 10
}

camera
// { location <1, 13.5, -18>
{ location <2, 10, -18>
  look_at <1, MugHt/2, 0>
  #if (FocalBlur=1)
    aperture 0.7
    blur_samples 20
    focal_point <0, MugHt/2, -MugRad>
  #end
  angle 20
}

#declare LIGHT_POSITION = <-0.5, 1, -1> * 60;
light_source
{ LIGHT_POSITION, rgb 1.2
  fade_power 2 fade_distance vlength (LIGHT_POSITION)
  spotlight point_at <0, MugHt/2, 0> radius 5 falloff 10
  #if (Soft) area_light 2.5 * x, 2.5 * z, 9, 9 adaptive 1 circular orient #end
}

//----- A little ambience -----
background { C_SKY }

//----- Estimate ambient light -----
#declare Illumination = vdot (vnormalize (LIGHT_POSITION), y);
#declare c_Table = rgb <0.295, 0.163, 0.118>; // sampled from T_Wood12
#declare LIT = 0.8; // estimate of contribution of spotlit portion of the table
#declare DIFFUSE = 0.6; // this scene's diffuse (which is the POV-Ray default)
#declare Ambience =
( Rad?
  0:
  (C_SKY + c_Table * (C_SKY + Illumination * DIFFUSE * LIT)) / 2
);
#default { finish { ambient Ambience } }

//----- The table -----
#declare Floor =
plane {
  y, 0
  texture {
    T_Wood12
    rotate <0, 5, 0>
    scale 2
  }
  interior { ior 1.47 }
}

#declare Chq_Floor =
plane {
  y, 0
  pigment {
    checker color Black, color White
  }
}

#declare White_Floor =
plane {
  y, 0
  pigment { rgb 1 }
}

#declare Black_Floor =
plane {
  y, 0
  pigment { rgb 0 }
}

//=============================== MUG TEXTURES =================================

//------------------- Texture elements ---------------------

#declare Scale_Image = 1.4 * Image_Mult;

#declare p_Image = pigment
{// Note: Image_File should be gamma=1.
  image_map { png Image_File once interpolate 2 }
  translate -0.5 // must be centered on the origin
  scale Scale_Image * <6, 2, 1>
}

#declare o_Pic_area = box {-Scale_Image * <3, 1, 1>, Scale_Image * <3, 1, 1>}

#declare f_Gloss = finish
{ specular 4.24 roughness 0.002
  reflection { 0.05 0.4 fresnel } conserve_energy
}

#declare m_Glass = material
{
  texture {
    pigment { Col_Glass_Green }
    finish { F_Glass5 }
  }
  interior { I_Glass1 }
}


//-------------------- Final textures ----------------------

#declare p_Design = CoffeeMug_Pigment
( MugRad, 0, MugHt, MUG_HEIGHT, o_Pic_area, MugCol, p_Image
)


//============================= COFFEE MATERIAL ================================

#declare m_Coffee = material
{ texture
  { pigment { rgbf <0.9, 0.7, 0.4, 1> }
    finish
    { specular 0.64 roughness 0.01
      reflection { 0, 1 fresnel } conserve_energy
    }
  }
  interior
  { ior 1.34
    media
    { absorption <0.25, 0.4, 0.75>
      scattering { 3, rgb 1 }
    }
  }
}

#declare m_Water = material
{ texture
  { pigment { rgbt <0.9, 0.9, 0.9, 1> }
    finish
    { specular 0.64 roughness 0.01
      reflection { 0, 1 fresnel } conserve_energy
    }
  }
  interior {
    ior 1.333
    fade_distance 5
    fade_power 1001.0
    fade_color <0.02, 0.20, 0.06>
  }
}

//================================ SHOWPIECE ===================================

#declare Coffee_Mug =
object
{ CoffeeMug_Mug (MugRad, MugHt, MUG_HEIGHT, no)
  pigment { p_Design }
  finish { f_Gloss }
  interior { ior 1.6 }
  #if (Ph) photons { target reflection on } #end
}

#declare Coffee_Mug_Trans =
object
{ CoffeeMug_Mug (MugRad, MugHt, MUG_HEIGHT, yes)
  pigment { rgbt <1, 0.5, 0.5, 1> }
  finish { f_Gloss }
  interior { ior 1.6 }
  #if (Ph) photons { target reflection on } #end
}

#declare Coffee_Mug_Plain =
object
{ CoffeeMug_Mug (MugRad, MugHt, MUG_HEIGHT, yes)
  pigment { rgb <MugColR, MugColG, MugColB> }
  finish { f_Gloss }
}

#declare Bev_Coffee =
object {
  CoffeeMug_Beverage (MugRad, 0, 8, MUG_INCH, 0.001)
  hollow
  material { m_Coffee }
}

#declare Bev_Water =
object {
  CoffeeMug_Beverage (MugRad, 0, 8, MUG_INCH, 0.001)
  hollow
  material { m_Water }
  #if (Ph) photons { target refraction on } #end
}

#declare MugImage =
object
{ CoffeeMug_Mug (MugRad, MugHt, MUG_HEIGHT, yes)
  CoffeeMug_Pigment
  ( MugRad, 0, MugHt, MUG_HEIGHT, o_Pic_area, rgbt <MugColR, MugColG, MugColB,1>, p_Image
  )
  finish { f_Gloss }
}

// end of coffeemug.pov
All images on this page were created by the commands shown, using:
%IMG7%magick -version
Version: ImageMagick 7.1.0-42 Q16-HDRI x64 396d87c:20220709 https://imagemagick.org
Copyright: (C) 1999 ImageMagick Studio LLC
License: https://imagemagick.org/script/license.php
Features: Cipher DPC HDRI OpenCL
Delegates (built-in): bzlib cairo freetype gslib heic jng jp2 jpeg jxl lcms lqr lzma openexr pangocairo png ps raqm raw rsvg tiff webp xml zip zlib
Compiler: Visual Studio 2022 (193231332)
... and POV-Ray 3.7, with "Render, On completion, Exit POV-Ray for Windows" ticked.
"POV-Ray" is a trademark of Persistence of Vision Raytracer Pty Ltd.
Source file for this web page is coffmug.h1. To re-create this web page, run "procH1 coffmug".
This page, including the images, is my copyright. Anyone is permitted to use or adapt any of the code, scripts or images for any purpose, including commercial use.
Anyone is permitted to re-publish this page, but only for non-commercial use.
Anyone is permitted to link to this page, including for commercial use.
Page version v1.0 7-June-2015.
Page created 07-Aug-2022 03:39:08.
Copyright © 2022 Alan Gibson.